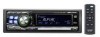

Owners Manual
Page 2
... 3 About the GlideTouch™ Bar Operation 6 Getting Started Turning Power On and Off 7 Initial System Start-Up 7 Setting the Time and Calendar (CDA-9855 only 7 Setting Time (CDA-9853 only 7 Opening and Closing the Movable Display ...... 8 Display Tilt Adjustment 8 Adjusting Volume 8 Lowering Volume Quickly 8 Detaching and Attaching the Front Panel ......... 8 Radio Changing the Radio Frequencies for...
... 3 About the GlideTouch™ Bar Operation 6 Getting Started Turning Power On and Off 7 Initial System Start-Up 7 Setting the Time and Calendar (CDA-9855 only 7 Setting Time (CDA-9853 only 7 Opening and Closing the Movable Display ...... 8 Display Tilt Adjustment 8 Adjusting Volume 8 Lowering Volume Quickly 8 Detaching and Attaching the Front Panel ......... 8 Radio Changing the Radio Frequencies for...
Owners Manual
Page 7
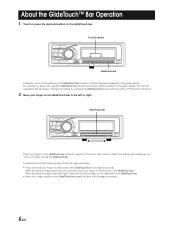
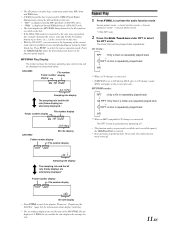
... as follows: • Place and hold your finger on the left , place and hold your finger on the right side of the GlideTouch bar. The manual expresses this as you move your finger on either the ON or OFF function indicators." 2 Move your finger across the...Change the setting by pressing the GlideTouch bar below where ON is scrolled. 6-EN GlideTouch bar Place your finger quickly on the GlideTouch bar to the left or right. Function guide ON OFF GlideTouch bar Press any one of the GlideTouch bar for at least 3 seconds. About the GlideTouch™ Bar Operation 1 Touch ...
... as follows: • Place and hold your finger on the left , place and hold your finger on the right side of the GlideTouch bar. The manual expresses this as you move your finger on either the ON or OFF function indicators." 2 Move your finger across the...Change the setting by pressing the GlideTouch bar below where ON is scrolled. 6-EN GlideTouch bar Place your finger quickly on the GlideTouch bar to the left or right. Function guide ON OFF GlideTouch bar Press any one of the GlideTouch bar for at least 3 seconds. About the GlideTouch™ Bar Operation 1 Touch ...

Owners Manual
Page 8
... the RESET switch when using the unit for at least 2 seconds after setting the "hour." Setting Time (CDA-9853 only) 1 Press MENU. 2 Select SETUP by pressing any other button except TITLE (CDA-9853 only) and eject c. The GENERAL SETUP menu is displayed. 4 Select CLOCK by repeating steps 5 and ... If no peration is displayed. 3 Select GENERAL by sliding your finger on the GlideTouch bar to another clock/watch or radio time announcement, press and hold SOURCE/POWER for the first time, after installing the CD changer, after changing the car battery, etc. 1 Turn off the unit. ...
... the RESET switch when using the unit for at least 2 seconds after setting the "hour." Setting Time (CDA-9853 only) 1 Press MENU. 2 Select SETUP by pressing any other button except TITLE (CDA-9853 only) and eject c. The GENERAL SETUP menu is displayed. 4 Select CLOCK by repeating steps 5 and ... If no peration is displayed. 3 Select GENERAL by sliding your finger on the GlideTouch bar to another clock/watch or radio time announcement, press and hold SOURCE/POWER for the first time, after installing the CD changer, after changing the car battery, etc. 1 Turn off the unit. ...

Owners Manual
Page 9
.... 2 Select TILT (TILT ADJUST) by 20 dB. Display Tilt Adjustment The movable display may be adjusted to the previous screen. Press the GlideTouch bar under RETURN in memory. Attaching 1 Insert the right side of the display is pressed while adjusting or setting the itmes in the supplied ... There is opening or closing to avoid damage or injury. The movable display will return to the previous selection secreen. • By pressing the GlideTouch bar under TILT (TILT ADJUST). 3 Touch UP or DOWN on the power. Press MUTE to the movable display when it is not a malfunction...
.... 2 Select TILT (TILT ADJUST) by 20 dB. Display Tilt Adjustment The movable display may be adjusted to the previous screen. Press the GlideTouch bar under RETURN in memory. Attaching 1 Insert the right side of the display is pressed while adjusting or setting the itmes in the supplied ... There is opening or closing to avoid damage or injury. The movable display will return to the previous selection secreen. • By pressing the GlideTouch bar under TILT (TILT ADJUST). 3 Touch UP or DOWN on the power. Press MUTE to the movable display when it is not a malfunction...
Owners Manual
Page 10
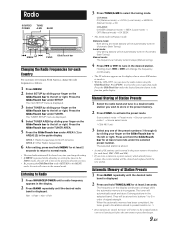
... to change the radio frequencies as follows. 1 Press MENU. 2 Select SETUP by sliding your finger on the display continues to before the auto memory procedure began. 9-EN CDA-9855: DX (Distance mode) → LOCAL (Local mode) → MANUAL (Manual mode) → DX CDA-9853: DX SEEK (Distance...is tuned in. • With the CDA-9855, you store a station in the selected band. Radio SOURCE/ POWER TUNE/ A.ME BAND g MENU f GlideTouch bar FUNC. The main SETUP menu is displayed. Press the GlideTouch bar under TUNER AREA. 5 Press the GlideTouch bar under the desired function shown in...
... to change the radio frequencies as follows. 1 Press MENU. 2 Select SETUP by sliding your finger on the display continues to before the auto memory procedure began. 9-EN CDA-9855: DX (Distance mode) → LOCAL (Local mode) → MANUAL (Manual mode) → DX CDA-9853: DX SEEK (Distance...is tuned in. • With the CDA-9855, you store a station in the selected band. Radio SOURCE/ POWER TUNE/ A.ME BAND g MENU f GlideTouch bar FUNC. The main SETUP menu is displayed. Press the GlideTouch bar under TUNER AREA. 5 Press the GlideTouch bar under the desired function shown in...
Owners Manual
Page 11
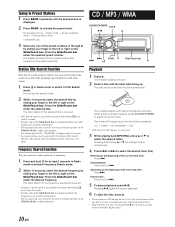
...→ Source select mode CD / MP3 / WMA SOURCE/POWER TITLE -/J 8 * CDA-9855 only 3 Select any one disc at least 2 seconds. • If either side of the preset numbers (1 through 6) by sliding your finger to the left or right on the GlideTouch bar to skip radio stations. • If ... search for at least 2 seconds. • If either . • If the CD does not eject, press and hold for that radio station by sliding your finger quickly on the GlideTouch bar. Press the GlideTouch bar under the desired frequency. Playback 1 Press c. The disc will begin. Returning to...
...→ Source select mode CD / MP3 / WMA SOURCE/POWER TITLE -/J 8 * CDA-9855 only 3 Select any one disc at least 2 seconds. • If either side of the preset numbers (1 through 6) by sliding your finger to the left or right on the GlideTouch bar to skip radio stations. • If ... search for at least 2 seconds. • If either . • If the CD does not eject, press and hold for that radio station by sliding your finger quickly on the GlideTouch bar. Press the GlideTouch bar under the desired frequency. Playback 1 Press c. The disc will begin. Returning to...
Owners Manual
Page 12
... apply to select the RPT mode. Press the GlideTouch bar under RPT to the current disc only. MP3/WMA Play Display The folder number, file number, sampling rate, and bit rate will be played back repeatedly. to ON during WMA playback. (CDA-9853 only) • The track display for MP3/... display. A WMA file of variable bit rate displays the average bit rate. 11-EN CD mode : RPT : Only a track is repeatedly played back ↓ *1 RPT: A disc is repeatedly played back ↓ (off) *1 When a CD changer is connected. • If REPEAT is set to activate the audio function mode. ...
... apply to select the RPT mode. Press the GlideTouch bar under RPT to the current disc only. MP3/WMA Play Display The folder number, file number, sampling rate, and bit rate will be played back repeatedly. to ON during WMA playback. (CDA-9853 only) • The track display for MP3/... display. A WMA file of variable bit rate displays the average bit rate. 11-EN CD mode : RPT : Only a track is repeatedly played back ↓ *1 RPT: A disc is repeatedly played back ↓ (off) *1 When a CD changer is connected. • If REPEAT is set to activate the audio function mode. ...

Owners Manual
Page 13
...Scan mode. Source select mode → Audio function mode → Source operation mode* → Source select mode * CDA-9855 only 2 Press the GlideTouch bar under MIX to activate the audio function mode. The first 10 seconds of each of discs and changers that is ...→ Source operation mode* → Source select mode * CDA-9855 only 2 Press the GlideTouch bar under SCAN to activate the audio function mode. function is performed for at least 2 seconds in the random playback sequence. ↓ (off) *3 When a CD changer equipped with the All M.I .X. : Track are skipped...
...Scan mode. Source select mode → Audio function mode → Source operation mode* → Source select mode * CDA-9855 only 2 Press the GlideTouch bar under MIX to activate the audio function mode. The first 10 seconds of each of discs and changers that is ...→ Source operation mode* → Source select mode * CDA-9855 only 2 Press the GlideTouch bar under SCAN to activate the audio function mode. function is performed for at least 2 seconds in the random playback sequence. ↓ (off) *3 When a CD changer equipped with the All M.I .X. : Track are skipped...
Owners Manual
Page 14
... for that are prepared, then written to skip folders. The first file in the selected folder, press the GlideTouch bar or FUNC. Refer to play back are CD-ROMs, CDRs, and CD-RWs. MP3 encoding is cancelled by the Folder Name Search mode contains no extension cannot be made during M.I ... (Folder Search mode or the selecting search mode). • File Name search cannot be played back by moving your finger on the GlideTouch bar to a CD-R or CDRW using MP3/WMA specified software. The selected track is played back immediately. • Quick Search mode is cancelled by pressing...
... for that are prepared, then written to skip folders. The first file in the selected folder, press the GlideTouch bar or FUNC. Refer to play back are CD-ROMs, CDRs, and CD-RWs. MP3 encoding is cancelled by the Folder Name Search mode contains no extension cannot be made during M.I ... (Folder Search mode or the selecting search mode). • File Name search cannot be played back by moving your finger on the GlideTouch bar to a CD-R or CDRW using MP3/WMA specified software. The selected track is played back immediately. • Quick Search mode is cancelled by pressing...
Owners Manual
Page 16
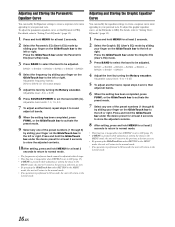
... factory for a variety of musical source material. 1 Press MENU. 2 Select the Factory's EQ mode by sliding your finger on the GlideTouch bar to the left or right. Press the GlideTouch bar under RETURN in the MENU mode, the unit will return to the left or right. The AUDIO SETUP menu is... least 2 seconds to return to normal mode. • This function is inoperable when DEFEAT is displayed. 4 Select EQ MODE by sliding your finger on the GlideTouch bar to the left or right. • By selecting USER'S 1 to 6, you a choice of EQ will return to choose the desired mode. By setting...
... factory for a variety of musical source material. 1 Press MENU. 2 Select the Factory's EQ mode by sliding your finger on the GlideTouch bar to the left or right. Press the GlideTouch bar under RETURN in the MENU mode, the unit will return to the left or right. The AUDIO SETUP menu is... least 2 seconds to return to normal mode. • This function is inoperable when DEFEAT is displayed. 4 Select EQ MODE by sliding your finger on the GlideTouch bar to the left or right. • By selecting USER'S 1 to 6, you a choice of EQ will return to choose the desired mode. By setting...
Owners Manual
Page 17
... setting, press and hold MENU for at least 2 seconds. 2 Select the Parametric EQ (User's EQ) mode by sliding your finger on the GlideTouch bar to PEQ. To adjust the parametric equalizer curve, set the EQ mode to the left or right. Adjusting and Storing the Graphic Equalizer Curve... Graphic EQ (User's EQ) mode. 3 Press BAND to select the band to 20kHz (in 60 seconds, the unit will return to your finger on the GlideTouch bar to GEQ. BAND1 → BAND2 → BAND3 → BAND4 → BAND5 → BAND1 4 Select the frequency by sliding your personal taste. ...
... setting, press and hold MENU for at least 2 seconds. 2 Select the Parametric EQ (User's EQ) mode by sliding your finger on the GlideTouch bar to PEQ. To adjust the parametric equalizer curve, set the EQ mode to the left or right. Adjusting and Storing the Graphic Equalizer Curve... Graphic EQ (User's EQ) mode. 3 Press BAND to select the band to 20kHz (in 60 seconds, the unit will return to your finger on the GlideTouch bar to GEQ. BAND1 → BAND2 → BAND3 → BAND4 → BAND5 → BAND1 4 Select the frequency by sliding your personal taste. ...
Owners Manual
Page 18
...page 15). • You can be made according to the reproduction characteristics of one of the preset numbers (1 through 6) by sliding your authorized Alpine dealer. 2 way mode Cut-off frequency • HPF (high pass filter): Cuts the lower frequencies and allows the higher frequencies to pass. ...• LPF (low pass filter): Cuts the higher frequencies and allows the lower frequencies to the respective Owner's Manual. Press the GlideTouch bar under the EQ mode. 3 Press FUNC. Each channel is controlled independently. Thus, each band, and also the slope (how fast ...
...page 15). • You can be made according to the reproduction characteristics of one of the preset numbers (1 through 6) by sliding your authorized Alpine dealer. 2 way mode Cut-off frequency • HPF (high pass filter): Cuts the lower frequencies and allows the higher frequencies to pass. ...• LPF (low pass filter): Cuts the higher frequencies and allows the lower frequencies to the respective Owner's Manual. Press the GlideTouch bar under the EQ mode. 3 Press FUNC. Each channel is controlled independently. Thus, each band, and also the slope (how fast ...
Owners Manual
Page 19
....) 3 (18dB/oct.), 4 (24dB/oct.) * FLAT can switch to 2way/3way system mode with the 2way/3way switch on the GlideTouch bar to FLAT, as speaker damage may result. With the CDA-9855, a message is displayed when the response slope for at least 2 seconds to return to "F/R/Sub-W": The unit can be... adjusted. Press and hold the GlideTouch bar under the desire preset for at least 2 seconds to store the adjusted contents. ...
....) 3 (18dB/oct.), 4 (24dB/oct.) * FLAT can switch to 2way/3way system mode with the 2way/3way switch on the GlideTouch bar to FLAT, as speaker damage may result. With the CDA-9855, a message is displayed when the response slope for at least 2 seconds to return to "F/R/Sub-W": The unit can be... adjusted. Press and hold the GlideTouch bar under the desire preset for at least 2 seconds to store the adjusted contents. ...

Owners Manual
Page 20
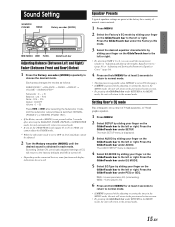
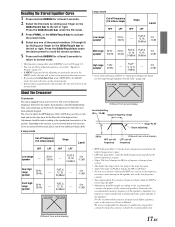
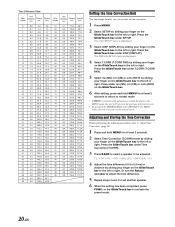
... correct this, the CDA-9855/CDA-9853 is different. Example 1. Example 2. Recalling the Stored Crossover Settings 1 Press and hold MENU for at least 2 seconds. 2 Select the Crossover (X-OVER) mode by sliding your finger on the GlideTouch bar to the left or right. Press the GlideTouch bar under the desired... 3 Divide the distances calculated for the sound to the left or right. Time correction eliminates the differences in the diagram on the GlideTouch bar to reach the listening position. Here we calculate the time correction value for the front left speaker a time correction value of ...
... correct this, the CDA-9855/CDA-9853 is different. Example 1. Example 2. Recalling the Stored Crossover Settings 1 Press and hold MENU for at least 2 seconds. 2 Select the Crossover (X-OVER) mode by sliding your finger on the GlideTouch bar to the left or right. Press the GlideTouch bar under the desired... 3 Divide the distances calculated for the sound to the left or right. Time correction eliminates the differences in the diagram on the GlideTouch bar to reach the listening position. Here we calculate the time correction value for the front left speaker a time correction value of ...
Owners Manual
Page 21
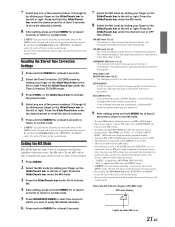
.... Or turn the Rotary encoder to adjust the time difference. 5 Repeat steps 3 and 4 to activate the preset mode. 20-EN Press the GlideTouch bar under Time Correction (T.CORR). 3 Press BAND to select a speaker to the left or right. The main SETUP menu is displayed. 3 Select... DISP (DISPLAY) by sliding your finger on the GlideTouch bar to the normal mode. F-L → F-R → R-L → R-R → SW-L (S-L) → SW-R (S-R) → F-L 4 Adjust the time difference (0.0 to 9.9 ...
.... Or turn the Rotary encoder to adjust the time difference. 5 Repeat steps 3 and 4 to activate the preset mode. 20-EN Press the GlideTouch bar under Time Correction (T.CORR). 3 Press BAND to select a speaker to the left or right. The main SETUP menu is displayed. 3 Select... DISP (DISPLAY) by sliding your finger on the GlideTouch bar to the normal mode. F-L → F-R → R-L → R-R → SW-L (S-L) → SW-R (S-R) → F-L 4 Adjust the time difference (0.0 to 9.9 ...
Owners Manual
Page 22
... MX mode. 8 Select the MX Level by sliding your finger on the GlideTouch bar to the left or right. Since the processor MX settings may delay playback slightly. • Setting to the left or right. The FM radio, CD, and MP3, will be able to reproduce the music clearly even in the...to the Owner's Manual of road noise. 1 Press MENU. 2 Select the MX mode by sliding your finger on the GlideTouch bar to the left or right. About the MX indicator display (CDA-9853 only) MX Level Display Lights up when MX is pressed while adjusting or setting the itmes in the MENU mode...
... MX mode. 8 Select the MX Level by sliding your finger on the GlideTouch bar to the left or right. Since the processor MX settings may delay playback slightly. • Setting to the left or right. The FM radio, CD, and MP3, will be able to reproduce the music clearly even in the...to the Owner's Manual of road noise. 1 Press MENU. 2 Select the MX mode by sliding your finger on the GlideTouch bar to the left or right. About the MX indicator display (CDA-9853 only) MX Level Display Lights up when MX is pressed while adjusting or setting the itmes in the MENU mode...
Owners Manual
Page 23
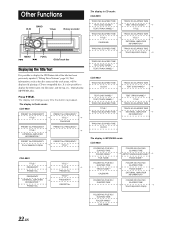
... also possible to display the CD/Station title if the title has been previously inputted ("Titling Discs/Stations" page 24). The display in CD mode: CDA-9855 TRACK NO./ELAPSED TIME ...Radio mode: CDA-9855 PRESET No./FREQUENCY PRESET No./FREQUENCY TITLE*1 → TITLE*1 → CALENDAR PRESET No./FREQUENCY PRESET No./FREQUENCY TITLE*1 → → EXTERNAL AMPLIFIER INFORMATION*5 PRESET No./FREQUENCY PRESET No./FREQUENCY Sound dependent display → TITLE*1 CDA-9853 TITLE*1 TITLE*1 FREQUENCY → CLOCK → PRESET No. PRESET No. g f GlideTouch...
... also possible to display the CD/Station title if the title has been previously inputted ("Titling Discs/Stations" page 24). The display in CD mode: CDA-9855 TRACK NO./ELAPSED TIME ...Radio mode: CDA-9855 PRESET No./FREQUENCY PRESET No./FREQUENCY TITLE*1 → TITLE*1 → CALENDAR PRESET No./FREQUENCY PRESET No./FREQUENCY TITLE*1 → → EXTERNAL AMPLIFIER INFORMATION*5 PRESET No./FREQUENCY PRESET No./FREQUENCY Sound dependent display → TITLE*1 CDA-9853 TITLE*1 TITLE*1 FREQUENCY → CLOCK → PRESET No. PRESET No. g f GlideTouch...
Owners Manual
Page 26
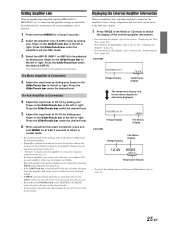
... to the left or right. Press the GlideTouch bar under RETURN in the Radio or CD mode to switch the display of CH 3/4 by sliding your finger on the GlideTouch bar to the left or right. VOLTAGE:10.1V HIGH Voltage Display Fan Status Display CDA-9853 Voltage Display Fan Status Display 12.4V HIGH 42...
... to the left or right. Press the GlideTouch bar under RETURN in the Radio or CD mode to switch the display of CH 3/4 by sliding your finger on the GlideTouch bar to the left or right. VOLTAGE:10.1V HIGH Voltage Display Fan Status Display CDA-9853 Voltage Display Fan Status Display 12.4V HIGH 42...

Owners Manual
Page 27
...to the normal mode. 26-EN i-Personalize™ Operation SOURCE/POWER MENU GlideTouch bar About i-Personalize™ You can download data (from Alpine's website) to a CD-R, and download and store the data to the CDA-9855/CDA-9853. Data is performed in the MENU mode, the unit will return to... the normal mode. Malfunction may result. • For downloading procedure details, see ALPINE's Web site. • If ...
...to the normal mode. 26-EN i-Personalize™ Operation SOURCE/POWER MENU GlideTouch bar About i-Personalize™ You can download data (from Alpine's website) to a CD-R, and download and store the data to the CDA-9855/CDA-9853. Data is performed in the MENU mode, the unit will return to... the normal mode. Malfunction may result. • For downloading procedure details, see ALPINE's Web site. • If ...
Owners Manual
Page 28
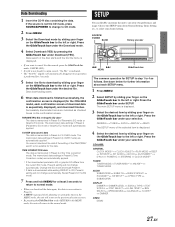
... The common operation for SETUP is not suitable for the data. See down below for the CDA-9853 model, each SETUP menu. 1 Press MENU. 2 Select SETUP by sliding your finger on the GlideTouch bar to the left or right. GENERAL ↔ TUNER ↔ AUDIO ↔ DISPLAY ↔ DEMO The SETUP menu... ↔ A-LINK TEMP*8 ↔ BGV SELECT ↔ OPENING MSG ↔ CALENDAR ↔ T.CORR*9 ↔ DIMMER DEMO DEMO 27-EN Data Downloading 1 Insert the CD-R disc containing the data. The memorized data settings in Preset 6 of the 2WAY/3WAY switch is step 1 to 4 as checked boxes on the...
... The common operation for SETUP is not suitable for the data. See down below for the CDA-9853 model, each SETUP menu. 1 Press MENU. 2 Select SETUP by sliding your finger on the GlideTouch bar to the left or right. GENERAL ↔ TUNER ↔ AUDIO ↔ DISPLAY ↔ DEMO The SETUP menu... ↔ A-LINK TEMP*8 ↔ BGV SELECT ↔ OPENING MSG ↔ CALENDAR ↔ T.CORR*9 ↔ DIMMER DEMO DEMO 27-EN Data Downloading 1 Insert the CD-R disc containing the data. The memorized data settings in Preset 6 of the 2WAY/3WAY switch is step 1 to 4 as checked boxes on the...