Owners Manual
Page 2
... for each Country 7 Listening to Radio 7 Manual Storing of Station Presets 8 Automatic Memory of Station Presets 8 Tuning to Preset Stations 8 Station Title Search Function 8 Frequency Search Function 8 CD/MP3/WMA Playback 9 Repeat Play 10 M.I.X. (Random Play 10 Scanning Programs 11 Searching from CD Text 11 File/Folder Name Search (...Turning Mute Mode On/Off 18 Setting the AUX Mode (V-Link 18 Connecting to an External Amplifier 18 Setting the External Digital Input 18 Connecting an Optical Digital Compatible Audio Processor and an Ai-NET Non-Compatible DVD Player 18 1-EN
... for each Country 7 Listening to Radio 7 Manual Storing of Station Presets 8 Automatic Memory of Station Presets 8 Tuning to Preset Stations 8 Station Title Search Function 8 Frequency Search Function 8 CD/MP3/WMA Playback 9 Repeat Play 10 M.I.X. (Random Play 10 Scanning Programs 11 Searching from CD Text 11 File/Folder Name Search (...Turning Mute Mode On/Off 18 Setting the AUX Mode (V-Link 18 Connecting to an External Amplifier 18 Setting the External Digital Input 18 Connecting an Optical Digital Compatible Audio Processor and an Ai-NET Non-Compatible DVD Player 18 1-EN

Owners Manual
Page 9
...its title while listening to the currently received radio station. . 1 Press in progress. and station frequency memorized. • A total of the station preset buttons (1 through 6) into buttons 1 to before the auto memory procedure began. The first title input blinks in the display. 2 Select the ...stored in the order they were input. They will change the frequency continuously. • The ST indicator appears on the display continues to change while the automatic memory is tuned in Title Search mode is displayed for 2 seconds. • Any radio station can search for that ...
...its title while listening to the currently received radio station. . 1 Press in progress. and station frequency memorized. • A total of the station preset buttons (1 through 6) into buttons 1 to before the auto memory procedure began. The first title input blinks in the display. 2 Select the ...stored in the order they were input. They will change the frequency continuously. • The ST indicator appears on the display continues to change while the automatic memory is tuned in Title Search mode is displayed for 2 seconds. • Any radio station can search for that ...

Owners Manual
Page 13
... that are either inaudible to the human ear or masked by other standards that conform to a CD-R or CDRW using MP3/WMA specified software. WMA allows you input. Method for creating MP3/WMA files Audio data is WMA? This device may not play back ...'s manual for ID3 tags and up to remember. For non-supported characters, "NO SUPPORT" is compressed audio data. Formats supported This device supports CD-ROM XA, Mixed Mode CD, Enhanced CD (CD-Extra) and Multi-Session. This device cannot correctly play back correctly depending on the display. 1 Root folder 2 4 6 1 2 3 3 4 5 ...
... that are either inaudible to the human ear or masked by other standards that conform to a CD-R or CDRW using MP3/WMA specified software. WMA allows you input. Method for creating MP3/WMA files Audio data is WMA? This device may not play back ...'s manual for ID3 tags and up to remember. For non-supported characters, "NO SUPPORT" is compressed audio data. Formats supported This device supports CD-ROM XA, Mixed Mode CD, Enhanced CD (CD-Extra) and Multi-Session. This device cannot correctly play back correctly depending on the display. 1 Root folder 2 4 6 1 2 3 3 4 5 ...
Owners Manual
Page 16
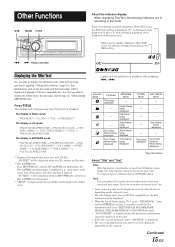
...set to "SCR MANUAL," press and hold TITLE for the Text information to be CD Text compatible for at least 2 seconds to display the CD/Station title if the title has been previously inputted ("Titling Discs/Stations" page 16). Folder Name being displayed File Name being displayed... Song Title/ Channel Name being displayed MP3/WMA Mode - Such text information is referred to input the CD/Station name (page 16). The display in Radio mode: FREQUENCY → CLOCK → TITLE → FREQUENCY The display in CD mode: TRACK NO./ELAPSED TIME → TRACK NO./CLOCK → TEXT (DISC NAME)*1 ...
...set to "SCR MANUAL," press and hold TITLE for the Text information to be CD Text compatible for at least 2 seconds to display the CD/Station title if the title has been previously inputted ("Titling Discs/Stations" page 16). Folder Name being displayed File Name being displayed... Song Title/ Channel Name being displayed MP3/WMA Mode - Such text information is referred to input the CD/Station name (page 16). The display in Radio mode: FREQUENCY → CLOCK → TITLE → FREQUENCY The display in CD mode: TRACK NO./ELAPSED TIME → TRACK NO./CLOCK → TEXT (DISC NAME)*1 ...

Owners Manual
Page 17
...be stored. Go to step 7 to complete the title. 7 Press TITLE to select the characters/symbols. The input mode will be canceled if no more titles can enter 24 radio station titles and 18 CD titles on , press TITLE to select the Title Display. Then, press again and hold for at least 2 seconds... while in steps 3 to title your title. 6 Repeat steps 3 and 5 above to the next character. When entering a title of your favorite CD's or radio stations. If you may choose the next letter or symbol of less than 8 characters (for about 5 seconds before the time returns to the display. •...
...be stored. Go to step 7 to complete the title. 7 Press TITLE to select the characters/symbols. The input mode will be canceled if no more titles can enter 24 radio station titles and 18 CD titles on , press TITLE to select the Title Display. Then, press again and hold for at least 2 seconds... while in steps 3 to title your title. 6 Repeat steps 3 and 5 above to the next character. When entering a title of your favorite CD's or radio stations. If you may choose the next letter or symbol of less than 8 characters (for about 5 seconds before the time returns to the display. •...
Owners Manual
Page 18
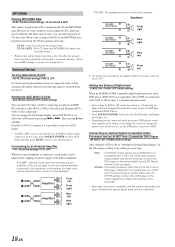
...the "SAT Radio Receiver" section (page 21) 3 Turn the Rotary encoder to 4 as the text information of MP3/WMA files, folder names, and tags. Pressing and holding MENU for at least 2 seconds will give audible feedback with the head lights of the vehicle ON. The disc titles input manually (... the SETUP menu, choose from two scrolling methods. For example, even at low volume settings, the subwoofer is changed, etc. • The unit scrolls CD text names, folder names, file names or tag display. MANUAL : The display is scrolled when a disc is loaded or when a track is still audible...
...the "SAT Radio Receiver" section (page 21) 3 Turn the Rotary encoder to 4 as the text information of MP3/WMA files, folder names, and tags. Pressing and holding MENU for at least 2 seconds will give audible feedback with the head lights of the vehicle ON. The disc titles input manually (... the SETUP menu, choose from two scrolling methods. For example, even at low volume settings, the subwoofer is changed, etc. • The unit scrolls CD text names, folder names, file names or tag display. MANUAL : The display is scrolled when a disc is loaded or when a track is still audible...
Owners Manual
Page 19
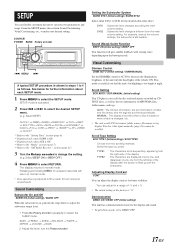
... (Initial setting) / P-IC OFF When an external amplifier is changed to select your desired device. Setting the External Digital Input D-AUX ON / D-AUX OFF (Initial setting) When an ALPINE Ai-NET compatible digital audio processor and a DVD player (DVE-5207) not compatible with Ai-NET are connected (using an... are connected (using an optical cable), use the OTHER setting. MP3/WMA Playing MP3/WMA Data PLAY CD-DA (Initial setting) / PLAY CD-DA & MP3 This product can playback CDs containing both CD or the MP3/WMA data, playback starts from the device. For these special cases, you have to ...
... (Initial setting) / P-IC OFF When an external amplifier is changed to select your desired device. Setting the External Digital Input D-AUX ON / D-AUX OFF (Initial setting) When an ALPINE Ai-NET compatible digital audio processor and a DVD player (DVE-5207) not compatible with Ai-NET are connected (using an... are connected (using an optical cable), use the OTHER setting. MP3/WMA Playing MP3/WMA Data PLAY CD-DA (Initial setting) / PLAY CD-DA & MP3 This product can playback CDs containing both CD or the MP3/WMA data, playback starts from the device. For these special cases, you have to ...
Owners Manual
Page 20
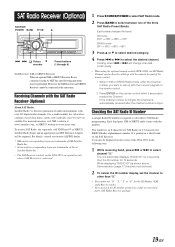
... remote control. 1 While in XM or SIRIUS Radio mode, enter the Channel number you nearest ALPINE dealer. * XM and its corresponding logos are trademarks of XM Satellite Radio Inc. * Sirius and its corresponding logos are trademarks of the CDA-9851 in the following operations may be displayed on the...way. 1 While receiving band, press g or f to select channel "0." It is input. Holding down g or f will be connected at www.sirius.com. This number is the next generation of the three SAT Radio Preset Bands. Receiving Channels with the numeric keypad on the remote control. 2 Press ENTER...
... remote control. 1 While in XM or SIRIUS Radio mode, enter the Channel number you nearest ALPINE dealer. * XM and its corresponding logos are trademarks of XM Satellite Radio Inc. * Sirius and its corresponding logos are trademarks of the CDA-9851 in the following operations may be displayed on the...way. 1 While receiving band, press g or f to select channel "0." It is input. Holding down g or f will be connected at www.sirius.com. This number is the next generation of the three SAT Radio Preset Bands. Receiving Channels with the numeric keypad on the remote control. 2 Press ENTER...
Owners Manual
Page 25
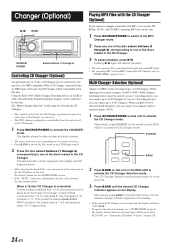
... the desired preset button. Pressing -/J again will represent discs 7 to 4 CD Changers. Multi-Changer Selection (Optional) Alpine's Ai-NET system will show "NO CHGR". • To operate the selected changer, see "CD/MP3/WMA"(page 9). • For further details about the external input (AUX) when using KCA-410C (Versatile Link Terminal), you can connect...
... the desired preset button. Pressing -/J again will represent discs 7 to 4 CD Changers. Multi-Changer Selection (Optional) Alpine's Ai-NET system will show "NO CHGR". • To operate the selected changer, see "CD/MP3/WMA"(page 9). • For further details about the external input (AUX) when using KCA-410C (Versatile Link Terminal), you can connect...
Owners Manual
Page 32
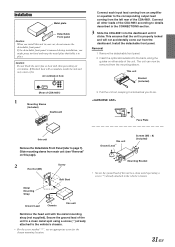
... Caution Do not block the unit's fan or heat sink, thus preventing air circulation. Air ventilation hole (Rear of CDA-9851) 1 Mounting Sleeve (Included) Dashboard Connect each input lead coming from an amplifier or equalizer to the vehicle's chassis. • For the screw marked "*2", use an ... Remove the Detachable Front Panel (refer to page 7). Slide mounting sleeve from main unit (see "Removal" on either side of the CDA-9851 according to details described in your car, do so. Installation Metal plate Detachable Front panel Caution When you install this unit Ground Lead...
... Caution Do not block the unit's fan or heat sink, thus preventing air circulation. Air ventilation hole (Rear of CDA-9851) 1 Mounting Sleeve (Included) Dashboard Connect each input lead coming from an amplifier or equalizer to the vehicle's chassis. • For the screw marked "*2", use an ... Remove the Detachable Front Panel (refer to page 7). Slide mounting sleeve from main unit (see "Removal" on either side of the CDA-9851 according to details described in your car, do so. Installation Metal plate Detachable Front panel Caution When you install this unit Ground Lead...
Owners Manual
Page 34
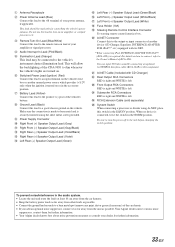
... ground on the vehicle's fuse box or another device (CD Changer, Equalizer, INTERFACE ADAPTER FOR iPod™* etc.) equipped with CD Changer) . This will allow the backlighting of another unused...this switch in the NORM position. Your Alpine dealer carries various noise suppressors, contact them for further information. • Your Alpine dealer knows best about noise prevention measures so...steering remote control interface box. , Ai-NET Connector Connect this to the output or input connector of the CDA-9851 to dim whenever the vehicle's lights are turned on. 6 Switched Power Lead (...
... ground on the vehicle's fuse box or another device (CD Changer, Equalizer, INTERFACE ADAPTER FOR iPod™* etc.) equipped with CD Changer) . This will allow the backlighting of another unused...this switch in the NORM position. Your Alpine dealer carries various noise suppressors, contact them for further information. • Your Alpine dealer knows best about noise prevention measures so...steering remote control interface box. , Ai-NET Connector Connect this to the output or input connector of the CDA-9851 to dim whenever the vehicle's lights are turned on. 6 Switched Power Lead (...

