Owners Manual
Page 2
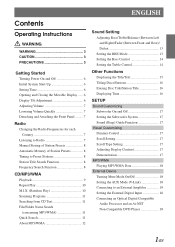
... Adjustment 6 Adjusting Volume 7 Lowering Volume Quickly 7 Detaching and Attaching the Front Panel ......... 7 Radio Changing the Radio Frequencies for each Country 7 Listening to Radio 7 Manual Storing of Station Presets 8 Automatic Memory of Station Presets 8 Tuning to Preset Stations 8 Station Title Search Function 8 Frequency Search Function 8 CD/MP3/WMA Playback 9 Repeat Play 10 M.I.X. (Random Play 10 Scanning Programs 11 Searching from CD Text 11 File/Folder Name Search (concerning MP3/WMA 11 Quick Search 11 About MP3/WMA 12 Sound Setting Adjusting Bass/Treble/Balance...
... Adjustment 6 Adjusting Volume 7 Lowering Volume Quickly 7 Detaching and Attaching the Front Panel ......... 7 Radio Changing the Radio Frequencies for each Country 7 Listening to Radio 7 Manual Storing of Station Presets 8 Automatic Memory of Station Presets 8 Tuning to Preset Stations 8 Station Title Search Function 8 Frequency Search Function 8 CD/MP3/WMA Playback 9 Repeat Play 10 M.I.X. (Random Play 10 Scanning Programs 11 Searching from CD Text 11 File/Folder Name Search (concerning MP3/WMA 11 Quick Search 11 About MP3/WMA 12 Sound Setting Adjusting Bass/Treble/Balance...
Owners Manual
Page 5
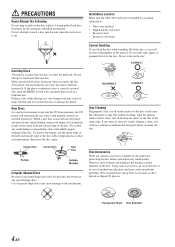
... reloading mechanism. New Discs As a protective measure to be installed in a solution of special shape discs may create operational problems. We recommend not using your finger, feel any small bumps or irregularities, this unit and never use round shape discs only for this could cause the CD player to the outer edge. Playing a disc while driving on the disc. If the surface is facing up when you...
... reloading mechanism. New Discs As a protective measure to be installed in a solution of special shape discs may create operational problems. We recommend not using your finger, feel any small bumps or irregularities, this unit and never use round shape discs only for this could cause the CD player to the outer edge. Playing a disc while driving on the disc. If the surface is facing up when you...
Owners Manual
Page 7
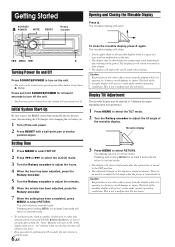
..., the time will stop at least 2 seconds after turning on , the volume will return to adjust the tilt angle of the unit. • The display may result in memory. The display returns to normal mode. g MENU f c Turning Power On and Off Press SOURCE/POWER to normal mode. 6-EN To close the movable display, press c again. Display Tilt Adjustment The movable display may be turned on by pressing any other button except eject...
..., the time will stop at least 2 seconds after turning on , the volume will return to adjust the tilt angle of the unit. • The display may result in memory. The display returns to normal mode. g MENU f c Turning Power On and Off Press SOURCE/POWER to normal mode. 6-EN To close the movable display, press c again. Display Tilt Adjustment The movable display may be turned on by pressing any other button except eject...
Owners Manual
Page 8
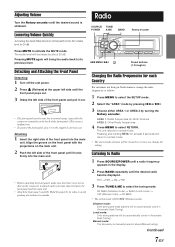
... (Manual tuning). Adjusting Volume Turn the Rotary encoder until it locks firmly into the main unit. Lowering Volume Quickly Radio SOURCE/ TUNE/ POWER A.ME BAND Rotary encoder Activating the Audio Mute function will return to select the tuning mode. Detaching and Attaching the Front Panel Detaching 1 Turn off the unit power. 2 Press (Release) at least 2 seconds will instantly lower the volume level by about 20 dB. The unit returns to activate the MUTE mode. Local mode: Only strong stations will...
... (Manual tuning). Adjusting Volume Turn the Rotary encoder until it locks firmly into the main unit. Lowering Volume Quickly Radio SOURCE/ TUNE/ POWER A.ME BAND Rotary encoder Activating the Audio Mute function will return to select the tuning mode. Detaching and Attaching the Front Panel Detaching 1 Turn off the unit power. 2 Press (Release) at least 2 seconds will instantly lower the volume level by about 20 dB. The unit returns to activate the MUTE mode. Local mode: Only strong stations will...
Owners Manual
Page 10
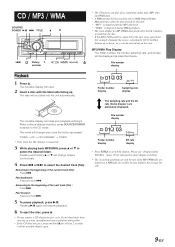
... eject, press and hold c for at a time. TUNER → CD → CD CHANGER* → TUNER * Only when the CD changer is connected 3 While playing back MP3/WMA, press 8 or 9 to switch the display. Pressing -/J again will change every time the button is displayed during its eject cycle. File number display 01 03 160 kbps Folder number display Bit rate display • Press TITLE to select the desired folder. Do not load more than one disc...
... eject, press and hold c for at a time. TUNER → CD → CD CHANGER* → TUNER * Only when the CD changer is connected 3 While playing back MP3/WMA, press 8 or 9 to switch the display. Pressing -/J again will change every time the button is displayed during its eject cycle. File number display 01 03 160 kbps Folder number display Bit rate display • Press TITLE to select the desired folder. Do not load more than one disc...
Owners Manual
Page 14
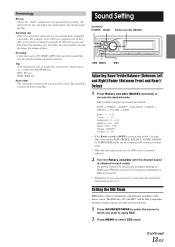
... unit automatically returns to normal mode. *1 When the subwoofer mode is turned off. • Depending on the connected devices, some functions and display indications do not work. Encoding Converting music CDs, WAVE (AIFF) files, and other sound files into MP3/WMA files. The FM radio, CD, and MP3, will return to choose the desired mode. Sound Setting SOURCE/ POWER BAND Rotary encoder (MODE) g MENU f Adjusting Bass/Treble/Balance (Between Left and Right)/Fader (Between Front and Rear...
... unit automatically returns to normal mode. *1 When the subwoofer mode is turned off. • Depending on the connected devices, some functions and display indications do not work. Encoding Converting music CDs, WAVE (AIFF) files, and other sound files into MP3/WMA files. The FM radio, CD, and MP3, will return to choose the desired mode. Sound Setting SOURCE/ POWER BAND Rotary encoder (MODE) g MENU f Adjusting Bass/Treble/Balance (Between Left and Right)/Fader (Between Front and Rear...
Owners Manual
Page 16
.../ Mode CD Mode Title being displayed SAT RADIO Mode - - - This inputted name is referred to the BBE setting. Bass Level setting is availabel after pressing g or f. Song Title/ Channel Name being displayed - Such text information is referred to as the disc name and track name. It is also possible to display the CD/Station title if the title has been previously inputted ("Titling Discs/Stations" page 16). The display in Radio mode: FREQUENCY → CLOCK...
.../ Mode CD Mode Title being displayed SAT RADIO Mode - - - This inputted name is referred to the BBE setting. Bass Level setting is availabel after pressing g or f. Song Title/ Channel Name being displayed - Such text information is referred to as the disc name and track name. It is also possible to display the CD/Station title if the title has been previously inputted ("Titling Discs/Stations" page 16). The display in Radio mode: FREQUENCY → CLOCK...
Owners Manual
Page 18
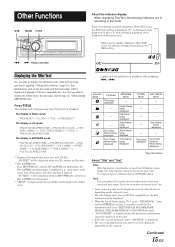
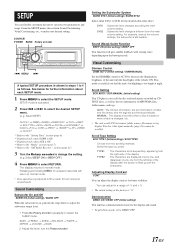
SOURCE/ POWER BAND Rotary encoder g MENU f A typical SETUP procedure is activated. 2 Press g or f to 4 as the text information of the vehicle ON. SETUP mode is shown in steps 1 to select the desired SETUP menu. (e.g. SYS1 SYS2 : Subwoofer level changes according the main volume setting. : Subwoofer level change the setting. (e.g. Sound (Beep) Guide Function BEEP ON (Initial setting) / BEEP OFF This function will return to normal mode. • If no operation is on CDTEXT discs, as well as follows...
SOURCE/ POWER BAND Rotary encoder g MENU f A typical SETUP procedure is activated. 2 Press g or f to 4 as the text information of the vehicle ON. SETUP mode is shown in steps 1 to select the desired SETUP menu. (e.g. SYS1 SYS2 : Subwoofer level changes according the main volume setting. : Subwoofer level change the setting. (e.g. Sound (Beep) Guide Function BEEP ON (Initial setting) / BEEP OFF This function will return to normal mode. • If no operation is on CDTEXT discs, as well as follows...
Owners Manual
Page 19
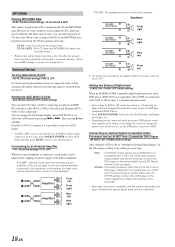
... digital input (Head unit) terminal of CD data only. Connect the DVD player to the speakers. You can select playback of the processor. • After input selection is completed. 18-EN Connect the DVD player to the optical digital input (DVD Player) terminal of the unit are connected (using an optical cable), use an MP3 changer, you can change discs.) External Device Turning Mute Mode On/Off MUTE ON (Initial setting) / MUTE OFF If a device having the interrupt feature is connected, audio will be connected. Amplifier Amplifier Front...
... digital input (Head unit) terminal of CD data only. Connect the DVD player to the speakers. You can select playback of the processor. • After input selection is completed. 18-EN Connect the DVD player to the optical digital input (DVD Player) terminal of the unit are connected (using an optical cable), use an MP3 changer, you can change discs.) External Device Turning Mute Mode On/Off MUTE ON (Initial setting) / MUTE OFF If a device having the interrupt feature is connected, audio will be connected. Amplifier Amplifier Front...
Owners Manual
Page 20
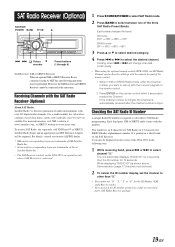
... Receiver and SIRIUS Receiver cannot be displayed on the CDA-9851 are trademarks of Sirius Satellite Radio Inc. • The SAT Receiver controls on the screen of the CDA-9851 in XM or SIRIUS Radio mode, enter the Channel number you want to select channel "0." For details, consult you nearest ALPINE dealer. * XM and its corresponding logos are trademarks of XM Satellite Radio Inc. * Sirius and its corresponding logos are operative only when a SAT Receiver is connected via satellite...
... Receiver and SIRIUS Receiver cannot be displayed on the CDA-9851 are trademarks of Sirius Satellite Radio Inc. • The SAT Receiver controls on the screen of the CDA-9851 in XM or SIRIUS Radio mode, enter the Channel number you want to select channel "0." For details, consult you nearest ALPINE dealer. * XM and its corresponding logos are trademarks of XM Satellite Radio Inc. * Sirius and its corresponding logos are operative only when a SAT Receiver is connected via satellite...
Owners Manual
Page 23
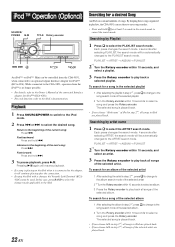
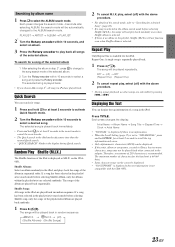
... connected to the CDA-9851, operation from the CDA-9851, when connected to an optional Alpine Interface Adapter for an album of the selected artist 1 After selecting the artist in iPod are played back. Pressing -/J again will be automatically changed to the ARTIST search mode. In this case, press BAND to select the changer mode applicable to the iPod. 22-EN Searching for iPod™ (KCA-420i). • For each function...
... connected to the CDA-9851, operation from the CDA-9851, when connected to an optional Alpine Interface Adapter for an album of the selected artist 1 After selecting the artist in iPod are played back. Pressing -/J again will be automatically changed to the ARTIST search mode. In this case, press BAND to select the changer mode applicable to the iPod. 22-EN Searching for iPod™ (KCA-420i). • For each function...
Owners Manual
Page 24
... is displayed as M.I.X. The song will be played repeatedly. Press TITLE. The maximum number of characters for the head unit is recommended. Random Play Shuffle (M.I.X.) The Shuffle function of 250 characters is 64 (64 byte). • Some characters may not be played back in iPod are played back sequentially. Searching by pressing g or f. Each press changes the search mode. 4 seconds after selecting ALBUM...
... is displayed as M.I.X. The song will be played repeatedly. Press TITLE. The maximum number of characters for the head unit is recommended. Random Play Shuffle (M.I.X.) The Shuffle function of 250 characters is 64 (64 byte). • Some characters may not be played back in iPod are played back sequentially. Searching by pressing g or f. Each press changes the search mode. 4 seconds after selecting ALBUM...
Owners Manual
Page 25
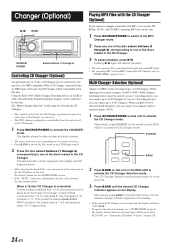
... use 2 Switching devices, you can operate in the same way as the CD changer. 1 Press SOURCE/POWER to "d." Alternatively, press SOURCE on the connected source. • Press BAND to switch the Disc mode in the CD/Changer mode. 2 Press the disc select buttons (1 through 6) corresponding to one of the discs loaded in the CD Changer. With F activated, the preset buttons 1 to 6 will support up to 6 CD Changers. The display shows the disc number and track number. • The source indicator varies depending on the remote control...
... use 2 Switching devices, you can operate in the same way as the CD changer. 1 Press SOURCE/POWER to "d." Alternatively, press SOURCE on the connected source. • Press BAND to switch the Disc mode in the CD/Changer mode. 2 Press the disc select buttons (1 through 6) corresponding to one of the discs loaded in the CD Changer. With F activated, the preset buttons 1 to 6 will support up to 6 CD Changers. The display shows the disc number and track number. • The source indicator varies depending on the remote control...
Owners Manual
Page 26
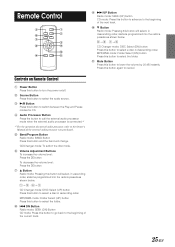
..., stations programmed into the radio's presets as shown below . 1 → 2 ... 6 → 1 CD Changer mode: DISC Select (UP) button Press this button to select a disc in descending order. CD/Changer mode: To switch the disc mode. 6 Volume Adjustment Buttons To increase the volume level: Press the L button To decrease the volume level: Press the K button 7 8 Button Radio mode: Pressing this button will change. Controls on Remote Control 1 Power Button Press this button to turn the power on/off. 2 Source Button Press this button to select the audio source. 3 -/J Button Press this button...
..., stations programmed into the radio's presets as shown below . 1 → 2 ... 6 → 1 CD Changer mode: DISC Select (UP) button Press this button to select a disc in descending order. CD/Changer mode: To switch the disc mode. 6 Volume Adjustment Buttons To increase the volume level: Press the L button To decrease the volume level: Press the K button 7 8 Button Radio mode: Pressing this button will change. Controls on Remote Control 1 Power Button Press this button to turn the power on/off. 2 Source Button Press this button to select the audio source. 3 -/J Button Press this button...
Owners Manual
Page 27
... You can operate this unit from the vehicle's control unit when an Alpine Steering Remote Control Interface Box (optional) (for sale in cable. - Make sure the tuner is at its mounting location. • The antenna may not be the proper length. - Make sure the antenna is off , then on again. Point the remote control transmitter at its mounting location. 26-EN Check power lead connections. • Blown fuse. - Basic No function or display. •...
... You can operate this unit from the vehicle's control unit when an Alpine Steering Remote Control Interface Box (optional) (for sale in cable. - Make sure the tuner is at its mounting location. • The antenna may not be the proper length. - Make sure the antenna is off , then on again. Point the remote control transmitter at its mounting location. 26-EN Check power lead connections. • Blown fuse. - Basic No function or display. •...
Owners Manual
Page 29
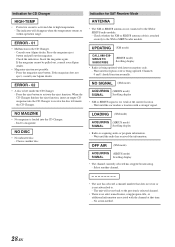
... channel at the current location. - Check whether the XM or SIRIUS antenna cable is being updated. UPDATING (XM mode) CALL 888-539SIRIUS TO SUBSCRIBE (SIRIUS mode) Scrolling display • Radio is attached securely to activate the eject function. Wait until the radio has received the information. Wait until the car reaches a location with latest encryption code. - OFF AIR (XM mode) ACQUIRING (SIRIUS mode) SIGNAL Scrolling display • The channel currently selected has stopped broadcasting. - No action needed...
... channel at the current location. - Check whether the XM or SIRIUS antenna cable is being updated. UPDATING (XM mode) CALL 888-539SIRIUS TO SUBSCRIBE (SIRIUS mode) Scrolling display • Radio is attached securely to activate the eject function. Wait until the radio has received the information. Wait until the car reaches a location with latest encryption code. - OFF AIR (XM mode) ACQUIRING (SIRIUS mode) SIGNAL Scrolling display • The channel currently selected has stopped broadcasting. - No action needed...
Owners Manual
Page 30
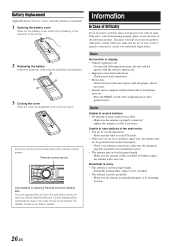
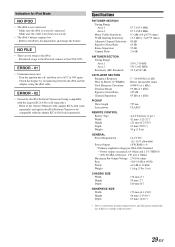
... again. - Turn the ignition key off, and then set to the CDA-9851. Check the display by the iPod Software Version not being compatible with the adapter KCA-420i (sold separately) and update the iPod Software Version to change without notice. 29-EN ERROR - 01 • Communication error - Specifications FM TUNER SECTION Tuning Range Area 1 Area 2 Mono Usable Sensitivity 50 dB Quieting Sensitivity Alternate Channel Selectivity Signal-to...
... again. - Turn the ignition key off, and then set to the CDA-9851. Check the display by the iPod Software Version not being compatible with the adapter KCA-420i (sold separately) and update the iPod Software Version to change without notice. 29-EN ERROR - 01 • Communication error - Specifications FM TUNER SECTION Tuning Range Area 1 Area 2 Mono Usable Sensitivity 50 dB Quieting Sensitivity Alternate Channel Selectivity Signal-to...
Owners Manual
Page 31
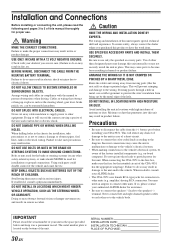
... contact your CDA-9851. IMPORTANT Please record the serial number of your ALPINE dealer. • The CDA-9851 uses female RCA-type jacks for connection to other or to provide power for this unit. KEEP SMALL OBJECTS SUCH AS BATTERIES OUT OF THE REACH OF CHILDREN. Never connect left and right channel speaker cables to each other units (e.g. DO NOT INSTALL IN LOCATIONS WHICH MIGHT HINDER VEHICLE OPERATION, SUCH...
... contact your CDA-9851. IMPORTANT Please record the serial number of your ALPINE dealer. • The CDA-9851 uses female RCA-type jacks for connection to other or to provide power for this unit. KEEP SMALL OBJECTS SUCH AS BATTERIES OUT OF THE REACH OF CHILDREN. Never connect left and right channel speaker cables to each other units (e.g. DO NOT INSTALL IN LOCATIONS WHICH MIGHT HINDER VEHICLE OPERATION, SUCH...
Owners Manual
Page 34
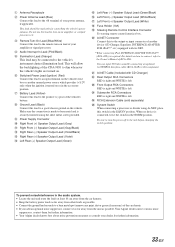
... backlighting of the CDA-9851 to dim whenever the vehicle's lights are turned on. 6 Switched Power Lead (Ignition) (Red) Connect this lead to an open terminal on the vehicle's fuse box or another device (CD Changer, Equalizer, INTERFACE ADAPTER FOR iPod™* etc.) equipped with CD Changer) . RCA Extension Cable (sold separately) < System Switch When connecting a processor or divider using the sheet metal screw provided. 9 Power Supply Connector ! 1 Antenna Receptacle 2 Power Antenna Lead (Blue) Connect this lead...
... backlighting of the CDA-9851 to dim whenever the vehicle's lights are turned on. 6 Switched Power Lead (Ignition) (Red) Connect this lead to an open terminal on the vehicle's fuse box or another device (CD Changer, Equalizer, INTERFACE ADAPTER FOR iPod™* etc.) equipped with CD Changer) . RCA Extension Cable (sold separately) < System Switch When connecting a processor or divider using the sheet metal screw provided. 9 Power Supply Connector ! 1 Antenna Receptacle 2 Power Antenna Lead (Blue) Connect this lead...
Owners Manual
Page 35
... THE ALPINE SERVICE CENTER, LOSS OF THE ORIGINAL PURCHASER'S TIME, LOSS OF THE USE OF THE PRODUCT, BUS FARES, CAR RENTALS OR OTHERS COSTS RELATING TO THE CARE AND CUSTODY OF THE PRODUCT. http://www.alpine-usa.com ALPINE ELECTRONICS OF AMERICA, INC., 19145 Gramercy Place, Torrance, California 90501, U.S.A. Dropped or damaged hard drives. 3 Damage caused by an Authorized Installation...
... THE ALPINE SERVICE CENTER, LOSS OF THE ORIGINAL PURCHASER'S TIME, LOSS OF THE USE OF THE PRODUCT, BUS FARES, CAR RENTALS OR OTHERS COSTS RELATING TO THE CARE AND CUSTODY OF THE PRODUCT. http://www.alpine-usa.com ALPINE ELECTRONICS OF AMERICA, INC., 19145 Gramercy Place, Torrance, California 90501, U.S.A. Dropped or damaged hard drives. 3 Damage caused by an Authorized Installation...


