Owners Manual
Page 1
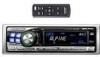
... 945-283588 SE Designed by ALPINE Japan Printed in China (Y) 68-02278Z07-A IT ALPINE ELECTRONICS MARKETING, INC. 1-1-8 Nishi Gotanda, Shinagawa-ku, Tokyo 141-0031, Japan Phone 03-5496-8231 ALPINE ELECTRONICS OF AMERICA, INC. 19145 Gramercy Place, Torrance, California 90501, U.S.A. Viale C. R EN MP3/WMA CD Receiver CDA-9851 FR ES • OWNER'S MANUAL Please read before using...
... 945-283588 SE Designed by ALPINE Japan Printed in China (Y) 68-02278Z07-A IT ALPINE ELECTRONICS MARKETING, INC. 1-1-8 Nishi Gotanda, Shinagawa-ku, Tokyo 141-0031, Japan Phone 03-5496-8231 ALPINE ELECTRONICS OF AMERICA, INC. 19145 Gramercy Place, Torrance, California 90501, U.S.A. Viale C. R EN MP3/WMA CD Receiver CDA-9851 FR ES • OWNER'S MANUAL Please read before using...
Owners Manual
Page 2
... Tilt Adjustment 6 Adjusting Volume 7 Lowering Volume Quickly 7 Detaching and Attaching the Front Panel ......... 7 Radio Changing the Radio Frequencies for each Country 7 Listening to Radio 7 Manual Storing of Station Presets 8 Automatic Memory of Station Presets 8 Tuning to Preset Stations 8 Station Title ...Search Function 8 Frequency Search Function 8 CD/MP3/WMA Playback 9 Repeat Play 10 M.I.X. (Random Play 10 Scanning Programs 11 Searching from CD...
... Tilt Adjustment 6 Adjusting Volume 7 Lowering Volume Quickly 7 Detaching and Attaching the Front Panel ......... 7 Radio Changing the Radio Frequencies for each Country 7 Listening to Radio 7 Manual Storing of Station Presets 8 Automatic Memory of Station Presets 8 Tuning to Preset Stations 8 Station Title ...Search Function 8 Frequency Search Function 8 CD/MP3/WMA Playback 9 Repeat Play 10 M.I.X. (Random Play 10 Scanning Programs 11 Searching from CD...
Owners Manual
Page 8
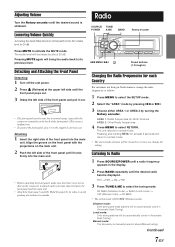
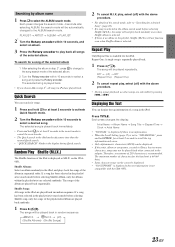
...). Pressing and holding MENU for North America AREA 2: Other Radio frequencies 4 Press MENU to Radio 1 Press SOURCE/POWER until a radio frequency appears in steps (Manual tuning). DX SEEK (Distance mode) → SEEK (Local mode) → OFF (Manual mode) → DX SEEK • The initial mode is manually tuned in the display. 2 Press BAND repeatedly until the...
...). Pressing and holding MENU for North America AREA 2: Other Radio frequencies 4 Press MENU to Radio 1 Press SOURCE/POWER until a radio frequency appears in steps (Manual tuning). DX SEEK (Distance mode) → SEEK (Local mode) → OFF (Manual mode) → DX SEEK • The initial mode is manually tuned in the display. 2 Press BAND repeatedly until the...

Owners Manual
Page 9
...Rotary encoder to store the station. The display shows the band, preset number and frequency of a radio station is stored. Manual Storing of Station Presets 1 Select the radio band and tune in a desired radio station you store a station in a preset memory which you wish to receive the frequency of 18... stations can search for that has your desired radio station in the selected band. The ...
...Rotary encoder to store the station. The display shows the band, preset number and frequency of a radio station is stored. Manual Storing of Station Presets 1 Select the radio band and tune in a desired radio station you store a station in a preset memory which you wish to receive the frequency of 18... stations can search for that has your desired radio station in the selected band. The ...

Owners Manual
Page 13
...or "Windows Media™ Audio," is achieved while still maintaining CD quality sound. Under the ISO9660 standard, there are prepared, then written to the user's manual for that conform to remember. indicated on creating MP3/WMA files, refer to a CD-R or CDRW using MP3/WMA specified software. half original size... can only display single-byte alphanumeric characters (up to 30 for ID3 tags and up to the human ear or masked by using CD-R writing software. This device cannot correctly play back discs in Joliet, Romeo, etc., and other sounds. The playback order of the...
...or "Windows Media™ Audio," is achieved while still maintaining CD quality sound. Under the ISO9660 standard, there are prepared, then written to the user's manual for that conform to remember. indicated on creating MP3/WMA files, refer to a CD-R or CDRW using MP3/WMA specified software. half original size... can only display single-byte alphanumeric characters (up to 30 for ID3 tags and up to the human ear or masked by using CD-R writing software. This device cannot correctly play back discs in Joliet, Romeo, etc., and other sounds. The playback order of the...
Owners Manual
Page 16
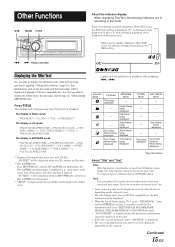
... ID3 tag/WMA tag information, the ID3 tag/WMA tag information is possible to the BBE setting. The display in Radio mode: FREQUENCY → CLOCK → TITLE → FREQUENCY The display in CD mode: TRACK NO./ELAPSED TIME → TRACK NO./CLOCK → TEXT (DISC NAME)*1 → TEXT (TRACK NAME... contents. Bass Level setting is usually displayed. Bass Level is usually displayed. Press TITLE. Lights up if the selection is set to "SCR MANUAL," press and hold TITLE for the root folder which doesn't have folder name. Song Title/ Channel Name being displayed MP3/WMA Mode - When...
... ID3 tag/WMA tag information, the ID3 tag/WMA tag information is possible to the BBE setting. The display in Radio mode: FREQUENCY → CLOCK → TITLE → FREQUENCY The display in CD mode: TRACK NO./ELAPSED TIME → TRACK NO./CLOCK → TEXT (DISC NAME)*1 → TEXT (TRACK NAME... contents. Bass Level setting is usually displayed. Bass Level is usually displayed. Press TITLE. Lights up if the selection is set to "SCR MANUAL," press and hold TITLE for the root folder which doesn't have folder name. Song Title/ Channel Name being displayed MP3/WMA Mode - When...
Owners Manual
Page 18
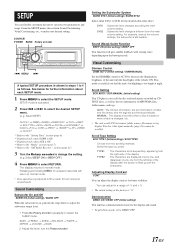
... are scrolled automatically. Select BEEP ON or BEEP OFF.) 4 Press MENU to change is ON. *4 Refer to the "Radio" section (page 7) *5 Refer to the "SAT Radio Receiver" section (page 21) 3 Turn the Rotary encoder to select RETURN. Pressing and holding MENU for further information about each... SUBW SYS1 (Initial setting) / SUBW SYS2 Select either SYS1 or SYS2 for better visibility. Scroll Setting SCR AUTO / SCR MANUAL (Initial setting) This CD player can scroll the disc and track names recorded on , perform the steps below for at low volume settings, the subwoofer ...
... are scrolled automatically. Select BEEP ON or BEEP OFF.) 4 Press MENU to change is ON. *4 Refer to the "Radio" section (page 7) *5 Refer to the "SAT Radio Receiver" section (page 21) 3 Turn the Rotary encoder to select RETURN. Pressing and holding MENU for further information about each... SUBW SYS1 (Initial setting) / SUBW SYS2 Select either SYS1 or SYS2 for better visibility. Scroll Setting SCR AUTO / SCR MANUAL (Initial setting) This CD player can scroll the disc and track names recorded on , perform the steps below for at low volume settings, the subwoofer ...
Owners Manual
Page 21
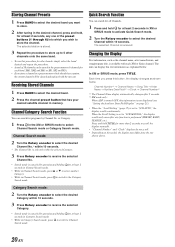
...seconds in Category Search mode. • While in Category Search mode, press to switch to Channel Search mode. The selected Channel is set to "SCR MANUAL," the display scrolls only once after 2 seconds. *2 XM mode only: When ADF is turned OFF, this procedure for other bands, simply select the ... No.* within 10 seconds. The unit can search for programs by Channel No. Press and hold TITLE for more than 2 seconds to scroll the display manually. • "Channel Number" and "Clock" displays do not scroll. • Depending on page 21). • When the "Scroll Setting" (page 17) is ...
...seconds in Category Search mode. • While in Category Search mode, press to switch to Channel Search mode. The selected Channel is set to "SCR MANUAL," the display scrolls only once after 2 seconds. *2 XM mode only: When ADF is turned OFF, this procedure for other bands, simply select the ... No.* within 10 seconds. The unit can search for programs by Channel No. Press and hold TITLE for more than 2 seconds to scroll the display manually. • "Channel Number" and "Clock" displays do not scroll. • Depending on page 21). • When the "Scroll Setting" (page 17) is ...
Owners Manual
Page 23
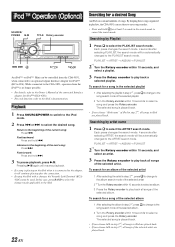
...playback. • If a song is playing on the iPod when it is no longer possible. • For details, refer to the Owner's Manual of the connected Interface adapter for a song of the selected album 1 After selecting the album in step 2*1, all songs of the selected album. ... selected artist. 2*3 Turn the Rotary encoder within 10 seconds to play back a selected playlist. While connected to the CDA-9851, operation from the CDA-9851, when connected to an optional Alpine Interface Adapter for a song in the selected playlist 1 After selecting the playlist in step 2*2, press to change to ...
...playback. • If a song is playing on the iPod when it is no longer possible. • For details, refer to the Owner's Manual of the connected Interface adapter for a song of the selected album 1 After selecting the album in step 2*1, all songs of the selected album. ... selected artist. 2*3 Turn the Rotary encoder within 10 seconds to play back a selected playlist. While connected to the CDA-9851, operation from the CDA-9851, when connected to an optional Alpine Interface Adapter for a song in the selected playlist 1 After selecting the playlist in step 2*2, press to change to ...
Owners Manual
Page 24
... compatible with the above procedure. • During repeat playback, no information. • When the Scroll Setting (page 17) is set to "SCR MANUAL" press and hold TITLE for at least 2 seconds to scroll the tag information only once. • Only alphanumeric characters (ASCII) can search for songs... Press to play back all songs in the album search mode before selecting Shuffle (M.I.X.), the songs will not play , select (off ) with the CDA-9851. 23-EN Repeat One: A single song is selected. The song will be automatically changed to select a song and press the Rotary encoder. The...
... compatible with the above procedure. • During repeat playback, no information. • When the Scroll Setting (page 17) is set to "SCR MANUAL" press and hold TITLE for at least 2 seconds to scroll the tag information only once. • Only alphanumeric characters (ASCII) can search for songs... Press to play back all songs in the album search mode before selecting Shuffle (M.I.X.), the songs will not play , select (off ) with the CDA-9851. 23-EN Repeat One: A single song is selected. The song will be automatically changed to select a song and press the Rotary encoder. The...
Owners Manual
Page 26
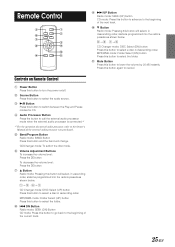
...Source Button Press this button to select the audio source. 3 -/J Button Press this button to switch between the Play and Pause modes for CD. 4 Audio Processor Button Press the button to call the external audio processor mode when the external audio processor is connected.*1 *1 For the ...operation of external audio processor, refer to the Owner's Manual of the external audio processor you purchased. 5 Band/Program Button Radio mode: BAND Button Press this button again to select a disc in ascending order, stations programmed into the...
...Source Button Press this button to select the audio source. 3 -/J Button Press this button to switch between the Play and Pause modes for CD. 4 Audio Processor Button Press the button to call the external audio processor mode when the external audio processor is connected.*1 *1 For the ...operation of external audio processor, refer to the Owner's Manual of the external audio processor you purchased. 5 Band/Program Button Radio mode: BAND Button Press this button again to select a disc in ascending order, stations programmed into the...
Owners Manual
Page 30
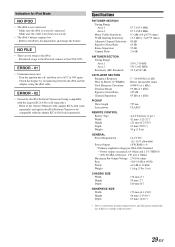
... Tuning Range Area 1 Area 2 Sensitivity (IEC Standard) 530-1,710 kHz 531-1,602 MHz 22.5 µV/27 dB CD PLAYER SECTION Frequency Response Wow & Flutter (% WRMS) Total Harmonic Distortion Dynamic Range Signal-to-Noise Ratio Channel Separation 5... the iPod Software Version not being compatible with the adapter KCA-420i (sold separately). Refer to the Owner's Manual of the adapter KCA-420i (sold separately). - Make sure the iPod is not connected. - Make sure...battery. NO FILE • There are subject to the CDA-9851. Turn the ignition key off, and then set to ACC or ON again. -
... Tuning Range Area 1 Area 2 Sensitivity (IEC Standard) 530-1,710 kHz 531-1,602 MHz 22.5 µV/27 dB CD PLAYER SECTION Frequency Response Wow & Flutter (% WRMS) Total Harmonic Distortion Dynamic Range Signal-to-Noise Ratio Channel Separation 5... the iPod Software Version not being compatible with the adapter KCA-420i (sold separately). Refer to the Owner's Manual of the adapter KCA-420i (sold separately). - Make sure the iPod is not connected. - Make sure...battery. NO FILE • There are subject to the CDA-9851. Turn the ignition key off, and then set to ACC or ON again. -
Owners Manual
Page 31
... damage to the vehicle's electrical system. • When making connections to the vehicle's electrical system, be aware of your ALPINE dealer. • The CDA-9851 uses female RCA-type jacks for connection to other or to provide power for proper use. If wiring passes through a hole... and right channel speaker cables to each other units (e.g. USE ONLY IN CARS WITH A 12 VOLT NEGATIVE GROUND. (Check with the manual to prevent obstructions when driving. This will reduce any other units. SERIAL NUMBER: INSTALLATION DATE: INSTALLATION TECHNICIAN: PLACE OF PURCHASE: 30-EN...
... damage to the vehicle's electrical system. • When making connections to the vehicle's electrical system, be aware of your ALPINE dealer. • The CDA-9851 uses female RCA-type jacks for connection to other or to provide power for proper use. If wiring passes through a hole... and right channel speaker cables to each other units (e.g. USE ONLY IN CARS WITH A 12 VOLT NEGATIVE GROUND. (Check with the manual to prevent obstructions when driving. This will reduce any other units. SERIAL NUMBER: INSTALLATION DATE: INSTALLATION TECHNICIAN: PLACE OF PURCHASE: 30-EN...
Owners Manual
Page 34
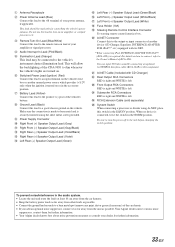
... 9 Power Supply Connector ! Your Alpine dealer carries various noise suppressors, contact them for further information. • Your Alpine dealer knows best about noise prevention ...Battery Lead (Yellow) Connect this lead to the positive (+) post of the CDA-9851 to dim whenever the vehicle's lights are turned on. 6 Switched Power Lead...CD Changer) . This will allow the backlighting of the vehicle's battery. 8 Ground Lead (Black) Connect this lead to the remote turn on an amplifier, or a signal processor, etc. 3 Remote Turn-On Lead (Blue/White) Connect this lead to the Owner's Manual...
... 9 Power Supply Connector ! Your Alpine dealer carries various noise suppressors, contact them for further information. • Your Alpine dealer knows best about noise prevention ...Battery Lead (Yellow) Connect this lead to the positive (+) post of the CDA-9851 to dim whenever the vehicle's lights are turned on. 6 Switched Power Lead...CD Changer) . This will allow the backlighting of the vehicle's battery. 8 Ground Lead (Black) Connect this lead to the remote turn on an amplifier, or a signal processor, etc. 3 Remote Turn-On Lead (Blue/White) Connect this lead to the Owner's Manual...
Owners Manual
Page 35
...or damaged hard drives. 3 Damage caused by negligence, misuse, improper operation or failure to an Authorized Alpine Service Center or Alpine for repair and for your nearest Authorized Alpine Service Center. Alpine will pay the return shipping charges. 2 You should provide a detailed description of the problem(s) for... or Canada. [WHAT IS COVERED: This Warranty covers defects in materials or workmanship (parts and labor) in the Owner's manual. 4 Damage caused by Alpine within the United States, Puerto Rico or Canada. 9 Any product not purchased from state to state and province to offer ...
...or damaged hard drives. 3 Damage caused by negligence, misuse, improper operation or failure to an Authorized Alpine Service Center or Alpine for repair and for your nearest Authorized Alpine Service Center. Alpine will pay the return shipping charges. 2 You should provide a detailed description of the problem(s) for... or Canada. [WHAT IS COVERED: This Warranty covers defects in materials or workmanship (parts and labor) in the Owner's manual. 4 Damage caused by Alpine within the United States, Puerto Rico or Canada. 9 Any product not purchased from state to state and province to offer ...


