
Owners Manual
Page 3
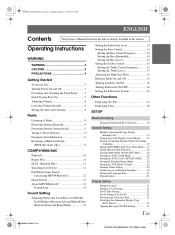
... Start-Up 7 Adjusting Volume 8 Lowering Volume Quickly 8 Setting the Time and Calendar 8 Radio Listening to Radio 8 Presetting Stations Manually 9 Presetting Stations Automatically 9 Tuning to Preset Stations 9 Frequency Search Function 9 Receiving a Multicast Station (HD Radio mode only 9 CD/MP3/WMA/AAC Playback 10 Repeat Play 11 M.I.X. (Random Play 11 Searching for CD Text 11 File/Folder Name Search (concerning MP3/WMA/AAC 12 Quick Search 12 About MP3/WMA/AAC 12 Terminology 13 Sound Setting Adjusting Subwoofer Level/Bass Level/Treble Level/Balance (Between Left and...
... Start-Up 7 Adjusting Volume 8 Lowering Volume Quickly 8 Setting the Time and Calendar 8 Radio Listening to Radio 8 Presetting Stations Manually 9 Presetting Stations Automatically 9 Tuning to Preset Stations 9 Frequency Search Function 9 Receiving a Multicast Station (HD Radio mode only 9 CD/MP3/WMA/AAC Playback 10 Repeat Play 11 M.I.X. (Random Play 11 Searching for CD Text 11 File/Folder Name Search (concerning MP3/WMA/AAC 12 Quick Search 12 About MP3/WMA/AAC 12 Terminology 13 Sound Setting Adjusting Subwoofer Level/Bass Level/Treble Level/Balance (Between Left and...

Owners Manual
Page 4
... Repeat Play 29 Displaying the Text 29 IMPRINT Operation (Optional) Changing MultEQ mode 29 Adjusting Subwoofer Level/Bass Level/Treble Level/Fader (Between Front and Rear)/ Balance (Between Left and Right)/Black Out in MultEQ mode 30 Adjusting Sound Setting in Manual Mode ......30 Turning Subwoofer ON/OFF 30 Setting the Subwoofer System 30 Setting the Subwoofer Phase 30 Setting the Subwoofer Channel (SUBW. 01GB00CDA9886M.book Page 2 Monday, March 17, 2008 4:05 PM Tuner Setting (Only when HD Radio is connected) HD Radio Station Call Setting 21...
... Repeat Play 29 Displaying the Text 29 IMPRINT Operation (Optional) Changing MultEQ mode 29 Adjusting Subwoofer Level/Bass Level/Treble Level/Fader (Between Front and Rear)/ Balance (Between Left and Right)/Black Out in MultEQ mode 30 Adjusting Sound Setting in Manual Mode ......30 Turning Subwoofer ON/OFF 30 Setting the Subwoofer System 30 Setting the Subwoofer Phase 30 Setting the Subwoofer Channel (SUBW. 01GB00CDA9886M.book Page 2 Monday, March 17, 2008 4:05 PM Tuner Setting (Only when HD Radio is connected) HD Radio Station Call Setting 21...
Owners Manual
Page 7
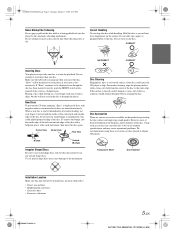
..., "Error" is facing up when you insert a disc incorrectly. If "Error" continues to be installed in skips, but this unit and never use your player if you insert the disc. New Discs To prevent the CD from the center of the disc to : • Direct sun and heat • High humidity and water • Excessive dust • Excessive vibrations 01GB04CDA9886.fm 5-EN ALPINE CDA-9886M 68...
..., "Error" is facing up when you insert a disc incorrectly. If "Error" continues to be installed in skips, but this unit and never use your player if you insert the disc. New Discs To prevent the CD from the center of the disc to : • Direct sun and heat • High humidity and water • Excessive dust • Excessive vibrations 01GB04CDA9886.fm 5-EN ALPINE CDA-9886M 68...
Owners Manual
Page 8
... ALPINE CDA-9886M 68-12118Z86-A (EN) This non-audio data will not produce sound when played back. Read the USB memory Owner's Manual thoroughly. Do not touch the terminals by using other countries. • iPod is a trademark of Apple Inc., registered in the United States and/or other USB products cannot be guaranteed. • If the USB connector is in a location where driver operation will not be hindered. • USB memory...
... ALPINE CDA-9886M 68-12118Z86-A (EN) This non-audio data will not produce sound when played back. Read the USB memory Owner's Manual thoroughly. Do not touch the terminals by using other countries. • iPod is a trademark of Apple Inc., registered in the United States and/or other USB products cannot be guaranteed. • If the USB connector is in a location where driver operation will not be hindered. • USB memory...
Owners Manual
Page 9
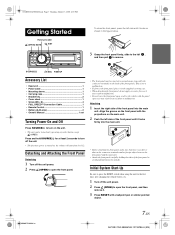
... connector terminals on the back of the front panel until it locks as it locks firmly into the main unit. SOURCE/ /ESC F/SETUP Accessory List • Head unit 1 • Power cable 1 • Mounting sleeve 1 • Carrying case 1 • Bracket key 2 • Cover sheet 1 • Screw (M5 × 8 4 • FULL SPEED™ Connection Cable 1 • Remote Control 1 • Battery (AAA size 2 • Owner's Manual 1 set Turning Power On and Off Press SOURCE...
... connector terminals on the back of the front panel until it locks as it locks firmly into the main unit. SOURCE/ /ESC F/SETUP Accessory List • Head unit 1 • Power cable 1 • Mounting sleeve 1 • Carrying case 1 • Bracket key 2 • Cover sheet 1 • Screw (M5 × 8 4 • FULL SPEED™ Connection Cable 1 • Remote Control 1 • Battery (AAA size 2 • Owner's Manual 1 set Turning Power On and Off Press SOURCE...
Owners Manual
Page 10
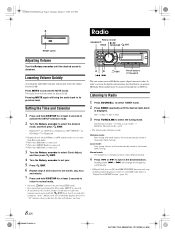
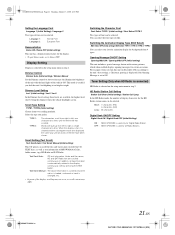
... XM Radio is connected. *3 Only when SIRIUS Radio is connected. *4 Only when HD Radio is connected. 3 Turn the Rotary encoder to select Clock Adjust, and then press /ENT. 4 Turn the Rotary encoder to set year. 5 Press /ENT. 6 Repeat steps 4 and 5 above to set to its previous level. Distance mode: Both strong and weak stations will advance one hour. /ESC Preset buttons (1 through the Ai-NET bus. Lowering Volume Quickly Activating the Audio Mute function will...
... XM Radio is connected. *3 Only when SIRIUS Radio is connected. *4 Only when HD Radio is connected. 3 Turn the Rotary encoder to select Clock Adjust, and then press /ENT. 4 Turn the Rotary encoder to set year. 5 Press /ENT. 6 Repeat steps 4 and 5 above to set to its previous level. Distance mode: Both strong and weak stations will advance one hour. /ESC Preset buttons (1 through the Ai-NET bus. Lowering Volume Quickly Activating the Audio Mute function will...

Owners Manual
Page 11
... this unit. The tuner will return to the original station you were listening to before the auto memory procedure began. A maximum of eight multicast station channels can be canceled if no stations are stored, the tuner will automatically seek and store 6 strong stations in the selected band. Tuning to Preset Stations 1 Press BAND repeatedly until the desired radio band is received, the program number and the SPS indicator lights...
... this unit. The tuner will return to the original station you were listening to before the auto memory procedure began. A maximum of eight multicast station channels can be canceled if no stations are stored, the tuner will automatically seek and store 6 strong stations in the selected band. Tuning to Preset Stations 1 Press BAND repeatedly until the desired radio band is received, the program number and the SPS indicator lights...
Owners Manual
Page 12
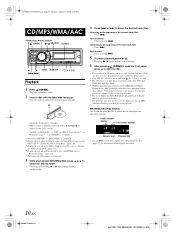
... is played back. TUNER XM/SIRIUS*1 DISC USB iPod*2/AUX+*3 Bluetooth Audio*4 CHANGER*5 TUNER *1 Only when XM Radio or SIRIUS Radio is connected. *2 Displayed only when the iPod is connected and AUX+ Setup is set to OFF, refer to "Setting the AUX+ Setup Mode" (page 20). *3 Displayed only when the AUX+ Setup is set to ON, refer to "Setting the AUX+ Setup Mode" (page 20). *4 Displayed only when Bluetooth IN is set to ADAPTER, refer to "Bluetooth Setting" (page 19). *5 Only when the CD changer is already inserted, press SOURCE/ to switch to select...
... is played back. TUNER XM/SIRIUS*1 DISC USB iPod*2/AUX+*3 Bluetooth Audio*4 CHANGER*5 TUNER *1 Only when XM Radio or SIRIUS Radio is connected. *2 Displayed only when the iPod is connected and AUX+ Setup is set to OFF, refer to "Setting the AUX+ Setup Mode" (page 20). *3 Displayed only when the AUX+ Setup is set to ON, refer to "Setting the AUX+ Setup Mode" (page 20). *4 Displayed only when Bluetooth IN is set to ADAPTER, refer to "Bluetooth Setting" (page 19). *5 Only when the CD changer is already inserted, press SOURCE/ to switch to select...

Owners Manual
Page 16
... the connected devices, some functions and display indications do not work. Level Adjustment mode, and then press /ENT. SUBW. Setting the Bass Bandwidth 3-2 Press SOURCE/ to select the desired bass center frequency. 80 Hz 100 Hz 200 Hz 60 Hz 80 Hz Emphasizes the displayed bass frequency ranges. A narrower setting will return to ON. Setting the Subwoofer Level You can change the Bass Frequency emphasis to create your own tonal preference. 1 Press SOUND SETUP to activate the Sound Setting mode. 2 Turn...
... the connected devices, some functions and display indications do not work. Level Adjustment mode, and then press /ENT. SUBW. Setting the Bass Bandwidth 3-2 Press SOURCE/ to select the desired bass center frequency. 80 Hz 100 Hz 200 Hz 60 Hz 80 Hz Emphasizes the displayed bass frequency ranges. A narrower setting will return to ON. Setting the Subwoofer Level You can change the Bass Frequency emphasis to create your own tonal preference. 1 Press SOUND SETUP to activate the Sound Setting mode. 2 Turn...

Owners Manual
Page 18
... power enhances the sound quality. 1 Press SOUND SETUP to activate the Sound Setting mode. 2 Turn the Rotary encoder to select Subwoofer System, and then press /ENT. Level*11 Bass*12 Treble*12 HPF*12 Black Out SUBW. Press and hold /ESC for at least 2 seconds to activate or deactivate the loudness mode. "LOUD" indicator lights. • When an external audio processor is connected, this unit will turn off to reduce power consumption. Setting...
... power enhances the sound quality. 1 Press SOUND SETUP to activate the Sound Setting mode. 2 Turn the Rotary encoder to select Subwoofer System, and then press /ENT. Level*11 Bass*12 Treble*12 HPF*12 Black Out SUBW. Press and hold /ESC for at least 2 seconds to activate or deactivate the loudness mode. "LOUD" indicator lights. • When an external audio processor is connected, this unit will turn off to reduce power consumption. Setting...
Owners Manual
Page 19
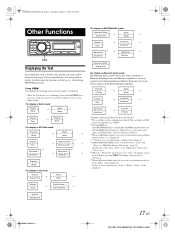
..." is set, displayed in 2 lines when "Long" is set. *6 When the "Text Scroll" (page 21) is set to Manual, press and hold VIEW for at least 2 seconds, the current text will be displayed. *5 RADIO STATION NAME can be scrolled one time (except Radio mode). The display will change every time the button is pressed. • When the Text Scroll is set to "Auto," the display cannot be switched by pressing VIEW...
..." is set, displayed in 2 lines when "Long" is set. *6 When the "Text Scroll" (page 21) is set to Manual, press and hold VIEW for at least 2 seconds, the current text will be displayed. *5 RADIO STATION NAME can be scrolled one time (except Radio mode). The display will change every time the button is pressed. • When the Text Scroll is set to "Auto," the display cannot be switched by pressing VIEW...
Owners Manual
Page 21
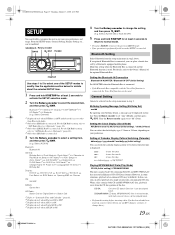
...). SOURCE/ Rotary encoder BAND /ENT /ESC F/SETUP Use steps 1 to 5 to select one of a single session only, containing the CD data. equipped mobile phone. Select AUX IN) Bluetooth: Bluetooth IN General: Birthday Set Clock Mode Clock Adjust*5 Calendar Play Mode Beep INT Mute*6 AUX+ Setup AUX+ Name*7 AUX IN GAIN*7 Digital AUX D.AUX Name*8 AUX IN AUX Name*9 Changer Name Power IC Language Set Demo Birthday Set Display: Dimmer Dimmer Level Font Select BGV Select Scroll Type Text Scroll Opening MSG Dimmer XM: XM ADF SIRIUS: Game Alert HD Radio: Station...
...). SOURCE/ Rotary encoder BAND /ENT /ESC F/SETUP Use steps 1 to 5 to select one of a single session only, containing the CD data. equipped mobile phone. Select AUX IN) Bluetooth: Bluetooth IN General: Birthday Set Clock Mode Clock Adjust*5 Calendar Play Mode Beep INT Mute*6 AUX+ Setup AUX+ Name*7 AUX IN GAIN*7 Digital AUX D.AUX Name*8 AUX IN AUX Name*9 Changer Name Power IC Language Set Demo Birthday Set Display: Dimmer Dimmer Level Font Select BGV Select Scroll Type Text Scroll Opening MSG Dimmer XM: XM ADF SIRIUS: Game Alert HD Radio: Station...

Owners Manual
Page 22
... input audio level. If this setting, the head unit's internal amplifier is connected. Amplifier Amplifier Front left Front right Rear left • No sound is produced by turning the Rotary encoder, then press /ENT. Setting the AUX Mode (V-Link) AUX IN ON / AUX IN OFF (Initial setting) You can be carried out. In this occurs, set to select the desired AUX+ name. A portable music device and an iPod cannot be connected to the iPod Direct connector of this unit is set...
... input audio level. If this setting, the head unit's internal amplifier is connected. Amplifier Amplifier Front left Front right Rear left • No sound is produced by turning the Rotary encoder, then press /ENT. Setting the AUX Mode (V-Link) AUX IN ON / AUX IN OFF (Initial setting) You can be carried out. In this occurs, set to select the desired AUX+ name. A portable music device and an iPod cannot be connected to the iPod Direct connector of this unit is set...
Owners Manual
Page 23
... Radio station name can scroll the disc and track names recorded on the setup main menu in the display continuously, without pressing the VIEW button. Dimmer Level Setting Lev1 (Initial setting) / Lev2 / Lev3 In the Dimmer Level setting, three levels are available, the highest level (Lev3) being the dimmest when the vehicle headlights are scrolled continuously. Scroll Setting (Text Scroll) Text Scroll Auto / Text Scroll Manual (Initial setting) This CD player can be selected...
... Radio station name can scroll the disc and track names recorded on the setup main menu in the display continuously, without pressing the VIEW button. Dimmer Level Setting Lev1 (Initial setting) / Lev2 / Lev3 In the Dimmer Level setting, three levels are available, the highest level (Lev3) being the dimmest when the vehicle headlights are scrolled continuously. Scroll Setting (Text Scroll) Text Scroll Auto / Text Scroll Manual (Initial setting) This CD player can be selected...
Owners Manual
Page 29
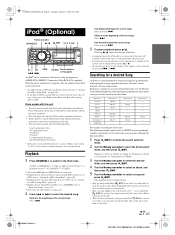
... Bluetooth Box while turning ACC to OFF. When this unit • The unit can be used with the following example explains how an ARTIST search is connected (refer to "Setting the AUX+ Setup Mode" on the table below. iPods usable with the fourth generation and above iPod, iPod photo, iPod mini or iPod nano. TUNER XM/SIRIUS*1 DISC USB iPod*2/AUX+*3 Bluetooth Audio*4 CHANGER*5 TUNER *1 Only when XM Radio or SIRIUS Radio is connected. *2 Displayed only when the iPod is connected and AUX+ Setup...
... Bluetooth Box while turning ACC to OFF. When this unit • The unit can be used with the following example explains how an ARTIST search is connected (refer to "Setting the AUX+ Setup Mode" on the table below. iPods usable with the fourth generation and above iPod, iPod photo, iPod mini or iPod nano. TUNER XM/SIRIUS*1 DISC USB iPod*2/AUX+*3 Bluetooth Audio*4 CHANGER*5 TUNER *1 Only when XM Radio or SIRIUS Radio is connected. *2 Displayed only when the iPod is connected and AUX+ Setup...

Owners Manual
Page 33
... music source. This reproduces a well-balanced sound close to high frequencies become clearer, and produces well balanced sound at the time of data during the blackout mode, the function will turn off to FLAT in 5 seconds after returning to ON. • There is set to ON, in 2.2ch (3WAY) mode (see "Adjusting the Crossover Settings" on page 32), as speaker damage may result. DVD (Video CD) (MOVIE MX level 1 to stereo...
... music source. This reproduces a well-balanced sound close to high frequencies become clearer, and produces well balanced sound at the time of data during the blackout mode, the function will turn off to FLAT in 5 seconds after returning to ON. • There is set to ON, in 2.2ch (3WAY) mode (see "Adjusting the Crossover Settings" on page 32), as speaker damage may result. DVD (Video CD) (MOVIE MX level 1 to stereo...

Owners Manual
Page 35
... EQ Adjustment, Time Correction and X-Over settings that has your desired characteristic in memory to recall the stored settings. 2 Press the preset buttons again to return to the Sound Field Adjustment mode. • While performing this unit, a message is displayed when the response slope for the high range speaker is set for the HIGH slope only when User's is stored. • While perform this operation, all adjustment...
... EQ Adjustment, Time Correction and X-Over settings that has your desired characteristic in memory to recall the stored settings. 2 Press the preset buttons again to return to the Sound Field Adjustment mode. • While performing this unit, a message is displayed when the response slope for the high range speaker is set for the HIGH slope only when User's is stored. • While perform this operation, all adjustment...

Owners Manual
Page 40
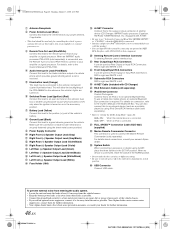
... Select (UP) button Press this button to select a folder in ascending order, stations programmed into the radio's presets as shown below. ... DN Button Radio mode: SEEK (DN) Button CD/iPod mode: Press this button to go back to turn the power on page 29. When the IMPRINT audio processor (PXA-H100) (sold separately) is connected.* * For the operation of external audio processor, refer to switch between the Play and Pause modes for CD. Volume Adjustment Buttons To increase the volume level...
... Select (UP) button Press this button to select a folder in ascending order, stations programmed into the radio's presets as shown below. ... DN Button Radio mode: SEEK (DN) Button CD/iPod mode: Press this button to go back to turn the power on page 29. When the IMPRINT audio processor (PXA-H100) (sold separately) is connected.* * For the operation of external audio processor, refer to switch between the Play and Pause modes for CD. Volume Adjustment Buttons To increase the volume level...

Owners Manual
Page 42
.... Radio Unable to tune stations in the seek mode. • You are in is being inserted following checklist. replace the antenna or cable if necessary. Make sure the tuner is in the format supported by this unit and the iPod. Make sure the antenna is at its mounting location. • The antenna may not be replaced. CD playback sound is very dirty. - Eject the CD and remove it ; Securely re-mount the unit. • The disc...
.... Radio Unable to tune stations in the seek mode. • You are in is being inserted following checklist. replace the antenna or cable if necessary. Make sure the tuner is in the format supported by this unit and the iPod. Make sure the antenna is at its mounting location. • The antenna may not be replaced. CD playback sound is very dirty. - Eject the CD and remove it ; Securely re-mount the unit. • The disc...
Owners Manual
Page 50
... use a hands-free mobile phone, an optional Bluetooth Box connection is left. For details, refer to turn on the vehicle's fuse box or another device (CD Changer, IMPRINT audio processor, Equalizer, HD Radio TUNER MODULE, etc.) equipped with Ai-NET. • Be sure to set "Setting the Connected Head Unit (MODEL SETUP)" to "CD CHG", when the DHA-S690 is connected. • Interface adapter for further information. 48-EN 01GB06CDA9886.fm ALPINE CDA-9886M 68-12118Z86-A (EN) Switched Power...
... use a hands-free mobile phone, an optional Bluetooth Box connection is left. For details, refer to turn on the vehicle's fuse box or another device (CD Changer, IMPRINT audio processor, Equalizer, HD Radio TUNER MODULE, etc.) equipped with Ai-NET. • Be sure to set "Setting the Connected Head Unit (MODEL SETUP)" to "CD CHG", when the DHA-S690 is connected. • Interface adapter for further information. 48-EN 01GB06CDA9886.fm ALPINE CDA-9886M 68-12118Z86-A (EN) Switched Power...


