
Owners Manual
Page 2
...8482; Bar Operation 6 Getting Started Turning Power On and Off 7 Initial System Start-Up 7 Setting the Time and Calendar (CDA-9855 only 7 Setting Time (CDA-9853 only 7 Opening and Closing the Movable Display ...... 8 Display Tilt Adjustment 8 Adjusting Volume 8 Lowering Volume Quickly 8 ... the Front Panel ......... 8 Radio Changing the Radio Frequencies for each Country 9 Listening to Radio 9 Manual Storing of Station Presets 9 Automatic Memory of Station Presets 9 Tuning to Preset Stations 10 Station Title Search Function 10 Freqency Search Function 10 CD / MP3 / WMA Playback ...
...8482; Bar Operation 6 Getting Started Turning Power On and Off 7 Initial System Start-Up 7 Setting the Time and Calendar (CDA-9855 only 7 Setting Time (CDA-9853 only 7 Opening and Closing the Movable Display ...... 8 Display Tilt Adjustment 8 Adjusting Volume 8 Lowering Volume Quickly 8 ... the Front Panel ......... 8 Radio Changing the Radio Frequencies for each Country 9 Listening to Radio 9 Manual Storing of Station Presets 9 Automatic Memory of Station Presets 9 Tuning to Preset Stations 10 Station Title Search Function 10 Freqency Search Function 10 CD / MP3 / WMA Playback ...
Owners Manual
Page 3
... Display Type (CDA-9855 only 30 Opening Message ON/OFF Setting (CDA-9855 only 30 Setting of Calendar Display Pattern Switching (CDA-9855 only 30 Demo Setting Demonstration 30 SAT Radio Receiver (Optional) Receiving Channels with the SAT Radio Receiver (Optional 31 Checking the SAT Radio ID Number 31... Search 35 Random Play Shuffle (M.I.X 35 Repeat Play 36 Displaying the Text 36 Changer (Optional) Controlling CD Changer (Optional 37 Playing MP3 Files with the CD Changer (Optional 37 Multi-Changer Selection (Optional 37 Remote Control Controls on Remote Control 38 Operating the...
... Display Type (CDA-9855 only 30 Opening Message ON/OFF Setting (CDA-9855 only 30 Setting of Calendar Display Pattern Switching (CDA-9855 only 30 Demo Setting Demonstration 30 SAT Radio Receiver (Optional) Receiving Channels with the SAT Radio Receiver (Optional 31 Checking the SAT Radio ID Number 31... Search 35 Random Play Shuffle (M.I.X 35 Repeat Play 36 Displaying the Text 36 Changer (Optional) Controlling CD Changer (Optional 37 Playing MP3 Files with the CD Changer (Optional 37 Multi-Changer Selection (Optional 37 Remote Control Controls on Remote Control 38 Operating the...
Owners Manual
Page 5
... the unit power is off. Do not attempt to load more than one disc at a time for playback. Installation Location Make sure the CDA-9855/CDA-9853 will automatically eject any special shape discs. Do not write on discs played in a solution of the disc with irregular surfaces or inserted... disc again. New Discs As a protective measure to the outer edge. When a new disc is heavily soiled, dampen a clean, soft cloth in Alpine CD players. If the surface is inserted into the player and ejected after initial loading, using these accessories on the disc. Using such accessories can cause...
... the unit power is off. Do not attempt to load more than one disc at a time for playback. Installation Location Make sure the CDA-9855/CDA-9853 will automatically eject any special shape discs. Do not write on discs played in a solution of the disc with irregular surfaces or inserted... disc again. New Discs As a protective measure to the outer edge. When a new disc is heavily soiled, dampen a clean, soft cloth in Alpine CD players. If the surface is inserted into the player and ejected after initial loading, using these accessories on the disc. Using such accessories can cause...

Owners Manual
Page 8
... one hour. • If MENU is performed for the first time, after installing the CD changer, after setting the "hour." The GENERAL SETUP menu is turned on the GlideTouch bar...least 2 seconds to return to normal mode. • To synchronize the clock to another clock/watch or radio time announcement, press and hold the Rotary encoder for at least 2 seconds after changing the car battery, ... to the left or right. Press the GlideTouch bar under GENERAL. Setting the Time and Calendar (CDA-9855 only) 1 Press MENU. 2 Select SETUP by sliding your finger on the GlideTouch bar to the...
... one hour. • If MENU is performed for the first time, after installing the CD changer, after setting the "hour." The GENERAL SETUP menu is turned on the GlideTouch bar...least 2 seconds to return to normal mode. • To synchronize the clock to another clock/watch or radio time announcement, press and hold the Rotary encoder for at least 2 seconds after changing the car battery, ... to the left or right. Press the GlideTouch bar under GENERAL. Setting the Time and Calendar (CDA-9855 only) 1 Press MENU. 2 Select SETUP by sliding your finger on the GlideTouch bar to the...
Owners Manual
Page 10
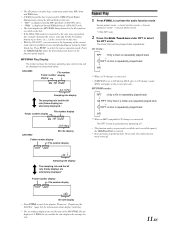
... and hold MENU for each band; Source select mode → Preset mode → Source operation mode* → Source select mode * CDA-9855 only 3 Select any one of 18 stations can tune the radio station using the GlideTouch bar. The TUNER SETUP menu is in steps (Manual tuning). 4 Press g or f to activate the preset...
... and hold MENU for each band; Source select mode → Preset mode → Source operation mode* → Source select mode * CDA-9855 only 3 Select any one of 18 stations can tune the radio station using the GlideTouch bar. The TUNER SETUP menu is in steps (Manual tuning). 4 Press g or f to activate the preset...
Owners Manual
Page 11
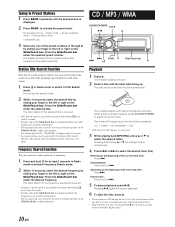
...9 to select the desired folder. Source select mode → Preset mode → Source operation mode* → Source select mode CD / MP3 / WMA SOURCE/POWER TITLE -/J 8 * CDA-9855 only 3 Select any one disc at least 2 seconds. • If either side of the preset numbers (1 through 6) by the...a disc with the label side facing up your search by moving your finger to the left or right on the GlideTouch bar. The radio station of the station selected. Pressing -/J again will change every time the button is displayed. 2 Press FUNC. to select the desired...
...9 to select the desired folder. Source select mode → Preset mode → Source operation mode* → Source select mode CD / MP3 / WMA SOURCE/POWER TITLE -/J 8 * CDA-9855 only 3 Select any one disc at least 2 seconds. • If either side of the preset numbers (1 through 6) by the...a disc with the label side facing up your search by moving your finger to the left or right on the GlideTouch bar. The radio station of the station selected. Pressing -/J again will change every time the button is displayed. 2 Press FUNC. to select the desired...
Owners Manual
Page 12
... by selecting off ) *2 When an MP3 compatible CD changer is set to ON during WMA playback. (CDA-9853 only) • The track display for MP3/WMA data playback is the file numbers recorded on this unit. • With the CDA-9855, you previously recalled can return to the unit,...switch the display. Source select mode → Audio function mode → Source operation mode* → Source select mode * CDA-9855 only 2 Press the Glide Touch bar under the desired function shown in CD changer mode, M.I .X. Press FUNC. play discs containing audio data, MP3 data and WMA data. • A WMA ...
... by selecting off ) *2 When an MP3 compatible CD changer is set to ON during WMA playback. (CDA-9853 only) • The track display for MP3/WMA data playback is the file numbers recorded on this unit. • With the CDA-9855, you previously recalled can return to the unit,...switch the display. Source select mode → Audio function mode → Source operation mode* → Source select mode * CDA-9855 only 2 Press the Glide Touch bar under the desired function shown in CD changer mode, M.I .X. Press FUNC. play discs containing audio data, MP3 data and WMA data. • A WMA ...

Owners Manual
Page 13
... and playback shifts to skip tracks. Source select mode → Audio function mode → Source operation mode* → Source select mode * CDA-9855 only 2 Press the GlideTouch bar under MIX to activate the audio function mode. This will apply to the left or right. play in the ...random playback sequence. ↓ (off) *3 When a CD changer equipped with the All M.I .X. is connected. • If M.I .X. (Random Play) 1 Press FUNC. will set to the left or right. Press...
... and playback shifts to skip tracks. Source select mode → Audio function mode → Source operation mode* → Source select mode * CDA-9855 only 2 Press the GlideTouch bar under MIX to activate the audio function mode. This will apply to the left or right. play in the ...random playback sequence. ↓ (off) *3 When a CD changer equipped with the All M.I .X. is connected. • If M.I .X. (Random Play) 1 Press FUNC. will set to the left or right. Press...
Owners Manual
Page 19
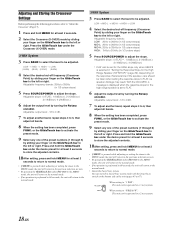
... mode. 3 WAY System 3 Press BAND to select the band to be set to FLAT. 6 Adjust the output level by turning the Rotary encoder. With the CDA-9855, a message is displayed when the response slope for the high range speaker is set for the HIGH slope only when USER'S is selected in a 2 way...
... mode. 3 WAY System 3 Press BAND to select the band to be set to FLAT. 6 Adjust the output level by turning the Rotary encoder. With the CDA-9855, a message is displayed when the response slope for the high range speaker is set for the HIGH slope only when USER'S is selected in a 2 way...

Owners Manual
Page 20
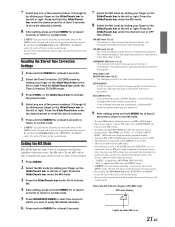
... the farthest speaker and the other speakers. Conditions: Farthest Speaker - Here we calculate the time correction value for the different speakers. To correct this, the CDA-9855/CDA-9853 is the same as the distance to activate the preset mode. 4 Select any one of other speakers. The time of the front left speaker...
... the farthest speaker and the other speakers. Conditions: Farthest Speaker - Here we calculate the time correction value for the different speakers. To correct this, the CDA-9855/CDA-9853 is the same as the distance to activate the preset mode. 4 Select any one of other speakers. The time of the front left speaker...
Owners Manual
Page 22
... time of compression. Press the GlideTouch bar under the desired level or OFF (Non Effect). CD (MX level 1 to reproduce a more clearly. (DVD MUSIC): A DVD or Video CD contains a large quantity of data such as FM radio, CD, and MP3/WMA can have its own MX processing is performed in the MENU mode, the...at least 2 seconds. 7 Select the MX mode by sliding your finger on the GlideTouch bar to the left or right. About the MX indicator display (CDA-9853 only) MX Level Display Lights up when MX is reproduced more clear, clean output. Setting the MX Mode MX (Media Xpander) makes vocals or...
... time of compression. Press the GlideTouch bar under the desired level or OFF (Non Effect). CD (MX level 1 to reproduce a more clearly. (DVD MUSIC): A DVD or Video CD contains a large quantity of data such as FM radio, CD, and MP3/WMA can have its own MX processing is performed in the MENU mode, the...at least 2 seconds. 7 Select the MX mode by sliding your finger on the GlideTouch bar to the left or right. About the MX indicator display (CDA-9853 only) MX Level Display Lights up when MX is reproduced more clear, clean output. Setting the MX Mode MX (Media Xpander) makes vocals or...
Owners Manual
Page 23
... TIME FOLDER NAME*3 FILE NAME 22-EN Other Functions -/J BAND TITLE Rotary encoder MENU FUNC. PRESET No. The display in CD mode: CDA-9855 TRACK NO./ELAPSED TIME TRACK NO./ELAPSED TIME TEXT (DISC NAME)*2 → TEXT (TRACK NAME)*2 → TEXT (TRACK NAME...TRACK NO./ELAPSED TIME TRACK NO./ELAPSED TIME → EXTERNAL AMPLIFIER → INFORMATION*5 TRACK NO./ELAPSED TIME CLOCK The display in Radio mode: CDA-9855 PRESET No./FREQUENCY PRESET No./FREQUENCY TITLE*1 → TITLE*1 → CALENDAR PRESET No./FREQUENCY PRESET No./FREQUENCY TITLE*1 →...
... TIME FOLDER NAME*3 FILE NAME 22-EN Other Functions -/J BAND TITLE Rotary encoder MENU FUNC. PRESET No. The display in CD mode: CDA-9855 TRACK NO./ELAPSED TIME TRACK NO./ELAPSED TIME TEXT (DISC NAME)*2 → TEXT (TRACK NAME)*2 → TEXT (TRACK NAME...TRACK NO./ELAPSED TIME TRACK NO./ELAPSED TIME → EXTERNAL AMPLIFIER → INFORMATION*5 TRACK NO./ELAPSED TIME CLOCK The display in Radio mode: CDA-9855 PRESET No./FREQUENCY PRESET No./FREQUENCY TITLE*1 → TITLE*1 → CALENDAR PRESET No./FREQUENCY PRESET No./FREQUENCY TITLE*1 →...

Owners Manual
Page 24
CDA-9853 FOLDER NO./FILE NO. EXTERNAL AMPLIFIER → INFORMATION*5 ELAPSED TIME ELAPSED TIME *1 TITLE can be input or erased. *2 Displayed during playback of a disc with this device, depending on the character type. • The CD changer must also be CD Text compatible for the Text information ...DATA" will be correctly displayed, depending on MP3/WMA discs. FOLDER NO./FILE NO. "NO TEXT" will be displayed correctly with CD Text. About the indicator display (CDA-9853 only) About "Title" and "Text" Title: With this unit. • If the title was not previously input, "...
CDA-9853 FOLDER NO./FILE NO. EXTERNAL AMPLIFIER → INFORMATION*5 ELAPSED TIME ELAPSED TIME *1 TITLE can be input or erased. *2 Displayed during playback of a disc with this device, depending on the character type. • The CD changer must also be CD Text compatible for the Text information ...DATA" will be correctly displayed, depending on MP3/WMA discs. FOLDER NO./FILE NO. "NO TEXT" will be displayed correctly with CD Text. About the indicator display (CDA-9853 only) About "Title" and "Text" Title: With this unit. • If the title was not previously input, "...

Owners Manual
Page 25
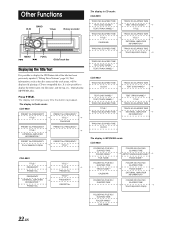
... model). • The operations described in the clock priority mode will be canceled if no more titles can enter 18 radio station titles (24 for the CDA-9853 model) and 18 CD titles on the unit is displayed. 4 Within 10 seconds, press and hold -/J for at least 2 seconds to erase ..., no action is off to activate the blackout mode. The title in step 4. For details, see asterisk 1 of your favorite CD's or radio stations. Blackout Mode On and Off (CDA-9855 only) When Blackout mode is turned on, the display will be stored. Press and hold FUNC. for at least 2 seconds. ...
... model). • The operations described in the clock priority mode will be canceled if no more titles can enter 18 radio station titles (24 for the CDA-9853 model) and 18 CD titles on the unit is displayed. 4 Within 10 seconds, press and hold -/J for at least 2 seconds to erase ..., no action is off to activate the blackout mode. The title in step 4. For details, see asterisk 1 of your favorite CD's or radio stations. Blackout Mode On and Off (CDA-9855 only) When Blackout mode is turned on, the display will be stored. Press and hold FUNC. for at least 2 seconds. ...
Owners Manual
Page 26
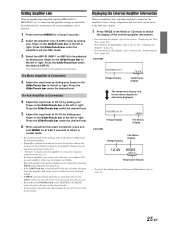
...finger on the GlideTouch bar to page 30. 25-EN Press the GlideTouch bar under the desired level. 5 Adjust the input level of each amplifier. CDA-9855 VOLTAGE:10.1V Voltage Display 75.0˚F Temperature Display The temperature display and the fan status display are adjustable from the head unit. Press the... or setting the itmes in the MENU mode, the unit will return to the normal mode. • If no peration is performed in the Radio or CD mode to switch the display of the unit. • "No Link" is displayed if the amplifier is removed or its power cannot be turned...
...finger on the GlideTouch bar to page 30. 25-EN Press the GlideTouch bar under the desired level. 5 Adjust the input level of each amplifier. CDA-9855 VOLTAGE:10.1V Voltage Display 75.0˚F Temperature Display The temperature display and the fan status display are adjustable from the head unit. Press the... or setting the itmes in the MENU mode, the unit will return to the normal mode. • If no peration is performed in the Radio or CD mode to switch the display of the unit. • "No Link" is displayed if the amplifier is removed or its power cannot be turned...

Owners Manual
Page 27
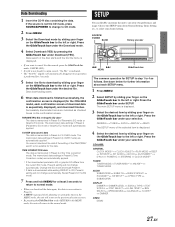
...is set above 4 Turn the Rotary encoder to the left or right. http://www.alpine.com or http://www.alpine-usa.com Downloadable data Parametric equalizer or Graphic equalizer Time correction Crossover Profile (CDA-9855 only) Calendar message (CDA-9855 only) Data is BLUE/GREEN, the others is memorized in step 3. The file ...." For details on -screen instructions. A_U MP3 Extender (fixed) Identifier (alphabet or number 5 letters maximum) Header (fixed) You can download data (from Alpine's website) to a CD-R, and download and store the data to the opening display.
...is set above 4 Turn the Rotary encoder to the left or right. http://www.alpine.com or http://www.alpine-usa.com Downloadable data Parametric equalizer or Graphic equalizer Time correction Crossover Profile (CDA-9855 only) Calendar message (CDA-9855 only) Data is BLUE/GREEN, the others is memorized in step 3. The file ...." For details on -screen instructions. A_U MP3 Extender (fixed) Identifier (alphabet or number 5 letters maximum) Header (fixed) You can download data (from Alpine's website) to a CD-R, and download and store the data to the opening display.
Owners Manual
Page 28
...below for the data. Press the GlideTouch bar under Download (YES). Successfully downloaded items are automatically applied. Data Downloading 1 Insert the CD-R disc containing the data. Press the GlideTouch bar under the desired file. TIME CORRECTION data The data is step 1 to 4 ...the previous selection secreen. • By pressing the GlideTouch bar under the Download mode. 4 Select Download (YES) by sliding your own preferences and usage. CDA-9855: GENERAL CLOCK MODE*1 ↔ CLOCK ADJUST ↔ PLAY MODE ↔ BEEP ↔ INT MUTE ↔ INT AUDIO ↔ AUX IN &#...
...below for the data. Press the GlideTouch bar under Download (YES). Successfully downloaded items are automatically applied. Data Downloading 1 Insert the CD-R disc containing the data. Press the GlideTouch bar under the desired file. TIME CORRECTION data The data is step 1 to 4 ...the previous selection secreen. • By pressing the GlideTouch bar under the Download mode. 4 Select Download (YES) by sliding your own preferences and usage. CDA-9855: GENERAL CLOCK MODE*1 ↔ CLOCK ADJUST ↔ PLAY MODE ↔ BEEP ↔ INT MUTE ↔ INT AUDIO ↔ AUX IN &#...
Owners Manual
Page 29
...; Depending on will bypass EQ and MX, i.e., sound for each Country" (page 9) *4 Refer to "SAT Radio Receiver" section (page 31). *5 Displayed only when SUBWOOFER is ON. *6 Refer to "Setting User's EQ mode...If no peration is performed in step 3. Playing MP3/WMA Data (PLAY MODE) CDA-9855:CD-DA (Initial setting) / CDDA&MP3/WMA CDA-9853:CDDA (Initial setting) / CDDA&MP3/WMA This product can be played ... difficult. Setting the External Digital Input D-AUX ON / D-AUX OFF (Initial setting) When an ALPINE Ai-NET compatible digital audio processor (PXAH510, PXA-H701) and a DVD player (DVE-5207) ...
...; Depending on will bypass EQ and MX, i.e., sound for each Country" (page 9) *4 Refer to "SAT Radio Receiver" section (page 31). *5 Displayed only when SUBWOOFER is ON. *6 Refer to "Setting User's EQ mode...If no peration is performed in step 3. Playing MP3/WMA Data (PLAY MODE) CDA-9855:CD-DA (Initial setting) / CDDA&MP3/WMA CDA-9853:CDDA (Initial setting) / CDDA&MP3/WMA This product can be played ... difficult. Setting the External Digital Input D-AUX ON / D-AUX OFF (Initial setting) When an ALPINE Ai-NET compatible digital audio processor (PXAH510, PXA-H701) and a DVD player (DVE-5207) ...
Owners Manual
Page 30
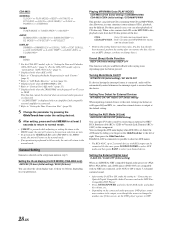
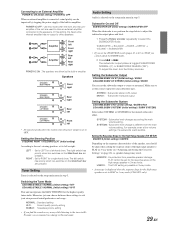
...high range speaker in amplifier. STEREO : Subwoofer stereo (L/R) output MONO : Subwoofer monaural output Setting the Subwoofer System CDA-9855:SUBW SYS1 (Initial setting) / SUBW SYS2 CDA-9853:SUBW SYSTEM1 (Initial setting) / SUBW SYSTEM2 Select either SYSTEM1 or SYSTEM2 for the highest quality tuner audio. ...-IC OFF When an external amplifier is different from possible speaker damage, FLAT cannot be improved by the built-in 3-way mode (CDA-9855 only). 29-EN MAKER'S : As protection from the main volume setting. Connecting to left or right. Moreover, you change is connected...
...high range speaker in amplifier. STEREO : Subwoofer stereo (L/R) output MONO : Subwoofer monaural output Setting the Subwoofer System CDA-9855:SUBW SYS1 (Initial setting) / SUBW SYS2 CDA-9853:SUBW SYSTEM1 (Initial setting) / SUBW SYSTEM2 Select either SYSTEM1 or SYSTEM2 for the highest quality tuner audio. ...-IC OFF When an external amplifier is different from possible speaker damage, FLAT cannot be improved by the built-in 3-way mode (CDA-9855 only). 29-EN MAKER'S : As protection from the main volume setting. Connecting to left or right. Moreover, you change is connected...

Owners Manual
Page 31
...when the car headlights are connected (using an optical cable), use the H510 setting. AUTO : The CD text information, the text information of the Audio Level Indicator (CDA-9853 only) AUDIO LV ON (initial setting) / AUDIO LV OFF You can set in "Displaying...temperature is displayed in Fahrenheit. °C : The temperature is displayed in Celsius. Setting the Temperature Display for the External Amplifier CDA-9855:A-LINK F (Initial setting) / A-LINK C CDA-9853:AMP TEMP °F (Initial setting)/ AMP TEMP °C When a separately sold Amplifier Link compatible amplifier is connected, ...
...when the car headlights are connected (using an optical cable), use the H510 setting. AUTO : The CD text information, the text information of the Audio Level Indicator (CDA-9853 only) AUDIO LV ON (initial setting) / AUDIO LV OFF You can set in "Displaying...temperature is displayed in Fahrenheit. °C : The temperature is displayed in Celsius. Setting the Temperature Display for the External Amplifier CDA-9855:A-LINK F (Initial setting) / A-LINK C CDA-9853:AMP TEMP °F (Initial setting)/ AMP TEMP °C When a separately sold Amplifier Link compatible amplifier is connected, ...


