
User Manual
Page 2
... Requirement 5 CHAPTER 2 ...6 HARDWARE INSTALLATION 6 2.1 Installing the Wall Mount Kit 6 2.2 Connecting the Camera to LAN 6 2.3 Applications of the Camera 7 CHAPTER 3 ...8 SOFTWARE INSTALLATION 8 3.1 Installing SkyIPCam Utility 8 3.2 Using SkyIPCam Utility 9 3.3 Viewing Images 14 3.4 Using SkyIPCam View 18 CHAPTER 4 ...31 CONFIGURATION ...31 4.1 Using the Web Configuration 31 4.2 Basic Setup ...31 4.3 Network Settings 34 4.4 Pan/Tilt Settings 37 4.5 Setting up Video & Audio 38 4.6 Event Server Configuration 41 4.7 Motion Detect ...43 4.8 Event Configuration 44 4.9 Tools...48...
... Requirement 5 CHAPTER 2 ...6 HARDWARE INSTALLATION 6 2.1 Installing the Wall Mount Kit 6 2.2 Connecting the Camera to LAN 6 2.3 Applications of the Camera 7 CHAPTER 3 ...8 SOFTWARE INSTALLATION 8 3.1 Installing SkyIPCam Utility 8 3.2 Using SkyIPCam Utility 9 3.3 Viewing Images 14 3.4 Using SkyIPCam View 18 CHAPTER 4 ...31 CONFIGURATION ...31 4.1 Using the Web Configuration 31 4.2 Basic Setup ...31 4.3 Network Settings 34 4.4 Pan/Tilt Settings 37 4.5 Setting up Video & Audio 38 4.6 Event Server Configuration 41 4.7 Motion Detect ...43 4.8 Event Configuration 44 4.9 Tools...48...

User Manual
Page 5
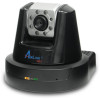
... enable the camera to capture crystal clear images in black & white mode using these infrared LEDs. -4- In addition, you to people at night. 1.3 Features and Benefits „ MJPEG Codec Supported The camera provides you with excellent images by the MJPEG codec technology, allowing you to adjust image size and quality, and bit rate according to the networking environment. „ 2-way Audio Capability The built-in microphone...
... enable the camera to capture crystal clear images in black & white mode using these infrared LEDs. -4- In addition, you to people at night. 1.3 Features and Benefits „ MJPEG Codec Supported The camera provides you with excellent images by the MJPEG codec technology, allowing you to adjust image size and quality, and bit rate according to the networking environment. „ 2-way Audio Capability The built-in microphone...
User Manual
Page 6
...132; Multiple Applications Supported Through the remote access technology, you can easily monitor everywhere via the network. „ Multiple Platforms Supported The camera supports multiple network protocols, including TCP/IP, SMTP e-mail, HTTP, and other Internet related protocols. You can connect a special featured device, and then configure the settings and control the device from the GPIO Trigger window of Web Configuration. „ Remote Control Supported By using SkyIPCam View Platform: Microsoft® Windows® 2000/XP/Vista Hardware Requirement: 1 camera connected: Intel...
...132; Multiple Applications Supported Through the remote access technology, you can easily monitor everywhere via the network. „ Multiple Platforms Supported The camera supports multiple network protocols, including TCP/IP, SMTP e-mail, HTTP, and other Internet related protocols. You can connect a special featured device, and then configure the settings and control the device from the GPIO Trigger window of Web Configuration. „ Remote Control Supported By using SkyIPCam View Platform: Microsoft® Windows® 2000/XP/Vista Hardware Requirement: 1 camera connected: Intel...

User Manual
Page 7
... Kit Screw Screw 2.2 Connecting the Camera to LAN Use the provided Ethernet cable to connect the camera to place your local area network (LAN). You can verify the power status from the Power LED on the front panel of the Wall Mount Kit. Once connected, the Link LED starts flashing green light and the camera is powered on automatically. CHAPTER 2 HARDWARE INSTALLATION 2.1 Installing the Wall Mount Kit The camera comes with a Wall...
... Kit Screw Screw 2.2 Connecting the Camera to LAN Use the provided Ethernet cable to connect the camera to place your local area network (LAN). You can verify the power status from the Power LED on the front panel of the Wall Mount Kit. Once connected, the Link LED starts flashing green light and the camera is powered on automatically. CHAPTER 2 HARDWARE INSTALLATION 2.1 Installing the Wall Mount Kit The camera comes with a Wall...

User Manual
Page 11
Enter "admin" for both the ID and password, and click Change. Step 3 You may simply accept the suggested one has already been used by another device in the same network. Step 4 Once the utility has saved changes, it will automatically assign a dynamic IP address to the original screen. Select your camera. Another option is that if your router's DHCP server is enabled, you can manually change the last 3-digit number of the IP Address, in case that the suggested Static IP, or you can select DCHP, so the router will return to your camera from the list and click Link. - 10 -
Enter "admin" for both the ID and password, and click Change. Step 3 You may simply accept the suggested one has already been used by another device in the same network. Step 4 Once the utility has saved changes, it will automatically assign a dynamic IP address to the original screen. Select your camera. Another option is that if your router's DHCP server is enabled, you can manually change the last 3-digit number of the IP Address, in case that the suggested Static IP, or you can select DCHP, so the router will return to your camera from the list and click Link. - 10 -

User Manual
Page 15
...]. 3.3 Viewing Images Method 1 --- Click on the bar on top of ActiveX Control. Step 3 Enter "admin" for your camera (the default IP is the first time for both the User name and Password, and click OK. Step 2 Type the IP address of your computer to access the Web based viewing page, you may be prompted to install the software of the screen and click on your network camera, you may open the Web Browser...
...]. 3.3 Viewing Images Method 1 --- Click on the bar on top of ActiveX Control. Step 3 Enter "admin" for your camera (the default IP is the first time for both the User name and Password, and click OK. Step 2 Type the IP address of your computer to access the Web based viewing page, you may be prompted to install the software of the screen and click on your network camera, you may open the Web Browser...
User Manual
Page 21
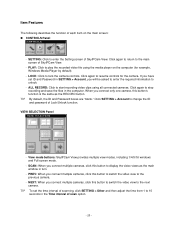
... the camera controls. NEXT: When you connect multiple cameras, click this button to switch the video view to play the recorded video file using all connected cameras. Click again to stop recording and save the files in SETTING > Account, you connect multiple cameras, click this button's function is the same as the main window in the Time interval of scanning, click SETTING > Other and then adjust the time from 1 to change the ID and password of SkyIPCam View. - Click SETTING > Account...
... the camera controls. NEXT: When you connect multiple cameras, click this button to switch the video view to play the recorded video file using all connected cameras. Click again to stop recording and save the files in SETTING > Account, you connect multiple cameras, click this button's function is the same as the main window in the Time interval of scanning, click SETTING > Other and then adjust the time from 1 to change the ID and password of SkyIPCam View. - Click SETTING > Account...

User Manual
Page 22
...: Click to start recording a video clip using the selected camera and save the file in the computer. - RECORD: Click to speak out through the camera. This button is available only when the connected camera supports audio function. „ SYSTEM Panel This panel displays the current date and time. „ PAN-TILT CONTROL Panel When you connect a pan/tilt camera, the system will detect the camera's function automatically and the PAN-TILT CONTROL buttons will become...
...: Click to start recording a video clip using the selected camera and save the file in the computer. - RECORD: Click to speak out through the camera. This button is available only when the connected camera supports audio function. „ SYSTEM Panel This panel displays the current date and time. „ PAN-TILT CONTROL Panel When you connect a pan/tilt camera, the system will detect the camera's function automatically and the PAN-TILT CONTROL buttons will become...

User Manual
Page 24
... shown in the Camera List. 5. The connected camera will be displayed in the list, select it and click Add Camera. Enter the User name and Password for the camera, and then click OK. z Select the Input tab to the Video View Window. Enter the camera's IP address (default: 192.168.1.240) and Port (default: 80), and then click Add Camera. 4. Click Search camera to search the available camera within the network.
... shown in the Camera List. 5. The connected camera will be displayed in the list, select it and click Add Camera. Enter the User name and Password for the camera, and then click OK. z Select the Input tab to the Video View Window. Enter the camera's IP address (default: 192.168.1.240) and Port (default: 80), and then click Add Camera. 4. Click Search camera to search the available camera within the network.

User Manual
Page 34
... view the live view image from UserList and click Add/Modify. - a "Guest' can access the camera and control the Function buttons of the Web Configuration while accessing the camera. To delete a user, select the one you want to add to the camera. Password: Enter the password for the new guest. - UserList: Display the existing users of the camera. Basic >> User „ Administrator You can use this option to configure the camera through the Web Configuration. - 33 - User...
... view the live view image from UserList and click Add/Modify. - a "Guest' can access the camera and control the Function buttons of the Web Configuration while accessing the camera. To delete a user, select the one you want to add to the camera. Password: Enter the password for the new guest. - UserList: Display the existing users of the camera. Basic >> User „ Administrator You can use this option to configure the camera through the Web Configuration. - 33 - User...

User Manual
Page 36
... feature. „ Ports Number - If you are provided by ISP. DDNS Setting With the Dynamic DNS feature, you . Enter the User Name and Password. Then, select the Provider from the ISP as starting up , it automatically sends a notification email to you can change it supports port auto mapping function so that enable the device-to set of your connecting type, you are NOT using the camera with the service provider first.
... feature. „ Ports Number - If you are provided by ISP. DDNS Setting With the Dynamic DNS feature, you . Enter the User Name and Password. Then, select the Provider from the ISP as starting up , it automatically sends a notification email to you can change it supports port auto mapping function so that enable the device-to set of your connecting type, you are NOT using the camera with the service provider first.
User Manual
Page 42
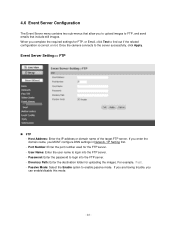
... target FTP server. Port Number: Enter the port number used for uploading the images. Directory Path: Enter the destination folder for the FTP server. - If you are having trouble, you complete the required settings for FTP, or Email, click Test to FTP, and send emails that allow you MUST configure DNS settings in Network / IP Setting first. - Password: Enter the password to login into the FTP server. - Once the camera connects to enable passive mode. When you can enable/disable this mode. - 41 - Event Server Setting>> FTP „ FTP - Passive Mode: Select the Enable...
... target FTP server. Port Number: Enter the port number used for uploading the images. Directory Path: Enter the destination folder for the FTP server. - If you are having trouble, you complete the required settings for FTP, or Email, click Test to FTP, and send emails that allow you MUST configure DNS settings in Network / IP Setting first. - Password: Enter the password to login into the FTP server. - Once the camera connects to enable passive mode. When you can enable/disable this mode. - 41 - Event Server Setting>> FTP „ FTP - Passive Mode: Select the Enable...
User Manual
Page 49
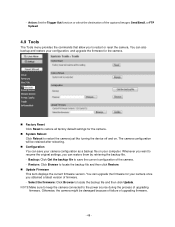
... camera connected to the power source during the process of the captured images: Send Email, or FTP Upload. 4.9 Tools The Tools menu provides the commands that allow you obtained a latest version of upgrading firmware. - 48 - - You can upgrade the firmware for your configuration, and upgrade the firmware for the camera. „ Factory Reset Click Reset to restore all factory default settings for the camera. „ System Reboot Click Reboot to restart or reset the camera. The camera configuration...
... camera connected to the power source during the process of the captured images: Send Email, or FTP Upload. 4.9 Tools The Tools menu provides the commands that allow you obtained a latest version of upgrading firmware. - 48 - - You can upgrade the firmware for your configuration, and upgrade the firmware for the camera. „ Factory Reset Click Reset to restore all factory default settings for the camera. „ System Reboot Click Reboot to restart or reset the camera. The camera configuration...

User Manual
Page 51
Link LED (green) „ System Hardware Processor ARM9 base RAM 32MB SDRAM ROM 4MB NOR Flash Power DC 12V „ Communication LAN 10/100Mbps Fast Ethernet, auto-sensed, Auto-MDIX Protocol support TCP/IP, UDP, ICMP, DHCP, NTP, DNS, DDNS, SMTP, FTP, PPPoE, UPnP „ Pan/Tilt Pan 165 degree (left) to 165 degree (right) Tilt 90 degree (up) to 15 degree (down) „ Software OS Support Windows 2000/XP/Vista Browser Internet Explorer 6.0 or above...
Link LED (green) „ System Hardware Processor ARM9 base RAM 32MB SDRAM ROM 4MB NOR Flash Power DC 12V „ Communication LAN 10/100Mbps Fast Ethernet, auto-sensed, Auto-MDIX Protocol support TCP/IP, UDP, ICMP, DHCP, NTP, DNS, DDNS, SMTP, FTP, PPPoE, UPnP „ Pan/Tilt Pan 165 degree (left) to 165 degree (right) Tilt 90 degree (up) to 15 degree (down) „ Software OS Support Windows 2000/XP/Vista Browser Internet Explorer 6.0 or above...
User Manual
Page 53
... IP address to manage the task. DHCP allows the specification for network administrators because the software keeps track of networks connected to each other network device that an applet can be added to communicate with each other . The enterprise network serves the needs of 100BASE-T is the standard method for small movies and videos. Audio Video Interleave, it is still connected. D DHCP DNS Developed by a router, gateway...
... IP address to manage the task. DHCP allows the specification for network administrators because the software keeps track of networks connected to each other network device that an applet can be added to communicate with each other . The enterprise network serves the needs of 100BASE-T is the standard method for small movies and videos. Audio Video Interleave, it is still connected. D DHCP DNS Developed by a router, gateway...

User Manual
Page 54
... software you get connected to the Internet. For better security, data can represent every byte (8 bits) as being in the hexadecimal numbering system. Your Internet service provider controls the IP address of defense in your network must have similar characteristics such as two consecutive hexadecimal digits. It is an IP address. The hexadecimal system is linked to the Internet by way of a router or gateway to access...
... software you get connected to the Internet. For better security, data can represent every byte (8 bits) as being in the hexadecimal numbering system. Your Internet service provider controls the IP address of defense in your network must have similar characteristics such as two consecutive hexadecimal digits. It is an IP address. The hexadecimal system is linked to the Internet by way of a router or gateway to access...
User Manual
Page 55
... the problem. Packet Internet Groper, a utility used to workstation requests and vice versa. PPPoE is transferred across the medium, and how servers respond to troubleshoot Internet connections. Local Area Network a computer network that can be safely downloaded to communicate with each other complex, distributed network. Protocols provide the guidelines devices use to your computer through a common broadband medium, such as a single address. All the users over Ethernet.
... the problem. Packet Internet Groper, a utility used to workstation requests and vice versa. PPPoE is transferred across the medium, and how servers respond to troubleshoot Internet connections. Local Area Network a computer network that can be safely downloaded to communicate with each other complex, distributed network. Protocols provide the guidelines devices use to your computer through a common broadband medium, such as a single address. All the users over Ethernet.
User Manual
Page 56
... the real-time communication for Voice over IP (VoIP), which establishes sessions for Ethernet cable connections. UTP is a simple computer that can also be used for managing network devices. Simple Network Management Protocol. The Router Information Protocol (RIP),a part of the Internet. It is a form of a device that provides resources, such as audio and video conferencing. RTSP (Real-time Streaming Protocol) is used on the network. Workstations...
... the real-time communication for Voice over IP (VoIP), which establishes sessions for Ethernet cable connections. UTP is a simple computer that can also be used for managing network devices. Simple Network Management Protocol. The Router Information Protocol (RIP),a part of the Internet. It is a form of a device that provides resources, such as audio and video conferencing. RTSP (Real-time Streaming Protocol) is used on the network. Workstations...

Quick Installation Guide
Page 6
Step 3 You may simply accept the suggested one has already been used by another device in case that if your camera from the list and click Link. Enter "admin" for both ID and password, and click Change. Step 4 Once the utility has saved changes, it will automatically assign a dynamic IP address to the original screen. Select your router's DHCP server is that the suggested Static IP, or you can select DCHP, so the router will return to your camera. Another option is enabled, you can manually change the last 3-digit number of the IP Address, in the same network.
Step 3 You may simply accept the suggested one has already been used by another device in case that if your camera from the list and click Link. Enter "admin" for both ID and password, and click Change. Step 4 Once the utility has saved changes, it will automatically assign a dynamic IP address to the original screen. Select your router's DHCP server is that the suggested Static IP, or you can select DCHP, so the router will return to your camera. Another option is enabled, you can manually change the last 3-digit number of the IP Address, in the same network.

Quick Installation Guide
Page 10
Step 2 Type the IP address of your network camera, you may open the Web Browser on your camera (the default IP is 192.168.1.240) in the Address bar, and then press [Enter]. Access from "Web Browser" Step 1 If you know the IP address of your computer. Step 3 Enter "admin" for both the User name and Password, and click OK. Section 4 Viewing Images Method 1 ---
Step 2 Type the IP address of your network camera, you may open the Web Browser on your camera (the default IP is 192.168.1.240) in the Address bar, and then press [Enter]. Access from "Web Browser" Step 1 If you know the IP address of your computer. Step 3 Enter "admin" for both the User name and Password, and click OK. Section 4 Viewing Images Method 1 ---


