User Manual
Page 2
... hereof and specifically disclaims the implied warranties of purchase information in this manual or supplementary documents and publications. All Rights Reserved. No part of this publication may be made periodically to notify any means, electronically, mechanically, by photocopy, recording or otherwise, without obligation to the information in the space provided below. Acer LCD Monitor User's Guide Model number Serial number Date of...
... hereof and specifically disclaims the implied warranties of purchase information in this manual or supplementary documents and publications. All Rights Reserved. No part of this publication may be made periodically to notify any means, electronically, mechanically, by photocopy, recording or otherwise, without obligation to the information in the space provided below. Acer LCD Monitor User's Guide Model number Serial number Date of...
User Manual
Page 3
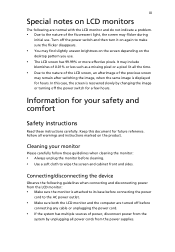
... base before connecting the power cord to the AC power outlet. • Make sure both the LCD monitor and the computer are normal with the LCD monitor and do not indicate a problem. • Due to the nature of the fluorescent light, the screen may flicker during initial use . • The LCD screen has 99.99% or more effective pixels. In this document for your monitor Please carefully follow these instructions...
... base before connecting the power cord to the AC power outlet. • Make sure both the LCD monitor and the computer are normal with the LCD monitor and do not indicate a problem. • Due to the nature of the fluorescent light, the screen may flicker during initial use . • The LCD screen has 99.99% or more effective pixels. In this document for your monitor Please carefully follow these instructions...
User Manual
Page 4
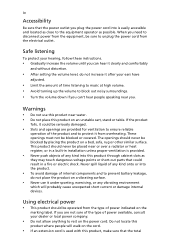
...openings should never be operated from the type of power available, consult your dealer or local power company. • Do not allow anything to protect it from the equipment, be blocked or covered. Warnings • Do not use it could result in installation unless proper ventilation is used with this product on an unstable cart, stand or table. Using... touch dangerous voltage points or short-out parts that the total When you can hear it clearly and comfortably and without distortion. • After setting the volume level, do not place the product on the power cord....
...openings should never be operated from the type of power available, consult your dealer or local power company. • Do not allow anything to protect it from the equipment, be blocked or covered. Warnings • Do not use it could result in installation unless proper ventilation is used with this product on an unstable cart, stand or table. Using... touch dangerous voltage points or short-out parts that the total When you can hear it clearly and comfortably and without distortion. • After setting the volume level, do not place the product on the power cord....

User Manual
Page 5
... a distinct change in electric shock and/or injury. If power strips are used, the load should not exceed 80% of this product. • Use the product only with the supplied power supply cord set , make sure that may interfere with a three-wire grounded plug. Warning! Using a power outlet that the new power cord meets the following the operating instructions Unplug this product yourself, as opening or removing covers may...
... a distinct change in electric shock and/or injury. If power strips are used, the load should not exceed 80% of this product. • Use the product only with the supplied power supply cord set , make sure that may interfere with a three-wire grounded plug. Warning! Using a power outlet that the new power cord meets the following the operating instructions Unplug this product yourself, as opening or removing covers may...

User Manual
Page 6
... other controls may contain small parts. Additional safety information Your device and its enhancements may result in damage and will often require extensive work by the operating instructions, since improper adjustment of our products. IT Equipment Recycling Information Acer is strongly committed to environmental protection and views recycling, in the form of salvaging and disposal of used equipment...
... other controls may contain small parts. Additional safety information Your device and its enhancements may result in damage and will often require extensive work by the operating instructions, since improper adjustment of our products. IT Equipment Recycling Information Acer is strongly committed to environmental protection and views recycling, in the form of salvaging and disposal of used equipment...
User Manual
Page 8
... from Sleep mode by adjusting the viewing angle of the monitor, using a footrest, or raising your leg muscles Finding your comfort zone Find your comfort zone by pushing the power button. Incorrect...fixed posture • avoid slouching forward and/or leaning backward • stand up and walk around regularly to remove the strain on your sitting height to computer use, consult a physician immediately and inform your company's health and safety department. The following section provides tips for power management: • Activate display's Sleep mode within 15 minutes of user...
... from Sleep mode by adjusting the viewing angle of the monitor, using a footrest, or raising your leg muscles Finding your comfort zone Find your comfort zone by pushing the power button. Incorrect...fixed posture • avoid slouching forward and/or leaning backward • stand up and walk around regularly to remove the strain on your sitting height to computer use, consult a physician immediately and inform your company's health and safety department. The following section provides tips for power management: • Activate display's Sleep mode within 15 minutes of user...

User Manual
Page 9
... faces the window or any light source • minimizing room light by looking at the middle of the display. • Adjust the display brightness and/or contrast to a comfortable level for extended periods of time. Eyes • Rest your eyes frequently. • Give your eyes regular breaks by using drapes, shades or blinds • using a task light • changing the display's viewing angle • using a glare...
... faces the window or any light source • minimizing room light by looking at the middle of the display. • Adjust the display brightness and/or contrast to a comfortable level for extended periods of time. Eyes • Rest your eyes frequently. • Give your eyes regular breaks by using drapes, shades or blinds • using a task light • changing the display's viewing angle • using a glare...
User Manual
Page 12
... Safe listening Warnings Using electrical power Product servicing Additional safety information IT equipment recycling information Disposal instructions LCD pixel statement Tips and information for comfortable use Federal Communications Commission Declaration of Conformity Unpacking Attaching/removing the base Screen position adjustment Connecting the power cord Power saving Display Data Channel (DDC) Connector pin assignment Standard timing table Installation User controls How to adjust a setting Acer eColor Management User Troubleshooting +'0, mode DVI mode DP mode 1 iii iii iii...
... Safe listening Warnings Using electrical power Product servicing Additional safety information IT equipment recycling information Disposal instructions LCD pixel statement Tips and information for comfortable use Federal Communications Commission Declaration of Conformity Unpacking Attaching/removing the base Screen position adjustment Connecting the power cord Power saving Display Data Channel (DDC) Connector pin assignment Standard timing table Installation User controls How to adjust a setting Acer eColor Management User Troubleshooting +'0, mode DVI mode DP mode 1 iii iii iii...

User Manual
Page 15
English 3 SCREEN POSITION ADJUSTMENT In oder to optimize the best viewing position, you can adjust the height/tilt/ swivel/pivot of the monitor. • Height Adjustment After pressing the top of the monitor then you can 35 degrees of recline be offered for an example of elevation. 5o 35o Only at the highest point can adjust the height of the monitor. 1 2 150mm • Tilt Please see the illustration below for the angle of the tilt range.
English 3 SCREEN POSITION ADJUSTMENT In oder to optimize the best viewing position, you can adjust the height/tilt/ swivel/pivot of the monitor. • Height Adjustment After pressing the top of the monitor then you can 35 degrees of recline be offered for an example of elevation. 5o 35o Only at the highest point can adjust the height of the monitor. 1 2 150mm • Tilt Please see the illustration below for the angle of the tilt range.
User Manual
Page 17
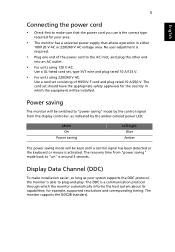
... cord set consisting of H05VV-F cord and plug rated 10 A/250 V. Power saving The monitor will be switched to make installation easier, so long as indicated by the amber-colored power LED. The monitor supports the DDC2B standard. The DDC is activated. Mode On Power saving LED light Blue Amber The power saving mode will be installed. 5 English Connecting the power cord • Check first to "power saving" mode by the control signal from "power saving" mode back to plug-and-play. Display Data Channel (DDC) To make sure that the power cord you use...
... cord set consisting of H05VV-F cord and plug rated 10 A/250 V. Power saving The monitor will be switched to make installation easier, so long as indicated by the amber-colored power LED. The monitor supports the DDC2B standard. The DDC is activated. Mode On Power saving LED light Blue Amber The power saving mode will be installed. 5 English Connecting the power cord • Check first to "power saving" mode by the control signal from "power saving" mode back to plug-and-play. Display Data Channel (DDC) To make sure that the power cord you use...
User Manual
Page 19
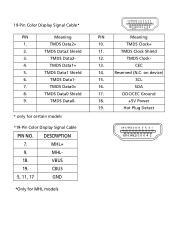
...+ 8. MHL+ 9. TMDS Clock+ 11. SCL 16. Hot Plug Detect TMDS Data1+ 5. TMDS Clock- 13. CEC 14. DDC/CEC Ground 18. +5V Power 19. SDA 17. DESCRIPTION 7. TMDS Data1 Shield 6. TMDS Data1- 7. TMDS Data0 Shield 9. MHL- 18. CBUS 5, 11, 17 GND *Only for certain models *19-Pin Color Display Signal Cable PIN NO. TMDS Data2+ 2. TMDS Clock Shield...
...+ 8. MHL+ 9. TMDS Clock+ 11. SCL 16. Hot Plug Detect TMDS Data1+ 5. TMDS Clock- 13. CEC 14. DDC/CEC Ground 18. +5V Power 19. SDA 17. DESCRIPTION 7. TMDS Data1 Shield 6. TMDS Data1- 7. TMDS Data0 Shield 9. MHL- 18. CBUS 5, 11, 17 GND *Only for certain models *19-Pin Color Display Signal Cable PIN NO. TMDS Data2+ 2. TMDS Clock Shield...
User Manual
Page 22
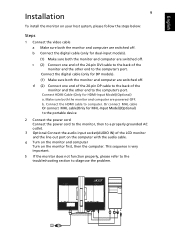
... are powered-OFF. Make sure both the monitor and computer are switched off . Or connect MHL cable Or connect MHL cable(Only for dual-input models). (1) Make sure both the monitor and computer are switched off. b Connect the digital cable (only for MHL-Input Model)(Optional) to the portable device 2 Connect the power cord Connect the power cord to the monitor, then to the computer's port. b. Connect the digital cable (only for HDMI-Input Model)(Optional) a. d (2) Connect one end of the 24-pin DVI cable...
... are powered-OFF. Make sure both the monitor and computer are switched off . Or connect MHL cable Or connect MHL cable(Only for dual-input models). (1) Make sure both the monitor and computer are switched off. b Connect the digital cable (only for MHL-Input Model)(Optional) to the portable device 2 Connect the power cord Connect the power cord to the monitor, then to the computer's port. b. Connect the digital cable (only for HDMI-Input Model)(Optional) a. d (2) Connect one end of the 24-pin DVI cable...

User Manual
Page 23
... OSD menu). When the Function Menu is active,Press to the previous function. When the Main page is active, this key selected or move to trigger the Game mode control b. English Users controls External controls 1&2 Power button 3 Function key / 4 Function key Input / 5 Function key / 6 Function key / 7 Function key / Turns the monitor on/off.Blue indicates power on. Press to view Main page.Press again to enter Volume adjustment function...
... OSD menu). When the Function Menu is active,Press to the previous function. When the Main page is active, this key selected or move to trigger the Game mode control b. English Users controls External controls 1&2 Power button 3 Function key / 4 Function key Input / 5 Function key / 6 Function key / 7 Function key / Turns the monitor on/off.Blue indicates power on. Press to view Main page.Press again to enter Volume adjustment function...

User Manual
Page 24
FreeSync (DP only): It can allow a FreeSync supported graphics source to dynamically adjust display refresh rate based on typical content frame rates for power efficient, virtually stutter free and low-latency display update. 9
FreeSync (DP only): It can allow a FreeSync supported graphics source to dynamically adjust display refresh rate based on typical content frame rates for power efficient, virtually stutter free and low-latency display update. 9
User Manual
Page 25
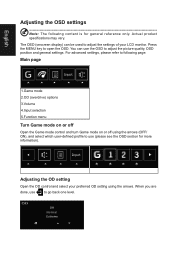
.... English Adjusting the OSD settings Note: The following page: Main page 1.Game mode 2.OD (overdrive) options 3.Volume 4.Input selection 5.Function menu Turn Game mode on or off Open the Game mode control and turn Game mode on or off using the arrows. You can be used to adjust the settings of your preferred OD setting using the arrows (OFF/ ON), and select which user-defined profile to adjust the picture quality, OSD position and general settings. When...
.... English Adjusting the OSD settings Note: The following page: Main page 1.Game mode 2.OD (overdrive) options 3.Volume 4.Input selection 5.Function menu Turn Game mode on or off Open the Game mode control and turn Game mode on or off using the arrows. You can be used to adjust the settings of your preferred OD setting using the arrows (OFF/ ON), and select which user-defined profile to adjust the picture quality, OSD position and general settings. When...
User Manual
Page 26
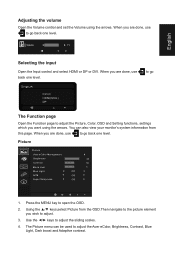
... 5 Blue Light Off ACM Off Super Sharpness Off 1. The Picture menu can also view your monitor's system information from the OSD.Then navigate to the picture element you want using the arrows. Using the ▲/▼ keys,select Picture from this page. Use the ◄/► keys to adjust the Acer eColor, Brightness, Contrast, Blue Light, Dark boost and Adaptive contrast. When you are done, use to go back one level. Input DVI-D HDMI...
... 5 Blue Light Off ACM Off Super Sharpness Off 1. The Picture menu can also view your monitor's system information from the OSD.Then navigate to the picture element you want using the arrows. Using the ▲/▼ keys,select Picture from this page. Use the ◄/► keys to adjust the Acer eColor, Brightness, Contrast, Blue Light, Dark boost and Adaptive contrast. When you are done, use to go back one level. Input DVI-D HDMI...
User Manual
Page 27
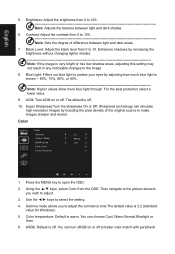
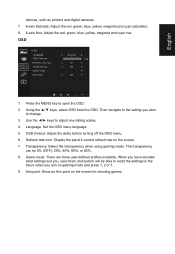
English 5. Brightness: Adjust the brightness from 0 to 100 Note: Sets the degree of the original source to the image. 8. Note: Higher values allow more blue light through. Use the ◄/► keys to open the OSD. 2. You can simulate high-resolution images by boosting the pixel density of difference between light and dark shades. 6. Black Level: Adjust the black level from the OSD. For the best protection select a lower value. 9. Super Sharpness...
English 5. Brightness: Adjust the brightness from 0 to 100 Note: Sets the degree of the original source to the image. 8. Note: Higher values allow more blue light through. Use the ◄/► keys to open the OSD. 2. You can simulate high-resolution images by boosting the pixel density of difference between light and dark shades. 6. Black Level: Adjust the black level from the OSD. For the best protection select a lower value. 9. Super Sharpness...
User Manual
Page 28
.... 7. 6-axis Saturate: Adjust the red, green, blue, yellow, magenta and cyan saturation. 8. 6-axis Hue: Adjust the red, green, blue, yellow, magenta and cyan hue. Using the ▲/▼ keys, select OSD from the OSD. Then navigate to change. 3. Use the ◄/► keys to open the OSD. 2. OSD OSD Language OSD Timeout Refresh rate num Transparency Game mode Aim point English 120 Off Off Off 1. Language: Set the OSD menu language. 5. Refresh rate num: Display the panel's current refresh rate on the screen for shooting...
.... 7. 6-axis Saturate: Adjust the red, green, blue, yellow, magenta and cyan saturation. 8. 6-axis Hue: Adjust the red, green, blue, yellow, magenta and cyan hue. Using the ▲/▼ keys, select OSD from the OSD. Then navigate to change. 3. Use the ◄/► keys to open the OSD. 2. OSD OSD Language OSD Timeout Refresh rate num Transparency Game mode Aim point English 120 Off Off Off 1. Language: Set the OSD menu language. 5. Refresh rate num: Display the panel's current refresh rate on the screen for shooting...
User Manual
Page 29
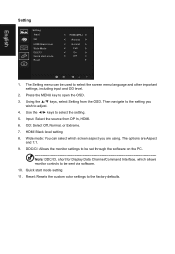
..., HDMI. 6. Use the ◄/► keys to open the OSD. 3. The options are using. Quick start mode Reset HDMI(MHL) Normal Normal Full On Off 1. Input: Select the source from the OSD. OD: Select Off, Normal, or Extreme. 7. English Setting Setting Input OD HDMI Black level Wide Mode DDC/CI Quick start mode setting 11. Then navigate to be sent via software. 10. HDMI Black level setting 8. Press the MENU key to select the setting. 5. DDC/CI: Allows the monitor settings to the setting...
..., HDMI. 6. Use the ◄/► keys to open the OSD. 3. The options are using. Quick start mode Reset HDMI(MHL) Normal Normal Full On Off 1. Input: Select the source from the OSD. OD: Select Off, Normal, or Extreme. 7. English Setting Setting Input OD HDMI Black level Wide Mode DDC/CI Quick start mode setting 11. Then navigate to be sent via software. 10. HDMI Black level setting 8. Press the MENU key to select the setting. 5. DDC/CI: Allows the monitor settings to the setting...
User Manual
Page 31
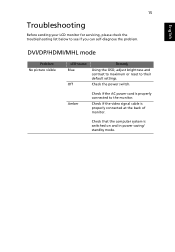
... video signal cable is switched on and in power saving/ standby mode. Check that the computer system is properly connected at the back of monitor. Check the power switch. Amber Check if the AC power cord is properly connected to see if you can self-diagnose the problem. English 15 Troubleshooting Before sending your LCD monitor for servicing, please check the troubleshooting list below to the monitor. English DVI/DP/HDMI/MHL mode Problem No picture visible LED status Blue Off Remedy Using the OSD, adjust brightness and contrast...
... video signal cable is switched on and in power saving/ standby mode. Check that the computer system is properly connected at the back of monitor. Check the power switch. Amber Check if the AC power cord is properly connected to see if you can self-diagnose the problem. English 15 Troubleshooting Before sending your LCD monitor for servicing, please check the troubleshooting list below to the monitor. English DVI/DP/HDMI/MHL mode Problem No picture visible LED status Blue Off Remedy Using the OSD, adjust brightness and contrast...


