User Manual
Page 4
... of time listening to music at high volume. • Avoid turning up the volume to protect it clearly and comfortably and without distortion. • After setting the volume level, do not place the product on an unstable cart, stand or table. If the product falls, it after your ears have adjusted...
... of time listening to music at high volume. • Avoid turning up the volume to protect it clearly and comfortably and without distortion. • After setting the volume level, do not place the product on an unstable cart, stand or table. If the product falls, it after your ears have adjusted...
User Manual
Page 5
... in too many devices. If power strips are used, the load should not exceed 80% of all servicing to replace the power cord set . Contact your electrician for service • the product does not operate normally after following requirements: detachable type, UL listed/CSA certified, type...outlet and refer servicing to qualified service personnel when: • the power cord or plug is equipped with the supplied power supply cord set , make sure that may result in performance, indicating a need to qualified service personnel. Unplug this product yourself, as opening or ...
... in too many devices. If power strips are used, the load should not exceed 80% of all servicing to replace the power cord set . Contact your electrician for service • the product does not operate normally after following requirements: detachable type, UL listed/CSA certified, type...outlet and refer servicing to qualified service personnel when: • the power cord or plug is equipped with the supplied power supply cord set , make sure that may result in performance, indicating a need to qualified service personnel. Unplug this product yourself, as opening or ...

User Manual
Page 10
... City 221, Taiwan Declaration of ecodesign requirements for the setting of Conformity We, Acer Incorporated 8F, 88, Sec. 1, Xintai 5th Rd., Xizhi, New Taipei City 221, Taiwan Contact Person: Mr. RU Jan, e-mail:ru.jan@acer.com And, Acer Italy s.r.l Via Lepetit, 40, 20020 Lainate (MI)... Italy Tel: +39-02-939-921 ,Fax: +39-02 9399-2913 www.acer.it Declare under our own responsibility that the product: Product: LCD Monitor Trade Name: Acer Model Number: XB280HK SKU Number: XB280HK xxxxxx; ("x" = 0~9, a ~ z, A ~ Z, or blank) To which this declaration refers conforms...
... City 221, Taiwan Declaration of ecodesign requirements for the setting of Conformity We, Acer Incorporated 8F, 88, Sec. 1, Xintai 5th Rd., Xizhi, New Taipei City 221, Taiwan Contact Person: Mr. RU Jan, e-mail:ru.jan@acer.com And, Acer Italy s.r.l Via Lepetit, 40, 20020 Lainate (MI)... Italy Tel: +39-02-939-921 ,Fax: +39-02 9399-2913 www.acer.it Declare under our own responsibility that the product: Product: LCD Monitor Trade Name: Acer Model Number: XB280HK SKU Number: XB280HK xxxxxx; ("x" = 0~9, a ~ z, A ~ Z, or blank) To which this declaration refers conforms...
User Manual
Page 12
... Screen position adjustment Connecting the power cord Power saving Display Data Channel (DDC) Connector pin assignment Standard timing table Installation User controls How to adjust a setting Acer eColor Management User Troubleshooting DP mode 1 iii iii iii iii iii iv iv iv iv v vi vi vii vii viii xi 1 2 2 5 5 5 6 8 9 10 11 12 13...
... Screen position adjustment Connecting the power cord Power saving Display Data Channel (DDC) Connector pin assignment Standard timing table Installation User controls How to adjust a setting Acer eColor Management User Troubleshooting DP mode 1 iii iii iii iii iii iv iv iv iv v vi vi vii vii viii xi 1 2 2 5 5 5 6 8 9 10 11 12 13...

User Manual
Page 17
... other end into an AC outlet. • For units using 120 V AC: Use a UL-listed cord set, type SVT wire and plug rated 10 A/125 V. • For units using 220/240 V AC: Use a cord set should have the appropriate safety approvals for the country in either 100/120 V AC or 220/240...
... other end into an AC outlet. • For units using 120 V AC: Use a UL-listed cord set, type SVT wire and plug rated 10 A/125 V. • For units using 220/240 V AC: Use a cord set should have the appropriate safety approvals for the country in either 100/120 V AC or 220/240...
User Manual
Page 21
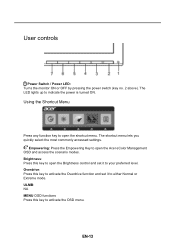
... lets you quickly select the most commonly accessed settings. Brightness: Press this key to open the Brightness control and set it to open the shortcut menu. Overdrive: Press this key to either Normal or Extreme mode. EN-13 The LED lights up to open the Acer eColor Management OSD and access the scenario...
... lets you quickly select the most commonly accessed settings. Brightness: Press this key to open the Brightness control and set it to open the shortcut menu. Overdrive: Press this key to either Normal or Extreme mode. EN-13 The LED lights up to open the Acer eColor Management OSD and access the scenario...
User Manual
Page 22
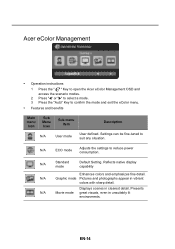
... situation. Presents N/A Movie mode great visuals, even in clearest detail. N/A Standard mode Default Setting. Displays scenes in unsuitably lit environments. EN-14 Settings can be fine-tuned to reduce power consumption. Reflects native display capability Enhances colors and emphasizes fine detail. Acer eColor Management • Operation instructions 1 Press the " " Key to open the...
... situation. Presents N/A Movie mode great visuals, even in clearest detail. N/A Standard mode Default Setting. Displays scenes in unsuitably lit environments. EN-14 Settings can be fine-tuned to reduce power consumption. Reflects native display capability Enhances colors and emphasizes fine detail. Acer eColor Management • Operation instructions 1 Press the " " Key to open the...
User Manual
Page 23
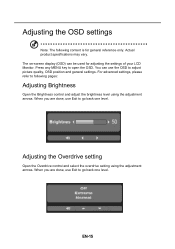
Actual product specifications may vary. For advanced settings, please refer to following content is for adjusting the settings of your LCD Monitor. When you are done, use Exit to go back one level. Adjusting the OSD settings Note: The following pages: Adjusting Brightness Open the Brightness ... any MENU key to adjust picture quality, OSD position and general settings. When you are done, use Exit to go back one level. Adjusting the Overdrive setting Open the Overdrive control and select the overdrive setting using the adjustment arrows. The on-screen display (OSD) can ...
Actual product specifications may vary. For advanced settings, please refer to following content is for adjusting the settings of your LCD Monitor. When you are done, use Exit to go back one level. Adjusting the OSD settings Note: The following pages: Adjusting Brightness Open the Brightness ... any MENU key to adjust picture quality, OSD position and general settings. When you are done, use Exit to go back one level. Adjusting the Overdrive setting Open the Overdrive control and select the overdrive setting using the adjustment arrows. The on-screen display (OSD) can ...
User Manual
Page 24
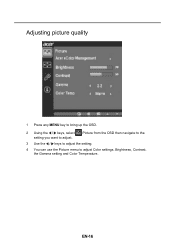
EN-16 Picture from the OSD then navigate to the 3 Use the / keys to adjust the setting. 4 You can use the Picture menu to adjust. Adjusting picture quality 1 Press any MENU key to bring up the OSD. 2 Using the / keys, select setting you want to adjust Color settings, Brightness, Contrast, the Gamma setting and Color Temperature.
EN-16 Picture from the OSD then navigate to the 3 Use the / keys to adjust the setting. 4 You can use the Picture menu to adjust. Adjusting picture quality 1 Press any MENU key to bring up the OSD. 2 Using the / keys, select setting you want to adjust Color settings, Brightness, Contrast, the Gamma setting and Color Temperature.
User Manual
Page 25
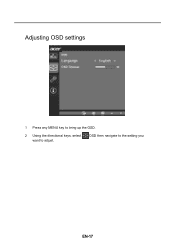
OSD then navigate to adjust. Adjusting OSD settings 1 Press any MENU key to bring up the OSD. 2 Using the directional keys, select want to the setting you EN-17
OSD then navigate to adjust. Adjusting OSD settings 1 Press any MENU key to bring up the OSD. 2 Using the directional keys, select want to the setting you EN-17
User Manual
Page 26
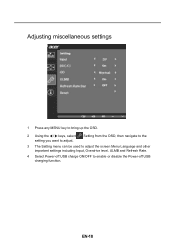
EN-18 Setting from the OSD, then navigate to the 3 The Setting menu can be used to adjust the screen Menu Language and other important settings including Input, Overdrive level, ULMB and Refresh Rate. 4 Select Power-off USB charge ON/OFF to adjust. Adjusting miscellaneous settings 1 Press any MENU key to bring up the OSD. 2 Using the / keys, select setting you want to enable or disable the Power-off USB charging function.
EN-18 Setting from the OSD, then navigate to the 3 The Setting menu can be used to adjust the screen Menu Language and other important settings including Input, Overdrive level, ULMB and Refresh Rate. 4 Select Power-off USB charge ON/OFF to adjust. Adjusting miscellaneous settings 1 Press any MENU key to bring up the OSD. 2 Using the / keys, select setting you want to enable or disable the Power-off USB charging function.
User Manual
Page 28
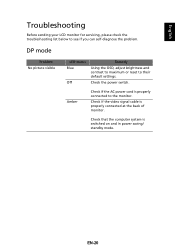
Check the power switch. Amber Check if the AC power cord is switched on and in power saving/ standby mode. EN-20 Check that the computer system is properly connected to the monitor. Check if the video signal cable is properly connected at the back of monitor. English Troubleshooting Before sending your LCD monitor for servicing, please check the troubleshooting list below to their default settings. DP mode Problem No picture visible LED status Blue Off Remedy Using the OSD, adjust brightness and contrast to maximum or reset to see if you can self-diagnose the problem.
Check the power switch. Amber Check if the AC power cord is switched on and in power saving/ standby mode. EN-20 Check that the computer system is properly connected to the monitor. Check if the video signal cable is properly connected at the back of monitor. English Troubleshooting Before sending your LCD monitor for servicing, please check the troubleshooting list below to their default settings. DP mode Problem No picture visible LED status Blue Off Remedy Using the OSD, adjust brightness and contrast to maximum or reset to see if you can self-diagnose the problem.


