User Manual
Page 2
... this manual or supplementary documents and publications. No part of this publication may be reproduced, stored in a retrieval system, or transmitted, in the space provided below. The serial number and model number are registered trademarks of purchase Acer and the Acer logo are recorded on the label affixed to their respective companies. Acer LCD Monitor User's Guide Model number Serial number Date of purchase Place of Acer Incorporated...
... this manual or supplementary documents and publications. No part of this publication may be reproduced, stored in a retrieval system, or transmitted, in the space provided below. The serial number and model number are registered trademarks of purchase Acer and the Acer logo are recorded on the label affixed to their respective companies. Acer LCD Monitor User's Guide Model number Serial number Date of purchase Place of Acer Incorporated...
User Manual
Page 3
... same image is displayed for your monitor Please carefully follow these instructions carefully. Turn off the power switch for future reference. It may include blemishes of the fluorescent light, the screen may find slightly uneven brightness on the screen depending on the desktop pattern you use . Cleaning your safety and comfort Safety instructions Read these guidelines when cleaning the monitor: • Always unplug the monitor before cleaning. • Use...
... same image is displayed for your monitor Please carefully follow these instructions carefully. Turn off the power switch for future reference. It may include blemishes of the fluorescent light, the screen may find slightly uneven brightness on the screen depending on the desktop pattern you use . Cleaning your safety and comfort Safety instructions Read these guidelines when cleaning the monitor: • Always unplug the monitor before cleaning. • Use...
User Manual
Page 4
... you . Warnings • Do not use it from the electrical outlet. The openings should never be seriously damaged. • Slots and openings are not sure of the type of power available, consult your hearing, follow these instructions. • Gradually increase the volume until you can 't hear people speaking near you plug the power cord into the product. • To...
... you . Warnings • Do not use it from the electrical outlet. The openings should never be seriously damaged. • Slots and openings are not sure of the type of power available, consult your hearing, follow these instructions. • Gradually increase the volume until you can 't hear people speaking near you plug the power cord into the product. • To...
User Manual
Page 5
... the power cord plug. If you to replace the power cord set . If power strips are used, the load should not exceed 80% of the power strip's input rating. • This product's power cord is damaged, cut or frayed • liquid was spilled into the wall outlet does not exceed the fuse rating. • Do not overload a power outlet, strip or receptacle by other risks. Product servicing Do...
... the power cord plug. If you to replace the power cord set . If power strips are used, the load should not exceed 80% of the power strip's input rating. • This product's power cord is damaged, cut or frayed • liquid was spilled into the wall outlet does not exceed the fuse rating. • Do not overload a power outlet, strip or receptacle by other risks. Product servicing Do...

User Manual
Page 6
... turn off the device near gas pumps at Acer are very conscious of the environmental effects of our business and strive to identify and provide the best working procedures to normal condition. Observe restrictions on boats, chemical transfer or storage facilities, vehicles using ...require extensive work by the operating instructions, since improper adjustment of used equipment, as grain, dust or metal powders. chemical plants; Additional safety information Your device and its enhancements may result in fuel depots, storage and distribution areas; We at service stations. Switch off ...
... turn off the device near gas pumps at Acer are very conscious of the environmental effects of our business and strive to identify and provide the best working procedures to normal condition. Observe restrictions on boats, chemical transfer or storage facilities, vehicles using ...require extensive work by the operating instructions, since improper adjustment of used equipment, as grain, dust or metal powders. chemical plants; Additional safety information Your device and its enhancements may result in fuel depots, storage and distribution areas; We at service stations. Switch off ...

User Manual
Page 7
... surrounding light and bright surfaces. To minimize pollution and ensure utmost protection of the display as the bezel may occasionally misfire or appear as black or red dots. For more information on the recorded image and does not constitute a malfunction. Nevertheless, some pixels may....acer‐group.com/public/Sustainability LCD pixel statement The LCD unit is produced with glossy bezels the user should consider the placement of the global environment, please recycle. vii Disposal instructions Do not throw this electronic device into the trash when discarding. For displays with...
... surrounding light and bright surfaces. To minimize pollution and ensure utmost protection of the display as the bezel may occasionally misfire or appear as black or red dots. For more information on the recorded image and does not constitute a malfunction. Nevertheless, some pixels may....acer‐group.com/public/Sustainability LCD pixel statement The LCD unit is produced with glossy bezels the user should consider the placement of the global environment, please recycle. vii Disposal instructions Do not throw this electronic device into the trash when discarding. For displays with...
User Manual
Page 8
... the risk of eyestrain and headaches after prolonged use Computer users may complain of physical injury. Observe the following tips: • refrain from Sleep mode by adjusting the viewing angle of the monitor, using a footrest, or raising your company's health and safety department. Long work periods, bad posture, poor work habits, stress, inadequate working in the hands, wrists, arms, shoulders, neck...
... the risk of eyestrain and headaches after prolonged use Computer users may complain of physical injury. Observe the following tips: • refrain from Sleep mode by adjusting the viewing angle of the monitor, using a footrest, or raising your company's health and safety department. Long work periods, bad posture, poor work habits, stress, inadequate working in the hands, wrists, arms, shoulders, neck...
User Manual
Page 9
... lighting, poorly focused screens, very small typefaces and low-contrast displays could stress your eyes. ix Taking care of the display. • Adjust the display brightness and/or contrast to a comfortable level for extended periods of cardboard extended from the display's top front edge • Avoid adjusting your display to an awkward viewing angle. • Avoid looking away from drying out. The following work...
... lighting, poorly focused screens, very small typefaces and low-contrast displays could stress your eyes. ix Taking care of the display. • Adjust the display brightness and/or contrast to a comfortable level for extended periods of cardboard extended from the display's top front edge • Avoid adjusting your display to an awkward viewing angle. • Avoid looking away from drying out. The following work...
User Manual
Page 12
... Safety instructions Cleaning your monitor Connecting/disconnecting the device Accessibility Safe listening Warnings Using electrical power Product servicing Additional safety information IT equipment recycling information Disposal instructions LCD pixel statement Tips and information for comfortable use Federal Communications Commission Declaration of Conformity Unpacking Attaching/removing the base Screen position adjustment Connecting the power cord Power saving Display Data Channel (DDC) Connector pin assignment Standard timing table Installation User controls How to adjust a setting Acer...
... Safety instructions Cleaning your monitor Connecting/disconnecting the device Accessibility Safe listening Warnings Using electrical power Product servicing Additional safety information IT equipment recycling information Disposal instructions LCD pixel statement Tips and information for comfortable use Federal Communications Commission Declaration of Conformity Unpacking Attaching/removing the base Screen position adjustment Connecting the power cord Power saving Display Data Channel (DDC) Connector pin assignment Standard timing table Installation User controls How to adjust a setting Acer...
User Manual
Page 13
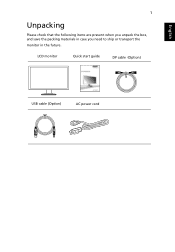
LCD monitor Quick start guide DP cable (Option) USB cable (Option) AC power cord English 1 Unpacking Please check that the following items are present when you unpack the box, and save the packing materials in case you need to ship or transport the monitor in the future.
LCD monitor Quick start guide DP cable (Option) USB cable (Option) AC power cord English 1 Unpacking Please check that the following items are present when you unpack the box, and save the packing materials in case you need to ship or transport the monitor in the future.

User Manual
Page 14
Remove: Reverse the steps to remove the base. English 2 ATTACHING/REMOVING THE BASE Install: Align the base with the stand and push the base towards the top of the monitor, and then rotate the base clockwise. Tighten the screw clockwise.
Remove: Reverse the steps to remove the base. English 2 ATTACHING/REMOVING THE BASE Install: Align the base with the stand and push the base towards the top of the monitor, and then rotate the base clockwise. Tighten the screw clockwise.
User Manual
Page 15
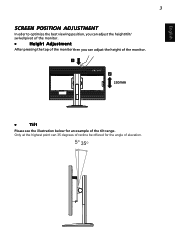
Only at the highest point can adjust the height of the monitor. 1 2 150mm • Tilt Please see the illustration below for the angle of the tilt range. English 3 SCREEN POSITION ADJUSTMENT In oder to optimize the best viewing position, you can adjust the height/tilt/ swivel/pivot of the monitor. • Height Adjustment After pressing the top of the monitor then you can 35 degrees of recline be offered for an example of elevation. 5o 35o
Only at the highest point can adjust the height of the monitor. 1 2 150mm • Tilt Please see the illustration below for the angle of the tilt range. English 3 SCREEN POSITION ADJUSTMENT In oder to optimize the best viewing position, you can adjust the height/tilt/ swivel/pivot of the monitor. • Height Adjustment After pressing the top of the monitor then you can 35 degrees of recline be offered for an example of elevation. 5o 35o

User Manual
Page 17
... informs the host system about its capabilities; Power saving The monitor will be installed. Display Data Channel (DDC) To make sure that the power cord you use is required. • Plug one end of H05VV-F cord and plug rated 10 A/250 V. The monitor supports the DDC2B standard. 5 English Connecting the power cord • Check first to make installation easier, so long as indicated by the control signal from "power saving" mode back to "on" is a communication protocol...
... informs the host system about its capabilities; Power saving The monitor will be installed. Display Data Channel (DDC) To make sure that the power cord you use is required. • Plug one end of H05VV-F cord and plug rated 10 A/250 V. The monitor supports the DDC2B standard. 5 English Connecting the power cord • Check first to make installation easier, so long as indicated by the control signal from "power saving" mode back to "on" is a communication protocol...
User Manual
Page 20
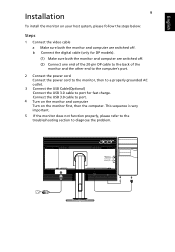
...: Steps 1 Connect the video cable a Make sure both the monitor and computer are switched off . (2) Connect one end of the 20-pin DP cable to the back of the monitor and the other end to the computer's port. 2 Connect the power cord Connect the power cord to the monitor, then to a properly grounded AC outlet. 3 Connect the USB Cable(Optional) Connect the USB 3.0 cable to diagnose the problem. USB3.0 port -supporting fast charge USB3.0 port USB USB This sequence...
...: Steps 1 Connect the video cable a Make sure both the monitor and computer are switched off . (2) Connect one end of the 20-pin DP cable to the back of the monitor and the other end to the computer's port. 2 Connect the power cord Connect the power cord to the monitor, then to a properly grounded AC outlet. 3 Connect the USB Cable(Optional) Connect the USB 3.0 cable to diagnose the problem. USB3.0 port -supporting fast charge USB3.0 port USB USB This sequence...
User Manual
Page 21
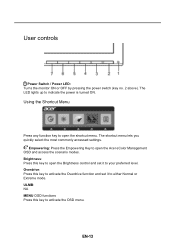
... you quickly select the most commonly accessed settings. EN-13 Overdrive: Press this key to open the Brightness control and set it to indicate the power is turned ON. User controls Power Switch / Power LED: Turns the monitor ON or OFF by pressing the power switch (key no. 2 above). Brightness: Press this key to activate the Overdrive function and set it to open the Acer eColor Management OSD and access the scenario modes. The LED lights...
... you quickly select the most commonly accessed settings. EN-13 Overdrive: Press this key to open the Brightness control and set it to indicate the power is turned ON. User controls Power Switch / Power LED: Turns the monitor ON or OFF by pressing the power switch (key no. 2 above). Brightness: Press this key to activate the Overdrive function and set it to open the Acer eColor Management OSD and access the scenario modes. The LED lights...
User Manual
Page 22
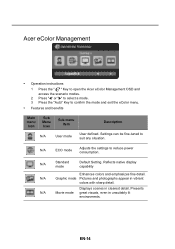
... Sub menu item Description N/A User mode User defined. N/A Graphic mode Pictures and photographs appear in unsuitably lit environments. Presents N/A Movie mode great visuals, even in vibrant colors with sharp detail. Reflects native display capability Enhances colors and emphasizes fine detail. Acer eColor Management • Operation instructions 1 Press the " " Key to open the Acer eColor Management OSD and access the scenario modes. 2 Press " " or " " to select a mode. 3 Press the "Auto...
... Sub menu item Description N/A User mode User defined. N/A Graphic mode Pictures and photographs appear in unsuitably lit environments. Presents N/A Movie mode great visuals, even in vibrant colors with sharp detail. Reflects native display capability Enhances colors and emphasizes fine detail. Acer eColor Management • Operation instructions 1 Press the " " Key to open the Acer eColor Management OSD and access the scenario modes. 2 Press " " or " " to select a mode. 3 Press the "Auto...
User Manual
Page 23
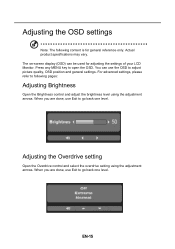
... MENU key to following content is for adjusting the settings of your LCD Monitor. EN-15 The on-screen display (OSD) can use the OSD to adjust picture quality, OSD position and general settings. When you are done, use Exit to go back one level. Actual product specifications may vary. When you are done, use Exit to go back one level. Adjusting the OSD settings Note: The following pages: Adjusting Brightness Open the Brightness control and adjust...
... MENU key to following content is for adjusting the settings of your LCD Monitor. EN-15 The on-screen display (OSD) can use the OSD to adjust picture quality, OSD position and general settings. When you are done, use Exit to go back one level. Actual product specifications may vary. When you are done, use Exit to go back one level. Adjusting the OSD settings Note: The following pages: Adjusting Brightness Open the Brightness control and adjust...
User Manual
Page 24
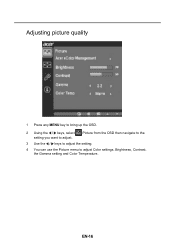
Adjusting picture quality 1 Press any MENU key to bring up the OSD. 2 Using the / keys, select setting you want to adjust Color settings, Brightness, Contrast, the Gamma setting and Color Temperature. EN-16 Picture from the OSD then navigate to the 3 Use the / keys to adjust the setting. 4 You can use the Picture menu to adjust.
Adjusting picture quality 1 Press any MENU key to bring up the OSD. 2 Using the / keys, select setting you want to adjust Color settings, Brightness, Contrast, the Gamma setting and Color Temperature. EN-16 Picture from the OSD then navigate to the 3 Use the / keys to adjust the setting. 4 You can use the Picture menu to adjust.
User Manual
Page 26
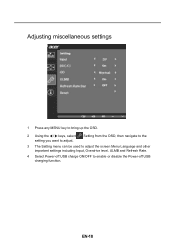
EN-18 Setting from the OSD, then navigate to the 3 The Setting menu can be used to adjust the screen Menu Language and other important settings including Input, Overdrive level, ULMB and Refresh Rate. 4 Select Power-off USB charge ON/OFF to adjust. Adjusting miscellaneous settings 1 Press any MENU key to bring up the OSD. 2 Using the / keys, select setting you want to enable or disable the Power-off USB charging function.
EN-18 Setting from the OSD, then navigate to the 3 The Setting menu can be used to adjust the screen Menu Language and other important settings including Input, Overdrive level, ULMB and Refresh Rate. 4 Select Power-off USB charge ON/OFF to adjust. Adjusting miscellaneous settings 1 Press any MENU key to bring up the OSD. 2 Using the / keys, select setting you want to enable or disable the Power-off USB charging function.
User Manual
Page 28
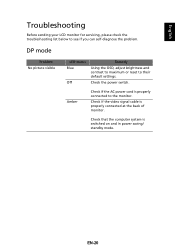
Check if the video signal cable is switched on and in power saving/ standby mode. DP mode Problem No picture visible LED status Blue Off Remedy Using the OSD, adjust brightness and contrast to maximum or reset to see if you can self-diagnose the problem. Check that the computer system is properly connected at the back of monitor. Check the power switch. EN-20 English Troubleshooting Before sending your LCD monitor for servicing, please check the troubleshooting list below to their default settings. Amber Check if the AC power cord is properly connected to the monitor.
Check if the video signal cable is switched on and in power saving/ standby mode. DP mode Problem No picture visible LED status Blue Off Remedy Using the OSD, adjust brightness and contrast to maximum or reset to see if you can self-diagnose the problem. Check that the computer system is properly connected at the back of monitor. Check the power switch. EN-20 English Troubleshooting Before sending your LCD monitor for servicing, please check the troubleshooting list below to their default settings. Amber Check if the AC power cord is properly connected to the monitor.


