Acer X203H Service Guide
Page 5
... resolution with Scaling supported Panel native resolution supported Number of Display Colors supported Contrast Ratio 1. X203H is defined as below, *All panel spec. of panel source. *All spec. Luminance ... monitor need to warm up at 100, Feature items Panel supplier & module name Screen diagonal Display Format Pixel Pitch Viewing Angle (@ Contrast Ratio >= 10) Analog interface with Scaling ...1hr. * To test the "Contrast Ratio" and "Luminance" functions, the color status must be the ACER project in ACER V series which will be "User preset" mode. * 1. 3. There are double input types, D-...
... resolution with Scaling supported Panel native resolution supported Number of Display Colors supported Contrast Ratio 1. X203H is defined as below, *All panel spec. of panel source. *All spec. Luminance ... monitor need to warm up at 100, Feature items Panel supplier & module name Screen diagonal Display Format Pixel Pitch Viewing Angle (@ Contrast Ratio >= 10) Analog interface with Scaling ...1hr. * To test the "Contrast Ratio" and "Luminance" functions, the color status must be the ACER project in ACER V series which will be "User preset" mode. * 1. 3. There are double input types, D-...
Acer X203H Service Guide
Page 14
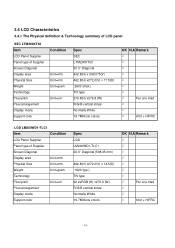
... 3.4.1 The Physical definition & Technology summary of LCD panel SEC LTM200KT03 Item LCD Panel Supplier Panel type of Supplier Screen Diagonal Display area Physical Size Weight Technology Pixel pitch Pixel arrangement Display mode Support color Condition Unit=mm Unit=mm ...8730; √ Per one triad √ √ √ 6 bit + HiFRC LGD LM200WD1-TLC1 Item Condition LCD Panel Supplier Panel type of Supplier Screen Diagonal Display area Unit=mm Physical Size Unit=mm Weight Unit=gram Technology Pixel pitch Unit=um Pixel arrangement Display mode Support color Spec LGD...
... 3.4.1 The Physical definition & Technology summary of LCD panel SEC LTM200KT03 Item LCD Panel Supplier Panel type of Supplier Screen Diagonal Display area Physical Size Weight Technology Pixel pitch Pixel arrangement Display mode Support color Condition Unit=mm Unit=mm ...8730; √ Per one triad √ √ √ 6 bit + HiFRC LGD LM200WD1-TLC1 Item Condition LCD Panel Supplier Panel type of Supplier Screen Diagonal Display area Unit=mm Physical Size Unit=mm Weight Unit=gram Technology Pixel pitch Unit=um Pixel arrangement Display mode Support color Spec LGD...

Acer X203H Service Guide
Page 51
Yes Scalar output Data ? Yes OSD shown when key pressed? Proceed to No "Check Scalar" "Check LCD Module" - 51 - Level 2 Circuit Board and Standard Parts Replacement 6.1 Trouble Shooting Guide 6.1.1 No Display or display is unstable (Interface Board) Screen is Blank and Power LED is White. Yes Backlight turned ON? Proceed to No "Check Control Board". 6. Yes Proceed to No "Check Power Board". Follow instructions from OSD dialog No Keypad OK?
Yes Scalar output Data ? Yes OSD shown when key pressed? Proceed to No "Check Scalar" "Check LCD Module" - 51 - Level 2 Circuit Board and Standard Parts Replacement 6.1 Trouble Shooting Guide 6.1.1 No Display or display is unstable (Interface Board) Screen is Blank and Power LED is White. Yes Backlight turned ON? Proceed to No "Check Control Board". 6. Yes Proceed to No "Check Power Board". Follow instructions from OSD dialog No Keypad OK?
Acer X203H Service Guide
Page 54
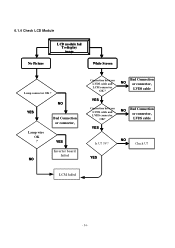
NO Bad Connection or connector, YES Inverter board failed NO Connection between LVDS cable and LVDS connector OK? NO Check U7 YES LCM failed - 54 - NO Bad Connection or connector, LVDS cable YES Is U7 5V? 6.1.4 Check LCD Module No Picture LCD module fail To display image White Screen Lamp connector OK ? Bad Connection NO or connector, LVDS cable YES Connection between LVDS cable and LCM connector OK ? YES Lamp wire OK ?
NO Bad Connection or connector, YES Inverter board failed NO Connection between LVDS cable and LVDS connector OK? NO Check U7 YES LCM failed - 54 - NO Bad Connection or connector, LVDS cable YES Is U7 5V? 6.1.4 Check LCD Module No Picture LCD module fail To display image White Screen Lamp connector OK ? Bad Connection NO or connector, LVDS cable YES Connection between LVDS cable and LCM connector OK ? YES Lamp wire OK ?
User Manual
Page 3
... LCD monitors The following are normal with the LCD monitor and do not indicate a problem. • Due to the nature of the previous screen may remain after switching the image, when the same image is recovered slowly by changing the image or turning off the power switch and then... turn it on again to make sure the flicker disappears. • You may find slightly uneven brightness on the screen depending on the desktop pattern you use . Cleaning your safety and comfort Safety instructions Read these guidelines when cleaning the monitor: • Always unplug...
... LCD monitors The following are normal with the LCD monitor and do not indicate a problem. • Due to the nature of the previous screen may remain after switching the image, when the same image is recovered slowly by changing the image or turning off the power switch and then... turn it on again to make sure the flicker disappears. • You may find slightly uneven brightness on the screen depending on the desktop pattern you use . Cleaning your safety and comfort Safety instructions Read these guidelines when cleaning the monitor: • Always unplug...

User Manual
Page 9
... display to a comfortable level for extended periods of your vision Long viewing hours, wearing incorrect glasses or contact lenses, glare, excessive room lighting, poorly focused screens, very small typefaces and low-contrast displays could stress your eyes.
... display to a comfortable level for extended periods of your vision Long viewing hours, wearing incorrect glasses or contact lenses, glare, excessive room lighting, poorly focused screens, very small typefaces and low-contrast displays could stress your eyes.
User Manual
Page 13
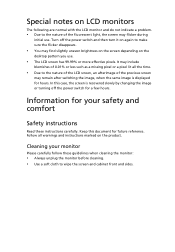
... instructions vii LCD pixel statement vii Tips and information for comfortable use viii Federal Communications Commission Declaration of Conformity xi Unpacking 1 Attaching/removing the base 2 Screen position adjustment 2 Connecting the power cord 3 Power saving 3 Display Data Channel (DDC) 3 Connector pin assignment 4 Standard timing table 6 Installation 7 User controls 8 How to adjust a setting...
... instructions vii LCD pixel statement vii Tips and information for comfortable use viii Federal Communications Commission Declaration of Conformity xi Unpacking 1 Attaching/removing the base 2 Screen position adjustment 2 Connecting the power cord 3 Power saving 3 Display Data Channel (DDC) 3 Connector pin assignment 4 Standard timing table 6 Installation 7 User controls 8 How to adjust a setting...
User Manual
Page 16
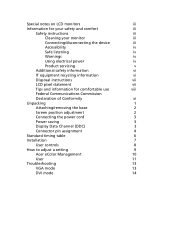
Removing: Press the release button as shown below. The monitor can adjust the monitor tilt by using both of your hands to hold the edges of the monitor as indicated, then pull in the direction of the base. English Attaching/removing the base Attaching: Align the release button on the bottom of the monitor with the corresponding slots on the bottom of the arrow to 15 degrees up or 5 degrees down. Screen position adjustment To optimize the viewing position, you can be adjusted to remove the base.
Removing: Press the release button as shown below. The monitor can adjust the monitor tilt by using both of your hands to hold the edges of the monitor as indicated, then pull in the direction of the base. English Attaching/removing the base Attaching: Align the release button on the bottom of the monitor with the corresponding slots on the bottom of the arrow to 15 degrees up or 5 degrees down. Screen position adjustment To optimize the viewing position, you can be adjusted to remove the base.
User Manual
Page 25
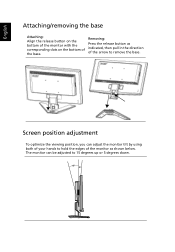
... V. English User Main Sub menu menu icon icon Sub menu item Contrast Brightness Description Adjusts the contrast between the foreground and background of the screen image. H. Position Adjusts the horizontal position (available in analog mode only). N/A Warm N/A Cool User/red Sets the color temperature to cool... to warm white. Clock Adjusts the picture clock (available in analog mode only). Adjusts the background brightness of the screen image. Position Adjusts the vertical position (available in analog mode only). User/green Adjusts green intensity.
... V. English User Main Sub menu menu icon icon Sub menu item Contrast Brightness Description Adjusts the contrast between the foreground and background of the screen image. H. Position Adjusts the horizontal position (available in analog mode only). N/A Warm N/A Cool User/red Sets the color temperature to cool... to warm white. Clock Adjusts the picture clock (available in analog mode only). Adjusts the background brightness of the screen image. Position Adjusts the vertical position (available in analog mode only). User/green Adjusts green intensity.
User Manual
Page 27
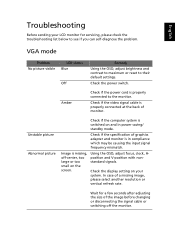
... cable is in power saving/ standby mode. Using the OSD, adjust focus, clock, Hposition and V-position with nonstandard signals. Check the display setting on the screen. Check if the specification of graphics adapter and monitor is properly connected at the back of monitor. In case of the image before changing or...
... cable is in power saving/ standby mode. Using the OSD, adjust focus, clock, Hposition and V-position with nonstandard signals. Check the display setting on the screen. Check if the specification of graphics adapter and monitor is properly connected at the back of monitor. In case of the image before changing or...


