User Manual (3D)
Page 3
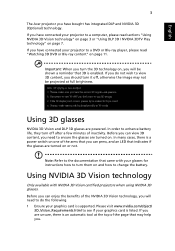
... your glasses for instructions how to turn off , otherwise the image may help you need to do the following. 1 Ensure your projector to a DVD or Blu-ray player, please read sections "Using NVIDIA 3D Vision technology" on page 3 or "Using DLP 3D / NVIDIA 3DTV Play technology" on and how to change the battery. Before you can view 3D content, you...
... your glasses for instructions how to turn off , otherwise the image may help you need to do the following. 1 Ensure your projector to a DVD or Blu-ray player, please read sections "Using NVIDIA 3D Vision technology" on page 3 or "Using DLP 3D / NVIDIA 3DTV Play technology" on and how to change the battery. Before you can view 3D content, you...
User Manual (3D)
Page 4
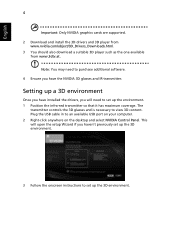
... an available USB port on your computer. 2 Right-click anywhere on the desktop and select NVIDIA Control Panel. Plug the USB cable in to view 3D content. This will need to purchase additional software. 4 Ensure you haven't previously set up the 3D environment. 3 Follow the onscreen instructions to set up the 3D environment. Setting up the environment. 1 Position the infra-red transmitter so...
... an available USB port on your computer. 2 Right-click anywhere on the desktop and select NVIDIA Control Panel. Plug the USB cable in to view 3D content. This will need to purchase additional software. 4 Ensure you haven't previously set up the 3D environment. 3 Follow the onscreen instructions to set up the 3D environment. Setting up the environment. 1 Position the infra-red transmitter so...
User Manual (3D)
Page 7
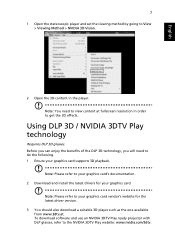
... fullscreen resolution in the player. English 7 1 Open the stereoscopic player and set the viewing method by going to the NVIDIA 3DTV Play website: www.nvidia.com/3dtv. Before you can enjoy the benefits of the DLP 3D technology, you will need to get the 3D effects. To download software and use an NVIDIA 3DTV Play ready projector with DLP glasses...
... fullscreen resolution in the player. English 7 1 Open the stereoscopic player and set the viewing method by going to the NVIDIA 3DTV Play website: www.nvidia.com/3dtv. Before you can enjoy the benefits of the DLP 3D technology, you will need to get the 3D effects. To download software and use an NVIDIA 3DTV Play ready projector with DLP glasses...
User Manual
Page 5
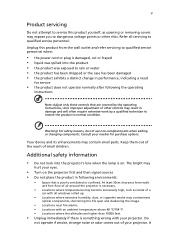
..., indicating a need for purchase options. Do not operate if smoke, strange noise or odor comes out of small children. Warning! v Product servicing Do not attempt to service this product from walls and free flow of air around the projector is necessary. • Locations where temperatures may become excessively high, such as opening or removing covers may expose you to dangerous voltage points or other controls...
..., indicating a need for purchase options. Do not operate if smoke, strange noise or odor comes out of small children. Warning! v Product servicing Do not attempt to service this product from walls and free flow of air around the projector is necessary. • Locations where temperatures may become excessively high, such as opening or removing covers may expose you to dangerous voltage points or other controls...

User Manual
Page 6
... follow all changing instructions. • Reset the "Lamp Hour Reset" function from the Onscreen display "Management" menu after replacing the lamp module. • Do not attempt to change the lamp when is securely installed. vi might cause fire or electric shock. Please be sure to disassemble this could cause it . Only use acer ceiling mount kit for ceiling mount installation. The temperature inside which has its cooling cycle before turning main power off...
... follow all changing instructions. • Reset the "Lamp Hour Reset" function from the Onscreen display "Management" menu after replacing the lamp module. • Do not attempt to change the lamp when is securely installed. vi might cause fire or electric shock. Please be sure to disassemble this could cause it . Only use acer ceiling mount kit for ceiling mount installation. The temperature inside which has its cooling cycle before turning main power off...

User Manual
Page 8
... Do: • Turn off , please ensure the projector completes its life, it shows warning messages. • Reset the "Lamp Hour Reset" function from the Onscreen display "Management" menu after replacing the lamp module. • When switching the projector off the product before disconnecting power. • Turn on the unit provided for a long period of time. If this may make a loud popping sound. Please be sure to change the lamp when it...
... Do: • Turn off , please ensure the projector completes its life, it shows warning messages. • Reset the "Lamp Hour Reset" function from the Onscreen display "Management" menu after replacing the lamp module. • When switching the projector off the product before disconnecting power. • Turn on the unit provided for a long period of time. If this may make a loud popping sound. Please be sure to change the lamp when it...

User Manual
Page 11
Outstanding features include: • DLP® technology • X1163/X113/P1163 series: Native 800 x 600 SVGA resolution X1263 series: Native 1024 x 768 XGA resolution 4:3 / 16:9 aspect ratio supported • Acer ColorBoost technology delivers nature's true colors for vivid, life-like images • High brightness and contrast ratio • Versatile display modes (Bright, Presentation, Standard, Video, Game, Education, User) enable optimum performance in any situation • NTSC...
Outstanding features include: • DLP® technology • X1163/X113/P1163 series: Native 800 x 600 SVGA resolution X1263 series: Native 1024 x 768 XGA resolution 4:3 / 16:9 aspect ratio supported • Acer ColorBoost technology delivers nature's true colors for vivid, life-like images • High brightness and contrast ratio • Versatile display modes (Bright, Presentation, Standard, Video, Game, Education, User) enable optimum performance in any situation • NTSC...
User Manual
Page 15
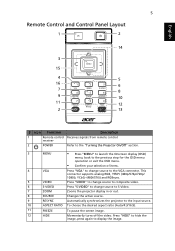
... items. 4 VGA Press "VGA" to change source to S-Video. 7 ZOOM Zooms the projector display in or out. 8 SOURCE Changes the active source. 9 RESYNC Automatically synchronizes the projector to the input source. 10 ASPECT RATIO To choose the desired aspect ratio (Auto/4:3/16:9). 11 FREEZE To pause the screen image. 12 HIDE Momentarily turns off the video. Press "HIDE" to hide the image, press again to the VGA connector. English 5 Remote Control and Control Panel Layout 1 2 14...
... items. 4 VGA Press "VGA" to change source to S-Video. 7 ZOOM Zooms the projector display in or out. 8 SOURCE Changes the active source. 9 RESYNC Automatically synchronizes the projector to the input source. 10 ASPECT RATIO To choose the desired aspect ratio (Auto/4:3/16:9). 11 FREEZE To pause the screen image. 12 HIDE Momentarily turns off the video. Press "HIDE" to hide the image, press again to the VGA connector. English 5 Remote Control and Control Panel Layout 1 2 14...

User Manual
Page 17
... specifications. Note: Connector interface is over 5 m. English 7 Getting Started Connecting the Projector USB DVD player VGA HDMI D-Sub RS232 D-Sub 2 3 4 5 4 6 1 HDMI D-Sub D-Sub VGA IN S-VIDEO VIDEO RS232 VGA OUT AUDIO IN USB RW S-Video output Y 8 9 7 Y Video output # Description 1 Power cord 2 USB cable 3 HDMI cable 4 VGA cable 5 RS232 cable # Description 6 Audio cable jack/jack 7 S-Video cable 8 Composite video cable 9 Audio cable jack/RCA Note: To ensure the projector works well with your computer, please make sure the timing of the display mode...
... specifications. Note: Connector interface is over 5 m. English 7 Getting Started Connecting the Projector USB DVD player VGA HDMI D-Sub RS232 D-Sub 2 3 4 5 4 6 1 HDMI D-Sub D-Sub VGA IN S-VIDEO VIDEO RS232 VGA OUT AUDIO IN USB RW S-Video output Y 8 9 7 Y Video output # Description 1 Power cord 2 USB cable 3 HDMI cable 4 VGA cable 5 RS232 cable # Description 6 Audio cable jack/jack 7 S-Video cable 8 Composite video cable 9 Audio cable jack/RCA Note: To ensure the projector works well with your computer, please make sure the timing of the display mode...
User Manual
Page 18
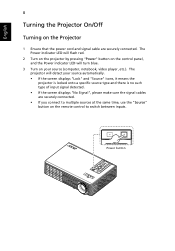
... the screen displays "Lock" and "Source" icons, it means the projector is locked onto a specific source type and there is no such type of input signal detected. • If the screen displays "No Signal", please make sure the signal cables are securely connected. The Power indicator LED will flash red. 2 Turn on the projector by pressing "Power" button on the control panel, and the Power indicator LED will detect your source (computer, notebook, video player ,etc.). Power button The projector will turn blue. 3 Turn on the remote control to switch between inputs.
... the screen displays "Lock" and "Source" icons, it means the projector is locked onto a specific source type and there is no such type of input signal detected. • If the screen displays "No Signal", please make sure the signal cables are securely connected. The Power indicator LED will flash red. 2 Turn on the projector by pressing "Power" button on the control panel, and the Power indicator LED will detect your source (computer, notebook, video player ,etc.). Power button The projector will turn blue. 3 Turn on the remote control to switch between inputs.

User Manual
Page 25
... enter a submenu for projector installation and maintenance. Use the OSD only when the message "No signal input" is displayed on the control pad to launch the OSD for projector installation and maintenance. 3 The background pattern acts as a guide to the Acer welcome screen. The menu options include settings and adjustments for screen size and distance, focus, keystone correction and more . 1 Turn on the projector by pressing "Power" button on the control pad. 2 Press the menu button on the...
... enter a submenu for projector installation and maintenance. Use the OSD only when the message "No signal input" is displayed on the control pad to launch the OSD for projector installation and maintenance. 3 The background pattern acts as a guide to the Acer welcome screen. The menu options include settings and adjustments for screen size and distance, focus, keystone correction and more . 1 Turn on the projector by pressing "Power" button on the control pad. 2 Press the menu button on the...

User Manual
Page 29
Note: "Saturation" and "Tint" functions are not supported under computer or HDMI mode. R Gain Adjusts the red gain for color temperature optimization. Effects the representation of dark scenery. With greater gamma value, dark scenery looks brighter. G Gain Adjusts the green gain for color temperature optimization. English 19 Color Temperature Gamma Mode Use this function to choose CT1, CT2 (Native), CT3, User mode. B Gain Adjusts the blue gain for color temperature optimization.
Note: "Saturation" and "Tint" functions are not supported under computer or HDMI mode. R Gain Adjusts the red gain for color temperature optimization. Effects the representation of dark scenery. With greater gamma value, dark scenery looks brighter. G Gain Adjusts the green gain for color temperature optimization. English 19 Color Temperature Gamma Mode Use this function to choose CT1, CT2 (Native), CT3, User mode. B Gain Adjusts the blue gain for color temperature optimization.

User Manual
Page 31
... experience an unstable or flickering image, use this function to display the image using a 16:9 ratio. Tracking Synchronizes the signal timing of the image. • Press to decrease the sharpness. • Press to choose your computer's graphics card. Note: "HDMI Color Range" and "HDMI Scan Info" functions are not supported under HDMI or Video mode. English 21 Maunal Keystone Adjust image distortion caused by tilting projection. (±40 degrees) (for...
... experience an unstable or flickering image, use this function to display the image using a 16:9 ratio. Tracking Synchronizes the signal timing of the image. • Press to decrease the sharpness. • Press to choose your computer's graphics card. Note: "HDMI Color Range" and "HDMI Scan Info" functions are not supported under HDMI or Video mode. English 21 Maunal Keystone Adjust image distortion caused by tilting projection. (±40 degrees) (for...

User Manual
Page 32
... user to enter password when switch on the projector without password. Both "User Password" and "Administrator Password" can be accepted for details. • If "Off" is up, the projector will request user to enter the password again. • The factory default setting of the projector . This function is only available when a composite video or S-Video input signal is selected and its system format is "16:9" or "Auto" . Security This projector provides a useful...
... user to enter password when switch on the projector without password. Both "User Password" and "Administrator Password" can be accepted for details. • If "Off" is up, the projector will request user to enter the password again. • The factory default setting of the projector . This function is only available when a composite video or S-Video input signal is selected and its system format is "16:9" or "Auto" . Security This projector provides a useful...

User Manual
Page 33
...; Press to change the "Administrator Password". • The factory default of "Administrator Password" is "1234". This unique password is the number which is printed on . Default is . • If losing this security card and number, please contact with an Acer service center. 23 English VGA OUT (Standby) Reset User password • Press to setup or change the "User Password". • Press number keys to set your password on the remote control and press "MENU" to confirm...
...; Press to change the "Administrator Password". • The factory default of "Administrator Password" is "1234". This unique password is the number which is printed on . Default is . • If losing this security card and number, please contact with an Acer service center. 23 English VGA OUT (Standby) Reset User password • Press to setup or change the "User Password". • Press number keys to set your password on the remote control and press "MENU" to confirm...

User Manual
Page 34
... the Power button is 120 minutes) Displays the lamp's elapsed operating time (in hours). The projector will lower power consumption, extend the lamp life and reduce noise. Activate this function to display a reminder to return normal mode. 24 Management English ECO Mode High Altitude Turn Off Mode Auto Shutdown Lamp Hour Elapse Lamp Reminding Lamp Hour Reset Choose "On" to dim the projector lamp which will automatically shutdown when there is no signal input after the allocated time. (default is...
... the Power button is 120 minutes) Displays the lamp's elapsed operating time (in hours). The projector will lower power consumption, extend the lamp life and reduce noise. Activate this function to display a reminder to return normal mode. 24 Management English ECO Mode High Altitude Turn Off Mode Auto Shutdown Lamp Hour Elapse Lamp Reminding Lamp Hour Reset Choose "On" to dim the projector lamp which will automatically shutdown when there is no signal input after the allocated time. (default is...

User Manual
Page 37
...; Check if the projector lamp has been securely installed. or incorrectly displayed image (for PC (Windows • For an incorrectly displayed image: • Open "My Computer," open the "Control 2000/XP/Vista/ Windows 7)) Panel," and then double-click the "Display" icon. • Select the "Settings" tab. • Verify that the resolution setting of the connector pins are using and follow the steps below: • Verify that the resolution setting is switched on...
...; Check if the projector lamp has been securely installed. or incorrectly displayed image (for PC (Windows • For an incorrectly displayed image: • Open "My Computer," open the "Control 2000/XP/Vista/ Windows 7)) Panel," and then double-click the "Display" icon. • Select the "Settings" tab. • Verify that the resolution setting of the connector pins are using and follow the steps below: • Verify that the resolution setting is switched on...

User Manual
Page 38
... a Preferred Image Size by Adjusting Distance and Zoom" section for detailed information. • If you are using an Apple® Mac® OS based notebook: In System Preferences, open Display and select Video Mirroring "On". 5 Image is unstable • Adjust the "Tracking" to make an adjustment. Refer to flickering bar the "Image" section for more information. • Change the display color depth settings on the remote control or control or incorrectly panel. Refer...
... a Preferred Image Size by Adjusting Distance and Zoom" section for detailed information. • If you are using an Apple® Mac® OS based notebook: In System Preferences, open Display and select Video Mirroring "On". 5 Image is unstable • Adjust the "Tracking" to make an adjustment. Refer to flickering bar the "Image" section for more information. • Change the display color depth settings on the remote control or control or incorrectly panel. Refer...

User Manual
Page 43
... dust filters Replacing the dust filters 1 Turn the projector off then unplug the power cord. 2 Pull the both sides dust filters out. (Illustration #1) 3 Clean or replace the dust filter. 4 To put the dust filters back, reverse the previous step. (Illustration #1) Cleaning the dust filters Clean the dust filters after every 1000 hours of use a small vacuum cleaner designed for computers and other office equipments. It also can cause overheating...
... dust filters Replacing the dust filters 1 Turn the projector off then unplug the power cord. 2 Pull the both sides dust filters out. (Illustration #1) 3 Clean or replace the dust filter. 4 To put the dust filters back, reverse the previous step. (Illustration #1) Cleaning the dust filters Clean the dust filters after every 1000 hours of use a small vacuum cleaner designed for computers and other office equipments. It also can cause overheating...
User Manual
Page 48
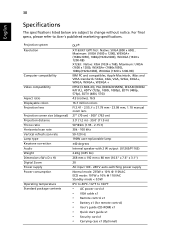
...8226; AC power cord x1 • VGA cable x1 • Remote control x1 • Battery x1 (for remote control) • User's guide (CD-ROM) x1 • Quick start guide x1 • Security card x1 • Carrying case x1 (Optional) Projection system Resolution Computer compatibility Video compatibility Aspect ratio Displayable colors Projection lens Projection screen size (diagonal) Projection distance Throw ratio Horizontal scan rate Vertical refresh scan rate Lamp type Keystone correction Audio Weight Dimensions (W x D x H) Digital Zoom Power supply Power consumption Operating temperature...
...8226; AC power cord x1 • VGA cable x1 • Remote control x1 • Battery x1 (for remote control) • User's guide (CD-ROM) x1 • Quick start guide x1 • Security card x1 • Carrying case x1 (Optional) Projection system Resolution Computer compatibility Video compatibility Aspect ratio Displayable colors Projection lens Projection screen size (diagonal) Projection distance Throw ratio Horizontal scan rate Vertical refresh scan rate Lamp type Keystone correction Audio Weight Dimensions (W x D x H) Digital Zoom Power supply Power consumption Operating temperature...


