Quick Guide
Page 4
... at . Plug the USB cable in to see if your computer. Please visit www.nvidia.com/object/ 3D_Vision_Requirements.html to an available USB port on your graphics card is supported. Before you can enjoy the benefits of the page that it has maximum coverage. Note: You may help you are supported. 2 Download and install the 3D drivers and 3D player...
... at . Plug the USB cable in to see if your computer. Please visit www.nvidia.com/object/ 3D_Vision_Requirements.html to an available USB port on your graphics card is supported. Before you can enjoy the benefits of the page that it has maximum coverage. Note: You may help you are supported. 2 Download and install the 3D drivers and 3D player...
Quick Guide
Page 8
... need to your graphics card's documentation. 2 Download and install the latest drivers for your graphics card vendor's website for frame/field sequential 3D formats. To download software and use an NVIDIA 3DTV Play ready projector with DLP glasses, refer to 100/120 Hz on the projector remote control to open the OSD. Setting up the environment. 1 Set the refresh rate to the NVIDIA 3DTV...
... need to your graphics card's documentation. 2 Download and install the latest drivers for your graphics card vendor's website for frame/field sequential 3D formats. To download software and use an NVIDIA 3DTV Play ready projector with DLP glasses, refer to 100/120 Hz on the projector remote control to open the OSD. Setting up the environment. 1 Set the refresh rate to the NVIDIA 3DTV...
User Manual
Page 5
... all servicing to normal condition. Refer all windows rolled up. • Locations where excessive humidity, dust, or cigarette smoke may become excessively high, such as opening or removing covers may contain small parts. Unplug this product yourself, as inside of your projector. The bright may result in following the operating instructions Note: Adjust only those controls that is on the projector first and then signal sources...
... all servicing to normal condition. Refer all windows rolled up. • Locations where excessive humidity, dust, or cigarette smoke may become excessively high, such as opening or removing covers may contain small parts. Unplug this product yourself, as inside of your projector. The bright may result in following the operating instructions Note: Adjust only those controls that is on the projector first and then signal sources...

User Manual
Page 6
... becomes hot. • Clean the air filter frequently if have. It may rise and cause damage when the filter/ventilation slots clogged with any electronic components unless the projector is showing warning message. • When changing the lamp, please allow unit to cool down, and follow all changing instructions. • Reset the "Lamp Hour Reset" function from the Onscreen display "Management" menu after replacing the lamp module. • Do...
... becomes hot. • Clean the air filter frequently if have. It may rise and cause damage when the filter/ventilation slots clogged with any electronic components unless the projector is showing warning message. • When changing the lamp, please allow unit to cool down, and follow all changing instructions. • Reset the "Lamp Hour Reset" function from the Onscreen display "Management" menu after replacing the lamp module. • Do...
User Manual
Page 8
... openings on the unit provided for a long period of time. If this may make a loud popping sound. viii First things first Usage Notes Do: • Turn off the product before cleaning. • Use a soft cloth moistened with mild detergent to clean the display housing. • Disconnect the power plug from the Onscreen display "Management" menu after replacing the lamp module. • When switching the projector...
... openings on the unit provided for a long period of time. If this may make a loud popping sound. viii First things first Usage Notes Do: • Turn off the product before cleaning. • Use a soft cloth moistened with mild detergent to clean the display housing. • Disconnect the power plug from the Onscreen display "Management" menu after replacing the lamp module. • When switching the projector...
User Manual
Page 10
How to login in 34 Home 35 Control Panel 35 Network Setting 36 Alert Setting 36 Logout 37 Appendices 38 Troubleshooting 38 LED & Alarm Definition Listing 42 Cleaning and replacing the dust filters 43 Replacing the Lamp 44 Ceiling Mount Installation 45 Specifications 48 Compatibility modes 52 Regulations and safety notices 57
How to login in 34 Home 35 Control Panel 35 Network Setting 36 Alert Setting 36 Logout 37 Appendices 38 Troubleshooting 38 LED & Alarm Definition Listing 42 Cleaning and replacing the dust filters 43 Replacing the Lamp 44 Ceiling Mount Installation 45 Specifications 48 Compatibility modes 52 Regulations and safety notices 57
User Manual
Page 11
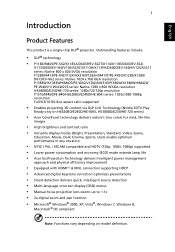
... (ECO) mode extends lamp life • Acer EcoProjeciton Technology delivers Intelligent power management approach and physical efficiency improvement • Equipped with HDMI™ & MHL connection supporting HDCP • Advanced digital keystone correction optimizes presentations • Smart detection delivers quick, intelligent source detection • Multi-language onscreen display (OSD) menus • Manual focus projection lens zooms up to 1.1x • 2x digital zoom and pan function • Microsoft® Windows®...
... (ECO) mode extends lamp life • Acer EcoProjeciton Technology delivers Intelligent power management approach and physical efficiency improvement • Equipped with HDMI™ & MHL connection supporting HDCP • Advanced digital keystone correction optimizes presentations • Smart detection delivers quick, intelligent source detection • Multi-language onscreen display (OSD) menus • Manual focus projection lens zooms up to 1.1x • 2x digital zoom and pan function • Microsoft® Windows®...
User Manual
Page 14
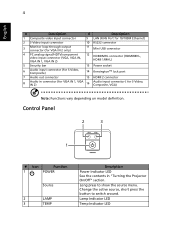
...for VGA IN 2 only) 11 Mini USB connector 4 PC analog signal/HDTV/component video input connector (VGA, VGA IN, VGA IN 1, VGA IN 2) 12 HDMI/MHL connector (HDMI/MHL, HDMI 1/MHL) 5 Security bar 13 Power socket 6 Audio input connector (for S-Video, Composite) 14 KensingtonTM lock port 7 Audio out connector 15 HDMI 2 connector 8 Audio in "Turning the Projector On/Off" section. Control Panel 2 3 LAMP TEMP 1 SOURCE # Icon Function 1 POWER Source 2 LAMP 3 TEMP Description Power Indicator LED See the contents in connector (for VGA IN 1, VGA IN 2) 16 Audio input connector...
...for VGA IN 2 only) 11 Mini USB connector 4 PC analog signal/HDTV/component video input connector (VGA, VGA IN, VGA IN 1, VGA IN 2) 12 HDMI/MHL connector (HDMI/MHL, HDMI 1/MHL) 5 Security bar 13 Power socket 6 Audio input connector (for S-Video, Composite) 14 KensingtonTM lock port 7 Audio out connector 15 HDMI 2 connector 8 Audio in "Turning the Projector On/Off" section. Control Panel 2 3 LAMP TEMP 1 SOURCE # Icon Function 1 POWER Source 2 LAMP 3 TEMP Description Power Indicator LED See the contents in connector (for VGA IN 1, VGA IN 2) 16 Audio input connector...
User Manual
Page 15
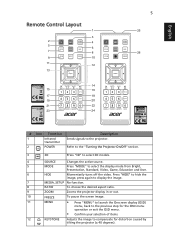
... signals to select the display mode from Bright, Presentation, Standard, Video, Game, Education and User. 6 HIDE Momentarily turns off the video. Press "HIDE" to hide the image, press again to display the image. 7 MEDIA_SETUP No function. 8 RATIO To choose the desired aspect ratio. 9 ZOOM Zooms the projector display in or out. 10 FREEZE To pause the screen image. 11 MENU • Press "MENU" to launch the Onscreen display (OSD) menu...
... signals to select the display mode from Bright, Presentation, Standard, Video, Game, Education and User. 6 HIDE Momentarily turns off the video. Press "HIDE" to hide the image, press again to display the image. 7 MEDIA_SETUP No function. 8 RATIO To choose the desired aspect ratio. 9 ZOOM Zooms the projector display in or out. 10 FREEZE To pause the screen image. 11 MENU • Press "MENU" to launch the Onscreen display (OSD) menu...
User Manual
Page 16
... the "Acer LAN webpage management" utility. For USB control and firmware upgrade. Press "0~9" to select the next or previous page. For computer mode only. Aim the remote at the viewing screen, press and hold this button to input a password in Japanese market. Use this button to the projector via a USB cable. Aim the remote at the viewing screen. No function. No function. Note: Functions vary depending on model definition. To change source to your...
... the "Acer LAN webpage management" utility. For USB control and firmware upgrade. Press "0~9" to select the next or previous page. For computer mode only. Aim the remote at the viewing screen, press and hold this button to input a password in Japanese market. Use this button to the projector via a USB cable. Aim the remote at the viewing screen. No function. No function. Note: Functions vary depending on model definition. To change source to your...
User Manual
Page 21
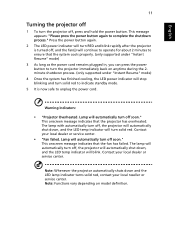
... the LED lamp indicator turns solid red, contact your local reseller or service center. English 11 Turning the projector off 1 To turn off soon." Lamp will automatically turn RED and blink rapidly after the projector is now safe to turn the projector immediately back on model definition. This onscreen message indicates that the projector has overheated. Note: Whenever the projector automatically shuts down , and the LED temp indicator will blink. This message appears: "Please press the power button again to indicate standby mode...
... the LED lamp indicator turns solid red, contact your local reseller or service center. English 11 Turning the projector off 1 To turn off soon." Lamp will automatically turn RED and blink rapidly after the projector is now safe to turn the projector immediately back on model definition. This onscreen message indicates that the projector has overheated. Note: Whenever the projector automatically shuts down , and the LED temp indicator will blink. This message appears: "Please press the power button again to indicate standby mode...
User Manual
Page 31
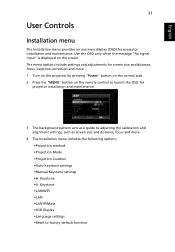
...as screen size and distance, focus and more . 1 Turn on the projector by pressing "Power" button on the control pad. 2 Press the "MENU" button on the screen. The menu options include settings and adjustments for screen size and distance, focus, keystone correction and more . 4 The Installation menu includes the following options: •Projection method •Projection Mode •Projection Location •Auto Keystone settings •Manual Keystone settings •H. Use the OSD only when the message "No signal input" is displayed on the remote control to factory default function...
...as screen size and distance, focus and more . 1 Turn on the projector by pressing "Power" button on the control pad. 2 Press the "MENU" button on the screen. The menu options include settings and adjustments for screen size and distance, focus, keystone correction and more . 4 The Installation menu includes the following options: •Projection method •Projection Mode •Projection Location •Auto Keystone settings •Manual Keystone settings •H. Use the OSD only when the message "No signal input" is displayed on the remote control to factory default function...
User Manual
Page 35
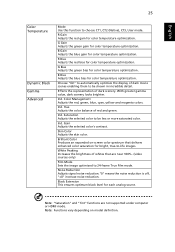
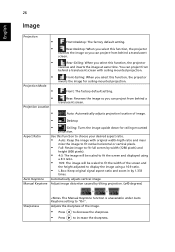
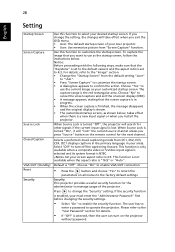
..." functions are near 100%. (video sources only) Film Mode Sets the image optimized to automatically optimize the display of whites that delivers enhanced color saturation for color temperature optimization. G Gain Adjusts the green gain for each analog source. With greater gamma value, dark scenery looks brighter. Color Management Adjusts the red, green, blue, cyan, yellow and magenta colors. Effects the representation of red and green. Hue Adjusts the color balance of dark scenery. Black...
..." functions are near 100%. (video sources only) Film Mode Sets the image optimized to automatically optimize the display of whites that delivers enhanced color saturation for color temperature optimization. G Gain Adjusts the green gain for each analog source. With greater gamma value, dark scenery looks brighter. Color Management Adjusts the red, green, blue, cyan, yellow and magenta colors. Effects the representation of red and green. Hue Adjusts the color balance of dark scenery. Black...
User Manual
Page 36
... times. English 26 Image Projection • Front-Desktop: The factory default setting. • Rear-Desktop: When you select this function, the projector reverses the image so you can project from behind a translucent screen. • Rear-Ceiling: When you select this function, the projector inverts the image for ceiling-mounted projection. You can project from behind a translucent screen. • Auto: Automatically adjusts projection location of image. • Desktop Aspect Ratio Auto Keystone Manual Keystone • Ceiling: Turns the image upside down for ceiling...
... times. English 26 Image Projection • Front-Desktop: The factory default setting. • Rear-Desktop: When you select this function, the projector reverses the image so you can project from behind a translucent screen. • Rear-Ceiling: When you select this function, the projector inverts the image for ceiling-mounted projection. You can project from behind a translucent screen. • Auto: Automatically adjusts projection location of image. • Desktop Aspect Ratio Auto Keystone Manual Keystone • Ceiling: Turns the image upside down for ceiling...
User Manual
Page 38
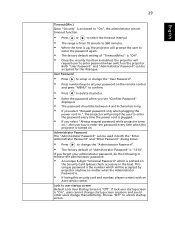
... message disappears and the original display is turned "Off", the projector will "lock" the current source channel unless you restart the projector. The user has to enter a password to 4:3. To capture the image that you want to use the current image as the startup screen, follow the instructions below , takes effect when there is a new input signal or when you press "Source" button on all menus to change the setting, the changes...
... message disappears and the original display is turned "Off", the projector will "lock" the current source channel unless you restart the projector. The user has to enter a password to 4:3. To capture the image that you want to use the current image as the startup screen, follow the instructions below , takes effect when there is a new input signal or when you press "Source" button on all menus to change the setting, the changes...
User Manual
Page 39
... the remote control and press "MENU" to confirm. • Press to delete character. • Enter the password when you select "Always request password while projector turns on.", the user has to change that arbitrarily. Choose "Off" to user startup screen Default Lock User Startup Screen is enabled, the projector will be accepted for this security card and number, please contact with an Acer service center. This unique password is the number...
... the remote control and press "MENU" to confirm. • Press to delete character. • Enter the password when you select "Always request password while projector turns on.", the user has to change that arbitrarily. Choose "Off" to user startup screen Default Lock User Startup Screen is enabled, the projector will be accepted for this security card and number, please contact with an Acer service center. This unique password is the number...
User Manual
Page 41
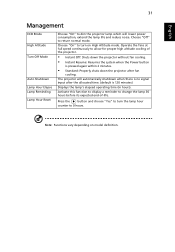
... allocated time. (default is no signal input after fan cooling. Operate the fans at full speed continuously to dim the projector lamp which will automatically shutdown when there is 120 minutes) Displays the lamp's elapsed operating time (in hours). Activate this function to display a reminder to turn the lamp hour counter to return normal mode. Note: Functions vary depending on High Altitude mode. English 31 Management ECO Mode High Altitude Turn Off Mode Auto Shutdown Lamp Hour Elapse Lamp Reminding Lamp Hour Reset...
... allocated time. (default is no signal input after fan cooling. Operate the fans at full speed continuously to dim the projector lamp which will automatically shutdown when there is 120 minutes) Displays the lamp's elapsed operating time (in hours). Activate this function to display a reminder to turn the lamp hour counter to return normal mode. Note: Functions vary depending on High Altitude mode. English 31 Management ECO Mode High Altitude Turn Off Mode Auto Shutdown Lamp Hour Elapse Lamp Reminding Lamp Hour Reset...
User Manual
Page 48
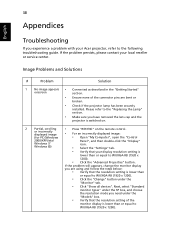
...", open the "Control 2000/XP/Vista/ Panel", and then double-click the "Display" Windows 7/ Windows 8)) icon. • Select the "Settings" tab. • Verify that your display resolution setting is lower than or equal to WUXGA-RB (1920 x 1200). • Click the "Change" button under the "Models" box. • Verify that the resolution setting is switched on. 2 Partial, scrolling • Press "RESYNC" on the remote control. 38 Appendices English Troubleshooting...
...", open the "Control 2000/XP/Vista/ Panel", and then double-click the "Display" Windows 7/ Windows 8)) icon. • Select the "Settings" tab. • Verify that your display resolution setting is lower than or equal to WUXGA-RB (1920 x 1200). • Click the "Change" button under the "Models" box. • Verify that the resolution setting is switched on. 2 Partial, scrolling • Press "RESYNC" on the remote control. 38 Appendices English Troubleshooting...
User Manual
Page 49
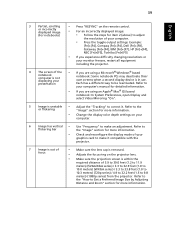
... flickering "Image" section for more information. • Change the display color depth settings on your graphics card to make an adjustment. Refer to your computer's manual for detailed information. • If you are using an Apple® Mac® OS based notebook: In System Preferences, open Display and select Video Mirroring "On". 5 Image is unstable • Adjust the "Tracking" to correct it compatible with the projector. 7 Image...
... flickering "Image" section for more information. • Change the display color depth settings on your graphics card to make an adjustment. Refer to your computer's manual for detailed information. • If you are using an Apple® Mac® OS based notebook: In System Preferences, open Display and select Video Mirroring "On". 5 Image is unstable • Adjust the "Tracking" to correct it compatible with the projector. 7 Image...
User Manual
Page 51
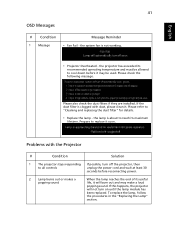
... OSD Messages # Condition 1 Message Message Reminder • Fan Fail - Please also check the dust filters if they are installed. Prepare to cool down before reconnecting power. 2 Lamp burns out or makes a popping sound When the lamp reaches the end of its recommended operating temperature and must be used. the system fan is about to "Cleaning and replacing the dust filter" for details. • Replace the lamp - the projector has exceeded its useful life...
... OSD Messages # Condition 1 Message Message Reminder • Fan Fail - Please also check the dust filters if they are installed. Prepare to cool down before reconnecting power. 2 Lamp burns out or makes a popping sound When the lamp reaches the end of its recommended operating temperature and must be used. the system fan is about to "Cleaning and replacing the dust filter" for details. • Replace the lamp - the projector has exceeded its useful life...


