

User Manual
Page 2
... projector. 6. Power sources Check that the replacement parts are required, be required to take adequate measures. 1 Refer all of your local power supply. 7. WARNING: This is identical with ventilation holes (intake) and ventilation holes (exhaust). Ventilation The projector is operated. 2. Unauthorized substitutions may cause radio interference in the operating instructions should be adhered to. 3. Read instructions All the safety and operating instructions should be read before cleaning...
... projector. 6. Power sources Check that the replacement parts are required, be required to take adequate measures. 1 Refer all of your local power supply. 7. WARNING: This is identical with ventilation holes (intake) and ventilation holes (exhaust). Ventilation The projector is operated. 2. Unauthorized substitutions may cause radio interference in the operating instructions should be adhered to. 3. Read instructions All the safety and operating instructions should be read before cleaning...

User Manual
Page 3
...9 Connecting the Projector ...9 Powering on/off the projector ...10 Adjusting the Projected Image ...11 User Controls 14 On-screen display menus ...14 Menu items ...15 Setting up the Projector Network Environment 33 Controlling the Projector via LAN ...34 Controlling the Projector Using Crestron RoomView 37 Maintenance 42 Cleaning the projection window ...42 Cleaning the projector housing ...42 Specifications ...43 Dimensions ...45 Ceiling mount installation ...45 Appendices 46 LED indicator messages ...46 Compatibility Chart ...48 Troubleshooting ...49 RS-232C Specifications and Commands...
...9 Connecting the Projector ...9 Powering on/off the projector ...10 Adjusting the Projected Image ...11 User Controls 14 On-screen display menus ...14 Menu items ...15 Setting up the Projector Network Environment 33 Controlling the Projector via LAN ...34 Controlling the Projector Using Crestron RoomView 37 Maintenance 42 Cleaning the projection window ...42 Cleaning the projector housing ...42 Specifications ...43 Dimensions ...45 Ceiling mount installation ...45 Appendices 46 LED indicator messages ...46 Compatibility Chart ...48 Troubleshooting ...49 RS-232C Specifications and Commands...

User Manual
Page 4
...-phosphor light source free from replacement • Ultra-short throw (UST) projection lens delivers large images from a short projection distance • HDMI x 2 inputs • H./V. Keystone for easy horizontal and vertical keystone correction • 4 Corner Correction allows you to adjust four corners of the projected image • Blu-Ray 3D function supported • 3D Color Management allowing color adjustments to your liking • Screen Color correction allowing projection on surfaces of several predefined colors • Network settings...
...-phosphor light source free from replacement • Ultra-short throw (UST) projection lens delivers large images from a short projection distance • HDMI x 2 inputs • H./V. Keystone for easy horizontal and vertical keystone correction • 4 Corner Correction allows you to adjust four corners of the projected image • Blu-Ray 3D function supported • 3D Color Management allowing color adjustments to your liking • Screen Color correction allowing projection on surfaces of several predefined colors • Network settings...

User Manual
Page 7
... 4. Video input jack 9. S-Video input jack 8. RJ45 LAN input jack 14. HDMI input jack 13. RGB signal output jack 11. SERVICE jack 2. 5V output for information to mount the projector on a ceiling. 6 Kensington anti-theft lock slot 3. AC power cord inlet Note • This projector can be used with a ceiling mount for support. Audio output jack 6. Audio (L/R) input jack 7. Rear 1 23 45 6 7 8 9 10 11 1213 V 14 1. Audio input jack 5. RGB (PC)/Component video (YPbPr) signal input jack 10. RS232 control port...
... 4. Video input jack 9. S-Video input jack 8. RJ45 LAN input jack 14. HDMI input jack 13. RGB signal output jack 11. SERVICE jack 2. 5V output for information to mount the projector on a ceiling. 6 Kensington anti-theft lock slot 3. AC power cord inlet Note • This projector can be used with a ceiling mount for support. Audio output jack 6. Audio (L/R) input jack 7. Rear 1 23 45 6 7 8 9 10 11 1213 V 14 1. Audio input jack 5. RGB (PC)/Component video (YPbPr) signal input jack 10. RS232 control port...

User Manual
Page 9
...) buttons For adjusting the speaker sound level. 17. 3D button For displaying the 3D mode menu screen. 2. ECO button For lowering the noise of the image. 9. Adjustment buttons ( / / / ) For selecting and adjusting menu items. 6. BACK button For returning to the previous menu screen during menu operation. 16. SOURCE buttons For switching Input mode. 5. ENTER button For setting items selected or adjusted on . 3. ON button For turning the power on the menu. 15. Remote control 1 2 RESYNC RATIO 10 3 SOURCE MENU 11 12 4 ENTER 13 5 MODE KEYSTONE BACK 14 6 7 ZOOM...
...) buttons For adjusting the speaker sound level. 17. 3D button For displaying the 3D mode menu screen. 2. ECO button For lowering the noise of the image. 9. Adjustment buttons ( / / / ) For selecting and adjusting menu items. 6. BACK button For returning to the previous menu screen during menu operation. 16. SOURCE buttons For switching Input mode. 5. ENTER button For setting items selected or adjusted on . 3. ON button For turning the power on the menu. 15. Remote control 1 2 RESYNC RATIO 10 3 SOURCE MENU 11 12 4 ENTER 13 5 MODE KEYSTONE BACK 14 6 7 ZOOM...

User Manual
Page 20
... On Closed Caption CC1 Caption Version CC2 CC3 CC4 Light Source Eco Mode Off On Settings Light Source Hours Disable SYSTEM SETUP : Advanced Auto Power Off Quick Cooling 10Min 20Min 30Min Off On Standby Settings LAN Control Off On DHCP Client Off On IP Address Network Settings Subnet Mask Default Gateway DNS Server Change Security password Advanced Settings Power on Lock Off On Keylock Off On All Reset SOURCE Picture Mode Signal Info INFORMATION Signal Type Light Source Hours IP Address MAC Address Firmware Version 19
... On Closed Caption CC1 Caption Version CC2 CC3 CC4 Light Source Eco Mode Off On Settings Light Source Hours Disable SYSTEM SETUP : Advanced Auto Power Off Quick Cooling 10Min 20Min 30Min Off On Standby Settings LAN Control Off On DHCP Client Off On IP Address Network Settings Subnet Mask Default Gateway DNS Server Change Security password Advanced Settings Power on Lock Off On Keylock Off On All Reset SOURCE Picture Mode Signal Info INFORMATION Signal Type Light Source Hours IP Address MAC Address Firmware Version 19

User Manual
Page 29
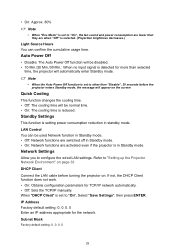
... SYSTEM SETUP : Advanced High Altitude Mode This function changes the fan rotation speed. • Off: Suitable for normal environments. • On: Set when using the projector at the broadcast source. Closed Caption • This function is available for NTSC3.58 signal. • "Closed Caption" is a system which allows conversations, narration, and sound effects in TV programs (Limited regions) and home videos to be viewed as...
... SYSTEM SETUP : Advanced High Altitude Mode This function changes the fan rotation speed. • Off: Suitable for normal environments. • On: Set when using the projector at the broadcast source. Closed Caption • This function is available for NTSC3.58 signal. • "Closed Caption" is a system which allows conversations, narration, and sound effects in TV programs (Limited regions) and home videos to be viewed as...
User Manual
Page 30
... used Network function in Standby mode. • Off: Network functions are switched off in Standby mode. • On: Network functions are activated even if the projector is in standby mode. IP Address Factory default setting: 0. 0. 0. 0 Enter an IP address appropriate for the network. When "DHCP Client" is set to "On", the fan sound and power consumption are when "Off" is selected. (Projection brightness decreases.) Light Source Hours You can be normal time. • On: The cooling time is setting power...
... used Network function in Standby mode. • Off: Network functions are switched off in Standby mode. • On: Network functions are activated even if the projector is in standby mode. IP Address Factory default setting: 0. 0. 0. 0 Enter an IP address appropriate for the network. When "DHCP Client" is set to "On", the fan sound and power consumption are when "Off" is selected. (Projection brightness decreases.) Light Source Hours You can be normal time. • On: The cooling time is setting power...

User Manual
Page 31
...; Factory default setting: 0. 0. 0. 0 Enter a DNS Server address appropriate for entering the password appears. 3. Press the / / / buttons on the remote control or on the projector to enter the preset password in "INPUT CURRENT PASSWORD". • When setting the password for the first time, "INPUT CURRENT PASSWORD" input will be skipped. • If you record the Password in "Input New Password". 5. Advanced Security Settings This function prevents unauthorized use , set , the Password input screen appears after the power is turned on. Change password 1. Select "Change Password...
...; Factory default setting: 0. 0. 0. 0 Enter a DNS Server address appropriate for entering the password appears. 3. Press the / / / buttons on the remote control or on the projector to enter the preset password in "INPUT CURRENT PASSWORD". • When setting the password for the first time, "INPUT CURRENT PASSWORD" input will be skipped. • If you record the Password in "Input New Password". 5. Advanced Security Settings This function prevents unauthorized use , set , the Password input screen appears after the power is turned on. Change password 1. Select "Change Password...

User Manual
Page 32
... projector is warming up. Keystone Correction - Security Settings - The following items or menu cannot be initialized. - Projection Mode - Network Settings - All Reset This function allows you to lock the operation buttons on . • The Keylock function does not affect the operation with the Menu Screen • On: All buttons on the projector, except Power, are locked. • Off: Turns off the Keylock function. High Altitude Mode - Light Source Hours 31 Setting with the remote control buttons. • You cannot use...
... projector is warming up. Keystone Correction - Security Settings - The following items or menu cannot be initialized. - Projection Mode - Network Settings - All Reset This function allows you to lock the operation buttons on . • The Keylock function does not affect the operation with the Menu Screen • On: All buttons on the projector, except Power, are locked. • Off: Turns off the Keylock function. High Altitude Mode - Light Source Hours 31 Setting with the remote control buttons. • You cannot use...
User Manual
Page 34
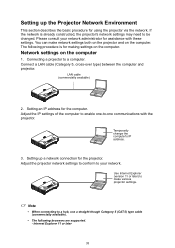
The following browsers are supported. - LAN cable (commercially available) 2. Adjust the projector network settings to conform to -one -to your network administrator for assistance with the projector. Adjust the IP settings of the computer to enable one communications with these settings. Temporarily change the computer's IP address. 3. Note • When connecting to a computer. Connecting a projector to a hub, use a straight-though Category 5 (CAT.5) type cable (commercially available). • The following procedure...
The following browsers are supported. - LAN cable (commercially available) 2. Adjust the projector network settings to conform to -one -to your network administrator for assistance with the projector. Adjust the IP settings of the computer to enable one communications with these settings. Temporarily change the computer's IP address. 3. Note • When connecting to a computer. Connecting a projector to a hub, use a straight-though Category 5 (CAT.5) type cable (commercially available). • The following procedure...

User Manual
Page 39
... Sharpness Freeze Buttons Functions Adjusting the contrast. Adjusting the Sharpness. For automatically adjusting images when connected to operate below functions by clicking on the remote control. Tabs Contact IT Help Functions Help Desk window will be displayed, and able to send/receive a message to use the control menu 5 1 2 4 3 1 Operate below . For temporarily displaying a black screen and turning off the sound. 2 Change the input mode by clicking on and putting the projector into Standby mode. For switching the picture size (NORMAL, 16...
... Sharpness Freeze Buttons Functions Adjusting the contrast. Adjusting the Sharpness. For automatically adjusting images when connected to operate below functions by clicking on the remote control. Tabs Contact IT Help Functions Help Desk window will be displayed, and able to send/receive a message to use the control menu 5 1 2 4 3 1 Operate below . For temporarily displaying a black screen and turning off the sound. 2 Change the input mode by clicking on and putting the projector into Standby mode. For switching the picture size (NORMAL, 16...

User Manual
Page 41
... to fix what is set on this Projector Menu. 3 User Password To lock the control menu on the conputer with a password, check on this Admin Password. 40 The error will be displayed. Setting for the control menu. (within 22 characters) When using DHCP, check on the control menu and the below will be invalid if checked. Click to change the settings for the projector. Set subnet mask for the projector. Set IP Address for the projector. Set default gateway for the projector. Set DNS...
... to fix what is set on this Projector Menu. 3 User Password To lock the control menu on the conputer with a password, check on this Admin Password. 40 The error will be displayed. Setting for the control menu. (within 22 characters) When using DHCP, check on the control menu and the below will be invalid if checked. Click to change the settings for the projector. Set subnet mask for the projector. Set IP Address for the projector. Set default gateway for the projector. Set DNS...

User Manual
Page 43
... service personnel. Cleaning the projection window Gently wipe the lens with a soft cloth. Do not use benzene or thinners. • Do not use detergents or chemicals other parts need replacing, contact your hands. Do not touch the projection window with a soft, dry cloth Note • Turn off and unplug the projector first. Warning • Never open any of the projector, always switch off the projector and remove the AC power cord...
... service personnel. Cleaning the projection window Gently wipe the lens with a soft cloth. Do not use benzene or thinners. • Do not use detergents or chemicals other parts need replacing, contact your hands. Do not touch the projection window with a soft, dry cloth Note • Turn off and unplug the projector first. Warning • Never open any of the projector, always switch off the projector and remove the AC power cord...
User Manual
Page 47
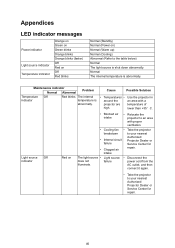
... for repair. Blocked air • intake Cooling fan • breakdown Internal circuit failure Clogged air intake Light source • failure Relocate the projector to the table below) Normal The light source is shut down abnormally. Normal The internal temperature is abnormally. Light source Off indicator Red on ) Normal (Warm up) Normal (Cooling) Abnormal (Refer to an area with a projector are temperature of high. Appendices LED indicator messages Power indicator Light source indicator Temperature indicator Orange on Green on Green blinks Orange blinks Orange blinks (faster...
... for repair. Blocked air • intake Cooling fan • breakdown Internal circuit failure Clogged air intake Light source • failure Relocate the projector to the table below) Normal The light source is shut down abnormally. Normal The internal temperature is abnormally. Light source Off indicator Red on ) Normal (Warm up) Normal (Cooling) Abnormal (Refer to an area with a projector are temperature of high. Appendices LED indicator messages Power indicator Light source indicator Temperature indicator Orange on Green on Green blinks Orange blinks Orange blinks (faster...

User Manual
Page 48
Power indicator Green on/ Orange Green blinks blinks Orange on/ (faster) Orange blinks Projector shutdown • Cooling fan stops • Disconnect the power cord from the AC outlet, and then connect it again. • Take the projector to your nearest Authorized Projector Dealer or Service Center for repair. 47
Power indicator Green on/ Orange Green blinks blinks Orange on/ (faster) Orange blinks Projector shutdown • Cooling fan stops • Disconnect the power cord from the AC outlet, and then connect it again. • Take the projector to your nearest Authorized Projector Dealer or Service Center for repair. 47
User Manual
Page 50
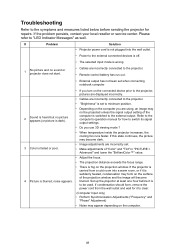
... signal output setting of the projection window and the image will become dark. 3 Color is faded or poor. • Image adjustments are incorrectly set to minimum position. 2 Sound is heard but no sound or projector does not start. • Cables are incorrectly connected to the projector. • Remote control battery has run out. • External output has not been set when connecting notebook computer • If you use 3D viewing mode ? • When temperature...
... signal output setting of the projection window and the image will become dark. 3 Color is faded or poor. • Image adjustments are incorrectly set to minimum position. 2 Sound is heard but no sound or projector does not start. • Cables are incorrectly connected to the projector. • Remote control battery has run out. • External output has not been set when connecting notebook computer • If you use 3D viewing mode ? • When temperature...
User Manual
Page 51
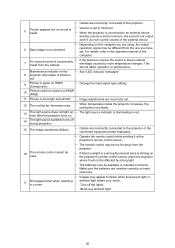
... light source suddenly turns off the lights. -Block any ambient light. 50 ambient light enters your vision. -Turn off during projection. 15 The image sometimes flickers. • Cables are incorrectly connected to the projector or the connected equipment works improperly. • Operate the remote control while pointing it will not affect operation or performance. Maintenance indicator on the 8 projector illuminates or blinks in red. • See "LED indicator messages". 9 Picture is green on HDMI (Component). • Change the input signal type setting. 10 Picture...
... light source suddenly turns off the lights. -Block any ambient light. 50 ambient light enters your vision. -Turn off during projection. 15 The image sometimes flickers. • Cables are incorrectly connected to the projector or the connected equipment works improperly. • Operate the remote control while pointing it will not affect operation or performance. Maintenance indicator on the 8 projector illuminates or blinks in red. • See "LED indicator messages". 9 Picture is green on HDMI (Component). • Change the input signal type setting. 10 Picture...
User Manual
Page 52
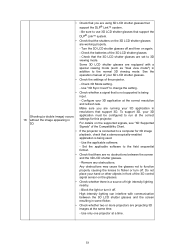
... high intensity lighting nearby. - Use only one projector at the correct resolution and refresh rate. See the operation manual of your 3D LCD shutter glasses. • Check the settings of the 3D LCD shutter glasses. - To support 3D, your 3D application must be configured to flicker or turn it off . Remove any obstructions. High intensity lighting can interfere with a special viewing mode (such as "dual view mode") in 3D. Ghosting (a double image...
... high intensity lighting nearby. - Use only one projector at the correct resolution and refresh rate. See the operation manual of your 3D LCD shutter glasses. • Check the settings of the 3D LCD shutter glasses. - To support 3D, your 3D application must be configured to flicker or turn it off . Remove any obstructions. High intensity lighting can interfere with a special viewing mode (such as "dual view mode") in 3D. Ghosting (a double image...

User Manual
Page 53
... Communication conditions Set the serial port settings of the computer to RS-232C standard. Enter the "internet explorer" in Windows 10. 1. Baud rate: 9,600 bps Data length: 8 bits Parity bit: None Stop bit: 1 bit Flow control: None CONTROL CONTENTS Power Light Source Source Change On Off State Usage Time (Hour) VGA IN HDMI1 HDMI2 S-VIDEO VIDEO Source Check Volume Volume up (1 point) Volume down (1 point) State RETURN COMMAND PARAMETER Power ON Standby mode P O W R _ _ _ 1 OK...
... Communication conditions Set the serial port settings of the computer to RS-232C standard. Enter the "internet explorer" in Windows 10. 1. Baud rate: 9,600 bps Data length: 8 bits Parity bit: None Stop bit: 1 bit Flow control: None CONTROL CONTENTS Power Light Source Source Change On Off State Usage Time (Hour) VGA IN HDMI1 HDMI2 S-VIDEO VIDEO Source Check Volume Volume up (1 point) Volume down (1 point) State RETURN COMMAND PARAMETER Power ON Standby mode P O W R _ _ _ 1 OK...


