

User Manual
Page 5
... use non-compliant parts when adding or changing components. Do not operate if smoke, strange noise or odor comes out of other risks. Consult your projector. The bright light may hurt your projector. v Product servicing Do not attempt to service this product from walls and free flow of air around the projector are necessary. • Locations where temperatures may become excessively high, such as opening or removing covers...
... use non-compliant parts when adding or changing components. Do not operate if smoke, strange noise or odor comes out of other risks. Consult your projector. The bright light may hurt your projector. v Product servicing Do not attempt to service this product from walls and free flow of air around the projector are necessary. • Locations where temperatures may become excessively high, such as opening or removing covers...

User Manual
Page 6
.... • Do not keep using this case contact your eyes. • Always open the lens shutter or remove the lens cap when the projector is on the remote control. • The lamp becomes extremely hot during operation. The temperature inside may rise and cause damage when the filter/ventilation slots are dangerous high voltages inside which has its cooling cycle before turning main power off , please...
.... • Do not keep using this case contact your eyes. • Always open the lens shutter or remove the lens cap when the projector is on the remote control. • The lamp becomes extremely hot during operation. The temperature inside may rise and cause damage when the filter/ventilation slots are dangerous high voltages inside which has its cooling cycle before turning main power off , please...

User Manual
Page 8
...; In areas susceptible to change the lamp when it shows warning messages. • Reset the "Lamp Hour Reset" function from the Onscreen Display "Management" menu after replacing the lamp module. • When switching the projector off the product before disconnecting power. • Turn on the projector first and then the signal sources. • Do not use lens cap when projector is on until the lamp module has been replaced. If this may hurt your...
...; In areas susceptible to change the lamp when it shows warning messages. • Reset the "Lamp Hour Reset" function from the Onscreen Display "Management" menu after replacing the lamp module. • When switching the projector off the product before disconnecting power. • Turn on the projector first and then the signal sources. • Do not use lens cap when projector is on until the lamp module has been replaced. If this may hurt your...
User Manual
Page 9
...Overview 3 Projector Outlook 3 Control Panel 4 Remote Control Layout 5 Getting Started 7 Connecting the Projector 7 Turning the Projector On/Off 9 Turning On the Projector 9 Turning Off the Projector 10 Adjusting the Projected Image 11 Adjusting the Height of the Projected Image 11 How to Optimize Image Size and Distance 12 How to Get a Preferred Image Size by Adjusting Distance and Zoom 14 User Controls 16 Installation Menu 16 Acer Empowering Technology 17 Onscreen Display (OSD) Menus 18 Color 19 Image 21 Setting 24 Management 27 Audio 28 Timer 28...
...Overview 3 Projector Outlook 3 Control Panel 4 Remote Control Layout 5 Getting Started 7 Connecting the Projector 7 Turning the Projector On/Off 9 Turning On the Projector 9 Turning Off the Projector 10 Adjusting the Projected Image 11 Adjusting the Height of the Projected Image 11 How to Optimize Image Size and Distance 12 How to Get a Preferred Image Size by Adjusting Distance and Zoom 14 User Controls 16 Installation Menu 16 Acer Empowering Technology 17 Onscreen Display (OSD) Menus 18 Color 19 Image 21 Setting 24 Management 27 Audio 28 Timer 28...

User Manual
Page 11
..., 1080p) supported • Lower power consumption and economy (ECO) mode extends lamp life • Acer EcoProjection Technology delivers Intelligent power management approach and physical efficiency improvement • Empowering Key reveals Acer Empowering Technology functions (Acer eView, eTimer, ePower Management) for easy adjustment of settings • Advanced keystone correction delivers optimum presentations • Multi-language Onscreen Display (OSD) menus • Manual focus projection lens • 2X digital zoom and pan...
..., 1080p) supported • Lower power consumption and economy (ECO) mode extends lamp life • Acer EcoProjection Technology delivers Intelligent power management approach and physical efficiency improvement • Empowering Key reveals Acer Empowering Technology functions (Acer eView, eTimer, ePower Management) for easy adjustment of settings • Advanced keystone correction delivers optimum presentations • Multi-language Onscreen Display (OSD) menus • Manual focus projection lens • 2X digital zoom and pan...

User Manual
Page 13
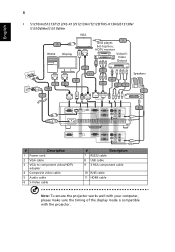
...S-VIDEO AUDIO-R AUDIO IN 1 VGA OUT VGA IN 1 AUDIO IN 2 (S1213/T212/XS-X13/ VGA IN 2 VIDEO AUDIO-L AUDIO OUT 7 89 S1213 S1313W) # Description # Description 1 USB connector 8 Tilt adjusting wheel 2 Monitor loop-through output connector 9 Kensington™ lock port 3 PC analog signal/HDTV/component video input connector 10 LAN (RJ45 port for 10/100M Ethernet) 4 RS232 connector 11 Remote control receiver 5 S-Video input connector Composite video input connector 12 HDMI input connector 6 Audio input connector Audio output connector 13 Audio input connector (L/R) 7 Power...
...S-VIDEO AUDIO-R AUDIO IN 1 VGA OUT VGA IN 1 AUDIO IN 2 (S1213/T212/XS-X13/ VGA IN 2 VIDEO AUDIO-L AUDIO OUT 7 89 S1213 S1313W) # Description # Description 1 USB connector 8 Tilt adjusting wheel 2 Monitor loop-through output connector 9 Kensington™ lock port 3 PC analog signal/HDTV/component video input connector 10 LAN (RJ45 port for 10/100M Ethernet) 4 RS232 connector 11 Remote control receiver 5 S-Video input connector Composite video input connector 12 HDMI input connector 6 Audio input connector Audio output connector 13 Audio input connector (L/R) 7 Power...

User Manual
Page 15
... 9 S-VIDEO 10 HDMI™; Press "0~9" to VGA. To change source to input a password in or out. Zooms the projector display in the "Setting" > "Security" OSD. This connection supports analog RGB, YPbPr (480p/576p/720p/1080i/1080p), and YCbCr (480i/576i). (No function) To change source to the input source. HDMI™/DVI 11 Infrared transmitter 12 Empowering key Selects items or makes adjustments to the "Turning the Projector On/Off" section. 5 Remote Control...
... 9 S-VIDEO 10 HDMI™; Press "0~9" to VGA. To change source to input a password in or out. Zooms the projector display in the "Setting" > "Security" OSD. This connection supports analog RGB, YPbPr (480p/576p/720p/1080i/1080p), and YCbCr (480i/576i). (No function) To change source to the input source. HDMI™/DVI 11 Infrared transmitter 12 Empowering key Selects items or makes adjustments to the "Turning the Projector On/Off" section. 5 Remote Control...
User Manual
Page 18
... AUDIO IN 1 AUDIO IN 2 AUDIO OUT # Description 1 Power cord 2 VGA cable 3 VGA to component video/HDTV adapter 4 Composite video cable 5 Audio cable 6 S-Video cable # Description 7 RS232 cable 8 USB cable 9 3 RCA component cable 10 RJ45 cable 11 HDMI cable Note: To ensure the projector works well with your computer, please make sure the timing of the display mode is compatible with the projector. English 8 • S1210Hn/S1213/T212/XS-X13/S1213Hn/T212DT/XS-X13HG/S1313W/ S1310WHn/S1313WHn VGA 10 RS232 Display USB 5 DVD player, Set...
... AUDIO IN 1 AUDIO IN 2 AUDIO OUT # Description 1 Power cord 2 VGA cable 3 VGA to component video/HDTV adapter 4 Composite video cable 5 Audio cable 6 S-Video cable # Description 7 RS232 cable 8 USB cable 9 3 RCA component cable 10 RJ45 cable 11 HDMI cable Note: To ensure the projector works well with your computer, please make sure the timing of the display mode is compatible with the projector. English 8 • S1210Hn/S1213/T212/XS-X13/S1213Hn/T212DT/XS-X13HG/S1313W/ S1310WHn/S1313WHn VGA 10 RS232 Display USB 5 DVD player, Set...

User Manual
Page 26
The new settings will be saved automatically upon exiting the menu. 5 Press "MENU" anytime to exit the menu and return to enter a submenu for feature setting. Use the OSD only when the message "No signal input" is displayed on the screen. 1 Turn on the projector by pressing remote control. (POWER) on the control panel or 2 Press "MENU" on the control panel or remote control to launch the OSD for projector installation and maintenance. English 16 User Controls Installation Menu The Installation menu provides...
The new settings will be saved automatically upon exiting the menu. 5 Press "MENU" anytime to exit the menu and return to enter a submenu for feature setting. Use the OSD only when the message "No signal input" is displayed on the screen. 1 Turn on the projector by pressing remote control. (POWER) on the control panel or 2 Press "MENU" on the control panel or remote control to launch the OSD for projector installation and maintenance. English 16 User Controls Installation Menu The Installation menu provides...

User Manual
Page 29
... education environment. • User: Memorize user's settings. Adjusting the contrast changes the amount of the picture. English 19 Color (S1110/T200/XS-S10/S1210/T210/ XS-X10/S1210Hn/S1310W/T220/ XS-W10/S1310WHn) (S1213/T212/XS-X13/S1213Hn/ T212DT/XS-X13HG/S1313W/ S1313WHn) Display Mode Wall Color Brightness Contrast There are several choices, including White, Light Yellow, Light Blue, Pink and Dark Green. Use this function to choose...
... education environment. • User: Memorize user's settings. Adjusting the contrast changes the amount of the picture. English 19 Color (S1110/T200/XS-S10/S1210/T210/ XS-X10/S1210Hn/S1310W/T220/ XS-W10/S1310WHn) (S1213/T212/XS-X13/S1213Hn/ T212DT/XS-X13HG/S1313W/ S1313WHn) Display Mode Wall Color Brightness Contrast There are several choices, including White, Light Yellow, Light Blue, Pink and Dark Green. Use this function to choose...

User Manual
Page 30
... fully saturated colors. If turned on, the projector dynamically adjusts the power consumption of the lamp according to increase the amount of the image being projected. At higher color temperatures, the screen looks colder; Adjusts the green color. Saturation • Press to decrease the amount of color in the image. Adjusts the red color. Adjusts the blue color. Note: "Saturation" and "Tint" functions are not supported under computer mode. at lower color temperatures, the screen looks warmer...
... fully saturated colors. If turned on, the projector dynamically adjusts the power consumption of the lamp according to increase the amount of the image being projected. At higher color temperatures, the screen looks colder; Adjusts the green color. Saturation • Press to decrease the amount of color in the image. Adjusts the red color. Adjusts the blue color. Note: "Saturation" and "Tint" functions are not supported under computer mode. at lower color temperatures, the screen looks warmer...

User Manual
Page 31
... time. 21 Image English Projection Aspect Ratio Keystone • Front-Desktop: The factory default setting. • Front-Ceiling: When you select this function, the projector inverts the image for ceiling-mounted projection. • Rear-Desktop: When you select this function, the projector reverses the image so that you can project from behind a translucent screen. • Rear-Ceiling: When you select this function to choose your desired aspect ratio. • Auto: Keeps...
... time. 21 Image English Projection Aspect Ratio Keystone • Front-Desktop: The factory default setting. • Front-Ceiling: When you select this function, the projector inverts the image for ceiling-mounted projection. • Rear-Desktop: When you select this function, the projector reverses the image so that you can project from behind a translucent screen. • Rear-Ceiling: When you select this function to choose your desired aspect ratio. • Auto: Keeps...

User Manual
Page 35
... time the projector is turned on. Press to "User Password" section for this dialogue. Please refer to change "User Password". • Use the numerical keys on the remote control to set timeout function. • Press to select timeout duration. • The range is from 10 to 990 minutes. • When time is up, the projector will request you to enter the password again. • The factory default setting...
... time the projector is turned on. Press to "User Password" section for this dialogue. Please refer to change "User Password". • Use the numerical keys on the remote control to set timeout function. • Press to select timeout duration. • The range is from 10 to 990 minutes. • When time is up, the projector will request you to enter the password again. • The factory default setting...
User Manual
Page 36
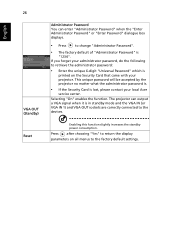
... Card is printed on all menus to the factory default settings. English 26 VGA OUT (Standby) Reset Administrator Password You can output a VGA signal when it is in standby mode and the VGA IN (or VGA IN 1) and VGA OUT sockets are correctly connected to the devices. Press after choosing "Yes" to return the display parameters on the Security Card that came with your local Acer service center.
... Card is printed on all menus to the factory default settings. English 26 VGA OUT (Standby) Reset Administrator Password You can output a VGA signal when it is in standby mode and the VGA IN (or VGA IN 1) and VGA OUT sockets are correctly connected to the devices. Press after choosing "Yes" to return the display parameters on the Security Card that came with your local Acer service center.

User Manual
Page 37
You can control the projector by using this page. English 27 To connect your computer. 2 The remote network operation page is displayed. LAN Setting (for S1210Hn/ S1213Hn/ T212DT/XSX13HG/ S1310WHn/ S1313WHn) The factory default of "Administrator Password" is displayed. 3 Enter "Administrator Password". to the default settings. Press after choosing "Yes" to return all items on , and press press . If your are not in a DHCP environment, set DHCP to "Off...
You can control the projector by using this page. English 27 To connect your computer. 2 The remote network operation page is displayed. LAN Setting (for S1210Hn/ S1213Hn/ T212DT/XSX13HG/ S1310WHn/ S1313WHn) The factory default of "Administrator Password" is displayed. 3 Enter "Administrator Password". to the default settings. Press after choosing "Yes" to return all items on , and press press . If your are not in a DHCP environment, set DHCP to "Off...

User Manual
Page 39
... projector immediately within 2 minutes after the setting time. Choose "Off" to return to 0 hours. 29 Management English ECO Mode High Altitude Choose "On" to dim the projector lamp, which will show or hide warning message Lamp Reminding when the changing lamp message is displayed. When this function to show up 30 hours before end of life. Choose "On" to turn the lamp hour counter to the normal mode. Lamp Hour Elapse Displays the lamp's elapsed operating time (in hours...
... projector immediately within 2 minutes after the setting time. Choose "Off" to return to 0 hours. 29 Management English ECO Mode High Altitude Choose "On" to dim the projector lamp, which will show or hide warning message Lamp Reminding when the changing lamp message is displayed. When this function to show up 30 hours before end of life. Choose "On" to turn the lamp hour counter to the normal mode. Lamp Hour Elapse Displays the lamp's elapsed operating time (in hours...

User Manual
Page 42
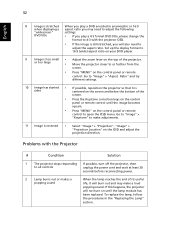
... service center. 30 Appendices English Troubleshooting If you have removed the lens cap and the projector is switched on. 2 Partial, scrolling • Press "RESYNC" on the control panel or remote or incorrectly control. If the problem persists, please contact your Acer projector, refer to 1600 x 1200, 1920 x 1080. If the problem still appears, change the monitor display you need under the "Models" box. • Verify that the resolution setting...
... service center. 30 Appendices English Troubleshooting If you have removed the lens cap and the projector is switched on. 2 Partial, scrolling • Press "RESYNC" on the control panel or remote or incorrectly control. If the problem persists, please contact your Acer projector, refer to 1600 x 1200, 1920 x 1080. If the problem still appears, change the monitor display you need under the "Models" box. • Verify that the resolution setting...

User Manual
Page 43
..." on the control panel or remote control. • For an incorrectly displayed image: • Follow the steps for item 2 (above) to adjust the resolution of focus • Make sure the lens cap is removed. • Adjusts the focus ring on your computer. 6 Image has vertical • Use "Frequency" to make it . Refer to the "Image" or flickering section for more information. • Check and reconfigure the display mode of your...
..." on the control panel or remote control. • For an incorrectly displayed image: • Follow the steps for item 2 (above) to adjust the resolution of focus • Make sure the lens cap is removed. • Adjusts the focus ring on your computer. 6 Image has vertical • Use "Frequency" to make it . Refer to the "Image" or flickering section for more information. • Check and reconfigure the display mode of your...
User Manual
Page 44
... adjustments. 11 Image is reversed • Select "Image" > "Projection", "Image" > "Projection Location" on the top of the screen. • Press the Keystone correction keys on the control panel or remote control until the lamp module has been replaced. Go to "Image" > "Aspect Ratio" and try different settings. 10 Image has slanted • If possible, reposition the projector so that it will not turn off the projector, then to all controls unplug the power cord...
... adjustments. 11 Image is reversed • Select "Image" > "Projection", "Image" > "Projection Location" on the top of the screen. • Press the Keystone correction keys on the control panel or remote control until the lamp module has been replaced. Go to "Image" > "Aspect Ratio" and try different settings. 10 Image has slanted • If possible, reposition the projector so that it will not turn off the projector, then to all controls unplug the power cord...

User Manual
Page 46
Quick flashing V V Quick flashing -- -- -- failure) V V V Quick flashing TEMP LED Red -- --- -- -- Error (Color wheel -- Error (Lamp breakdown) -- V LAMP LED Red -- ---- -- --- V -- V Quick flashing --- 34 English LED & Alarm Definition Listing LED Messages Message Standby (Power cord plugged in) Power on Lamp retry Turning off (Cooling state) Turning off (Cooling completed) Error (Thermal failure) Error (Fan lock failure) Power LED Red Blue V -- ---
Quick flashing V V Quick flashing -- -- -- failure) V V V Quick flashing TEMP LED Red -- --- -- -- Error (Color wheel -- Error (Lamp breakdown) -- V LAMP LED Red -- ---- -- --- V -- V Quick flashing --- 34 English LED & Alarm Definition Listing LED Messages Message Standby (Power cord plugged in) Power on Lamp retry Turning off (Cooling state) Turning off (Cooling completed) Error (Thermal failure) Error (Fan lock failure) Power LED Red Blue V -- ---


