
User Manual
Page 4
... sure that the total The openings should never be blocked or covered. If you can hear it clearly and comfortably and without distortion. • After setting the volume level, do not be used with this product where people will walk on the power cord. These openings must not be blocked by...
... sure that the total The openings should never be blocked or covered. If you can hear it clearly and comfortably and without distortion. • After setting the volume level, do not be used with this product where people will walk on the power cord. These openings must not be blocked by...
User Manual
Page 5
... been damaged • the product exhibits a distinct change in too many devices. Product servicing Do not attempt to replace the power cord set . Refer all products plugged into a non-grounded power outlet. Note: The grounding pin also provides good protection from the wall outlet and...in performance, indicating a need to service this product yourself, as opening or removing covers may interfere with the supplied power supply cord set , make sure that the new power cord meets the following the operating instructions If you to dangerous voltage points or other nearby electrical...
... been damaged • the product exhibits a distinct change in too many devices. Product servicing Do not attempt to replace the power cord set . Refer all products plugged into a non-grounded power outlet. Note: The grounding pin also provides good protection from the wall outlet and...in performance, indicating a need to service this product yourself, as opening or removing covers may interfere with the supplied power supply cord set , make sure that the new power cord meets the following the operating instructions If you to dangerous voltage points or other nearby electrical...
User Manual
Page 12
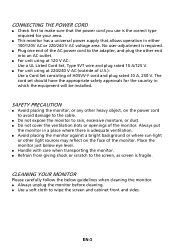
... monitor before cleaning. z Use a soft cloth to rain, excessive moisture, or dust. z For unit using at 220/240 V AC (outside of U.S.): Use a Cord Set consisting of the monitor. z Do not cover the ventilation slots or openings of the AC power cord to the cable. z Handle with care when transporting...end into an AC outlet. CLEANING YOUR MONITOR Please carefully follow the below eye level. z For unit using at 120 V AC: Use a UL Listed Cord Set, Type SVT wire and plug rated 10 A/125 V. z Plug one end of the monitor. EN-3 CONNECTING THE POWER CORD z Check first to the screen...
... monitor before cleaning. z Use a soft cloth to rain, excessive moisture, or dust. z For unit using at 220/240 V AC (outside of U.S.): Use a Cord Set consisting of the monitor. z Do not cover the ventilation slots or openings of the AC power cord to the cable. z Handle with care when transporting...end into an AC outlet. CLEANING YOUR MONITOR Please carefully follow the below eye level. z For unit using at 120 V AC: Use a UL Listed Cord Set, Type SVT wire and plug rated 10 A/125 V. z Plug one end of the monitor. EN-3 CONNECTING THE POWER CORD z Check first to the screen...
User Manual
Page 18
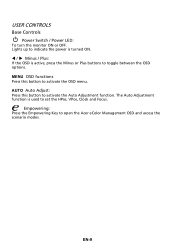
Lights up to indicate the power is used to set the HPos, VPos, Clock and Focus. The Auto Adjustment function is turned ON. AUTO Auto Adjust: Press this botton to activate the Auto Adjustment function. EN-9 W / X Minus / Plus: If the OSD is active, press the Minus or Plus buttons to open the Acer eColor Management OSD and access the scenario modes. Empowering: Press the Empowering Key to toggle between the OSD options. MENU OSD functions Press this button to activate the OSD menu. USER CONTROLS Base Controls Power Switch / Power LED: To turn the monitor ON or OFF.
Lights up to indicate the power is used to set the HPos, VPos, Clock and Focus. The Auto Adjustment function is turned ON. AUTO Auto Adjust: Press this botton to activate the Auto Adjustment function. EN-9 W / X Minus / Plus: If the OSD is active, press the Minus or Plus buttons to open the Acer eColor Management OSD and access the scenario modes. Empowering: Press the Empowering Key to toggle between the OSD options. MENU OSD functions Press this button to activate the OSD menu. USER CONTROLS Base Controls Power Switch / Power LED: To turn the monitor ON or OFF.
User Manual
Page 19
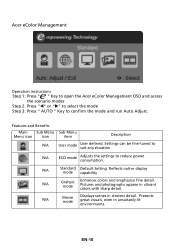
.... N/A Movie mode Displays scenes in vibrant colors with sharp detail. Presents great visuals, even in unsuitably-lit environments. N/A Standard Default Setting. Acer eColor Management Operation instructions Step 1: Press " " Key to open the Acer eColor Management OSD and access the scenario modes Step 2: Press "W" or "X" to select the mode Step 3: Press " AUTO " Key to...
.... N/A Movie mode Displays scenes in vibrant colors with sharp detail. Presents great visuals, even in unsuitably-lit environments. N/A Standard Default Setting. Acer eColor Management Operation instructions Step 1: Press " " Key to open the Acer eColor Management OSD and access the scenario modes Step 2: Press "W" or "X" to select the mode Step 3: Press " AUTO " Key to...

User Manual
Page 20
You can be used for general reference only. EN-11 Actual product specifications may vary. For advanced settings, please refer to following content is for adjusting the settings of your LCD Monitor. Then navigate to the picture element you wish to adjust. 3 Use the e/ f keys to adjust the sliding ...other image-related qualities. The OSD can use the OSD to adjust the picture quality, OSD position and general settings. Press the MENU key to open the OSD. Adjusting the OSD settings Note: The following page: Adjusting the picture quality 1 Press the MENU key to bring up the OSD....
You can be used for general reference only. EN-11 Actual product specifications may vary. For advanced settings, please refer to following content is for adjusting the settings of your LCD Monitor. Then navigate to the picture element you wish to adjust. 3 Use the e/ f keys to adjust the sliding ...other image-related qualities. The OSD can use the OSD to adjust the picture quality, OSD position and general settings. Press the MENU key to open the OSD. Adjusting the OSD settings Note: The following page: Adjusting the picture quality 1 Press the MENU key to bring up the OSD....

User Manual
Page 22
EN-13 Adjusting the setting 1 Press the MENU key to adjust the screen Menu Language and other important settings. Then navigate to the feature you wish to adjust. 3 The Setting menu can be used to bring up the OSD. 2 Using the e/ f keys, select Setting from the OSD.
EN-13 Adjusting the setting 1 Press the MENU key to adjust the screen Menu Language and other important settings. Then navigate to the feature you wish to adjust. 3 The Setting menu can be used to bring up the OSD. 2 Using the e/ f keys, select Setting from the OSD.
User Manual
Page 24
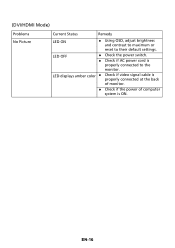
... power of monitor. EN-15 z Check if video signal cable is properly connected at the back of computer system is properly connected to their default settings.
... power of monitor. EN-15 z Check if video signal cable is properly connected at the back of computer system is properly connected to their default settings.
User Manual
Page 25
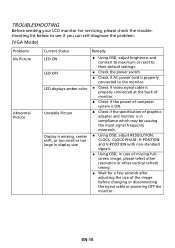
LED OFF z Check the power switch. z Check if AC power cord is ON. EN-16 (DVI/HDMI Mode) Problems No Picture Current Status Remedy LED ON z Using OSD, adjust brightness and contrast to maximum or reset to the monitor. z Check if the power of monitor. LED displays amber color z Check if video signal cable is properly connected at the back of computer system is properly connected to their default settings.
LED OFF z Check the power switch. z Check if AC power cord is ON. EN-16 (DVI/HDMI Mode) Problems No Picture Current Status Remedy LED ON z Using OSD, adjust brightness and contrast to maximum or reset to the monitor. z Check if the power of monitor. LED displays amber color z Check if video signal cable is properly connected at the back of computer system is properly connected to their default settings.
User Manual
Page 26
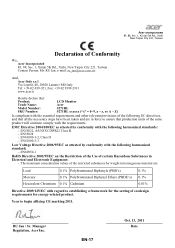
... D -. EN61000-3-3 Low Voltage Directive 2006/95/EC as attested by conformity with regard to establishing a framework for the setting of ecodesign requirements for energy-related product. Acer Incorporated 8F, 88, Sec. 1, Xintai 5th Rd., Xizhi New Taipei City 221, Taiwan Declaration of Conformity We... 40, 20020 Lainate (MI) Italy Tel: +39-02-939-921, Fax: +39-02 9399-2913 www.acer.it Hereby declare that: Product: Trade Name: Model Number: SKU Number: LCD Monitor Acer S271HL S271HL xxxxxx ("x" = 0~9, a ~ z, or A ~ Z) Is compliant with the essential requirements and other relevant ...
... D -. EN61000-3-3 Low Voltage Directive 2006/95/EC as attested by conformity with regard to establishing a framework for the setting of ecodesign requirements for energy-related product. Acer Incorporated 8F, 88, Sec. 1, Xintai 5th Rd., Xizhi New Taipei City 221, Taiwan Declaration of Conformity We... 40, 20020 Lainate (MI) Italy Tel: +39-02-939-921, Fax: +39-02 9399-2913 www.acer.it Hereby declare that: Product: Trade Name: Model Number: SKU Number: LCD Monitor Acer S271HL S271HL xxxxxx ("x" = 0~9, a ~ z, or A ~ Z) Is compliant with the essential requirements and other relevant ...


