
User Manual
Page 2
...or trademarks are recorded on the label affixed to your unit should include the serial number, model number and purchase information. Acer LCD Monitor User Guide Original Issue: 11/2011 Changes may be reproduced, stored in a retrieval system, or transmitted, in this publication... are used herein for a particular purpose. All correspondence concerning your computer. Acer LCD Monitor User Guide Model number Serial number Date of purchase Place of purchase Acer and the Acer logo are registered trademarks of merchantability or fitness for identification purposes only and ...
...or trademarks are recorded on the label affixed to your unit should include the serial number, model number and purchase information. Acer LCD Monitor User Guide Original Issue: 11/2011 Changes may be reproduced, stored in a retrieval system, or transmitted, in this publication... are used herein for a particular purpose. All correspondence concerning your computer. Acer LCD Monitor User Guide Model number Serial number Date of purchase Place of purchase Acer and the Acer logo are registered trademarks of merchantability or fitness for identification purposes only and ...
User Manual
Page 3
...displayed for hours. In this document for future reference. Cleaning your safety and comfort Safety instructions Read these guidelines when cleaning the monitor: • Always unplug the monitor before cleaning. • Use a soft cloth to make sure the flicker disappears. • You may find slightly uneven ... blemishes of 0.01% or less such as a missing pixel or a pixel lit all warnings and instructions marked on LCD monitors The following are normal with the LCD monitor and do not indicate a problem. • Due to the nature of the LCD screen, an afterimage of the fluorescent...
...displayed for hours. In this document for future reference. Cleaning your safety and comfort Safety instructions Read these guidelines when cleaning the monitor: • Always unplug the monitor before cleaning. • Use a soft cloth to make sure the flicker disappears. • You may find slightly uneven ... blemishes of 0.01% or less such as a missing pixel or a pixel lit all warnings and instructions marked on LCD monitors The following are normal with the LCD monitor and do not indicate a problem. • Due to the nature of the LCD screen, an afterimage of the fluorescent...
User Manual
Page 4
... product falls, it could result in installation unless proper ventilation is only used for other similar surface. Never spill liquid of any kind into this monitor ,do not increase it after your ears have adjusted. • Limit the amount of time listening to music at high volume. • Avoid turning up...
... product falls, it could result in installation unless proper ventilation is only used for other similar surface. Never spill liquid of any kind into this monitor ,do not increase it after your ears have adjusted. • Limit the amount of time listening to music at high volume. • Avoid turning up...
User Manual
Page 7
... enabled for power management: • Activate display's Sleep mode within 15 minutes of user inactivity. • Activate computer's Sleep mode within 30 minutes of the monitor, using a footrest, or raising your comfort zone by pushing the power button. Tips and information for more comfortable computer use , consult a physician immediately and inform...
... enabled for power management: • Activate display's Sleep mode within 15 minutes of user inactivity. • Activate computer's Sleep mode within 30 minutes of the monitor, using a footrest, or raising your comfort zone by pushing the power button. Tips and information for more comfortable computer use , consult a physician immediately and inform...
User Manual
Page 8
... adjusting your display in such a way that the side faces the window or any light source • minimizing room light by looking away from the monitor and focusing on how to an awkward viewing angle. • Avoid looking at bright light sources, such as open windows, for enhanced text readability and...
... adjusting your display in such a way that the side faces the window or any light source • minimizing room light by looking away from the monitor and focusing on how to an awkward viewing angle. • Avoid looking at bright light sources, such as open windows, for enhanced text readability and...

User Manual
Page 9
TABLE OF CONTENTS UNPACKING 1 ATTACHING / REMOVING THE BASE 2 SCREEN POSITION ADJUSTMENT 2 CONNECTING THE POWER CORD 3 SAFETY PRECAUTION 3 CLEANING YOUR MONITOR 3 POWER SAVING 4 DDC...4 CONNECTOR PIN ASSIGNMENT 5 STANDARD TIMING TABLE 7 INSTALLATION 8 USER CONTROLS 9 TROUBLESHOOTING 15
TABLE OF CONTENTS UNPACKING 1 ATTACHING / REMOVING THE BASE 2 SCREEN POSITION ADJUSTMENT 2 CONNECTING THE POWER CORD 3 SAFETY PRECAUTION 3 CLEANING YOUR MONITOR 3 POWER SAVING 4 DDC...4 CONNECTOR PIN ASSIGNMENT 5 STANDARD TIMING TABLE 7 INSTALLATION 8 USER CONTROLS 9 TROUBLESHOOTING 15
User Manual
Page 10
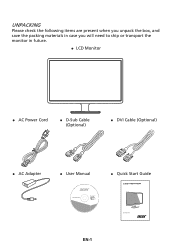
z LCD Monitor z AC Power Cord z D-Sub Cable (Optional) z DVI Cable (Optional) z AC Adapter z User Manual z Quick Start Guide LCD monitor EN-1 UNPACKING Please check the following items are present when you unpack the box, and save the packing materials in case you will need to ship or transport the monitor in future.
z LCD Monitor z AC Power Cord z D-Sub Cable (Optional) z DVI Cable (Optional) z AC Adapter z User Manual z Quick Start Guide LCD monitor EN-1 UNPACKING Please check the following items are present when you unpack the box, and save the packing materials in case you will need to ship or transport the monitor in future.

User Manual
Page 11
... POSITION ADJUSTMENT In order to optimize the best viewing position, you can be adjusted to hold the edges of the monitor by arrow below . The monitor can adjust the tilt of the monitor as indicated by using both of your hands to 15 degrees up or 5 degrees down on a stable surface -- EN-2... use a cloth to the Ensure that the base is locked onto the base. ATTACHING / REMOVING THE BASE Note: Remove the monitor and monitor base from its packaging. monitor stand arm. Attach the monitor stand arm to avoid scratching the screen. 1. 2.
... POSITION ADJUSTMENT In order to optimize the best viewing position, you can be adjusted to hold the edges of the monitor by arrow below . The monitor can adjust the tilt of the monitor as indicated by using both of your hands to 15 degrees up or 5 degrees down on a stable surface -- EN-2... use a cloth to the Ensure that the base is locked onto the base. ATTACHING / REMOVING THE BASE Note: Remove the monitor and monitor base from its packaging. monitor stand arm. Attach the monitor stand arm to avoid scratching the screen. 1. 2.
User Manual
Page 12
...the screen, as screen is fragile. z For unit using at 220/240 V AC (outside of U.S.): Use a Cord Set consisting of the monitor. Place the monitor just below guidelines when cleaning the monitor. z Refrain from giving shock or scratch to make sure that allows operation in either 100/120V AC or 220/240 V AC...cord to avoid damage to the adapter, and plug the other heavy object, on the face of the AC power cord to the cable. z This monitor has a universal power supply that the power cord you use is required. No user-adjustment is the correct type required for the country in a ...
...the screen, as screen is fragile. z For unit using at 220/240 V AC (outside of U.S.): Use a Cord Set consisting of the monitor. Place the monitor just below guidelines when cleaning the monitor. z Refrain from giving shock or scratch to make sure that allows operation in either 100/120V AC or 220/240 V AC...cord to avoid damage to the adapter, and plug the other heavy object, on the face of the AC power cord to the cable. z This monitor has a universal power supply that the power cord you use is required. No user-adjustment is the correct type required for the country in a ...
User Manual
Page 13
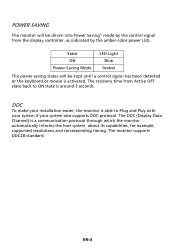
... a control signal has been detected or the keyboard or mouse is activated. The monitor supports DDC2B standard. DDC To make your installation easier, the monitor is able to ON state is around 3 seconds. POWER SAVING The monitor will be driven into Power Saving" mode by the control signal from Active OFF...and Play with your system if your system also supports DDC protocol. The DDC (Display Data Channel) is a communication protocol through which the monitor automatically informs the host system about its capabilities, for example, supported resolutions and corresponding timing.
... a control signal has been detected or the keyboard or mouse is activated. The monitor supports DDC2B standard. DDC To make your installation easier, the monitor is able to ON state is around 3 seconds. POWER SAVING The monitor will be driven into Power Saving" mode by the control signal from Active OFF...and Play with your system if your system also supports DDC protocol. The DDC (Display Data Channel) is a communication protocol through which the monitor automatically informs the host system about its capabilities, for example, supported resolutions and corresponding timing.
User Manual
Page 14
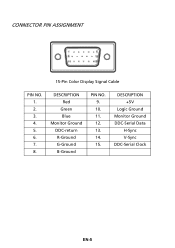
CONNECTOR PIN ASSIGNMENT 15-Pin Color Display Signal Cable PIN NO. 1. 2. 3. 4. 5. 6. 7. 8. DESCRIPTION +5V Logic Ground Monitor Ground DDC-Serial Data H-Sync V-Sync DDC-Serial Clock EN-5 DESCRIPTION Red Green Blue Monitor Ground DDC-return R-Ground G-Ground B-Ground PIN NO. 9. 10. 11. 12. 13. 14. 15.
CONNECTOR PIN ASSIGNMENT 15-Pin Color Display Signal Cable PIN NO. 1. 2. 3. 4. 5. 6. 7. 8. DESCRIPTION +5V Logic Ground Monitor Ground DDC-Serial Data H-Sync V-Sync DDC-Serial Clock EN-5 DESCRIPTION Red Green Blue Monitor Ground DDC-return R-Ground G-Ground B-Ground PIN NO. 9. 10. 11. 12. 13. 14. 15.
User Manual
Page 17
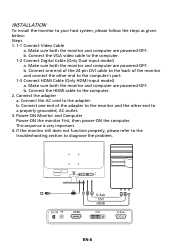
...one end of the 24-pin DVI cable to the back of the adapter to the monitor and the other end to the computer's port. 1-3 Connect HDMI Cable (Only HDMI-input model) a. If the monitor still does not function properly, please refer to the troubleshooting section to the computer. ...1-2 Connect Digital Cable (Only Dual-input model) a. Power-ON Monitor and Computer Power-ON the monitor first, then power-ON the computer. This sequence is very important. 4. b. INSTALLATION To install the monitor to the adapter. Connect the AC cord to your host system, please follow the ...
...one end of the 24-pin DVI cable to the back of the adapter to the monitor and the other end to the computer's port. 1-3 Connect HDMI Cable (Only HDMI-input model) a. If the monitor still does not function properly, please refer to the troubleshooting section to the computer. ...1-2 Connect Digital Cable (Only Dual-input model) a. Power-ON Monitor and Computer Power-ON the monitor first, then power-ON the computer. This sequence is very important. 4. b. INSTALLATION To install the monitor to the adapter. Connect the AC cord to your host system, please follow the ...
User Manual
Page 18
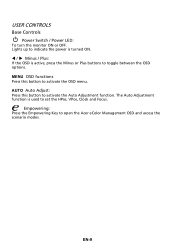
MENU OSD functions Press this button to open the Acer eColor Management OSD and access the scenario modes. EN-9 W / X Minus / Plus: If the OSD is turned ON. Empowering: Press the Empowering Key to activate the Auto Adjustment function. AUTO Auto Adjust: Press this botton to toggle between the OSD options. The Auto Adjustment function is used to indicate the power is active, press the Minus or Plus buttons to activate the OSD menu. Lights up to set the HPos, VPos, Clock and Focus. USER CONTROLS Base Controls Power Switch / Power LED: To turn the monitor ON or OFF.
MENU OSD functions Press this button to open the Acer eColor Management OSD and access the scenario modes. EN-9 W / X Minus / Plus: If the OSD is turned ON. Empowering: Press the Empowering Key to activate the Auto Adjustment function. AUTO Auto Adjust: Press this botton to toggle between the OSD options. The Auto Adjustment function is used to indicate the power is active, press the Minus or Plus buttons to activate the OSD menu. Lights up to set the HPos, VPos, Clock and Focus. USER CONTROLS Base Controls Power Switch / Power LED: To turn the monitor ON or OFF.

User Manual
Page 20
..., Colour Temp, Auto Config and other image-related qualities. For advanced settings, please refer to following content is for adjusting the settings of your LCD Monitor. Then navigate to the picture element you wish to adjust. 3 Use the e/ f keys to adjust the sliding scales. 4 The Picture menu can use the OSD...
..., Colour Temp, Auto Config and other image-related qualities. For advanced settings, please refer to following content is for adjusting the settings of your LCD Monitor. Then navigate to the picture element you wish to adjust. 3 Use the e/ f keys to adjust the sliding scales. 4 The Picture menu can use the OSD...

User Manual
Page 23
Then the basic information of LCD monitor will show up the OSD. 2 Using the e/ f keys, select Information from the OSD. Product information 1 Press the MENU key to bring up for current input. EN-14
Then the basic information of LCD monitor will show up the OSD. 2 Using the e/ f keys, select Information from the OSD. Product information 1 Press the MENU key to bring up for current input. EN-14
User Manual
Page 24
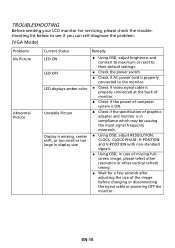
...the size of the image before changing or disconnecting the signal cable or powering OFF the monitor. z Using OSD, in display size Remedy z Using OSD, adjust brightness and contrast to maximum or reset to the monitor. z Check if video signal cable is ON. z Check the power switch. z ...LED OFF LED displays amber color Unstable Picture Display is missing, center shift, or too small or too large in case of graphics adapter and monitor is properly connected to their default settings. EN-15 z Using OSD, adjust RESOLUTION, CLOCK, CLOCK-PHASE, H-POSITION and V-POSITION with non-standard...
...the size of the image before changing or disconnecting the signal cable or powering OFF the monitor. z Using OSD, in display size Remedy z Using OSD, adjust brightness and contrast to maximum or reset to the monitor. z Check if video signal cable is ON. z Check the power switch. z ...LED OFF LED displays amber color Unstable Picture Display is missing, center shift, or too small or too large in case of graphics adapter and monitor is properly connected to their default settings. EN-15 z Using OSD, adjust RESOLUTION, CLOCK, CLOCK-PHASE, H-POSITION and V-POSITION with non-standard...
User Manual
Page 25
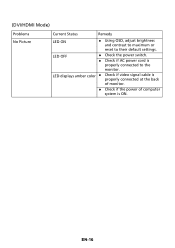
z Check if the power of monitor. LED OFF z Check the power switch. LED displays amber color z Check if video signal cable is properly connected at the back of computer system is properly connected to their default settings. (DVI/HDMI Mode) Problems No Picture Current Status Remedy LED ON z Using OSD, adjust brightness and contrast to maximum or reset to the monitor. z Check if AC power cord is ON. EN-16
z Check if the power of monitor. LED OFF z Check the power switch. LED displays amber color z Check if video signal cable is properly connected at the back of computer system is properly connected to their default settings. (DVI/HDMI Mode) Problems No Picture Current Status Remedy LED ON z Using OSD, adjust brightness and contrast to maximum or reset to the monitor. z Check if AC power cord is ON. EN-16
User Manual
Page 26
...the setting of ecodesign requirements for energy-related product. EN-17 Oct. 13, 2011 Date Acer Incorporated 8F, 88, Sec. 1, Xintai 5th Rd., Xizhi New Taipei City 221, Taiwan Declaration of Conformity We, Acer Incorporated 8F, 88, Sec. 1, Xintai 5th Rd., Xizhi, New Taipei City 221,...Via Lepetit, 40, 20020 Lainate (MI) Italy Tel: +39-02-939-921, Fax: +39-02 9399-2913 www.acer.it Hereby declare that: Product: Trade Name: Model Number: SKU Number: LCD Monitor Acer S271HL S271HL xxxxxx ("x" = 0~9, a ~ z, or A ~ Z) Is compliant with the essential requirements and other relevant provisions of the...
...the setting of ecodesign requirements for energy-related product. EN-17 Oct. 13, 2011 Date Acer Incorporated 8F, 88, Sec. 1, Xintai 5th Rd., Xizhi New Taipei City 221, Taiwan Declaration of Conformity We, Acer Incorporated 8F, 88, Sec. 1, Xintai 5th Rd., Xizhi, New Taipei City 221,...Via Lepetit, 40, 20020 Lainate (MI) Italy Tel: +39-02-939-921, Fax: +39-02 9399-2913 www.acer.it Hereby declare that: Product: Trade Name: Model Number: SKU Number: LCD Monitor Acer S271HL S271HL xxxxxx ("x" = 0~9, a ~ z, or A ~ Z) Is compliant with the essential requirements and other relevant provisions of the...
User Manual
Page 27
A. The following two conditions: (1) this device may not cause harmful interference, and (2) this declaration: Product: LCD Monitor Model Number: S271HL SKU Number: S271HL xxxxxx ("x" = 0~9, a ~ z, or A ~ Z) Name of Responsible Party: Address of the FCC Rules. S. San Jose, CA 95110 U. A. ...Tel : 254-298-4000 Fax : 254-298-4147 www.acer.com Federal Communications Commission Declaration of Conformity This device complies with Part 15 of Responsible Party: Acer America Corporation 333 West San Carlos St. Acer America Corporation 333 West San Carlos St., San Jose CA 95110...
A. The following two conditions: (1) this device may not cause harmful interference, and (2) this declaration: Product: LCD Monitor Model Number: S271HL SKU Number: S271HL xxxxxx ("x" = 0~9, a ~ z, or A ~ Z) Name of Responsible Party: Address of the FCC Rules. S. San Jose, CA 95110 U. A. ...Tel : 254-298-4000 Fax : 254-298-4147 www.acer.com Federal Communications Commission Declaration of Conformity This device complies with Part 15 of Responsible Party: Acer America Corporation 333 West San Carlos St. Acer America Corporation 333 West San Carlos St., San Jose CA 95110...


