
User Manual
Page 2
...company makes no representations or warranties, either expressed or implied, with respect to the contents hereof and specifically ...manual or supplementary documents and publications. Copyright © 2011. Acer LCD Monitor User Guide Original Issue: 11/2011 Changes may be incorporated in the space provided below. No part of such revisions or changes. Acer Incorporated. Record the model number, serial number, purchase date and place of Acer Incorporated. All correspondence concerning your computer. All Rights Reserved. Acer LCD Monitor User Guide Model number Serial number...
...company makes no representations or warranties, either expressed or implied, with respect to the contents hereof and specifically ...manual or supplementary documents and publications. Copyright © 2011. Acer LCD Monitor User Guide Original Issue: 11/2011 Changes may be incorporated in the space provided below. No part of such revisions or changes. Acer Incorporated. Record the model number, serial number, purchase date and place of Acer Incorporated. All correspondence concerning your computer. All Rights Reserved. Acer LCD Monitor User Guide Model number Serial number...
User Manual
Page 3
... to make sure the flicker disappears. • You may flicker during initial use . • The LCD screen has 99.99% or more effective pixels. Keep this case, the screen is displayed for a few hours. Turn off the power switch for hours. It may include blemishes of the previous screen may remain after switching the image, when the same image is recovered slowly by changing the image or turning off the power switch...
... to make sure the flicker disappears. • You may flicker during initial use . • The LCD screen has 99.99% or more effective pixels. Keep this case, the screen is displayed for a few hours. Turn off the power switch for hours. It may include blemishes of the previous screen may remain after switching the image, when the same image is recovered slowly by changing the image or turning off the power switch...
User Manual
Page 4
...; Your device uses one of the following power supplies: Manufacturer: Asian Power Devices Inc., Model: DA-40A19 Manufacturer: Delta Electronics Inc., Model: ADP-40PH BB Using electrical power • This product should never be blocked or covered. Safe listening To protect your hearing, follow these instructions. • Gradually increase the volume until you . When you plug the power cord into this monitor ,do not increase...
...; Your device uses one of the following power supplies: Manufacturer: Asian Power Devices Inc., Model: DA-40A19 Manufacturer: Delta Electronics Inc., Model: ADP-40PH BB Using electrical power • This product should never be blocked or covered. Safe listening To protect your hearing, follow these instructions. • Gradually increase the volume until you . When you plug the power cord into this monitor ,do not increase...
User Manual
Page 5
... the wall outlet and refer servicing to qualified service personnel when: • the power cord or plug is equipped with the supplied power supply cord set , make sure that may interfere with the performance of this product yourself, as opening or removing covers may result in too many devices. If power strips are used, the load should not exceed 80% of the power strip's input rating. • This product's power cord is...
... the wall outlet and refer servicing to qualified service personnel when: • the power cord or plug is equipped with the supplied power supply cord set , make sure that may interfere with the performance of this product yourself, as opening or removing covers may result in too many devices. If power strips are used, the load should not exceed 80% of the power strip's input rating. • This product's power cord is...

User Manual
Page 6
... strive to identify and provide the best working procedures to turn off the device near gas pumps at Acer are often, but not always, marked. chemical plants; Additional safety information Your device and its enhancements may result in damage and will often require extensive work by the operating instructions, since improper adjustment of small children. Sparks in...
... strive to identify and provide the best working procedures to turn off the device near gas pumps at Acer are often, but not always, marked. chemical plants; Additional safety information Your device and its enhancements may result in damage and will often require extensive work by the operating instructions, since improper adjustment of small children. Sparks in...
User Manual
Page 7
...; refrain from Sleep mode by adjusting the viewing angle of physical injury. Tips and information for more comfortable computer use , consult a physician immediately and inform your sitting height to remove the strain on the recorded image and does not constitute a malfunction. Users are also at risk of physical injury after prolonged use Computer users may appear in one fixed posture • avoid...
...; refrain from Sleep mode by adjusting the viewing angle of physical injury. Tips and information for more comfortable computer use , consult a physician immediately and inform your sitting height to remove the strain on the recorded image and does not constitute a malfunction. Users are also at risk of physical injury after prolonged use Computer users may appear in one fixed posture • avoid...
User Manual
Page 8
... your vision Long viewing hours, wearing incorrect glasses or contact lenses, glare, excessive room lighting, poorly focused screens, very small typefaces and low-contrast displays could stress your eyes. The following work habits to make your eyes point downward when looking at bright light sources, such as possible. • Exercise regularly and maintain a healthy body. Display • Keep your display clean. • Keep your head...
... your vision Long viewing hours, wearing incorrect glasses or contact lenses, glare, excessive room lighting, poorly focused screens, very small typefaces and low-contrast displays could stress your eyes. The following work habits to make your eyes point downward when looking at bright light sources, such as possible. • Exercise regularly and maintain a healthy body. Display • Keep your display clean. • Keep your head...

User Manual
Page 9
TABLE OF CONTENTS UNPACKING 1 ATTACHING / REMOVING THE BASE 2 SCREEN POSITION ADJUSTMENT 2 CONNECTING THE POWER CORD 3 SAFETY PRECAUTION 3 CLEANING YOUR MONITOR 3 POWER SAVING 4 DDC...4 CONNECTOR PIN ASSIGNMENT 5 STANDARD TIMING TABLE 7 INSTALLATION 8 USER CONTROLS 9 TROUBLESHOOTING 15
TABLE OF CONTENTS UNPACKING 1 ATTACHING / REMOVING THE BASE 2 SCREEN POSITION ADJUSTMENT 2 CONNECTING THE POWER CORD 3 SAFETY PRECAUTION 3 CLEANING YOUR MONITOR 3 POWER SAVING 4 DDC...4 CONNECTOR PIN ASSIGNMENT 5 STANDARD TIMING TABLE 7 INSTALLATION 8 USER CONTROLS 9 TROUBLESHOOTING 15

User Manual
Page 11
... the screen. 1. 2. DVI HDMI DC IN D-Sub D-Sub DVI HDMI DC IN SCREEN POSITION ADJUSTMENT In order to optimize the best viewing position, you can be adjusted to hold the edges of the monitor as indicated by using both of the monitor by arrow below . The monitor can adjust the tilt of your hands to 15 degrees up or 5 degrees down on a stable surface -- ATTACHING / REMOVING THE BASE Note: Remove the monitor and monitor base...
... the screen. 1. 2. DVI HDMI DC IN D-Sub D-Sub DVI HDMI DC IN SCREEN POSITION ADJUSTMENT In order to optimize the best viewing position, you can be adjusted to hold the edges of the monitor as indicated by using both of the monitor by arrow below . The monitor can adjust the tilt of your hands to 15 degrees up or 5 degrees down on a stable surface -- ATTACHING / REMOVING THE BASE Note: Remove the monitor and monitor base...
User Manual
Page 12
... other heavy object, on the power cord to avoid damage to the adapter, and plug the other light sources may reflect on the face of H05VV-F cord and plug rated 10 A, 250 V. z Always unplug the monitor before cleaning. z Plug one end of the monitor. z Do not cover the ventilation slots or openings of the AC power cord to the cable. CONNECTING THE POWER CORD z Check first to make sure that allows operation in...
... other heavy object, on the power cord to avoid damage to the adapter, and plug the other light sources may reflect on the face of H05VV-F cord and plug rated 10 A, 250 V. z Always unplug the monitor before cleaning. z Plug one end of the monitor. z Do not cover the ventilation slots or openings of the AC power cord to the cable. CONNECTING THE POWER CORD z Check first to make sure that allows operation in...
User Manual
Page 13
... the display controller, as indicated by the control signal from Active OFF state back to Plug and Play with your system if your installation easier, the monitor is able to ON state is around 3 seconds. DDC To make your system also supports DDC protocol. EN-4 POWER SAVING The monitor will be driven into Power Saving" mode by the amber-color power LED. The monitor supports DDC2B standard. The DDC (Display Data...
... the display controller, as indicated by the control signal from Active OFF state back to Plug and Play with your system if your installation easier, the monitor is able to ON state is around 3 seconds. DDC To make your system also supports DDC protocol. EN-4 POWER SAVING The monitor will be driven into Power Saving" mode by the amber-color power LED. The monitor supports DDC2B standard. The DDC (Display Data...
User Manual
Page 14
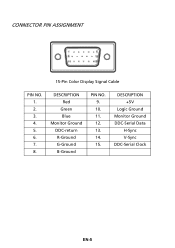
CONNECTOR PIN ASSIGNMENT 15-Pin Color Display Signal Cable PIN NO. 1. 2. 3. 4. 5. 6. 7. 8. DESCRIPTION Red Green Blue Monitor Ground DDC-return R-Ground G-Ground B-Ground PIN NO. 9. 10. 11. 12. 13. 14. 15. DESCRIPTION +5V Logic Ground Monitor Ground DDC-Serial Data H-Sync V-Sync DDC-Serial Clock EN-5
CONNECTOR PIN ASSIGNMENT 15-Pin Color Display Signal Cable PIN NO. 1. 2. 3. 4. 5. 6. 7. 8. DESCRIPTION Red Green Blue Monitor Ground DDC-return R-Ground G-Ground B-Ground PIN NO. 9. 10. 11. 12. 13. 14. 15. DESCRIPTION +5V Logic Ground Monitor Ground DDC-Serial Data H-Sync V-Sync DDC-Serial Clock EN-5
User Manual
Page 15
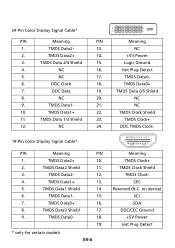
...) SCL SDA DDC/CEC Ground +5V Power Hot Plug Detect NC 10. DDC TMDS Clock- 19-Pin Color Display Signal Cable* PIN Meaning PIN 1. TMDS Data1 Shield 14. 6. TMDS Data0- 18. 19. * only for certain models EN-6 Meaning TMDS Clock+ TMDS Clock Shield TMDS Clock- NC 16. NC 17. 24-Pin Color Display Signal Cable* PIN Meaning PIN Meaning 1. TMDS Data2...
...) SCL SDA DDC/CEC Ground +5V Power Hot Plug Detect NC 10. DDC TMDS Clock- 19-Pin Color Display Signal Cable* PIN Meaning PIN 1. TMDS Data1 Shield 14. 6. TMDS Data0- 18. 19. * only for certain models EN-6 Meaning TMDS Clock+ TMDS Clock Shield TMDS Clock- NC 16. NC 17. 24-Pin Color Display Signal Cable* PIN Meaning PIN Meaning 1. TMDS Data2...
User Manual
Page 17
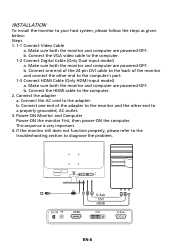
...-8 b. Connect the VGA video cable to the adapter. Connect the AC cord to the computer. 1-2 Connect Digital Cable (Only Dual-input model) a. Connect one end of the 24-pin DVI cable to the back of the adapter to the monitor and the other end to your host system, please follow the steps as given below: Steps 1. 1-1 Connect Video Cable a. Make sure both the monitor and computer are powered-OFF. b. Connect the HDMI cable to diagnose the problem. Power...
...-8 b. Connect the VGA video cable to the adapter. Connect the AC cord to the computer. 1-2 Connect Digital Cable (Only Dual-input model) a. Connect one end of the 24-pin DVI cable to the back of the adapter to the monitor and the other end to your host system, please follow the steps as given below: Steps 1. 1-1 Connect Video Cable a. Make sure both the monitor and computer are powered-OFF. b. Connect the HDMI cable to diagnose the problem. Power...
User Manual
Page 18
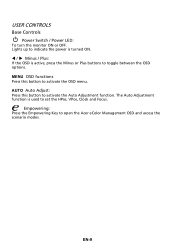
The Auto Adjustment function is turned ON. Lights up to indicate the power is used to set the HPos, VPos, Clock and Focus. AUTO Auto Adjust: Press this botton to activate the Auto Adjustment function. MENU OSD functions Press this button to activate the OSD menu. W / X Minus / Plus: If the OSD is active, press the Minus or Plus buttons to open the Acer eColor Management OSD and access the scenario modes. EN-9 Empowering: Press the Empowering Key to toggle between the OSD options. USER CONTROLS Base Controls Power Switch / Power LED: To turn the monitor ON or OFF.
The Auto Adjustment function is turned ON. Lights up to indicate the power is used to set the HPos, VPos, Clock and Focus. AUTO Auto Adjust: Press this botton to activate the Auto Adjustment function. MENU OSD functions Press this button to activate the OSD menu. W / X Minus / Plus: If the OSD is active, press the Minus or Plus buttons to open the Acer eColor Management OSD and access the scenario modes. EN-9 Empowering: Press the Empowering Key to toggle between the OSD options. USER CONTROLS Base Controls Power Switch / Power LED: To turn the monitor ON or OFF.
User Manual
Page 19
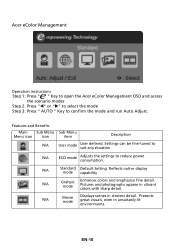
... mode and run Auto Adjust. Presents great visuals, even in clearest detail. EN-10 N/A Movie mode Displays scenes in unsuitably-lit environments. Pictures and photographs appear in vibrant colors with sharp detail. Acer eColor Management Operation instructions Step 1: Press " " Key to open the Acer eColor Management OSD and access the scenario modes Step 2: Press "W" or "X" to select the mode Step 3: Press " AUTO " Key to reduce power...
... mode and run Auto Adjust. Presents great visuals, even in clearest detail. EN-10 N/A Movie mode Displays scenes in unsuitably-lit environments. Pictures and photographs appear in vibrant colors with sharp detail. Acer eColor Management Operation instructions Step 1: Press " " Key to open the Acer eColor Management OSD and access the scenario modes Step 2: Press "W" or "X" to select the mode Step 3: Press " AUTO " Key to reduce power...

User Manual
Page 20
...: Adjusting the picture quality 1 Press the MENU key to adjust the picture quality, OSD position and general settings. Then navigate to the picture element you wish to adjust. 3 Use the e/ f keys to adjust the sliding scales. 4 The Picture menu can be used for general reference only. Press the MENU key to adjust the current Brightness, Contrast, Colour Temp, Auto Config and other image-related qualities. EN-11 The OSD can be used to open...
...: Adjusting the picture quality 1 Press the MENU key to adjust the picture quality, OSD position and general settings. Then navigate to the picture element you wish to adjust. 3 Use the e/ f keys to adjust the sliding scales. 4 The Picture menu can be used for general reference only. Press the MENU key to adjust the current Brightness, Contrast, Colour Temp, Auto Config and other image-related qualities. EN-11 The OSD can be used to open...

User Manual
Page 22
Then navigate to the feature you wish to adjust. 3 The Setting menu can be used to bring up the OSD. 2 Using the e/ f keys, select Setting from the OSD. Adjusting the setting 1 Press the MENU key to adjust the screen Menu Language and other important settings. EN-13
Then navigate to the feature you wish to adjust. 3 The Setting menu can be used to bring up the OSD. 2 Using the e/ f keys, select Setting from the OSD. Adjusting the setting 1 Press the MENU key to adjust the screen Menu Language and other important settings. EN-13
User Manual
Page 24
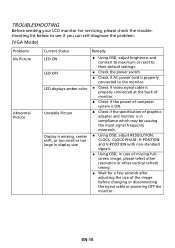
... signal cable or powering OFF the monitor. z Check if video signal cable is missing, center shift, or too small or too large in display size Remedy z Using OSD, adjust brightness and contrast to maximum or reset to see if you can self-diagnose the problem. (VGA Mode) Problems No Picture Abnormal Picture Current Status LED ON LED OFF LED displays amber color Unstable Picture Display is properly connected at the back of monitor. z Wait for servicing, please check the troubleshooting list below to their default settings...
... signal cable or powering OFF the monitor. z Check if video signal cable is missing, center shift, or too small or too large in display size Remedy z Using OSD, adjust brightness and contrast to maximum or reset to see if you can self-diagnose the problem. (VGA Mode) Problems No Picture Abnormal Picture Current Status LED ON LED OFF LED displays amber color Unstable Picture Display is properly connected at the back of monitor. z Wait for servicing, please check the troubleshooting list below to their default settings...
User Manual
Page 25
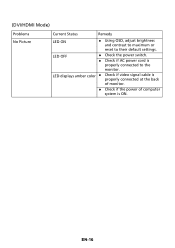
(DVI/HDMI Mode) Problems No Picture Current Status Remedy LED ON z Using OSD, adjust brightness and contrast to maximum or reset to the monitor. LED OFF z Check the power switch. LED displays amber color z Check if video signal cable is properly connected at the back of computer system is properly connected to their default settings. z Check if the power of monitor. EN-16 z Check if AC power cord is ON.
(DVI/HDMI Mode) Problems No Picture Current Status Remedy LED ON z Using OSD, adjust brightness and contrast to maximum or reset to the monitor. LED OFF z Check the power switch. LED displays amber color z Check if video signal cable is properly connected at the back of computer system is properly connected to their default settings. z Check if the power of monitor. EN-16 z Check if AC power cord is ON.


