
User Manual
Page 3
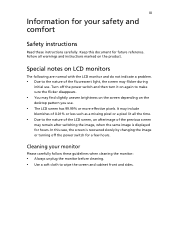
...; Always unplug the monitor before cleaning. • Use a soft cloth to wipe the screen and cabinet front and sides. Keep this case, the screen is displayed for hours. Follow all the time. • Due to the nature of the LCD screen, an afterimage of the previous screen may remain after switching...
...; Always unplug the monitor before cleaning. • Use a soft cloth to wipe the screen and cabinet front and sides. Keep this case, the screen is displayed for hours. Follow all the time. • Due to the nature of the LCD screen, an afterimage of the previous screen may remain after switching...
User Manual
Page 7
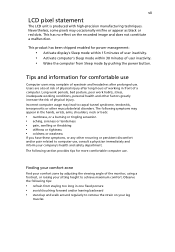
This product has been shipped enabled for power management: • Activate display's Sleep mode within 15 minutes of user inactivity. • Activate computer's Sleep mode within 30 minutes of physical injury. Tips and information for more comfortable ...
This product has been shipped enabled for power management: • Activate display's Sleep mode within 15 minutes of user inactivity. • Activate computer's Sleep mode within 30 minutes of physical injury. Tips and information for more comfortable ...
User Manual
Page 8
...light sources, such as open windows, for enhanced text readability and graphics clarity. • Eliminate glare and reflections by: • placing your display in such a way that the side faces the window or any light source • minimizing room light by looking at the middle of your...good work habits to keep your eyes from the monitor and focusing on how to a comfortable level for extended periods of cardboard extended from the display's top front edge • Avoid adjusting your computer use more relaxing and productive: • Take short breaks regularly and often. •...
...light sources, such as open windows, for enhanced text readability and graphics clarity. • Eliminate glare and reflections by: • placing your display in such a way that the side faces the window or any light source • minimizing room light by looking at the middle of your...good work habits to keep your eyes from the monitor and focusing on how to a comfortable level for extended periods of cardboard extended from the display's top front edge • Avoid adjusting your computer use more relaxing and productive: • Take short breaks regularly and often. •...
User Manual
Page 13
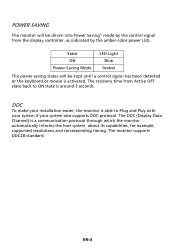
... is around 3 seconds. DDC To make your system also supports DDC protocol. The monitor supports DDC2B standard. EN-4 The DDC (Display Data Channel) is activated. The recovery time from the display controller, as indicated by the amber-color power LED. State ON Power Saving Mode LED Light Blue Amber The power saving...
... is around 3 seconds. DDC To make your system also supports DDC protocol. The monitor supports DDC2B standard. EN-4 The DDC (Display Data Channel) is activated. The recovery time from the display controller, as indicated by the amber-color power LED. State ON Power Saving Mode LED Light Blue Amber The power saving...
User Manual
Page 14
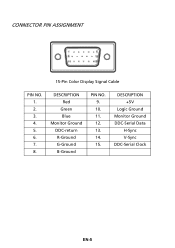
DESCRIPTION Red Green Blue Monitor Ground DDC-return R-Ground G-Ground B-Ground PIN NO. 9. 10. 11. 12. 13. 14. 15. DESCRIPTION +5V Logic Ground Monitor Ground DDC-Serial Data H-Sync V-Sync DDC-Serial Clock EN-5 CONNECTOR PIN ASSIGNMENT 15-Pin Color Display Signal Cable PIN NO. 1. 2. 3. 4. 5. 6. 7. 8.
DESCRIPTION Red Green Blue Monitor Ground DDC-return R-Ground G-Ground B-Ground PIN NO. 9. 10. 11. 12. 13. 14. 15. DESCRIPTION +5V Logic Ground Monitor Ground DDC-Serial Data H-Sync V-Sync DDC-Serial Clock EN-5 CONNECTOR PIN ASSIGNMENT 15-Pin Color Display Signal Cable PIN NO. 1. 2. 3. 4. 5. 6. 7. 8.
User Manual
Page 15
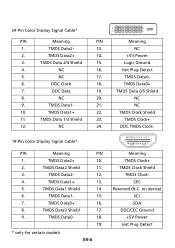
24-Pin Color Display Signal Cable* PIN Meaning PIN Meaning 1. TMDS Clock Shield 11. TMDS Data 1/3 Shield 23. TMDS Data0 Shield 17. 9. Hot Plug Detect 5. NC 24. TMDS Data1- ...+ 13. 5. NC 2. Logic Ground 4. NC 16. TMDS Data 0/5 Shield 8. TMDS Data1 Shield 14. 6. TMDS Data2- 13. TMDS Clock+ 12. DDC TMDS Clock- 19-Pin Color Display Signal Cable* PIN Meaning PIN 1. TMDS Data0- 18. 19. * only for certain models EN-6 Meaning TMDS Clock+ TMDS Clock Shield TMDS Clock- CEC Reserved (N.C. TMDS...
24-Pin Color Display Signal Cable* PIN Meaning PIN Meaning 1. TMDS Clock Shield 11. TMDS Data 1/3 Shield 23. TMDS Data0 Shield 17. 9. Hot Plug Detect 5. NC 24. TMDS Data1- ...+ 13. 5. NC 2. Logic Ground 4. NC 16. TMDS Data 0/5 Shield 8. TMDS Data1 Shield 14. 6. TMDS Data2- 13. TMDS Clock+ 12. DDC TMDS Clock- 19-Pin Color Display Signal Cable* PIN Meaning PIN 1. TMDS Data0- 18. 19. * only for certain models EN-6 Meaning TMDS Clock+ TMDS Clock Shield TMDS Clock- CEC Reserved (N.C. TMDS...
User Manual
Page 19
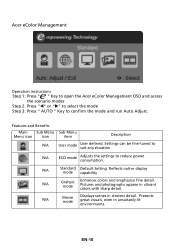
... capability N/A Grahpic mode Enhances colors and emphasize fine detail. EN-10 N/A Movie mode Displays scenes in unsuitably-lit environments. N/A Standard Default Setting. Presents great visuals, even in clearest detail. Pictures and photographs appear in vibrant ...be fine-tuned to suit any situation N/A ECO mode Adjusts the settings to confirm the mode and run Auto Adjust. Acer eColor Management Operation instructions Step 1: Press " " Key to open the Acer eColor Management OSD and access the scenario modes Step 2: Press "W" or "X" to select the mode Step 3: Press "...
... capability N/A Grahpic mode Enhances colors and emphasize fine detail. EN-10 N/A Movie mode Displays scenes in unsuitably-lit environments. N/A Standard Default Setting. Presents great visuals, even in clearest detail. Pictures and photographs appear in vibrant ...be fine-tuned to suit any situation N/A ECO mode Adjusts the settings to confirm the mode and run Auto Adjust. Acer eColor Management Operation instructions Step 1: Press " " Key to open the Acer eColor Management OSD and access the scenario modes Step 2: Press "W" or "X" to select the mode Step 3: Press "...

User Manual
Page 21
Then navigate to the feature you wish to bring up the OSD. 2 Using the directional keys, select OSD from the on screen display. EN-12 Adjusting the OSD position 1 Press the MENU key to adjust.
Then navigate to the feature you wish to bring up the OSD. 2 Using the directional keys, select OSD from the on screen display. EN-12 Adjusting the OSD position 1 Press the MENU key to adjust.
User Manual
Page 24
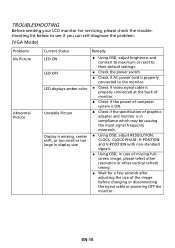
...of monitor. z Check if the specification of computer system is in compliance which may be causing the input signal frequency mismatch. z Using OSD, in display size Remedy z Using OSD, adjust brightness and contrast to maximum or reset to see if you can self-diagnose the problem. (VGA Mode) Problems... No Picture Abnormal Picture Current Status LED ON LED OFF LED displays amber color Unstable Picture Display is missing, center shift, or too small or too large in case of the image before changing or disconnecting the signal cable...
...of monitor. z Check if the specification of computer system is in compliance which may be causing the input signal frequency mismatch. z Using OSD, in display size Remedy z Using OSD, adjust brightness and contrast to maximum or reset to see if you can self-diagnose the problem. (VGA Mode) Problems... No Picture Abnormal Picture Current Status LED ON LED OFF LED displays amber color Unstable Picture Display is missing, center shift, or too small or too large in case of the image before changing or disconnecting the signal cable...
User Manual
Page 25
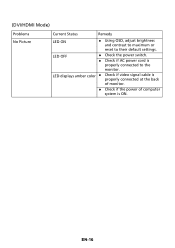
LED OFF z Check the power switch. EN-16 z Check if AC power cord is properly connected to their default settings. LED displays amber color z Check if video signal cable is ON. (DVI/HDMI Mode) Problems No Picture Current Status Remedy LED ON z Using OSD, adjust brightness and contrast to maximum or reset to the monitor. z Check if the power of computer system is properly connected at the back of monitor.
LED OFF z Check the power switch. EN-16 z Check if AC power cord is properly connected to their default settings. LED displays amber color z Check if video signal cable is ON. (DVI/HDMI Mode) Problems No Picture Current Status Remedy LED ON z Using OSD, adjust brightness and contrast to maximum or reset to the monitor. z Check if the power of computer system is properly connected at the back of monitor.


