
User Manual
Page 4
... environment which will walk on the cord. • If an extension cord is used , the load should be operated from the type of power indicated on the power cord. Do not insert the plug into the extension cord does not exceed the extension cord ampere rating. If you are used with the supplied power supply cord set , make sure that the new power cord meets the following requirements: detachable...
... environment which will walk on the cord. • If an extension cord is used , the load should be operated from the type of power indicated on the power cord. Do not insert the plug into the extension cord does not exceed the extension cord ampere rating. If you are used with the supplied power supply cord set , make sure that the new power cord meets the following requirements: detachable...
User Manual
Page 5
... change in performance, indicating a need for service • the product does not operate normally after following the operating instructions Note: Adjust only those controls that is to wait for the fan to turn off before disconnecting power. • Do not frequently turn off . Additional safety information • Do not look into the product • the product was spilled into the projector's lens when the lamp...
... change in performance, indicating a need for service • the product does not operate normally after following the operating instructions Note: Adjust only those controls that is to wait for the fan to turn off before disconnecting power. • Do not frequently turn off . Additional safety information • Do not look into the product • the product was spilled into the projector's lens when the lamp...
User Manual
Page 6
... open the lens shutter or remove the lens cap when the projector is showing warning message. • When changing the lamp, please allow unit to cool down, and follow all changing instructions. • Reset the "Lamp Hour Reset" function from the Onscreen display "Management" menu after replacing the lamp module. • Do not attempt to break on end vertically. The only user serviceable part is operating. The temperature inside which becomes hot. • Clean the air filter...
... open the lens shutter or remove the lens cap when the projector is showing warning message. • When changing the lamp, please allow unit to cool down, and follow all changing instructions. • Reset the "Lamp Hour Reset" function from the Onscreen display "Management" menu after replacing the lamp module. • Do not attempt to break on end vertically. The only user serviceable part is operating. The temperature inside which becomes hot. • Clean the air filter...
User Manual
Page 8
... First things first Usage Notes Do: • Turn off , please ensure the projector completes its life, it shows warning messages. • Reset the "Lamp Hour Reset" function from the Onscreen display "Management" menu after replacing the lamp module. • When switching the projector off the product before disconnecting power. • Turn on . Don't: • Block the slots and openings on the unit provided for a long period of the...
... First things first Usage Notes Do: • Turn off , please ensure the projector completes its life, it shows warning messages. • Reset the "Lamp Hour Reset" function from the Onscreen display "Management" menu after replacing the lamp module. • When switching the projector off the product before disconnecting power. • Turn on . Don't: • Block the slots and openings on the unit provided for a long period of the...

User Manual
Page 9
... 4 Projector Outlook 4 Control Panel 7 Remote Control Layout 8 MHL (Mobile High-Definition Link) Control 11 Getting Started 13 Connecting the Projector 13 Turning the Projector On/Off 15 Turning on the Projector 15 Turning the projector off 16 Adjusting the Projected Image 17 Adjusting the Height of Projected Image 17 How to optimize image size and distance 18 How to get a preferred image size by adjusting distance and zoom 24 User Controls 30 Installation menu 30 Onscreen Display (OSD) Menus 31 Color 32 Image 35 Setting 37 Management 40 Audio...
... 4 Projector Outlook 4 Control Panel 7 Remote Control Layout 8 MHL (Mobile High-Definition Link) Control 11 Getting Started 13 Connecting the Projector 13 Turning the Projector On/Off 15 Turning on the Projector 15 Turning the projector off 16 Adjusting the Projected Image 17 Adjusting the Height of Projected Image 17 How to optimize image size and distance 18 How to get a preferred image size by adjusting distance and zoom 24 User Controls 30 Installation menu 30 Onscreen Display (OSD) Menus 31 Color 32 Image 35 Setting 37 Management 40 Audio...

User Manual
Page 11
..., 1080i/p) supported • Lower power consumption and economy (ECO) mode extend lamp life • Acer EcoProjeciton Technology delivers Intelligent power management approach and physical efficiency improvement • Equipped with HDMI™ & MHL connection supporting HDCP • Smart detection delivers quick, intelligent source detection • Multi-language onscreen display (OSD) menus • Manual focus projection lens zooms up to 1.0x / 1.1x / 1.3x • 2x digital zoom • Microsoft® Windows®...
..., 1080i/p) supported • Lower power consumption and economy (ECO) mode extend lamp life • Acer EcoProjeciton Technology delivers Intelligent power management approach and physical efficiency improvement • Equipped with HDMI™ & MHL connection supporting HDCP • Smart detection delivers quick, intelligent source detection • Multi-language onscreen display (OSD) menus • Manual focus projection lens zooms up to 1.0x / 1.1x / 1.3x • 2x digital zoom • Microsoft® Windows®...
User Manual
Page 17
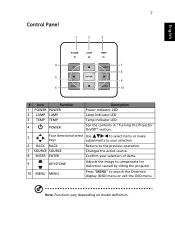
...: Functions vary depending on model definition. 7 Control Panel 1 2 3 English 4 7 8 5 9 6 10 # Icon Function 1 POWER POWER 2 LAMP LAMP 3 TEMP TEMP 4 POWER Description Power Indicator LED Lamp Indicator LED Temp Indicator LED See the contents in "Turning the Projector On/Off" section. 5 Four directional select Use to select items or make keys adjustments to your selection. 6 BACK BACK Returns to the previous operation. 7 SOURCE SOURCE Changes the active source. 8 ENTER ENTER Confirm your selection of items. 9 KEYSTONE Adjusts the image to compensate for distortion...
...: Functions vary depending on model definition. 7 Control Panel 1 2 3 English 4 7 8 5 9 6 10 # Icon Function 1 POWER POWER 2 LAMP LAMP 3 TEMP TEMP 4 POWER Description Power Indicator LED Lamp Indicator LED Temp Indicator LED See the contents in "Turning the Projector On/Off" section. 5 Four directional select Use to select items or make keys adjustments to your selection. 6 BACK BACK Returns to the previous operation. 7 SOURCE SOURCE Changes the active source. 8 ENTER ENTER Confirm your selection of items. 9 KEYSTONE Adjusts the image to compensate for distortion...
User Manual
Page 19
... OSD menu. 20 HDMI™/MHL To change source to select the 14 PgUp previous page. Use this button to the VGA connector. This 12 VGA connector supports analog RGB, YPbPr (480p/576p/720p/ 1080i), YCbCr (480i/576i) and RGBsync. 13 FREEZE To pause the screen image. This function is only available when USB Ctrl connector (mini type B) is connected to a computer via a USB cable...
... OSD menu. 20 HDMI™/MHL To change source to select the 14 PgUp previous page. Use this button to the VGA connector. This 12 VGA connector supports analog RGB, YPbPr (480p/576p/720p/ 1080i), YCbCr (480i/576i) and RGBsync. 13 FREEZE To pause the screen image. This function is only available when USB Ctrl connector (mini type B) is connected to a computer via a USB cable...

User Manual
Page 20
English 10 # Icon Function Description 22 ZOOM IN Zooms the projector display in. 23 VIDEO To change source to COMPOSITE VIDEO. 24 ZOOM OUT Zooms the projector display out. 25 LAN/WiFi No function. 26 Backlight Remote backlight. 27 Laser pointer Aim the remote at the viewing screen. 28 Laser button Aim the remote at the viewing screen, press and hold this button to activate the laser pointer. Note: Functions vary depending on model definition.
English 10 # Icon Function Description 22 ZOOM IN Zooms the projector display in. 23 VIDEO To change source to COMPOSITE VIDEO. 24 ZOOM OUT Zooms the projector display out. 25 LAN/WiFi No function. 26 Backlight Remote backlight. 27 Laser pointer Aim the remote at the viewing screen. 28 Laser button Aim the remote at the viewing screen, press and hold this button to activate the laser pointer. Note: Functions vary depending on model definition.
User Manual
Page 26
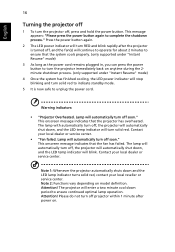
... cool down , and the LED temp indicator will turn RED and blink rapidly after power on. This message appears: "Please press the power button again to unplug the power cord. Please do not turn off soon." Press the power button again. 2 The LED power indicator will blink. The lamp with automatically turn off , and the fan(s) will automatically turn off , press and hold the power button. Attention! Warning indicators: • "Projector Overheated. This onscreen message indicates that the system cools properly...
... cool down , and the LED temp indicator will turn RED and blink rapidly after power on. This message appears: "Please press the power button again to unplug the power cord. Please do not turn off soon." Press the power button again. 2 The LED power indicator will blink. The lamp with automatically turn off , and the fan(s) will automatically turn off , press and hold the power button. Attention! Warning indicators: • "Projector Overheated. This onscreen message indicates that the system cools properly...
User Manual
Page 40
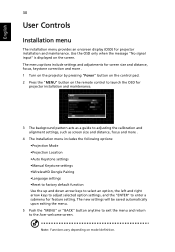
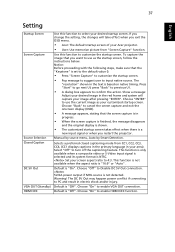
... "MENU" button on model definition. Note: Functions vary depending on the remote control to launch the OSD for feature setting. The menu options include settings and adjustments for projector installation and maintenance. Use the OSD only when the message "No signal input" is displayed on the screen. English 30 User Controls Installation menu The installation menu provides an onscreen display (OSD) for screen size and distance, focus, keystone correction and more . 4 The Installation menu includes the following options: •Projection Mode •Projection Location •Auto...
... "MENU" button on model definition. Note: Functions vary depending on the remote control to launch the OSD for feature setting. The menu options include settings and adjustments for projector installation and maintenance. Use the OSD only when the message "No signal input" is displayed on the screen. English 30 User Controls Installation menu The installation menu provides an onscreen display (OSD) for screen size and distance, focus, keystone correction and more . 4 The Installation menu includes the following options: •Projection Mode •Projection Location •Auto...
User Manual
Page 43
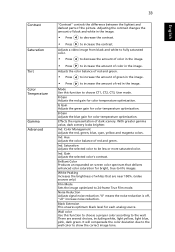
... a proper color according to -life images. Effects the representation of the picture. Color Management Adjusts the red, green, blue, cyan, yellow and magenta colors. Brilliant Color Produces an expanded on-screen color spectrum that are several choices, including white, light yellow, light blue, pink, dark green. B Gain Adjusts the blue gain for color temperature optimization. White Peaking Increases the brightness of whites that delivers enhanced color saturation for color temperature optimization. There are near 100%. (video sources only) Film Mode Sets the image optimized...
... a proper color according to -life images. Effects the representation of the picture. Color Management Adjusts the red, green, blue, cyan, yellow and magenta colors. Brilliant Color Produces an expanded on-screen color spectrum that are several choices, including white, light yellow, light blue, pink, dark green. B Gain Adjusts the blue gain for color temperature optimization. White Peaking Increases the brightness of whites that delivers enhanced color saturation for color temperature optimization. There are near 100%. (video sources only) Film Mode Sets the image optimized...
User Manual
Page 45
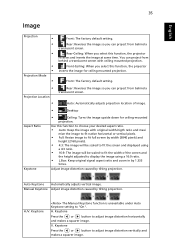
... image. V. Keystone Press the or button to fit full screen by 1.333 times. Use this function, the projector reverses and inverts the image at same time. H. Front-Ceiling: When you select this function to fit the width of image. • Desktop Aspect Ratio Keystone • Ceiling: Turns the image upside down for ceiling-mounted projection. Auto Keystone Automatically adjusts vertical image. Manual Keystone Adjust image distortion caused by tilting projection. Front: The factory default setting. • Projection Location • Rear: Reverses the image...
... image. V. Keystone Press the or button to fit full screen by 1.333 times. Use this function, the projector reverses and inverts the image at same time. H. Front-Ceiling: When you select this function to fit the width of image. • Desktop Aspect Ratio Keystone • Ceiling: Turns the image upside down for ceiling-mounted projection. Auto Keystone Automatically adjusts vertical image. Manual Keystone Adjust image distortion caused by tilting projection. Front: The factory default setting. • Projection Location • Rear: Reverses the image...

User Manual
Page 46
... flickering bar in the projected image, use this function to make the necessary adjustments. Note 3: Functions vary depending on HDMI image. V. Frequency "Frequency" changes the projector's refresh rate to match the frequency of the projector with the graphics card. HDMI Scan Info Adjust the overscan ratio of the HDMI image data to correct color display error. • Auto: Automatically adjust by information from player. • Limited Range: Prosess the input image as...
... flickering bar in the projected image, use this function to make the necessary adjustments. Note 3: Functions vary depending on HDMI image. V. Frequency "Frequency" changes the projector's refresh rate to match the frequency of the projector with the graphics card. HDMI Scan Info Adjust the overscan ratio of the HDMI image data to correct color display error. • Auto: Automatically adjust by information from player. • Limited Range: Prosess the input image as...
User Manual
Page 47
..." to customize the startup screen. • Pop message to suggest user to input native source. Select "Off" to turn off the captioning feature. Default is "Off". Default is "Off". Manual by source menu, Auto by Smart Detection. This function is not available when the aspect ratio is based on native timing. If you change the setting, the changes will capture your Acer projector. • User: Use memorize picture from CC1, CC2...
..." to customize the startup screen. • Pop message to suggest user to input native source. Select "Off" to turn off the captioning feature. Default is "Off". Default is "Off". Manual by source menu, Auto by Smart Detection. This function is not available when the aspect ratio is based on native timing. If you change the setting, the changes will capture your Acer projector. • User: Use memorize picture from CC1, CC2...
User Manual
Page 48
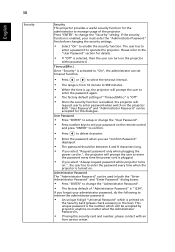
..., then the user can turn on the projector without password. Both "User Password" and "Administrator Password" can be used in the box). Please refer to the "User Password" section for this security card and number, please contact with an Acer service center. This unique password is the number which is printed on the remote control and press "ENTER" to confirm. • Press to setup or change the "Security" setting. English...
..., then the user can turn on the projector without password. Both "User Password" and "Administrator Password" can be used in the box). Please refer to the "User Password" section for this security card and number, please contact with an Acer service center. This unique password is the number which is printed on the remote control and press "ENTER" to confirm. • Press to setup or change the "Security" setting. English...
User Manual
Page 49
... unlock startup screen. Press "Enter" to download WOL (wake-on all in LAN setting page. English Network Reset 39 Lock User Startup Screen Default Lock User Startup Screen is "On", users cannot change startup screen anymore and avoid other users change that arbitrarily. Note: Functions vary depending on projector via LAN under standby status. Wake on LAN (Standby) Set to "On" to enable wake-on-LAN function to On. 2. Only available when DHCP set to power on model definition...
... unlock startup screen. Press "Enter" to download WOL (wake-on all in LAN setting page. English Network Reset 39 Lock User Startup Screen Default Lock User Startup Screen is "On", users cannot change startup screen anymore and avoid other users change that arbitrarily. Note: Functions vary depending on projector via LAN under standby status. Wake on LAN (Standby) Set to "On" to enable wake-on-LAN function to On. 2. Only available when DHCP set to power on model definition...
User Manual
Page 50
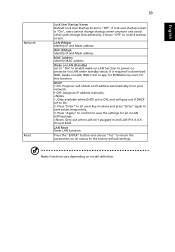
... on High Altitude mode. show warning message while user presses keypad.) • Disable "Full Lock" function, press "ENTER" key for proper high altitude cooling of "Control Panel Lock" is set to "Off" and not required to go back to 0 hours. Off Default is set to "Off". Lamp Reminding Activate this function to display a reminder to return normal mode. 40 English Management ECO Mode High Altitude Turn Off Mode Auto Shutdown Menu Display Time (Seconds) Auto Power On Control Panel Lock Lamp...
... on High Altitude mode. show warning message while user presses keypad.) • Disable "Full Lock" function, press "ENTER" key for proper high altitude cooling of "Control Panel Lock" is set to "Off" and not required to go back to 0 hours. Off Default is set to "Off". Lamp Reminding Activate this function to display a reminder to return normal mode. 40 English Management ECO Mode High Altitude Turn Off Mode Auto Shutdown Menu Display Time (Seconds) Auto Power On Control Panel Lock Lamp...
User Manual
Page 54
... are using and follow the steps below: • Verify that the resolution setting is lower than or equal to WUXGA-RB (1920 x 1200). • Click the "Change" button under the "Models" box. • Verify that your display resolution setting is switched on. 2 Partial, scrolling • For an incorrectly displayed image: or incorrectly displayed image (for PC (Windows 2000/XP/Vista/ • Open "My Computer", open the "Control Panel", and...
... are using and follow the steps below: • Verify that the resolution setting is lower than or equal to WUXGA-RB (1920 x 1200). • Click the "Change" button under the "Models" box. • Verify that your display resolution setting is switched on. 2 Partial, scrolling • For an incorrectly displayed image: or incorrectly displayed image (for PC (Windows 2000/XP/Vista/ • Open "My Computer", open the "Control Panel", and...
User Manual
Page 58
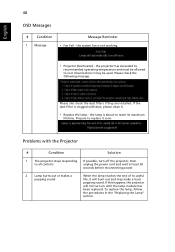
Please check the following message. the system fan is about to replace it soon. If the dust filter is clogged with the Projector # Condition Solution 1 The projector stops responding If possible, turn on until the lamp module has been replaced. the lamp is not working. • Projector Overheated - Prepare to reach its useful life, it will not turn off the projector, then to all controls unplug the power cord and wait at...
Please check the following message. the system fan is about to replace it soon. If the dust filter is clogged with the Projector # Condition Solution 1 The projector stops responding If possible, turn on until the lamp module has been replaced. the lamp is not working. • Projector Overheated - Prepare to reach its useful life, it will not turn off the projector, then to all controls unplug the power cord and wait at...


