
Power SC Service Guide
Page 2
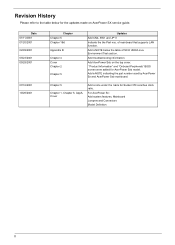
For AcerPower Sc: Add system features, Mainboard Jumpers and Connectors Model Definition II Chapter 5 Chapter 1, Chapter 5, AppA, Cover Add a note under the table for AcerPower Sxb model. Add a NOTE below for the updates made on the top cover. "Product Information" and "Onboard Perpherals" BIOS screen were added for Socket 370 core/bus clock...
For AcerPower Sc: Add system features, Mainboard Jumpers and Connectors Model Definition II Chapter 5 Chapter 1, Chapter 5, AppA, Cover Add a note under the table for AcerPower Sxb model. Add a NOTE below for the updates made on the top cover. "Product Information" and "Onboard Perpherals" BIOS screen were added for Socket 370 core/bus clock...
Power SC Service Guide
Page 15
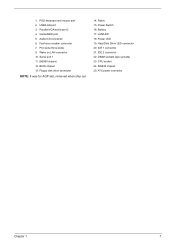
.... CPU socket 24. 1. Audio/CD connector 6. Wake on LAN connector 10. BIOS chipset 13. Floppy disk drive connector NOTE: 8 was for AGP slot, removed when ship out 14. Reset 15. Battery 17. Power LED 19. DIMM sockets (two sockets) 23. ATX power connector Chapter 1 7 Game/MIDI port 5. IDE 2 connector 22. PS/2 keyboard and...
.... CPU socket 24. 1. Audio/CD connector 6. Wake on LAN connector 10. BIOS chipset 13. Floppy disk drive connector NOTE: 8 was for AGP slot, removed when ship out 14. Reset 15. Battery 17. Power LED 19. DIMM sockets (two sockets) 23. ATX power connector Chapter 1 7 Game/MIDI port 5. IDE 2 connector 22. PS/2 keyboard and...
Power SC Service Guide
Page 19
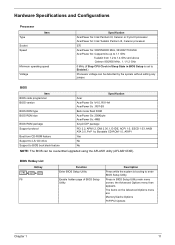
...AcerPower Sx: 500/550/600 MHz, 533/667/733 MHz AcerPower Sc: Coppermine up to 1.1 GHz Tualatin from CD-ROM feature Support to LS-120 drive Support to BIOS boot block feature Specification Acer AcerPower Sx :V4.0, R01-A4 AcerPower Sc : R07-B3 Bulk mode flash ROM AcerPower Sx: 256Kbyte AcerPower... Sc: 4MB 32-pin DIP package PCI 2.2, APM1.2, DMI 2.00.1, E-IDE, ACPI 1.0, ESCD ...
...AcerPower Sx: 500/550/600 MHz, 533/667/733 MHz AcerPower Sc: Coppermine up to 1.1 GHz Tualatin from CD-ROM feature Support to LS-120 drive Support to BIOS boot block feature Specification Acer AcerPower Sx :V4.0, R01-A4 AcerPower Sc : R07-B3 Bulk mode flash ROM AcerPower Sx: 256Kbyte AcerPower... Sc: 4MB 32-pin DIP package PCI 2.2, APM1.2, DMI 2.00.1, E-IDE, ACPI 1.0, ESCD ...

Power SC Service Guide
Page 20
The items on the Advanced Options menu are: Memory/Cache Options PnP/PCI Options Chips Options 12 Chapter 1 BIOS Hotkey List Alt+F4 Hotkey Function Enable hidden page of BIOS Setup Utility Description Press in BIOS Setup Utility main menu screen, the Advanced Options menu then appears.
The items on the Advanced Options menu are: Memory/Cache Options PnP/PCI Options Chips Options 12 Chapter 1 BIOS Hotkey List Alt+F4 Hotkey Function Enable hidden page of BIOS Setup Utility Description Press in BIOS Setup Utility main menu screen, the Advanced Options menu then appears.
Power SC Service Guide
Page 22
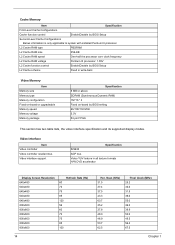
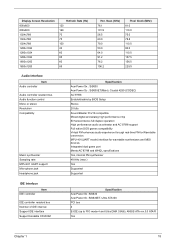
...the processor core clock frequency L2 Cache RAM voltage Pentium III processor: 1.65V L2 Cache function control Enable/Disable by BIOS Setup Second-Level Cache Configurations Below information is only applicable to system with installed Pentium III processor. Cache Memory Item ...Specification First-Level Cache Configurations Cache function control Enable/Disable by BIOS Setup L2 Cache scheme Fixed in all texture formats H/W DVD accelerator Display Screen Resolution 640x480 640x480 640x480 640x480 640x480 800x600...
...the processor core clock frequency L2 Cache RAM voltage Pentium III processor: 1.65V L2 Cache function control Enable/Disable by BIOS Setup Second-Level Cache Configurations Below information is only applicable to system with installed Pentium III processor. Cache Memory Item ...Specification First-Level Cache Configurations Cache function control Enable/Disable by BIOS Setup L2 Cache scheme Fixed in all texture formats H/W DVD accelerator Display Screen Resolution 640x480 640x480 640x480 640x480 640x480 800x600...
Power SC Service Guide
Page 23
... synthesizer Sampling rate MPU-401 UART support Microphone jack Headphone jack Specification AcerPower Sx : SiS630 AcerPower Sc : SiS630ET(Main), Crystal 4299 (CODEC) AC'97/98 Enable/disable by BIOS Setup Stereo 20 bits Sound Blaster Pro/16 compatible Mixed digital and analog high performance chip Enhanced ...IDE Interface IDE controller Item IDE controller resident bus Number of IDE channel Support IDE interface Support bootable CD-ROM Specification AcerPower Sx :SiS630 AcerPower Sc :SiS630ET, Ultra ATA100 PCI bus 2 E-IDE (up to PIO mode-4 and Ultra DMA 33/66), ANSIS ATA rev.3.0 ATAPI Yes ...
... synthesizer Sampling rate MPU-401 UART support Microphone jack Headphone jack Specification AcerPower Sx : SiS630 AcerPower Sc : SiS630ET(Main), Crystal 4299 (CODEC) AC'97/98 Enable/disable by BIOS Setup Stereo 20 bits Sound Blaster Pro/16 compatible Mixed digital and analog high performance chip Enhanced ...IDE Interface IDE controller Item IDE controller resident bus Number of IDE channel Support IDE interface Support bootable CD-ROM Specification AcerPower Sx :SiS630 AcerPower Sc :SiS630ET, Ultra ATA100 PCI bus 2 E-IDE (up to PIO mode-4 and Ultra DMA 33/66), ANSIS ATA rev.3.0 ATAPI Yes ...

Power SC Service Guide
Page 24
... Serial port controller resident bus Number of serial port Serial ports location 16550 UART support Connector type Optional serial port I/O address (via BIOS Setup) Optional serial port IRQ (via BIOS Setup) Specification SiS950 ISA bus 2 CN4, 5 Yes 9-pin D-type female connector COM1: 2F8h, 3E8h, 2E8h COM2: 3E8h, 3F8h, 2F8h COM1: IRQ 3, and... baud rate (bps) Voice modem Modem connector type Full duplex Specification V.17 12K/1.44K V.90 32K to 56K (received only) V.253 RJ11 Yes NOTE: AcerPower Sc support V.90 56K with Universal DAA Fax/Modem. 16 Chapter 1
... Serial port controller resident bus Number of serial port Serial ports location 16550 UART support Connector type Optional serial port I/O address (via BIOS Setup) Optional serial port IRQ (via BIOS Setup) Specification SiS950 ISA bus 2 CN4, 5 Yes 9-pin D-type female connector COM1: 2F8h, 3E8h, 2E8h COM2: 3E8h, 3F8h, 2F8h COM1: IRQ 3, and... baud rate (bps) Voice modem Modem connector type Full duplex Specification V.17 12K/1.44K V.90 32K to 56K (received only) V.253 RJ11 Yes NOTE: AcerPower Sc support V.90 56K with Universal DAA Fax/Modem. 16 Chapter 1
Power SC Service Guide
Page 32
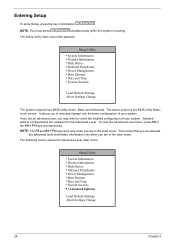
...System Security ! *Advanced Options Load Default Settings Abort Settings Change 24 Chapter 2 NOTE: You must press simultaneously while the system is the BIOS Utility Basic Level screen. The Setup Utility main menu then appears: Setup Utility ! Boot Options ! It allows you are contained in ...the main menu. Detailed system configurations are in the Advanced Level. Power Management ! NOTE: The F8 and Alt + F4 keys work only when you to check the detailed configuration of your system. Product ...
...System Security ! *Advanced Options Load Default Settings Abort Settings Change 24 Chapter 2 NOTE: You must press simultaneously while the system is the BIOS Utility Basic Level screen. The Setup Utility main menu then appears: Setup Utility ! Boot Options ! It allows you are contained in ...the main menu. Detailed system configurations are in the Advanced Level. Power Management ! NOTE: The F8 and Alt + F4 keys work only when you to check the detailed configuration of your system. Product ...
Power SC Service Guide
Page 35
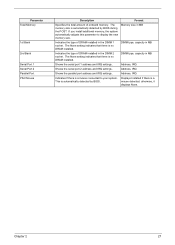
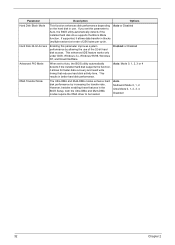
... memory size. Shows the parallel port address and IRQ settings. Indicates the type of DRAM installed in the DIMM 2 socket. This is automatically detected by BIOS. The memory size is automatically detected by...
... memory size. Shows the parallel port address and IRQ settings. Indicates the type of DRAM installed in the DIMM 2 socket. This is automatically detected by BIOS. The memory size is automatically detected by...
Power SC Service Guide
Page 36
..., '00 Product Information Product Name AcerPower Sxb System S/N N/A Main Board ID S57M Main Board S/N N/A System BIOS Version V4.0 SMBIOS Version 2.3 *System BIOS ID R06-A1 BIOS Release Date April 16,01 NOTE: This screen can be seen on Acer Power Sxb model. These information is necessary for troubleshooting (maybe required when asking for technical support...
..., '00 Product Information Product Name AcerPower Sxb System S/N N/A Main Board ID S57M Main Board S/N N/A System BIOS Version V4.0 SMBIOS Version 2.3 *System BIOS ID R06-A1 BIOS Release Date April 16,01 NOTE: This screen can be seen on Acer Power Sxb model. These information is necessary for troubleshooting (maybe required when asking for technical support...
Power SC Service Guide
Page 37
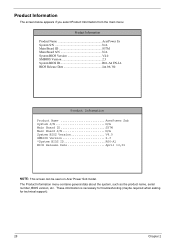
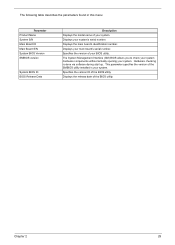
... Name System S/N Main Board ID Main Board S/N System BIOS Version SMBIOS version System BIOS ID BIOS Release Date Description Displays the model name of the BIOS utility. Chapter 2 29 Displays the release date of your BIOS utility. The following table describes the parameters found in your... system. Displays your system. Specifies the version of the BIOS utility. Specifies the version ID of ...
... Name System S/N Main Board ID Main Board S/N System BIOS Version SMBIOS version System BIOS ID BIOS Release Date Description Displays the model name of the BIOS utility. Chapter 2 29 Displays the release date of your BIOS utility. The following table describes the parameters found in your... system. Displays your system. Specifies the version of the BIOS utility. Specifies the version ID of ...
Power SC Service Guide
Page 39
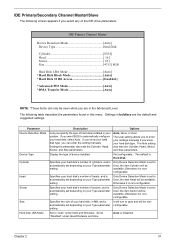
... of hard disk installed in your Type parameter setting. Only Device Detection Mode is automatically set depending on your Type parameter setting. If you want BIOS to enter your settings manually if you know your Type parameter setting Set to "Disabled" under DOS and Windows. Specifies your hard disk's number of...
... of hard disk installed in your Type parameter setting. Only Device Detection Mode is automatically set depending on your Type parameter setting. If you want BIOS to enter your settings manually if you know your Type parameter setting Set to "Disabled" under DOS and Windows. Specifies your hard disk's number of...
Power SC Service Guide
Page 40
Enabling this parameter to Auto, the BIOS utility automatically detects if the installed hard disk drive supports the Block Mode function. When set this parameter improves system performance by increasing the transfer ..., and Novell NetWare. This results in better hard disk performance. However, besides enabling these features in the BIOS Setup, both the Ultra DMA and Multi-DMA modes require the DMA driver to Auto, the BIOS utility automatically detects if the installed hard disk supports the function, it allows data transfer in blocks...
Enabling this parameter to Auto, the BIOS utility automatically detects if the installed hard disk drive supports the Block Mode function. When set this parameter improves system performance by increasing the transfer ..., and Novell NetWare. This results in better hard disk performance. However, besides enabling these features in the BIOS Setup, both the Ultra DMA and Multi-DMA modes require the DMA driver to Auto, the BIOS utility automatically detects if the installed hard disk supports the function, it allows data transfer in blocks...
Power SC Service Guide
Page 46
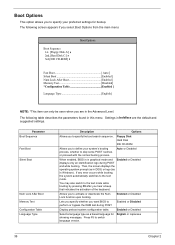
... whether you hear a beep that indicates the activation of the keyboard. Press F5 to the text mode while booting by pressing F9 after you want BIOS to Enabled or Disabled perform or bypass the RAM test during POST and while booting. Auto or Disabled When enabled..., BIOS is in Windows). Enabled or Disabled Select a language type as in graphical mode and Enabled or Disabled displays only an identification logo during POST. You ...
... whether you hear a beep that indicates the activation of the keyboard. Press F5 to the text mode while booting by pressing F9 after you want BIOS to Enabled or Disabled perform or bypass the RAM test during POST and while booting. Auto or Disabled When enabled..., BIOS is in Windows). Enabled or Disabled Select a language type as in graphical mode and Enabled or Disabled displays only an identification logo during POST. You ...
Power SC Service Guide
Page 48
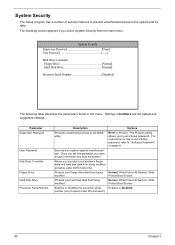
... the system. The following table describes the parameters found in boldface are the default and suggested settings. Once you set a Setup password, refer to the BIOS utility. Allows you to type it whenever you select System Security from being modified. Settings in this password, you to the system and its data.
... the system. The following table describes the parameters found in boldface are the default and suggested settings. Once you set a Setup password, refer to the BIOS utility. Allows you to type it whenever you select System Security from being modified. Settings in this password, you to the system and its data.
Power SC Service Guide
Page 49
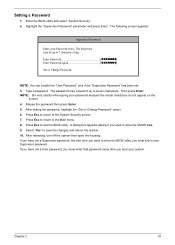
... password, you must key-in your system. Press Esc to return to 7 characters long. Press Esc to enter the BIOS utility, you want to exit the BIOS utility. Type a password. If you have set . 3. NOTE: Be very careful when typing your Password twice. Press... Esc to return to seven characters. Chapter 2 41 Enter the BIOS utility and select "System Security" . 2. Highlight the "Supervisor Password" parameter and press Enter. The following screen appears: Supervisor Password Enter your ...
... password, you must key-in your system. Press Esc to return to 7 characters long. Press Esc to enter the BIOS utility, you want to exit the BIOS utility. Type a password. If you have set . 3. NOTE: Be very careful when typing your Password twice. Press... Esc to return to seven characters. Chapter 2 41 Enter the BIOS utility and select "System Security" . 2. Highlight the "Supervisor Password" parameter and press Enter. The following screen appears: Supervisor Password Enter your ...

Power SC Service Guide
Page 50
... System Security menu and set first before you can change the User password). This time, the system does not require you to exit the BIOS utility. The Password menu appears. 3. Press Esc to type-in a password. Select "Yes" to save the CMOS data. 8. Enter the... and select "System Security". 2. Follow these steps to the main menu. 7. Refer to "Changing or Removing the Password" on the system and enter the BIOS utility. Enter a new password. 5. To remove the password, simply select the "Supervisor Password" parameter (for the procedure. 42 Chapter 2 Press Esc to return to ...
... System Security menu and set first before you can change the User password). This time, the system does not require you to exit the BIOS utility. The Password menu appears. 3. Press Esc to type-in a password. Select "Yes" to save the CMOS data. 8. Enter the... and select "System Security". 2. Follow these steps to the main menu. 7. Refer to "Changing or Removing the Password" on the system and enter the BIOS utility. Enter a new password. 5. To remove the password, simply select the "Supervisor Password" parameter (for the procedure. 42 Chapter 2 Press Esc to return to ...
Power SC Service Guide
Page 53
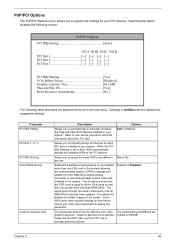
... your PCI devices. Options Auto or Manual Yes or No Enabled or Disabled The lowest setting is 8 MB and the highest is set to Auto, BIOS automatically assigns the available IRQs to manage graphical objects. Allows you to your VGA card manual before setting this parameter. The snooping process lets the...
... your PCI devices. Options Auto or Manual Yes or No Enabled or Disabled The lowest setting is 8 MB and the highest is set to Auto, BIOS automatically assigns the available IRQs to manage graphical objects. Allows you to your VGA card manual before setting this parameter. The snooping process lets the...
Power SC Service Guide
Page 54
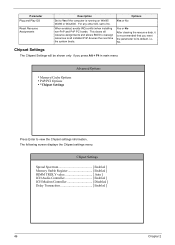
... Enabled ] RIMM TRDLY value Auto ] ICH Audio Controller Enabled ] ICH Modem Controller Disabled ] Delay Transaction Enabled ] 46 Chapter 2 This clears all resource assignments and allows BIOS to reassign resources to view the Chipset settings information. Memory/Cache Options ! Parameter Plug and Play OS Reset Resource Assignments Description Set to Yes if...
... Enabled ] RIMM TRDLY value Auto ] ICH Audio Controller Enabled ] ICH Modem Controller Disabled ] Delay Transaction Enabled ] 46 Chapter 2 This clears all resource assignments and allows BIOS to reassign resources to view the Chipset settings information. Memory/Cache Options ! Parameter Plug and Play OS Reset Resource Assignments Description Set to Yes if...
Power SC Service Guide
Page 55
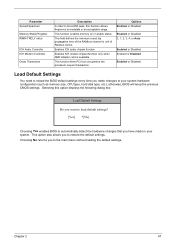
... Disabled 0, 1, 2, 3, 4, or Auto Enabled or Disabled Enabled or Disabled Enabled or Disabled Load Default Settings You need to reload the BIOS default settings every time you to the main menu without loading the default settings. Choosing No returns you make changes to your system. This ...Load Default Settings Do you want to load default settings? [Yes] *[No] Choosing Yes enables BIOS to automatically detect the hardware changes that you to restore the default settings. otherwise, BIOS will keep the previous CMOS settings. This option also allows you have made in stable status.
... Disabled 0, 1, 2, 3, 4, or Auto Enabled or Disabled Enabled or Disabled Enabled or Disabled Load Default Settings You need to reload the BIOS default settings every time you to the main menu without loading the default settings. Choosing No returns you make changes to your system. This ...Load Default Settings Do you want to load default settings? [Yes] *[No] Choosing Yes enables BIOS to automatically detect the hardware changes that you to restore the default settings. otherwise, BIOS will keep the previous CMOS settings. This option also allows you have made in stable status.


