

PD113P Service Guide
Page 5
......2 System Block Diagram ...6 Optics Conceptual Drawing 7 Chapter 2 Firmware Update 8 Setup Tool / Equipment...8 Upgrading Procedure ...8 Chapter 3 Machine Dissassembly and Replacement 10 General Information ...11 Disassemble Lamp Module 12 Disassemble IO Cover & Top Cover 13 Disassemble Speaker & Front Cover 14 Disassemble Front Fan...15 Disassemble Front IR Board & IR Cover 16 Disassemble ...
......2 System Block Diagram ...6 Optics Conceptual Drawing 7 Chapter 2 Firmware Update 8 Setup Tool / Equipment...8 Upgrading Procedure ...8 Chapter 3 Machine Dissassembly and Replacement 10 General Information ...11 Disassemble Lamp Module 12 Disassemble IO Cover & Top Cover 13 Disassemble Speaker & Front Cover 14 Disassemble Front Fan...15 Disassemble Front IR Board & IR Cover 16 Disassemble ...

PD113P Service Guide
Page 8
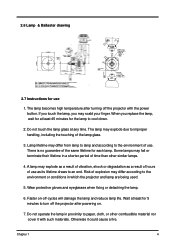
... Ballast type Test conditions stable at 200W with NSH200PT Rated lamp wattage 200W Lamp position Horizontal (within a reflector, and an electric lamp ballast. Lamp type NSH200PT Driver type PHG201G16** 2. Serial number(ex. Lamp Specification : NSH200PT 2.1 Dimensions Lamp Overall length Arc length Reflector type Lamp weight see 2.6 figure (Lamp & Ballaster drawing) 66.6 1.1mm(typical) Elliptical man. 75g 2.2 Marking on...
... Ballast type Test conditions stable at 200W with NSH200PT Rated lamp wattage 200W Lamp position Horizontal (within a reflector, and an electric lamp ballast. Lamp type NSH200PT Driver type PHG201G16** 2. Serial number(ex. Lamp Specification : NSH200PT 2.1 Dimensions Lamp Overall length Arc length Reflector type Lamp weight see 2.6 figure (Lamp & Ballaster drawing) 66.6 1.1mm(typical) Elliptical man. 75g 2.2 Marking on...

PD113P Service Guide
Page 9
2.4 Initial Ignition performance Wattage DC 200 Lamp Voltage (V) 82 V Lamp Current (A) 2.4 Efficiency (lm/w) 66 2.5 Optical characteristics Based on meansurement on standard optical unit by USHIO Lighting Brightness typ. 1600 lumen Color coordinates Flickering and arc jump x : 0.3 +/- 0.02 y : 0.32 +/- 0.02 less than 5 % The flicker and arc jump over than 5% should be less than 10 times during 10 minutes operation 3 Chapter 1
2.4 Initial Ignition performance Wattage DC 200 Lamp Voltage (V) 82 V Lamp Current (A) 2.4 Efficiency (lm/w) 66 2.5 Optical characteristics Based on meansurement on standard optical unit by USHIO Lighting Brightness typ. 1600 lumen Color coordinates Flickering and arc jump x : 0.3 +/- 0.02 y : 0.32 +/- 0.02 less than 5 % The flicker and arc jump over than 5% should be less than 10 times during 10 minutes operation 3 Chapter 1
PD113P Service Guide
Page 10
...draws to the environment of use 1. Risk of time than other combustible material nor cover it could cause a fire. Do not operate the lamp in proximity to the environment or conditions in a shorter period of explosion may scald your finger. If you touch the... lamp, you replace the lamp, wait for each lamp. When you may differ according to paper, cloth, or other similar lamps. 4. Do not touch the lamp glass at least 45 minutes for the lamp to improper handling, including the touching of the same lifetime...
...draws to the environment of use 1. Risk of time than other combustible material nor cover it could cause a fire. Do not operate the lamp in proximity to the environment or conditions in a shorter period of explosion may scald your finger. If you touch the... lamp, you replace the lamp, wait for each lamp. When you may differ according to paper, cloth, or other similar lamps. 4. Do not touch the lamp glass at least 45 minutes for the lamp to improper handling, including the touching of the same lifetime...
PD113P Service Guide
Page 11
...an atmosphere containing an inflammable substance, such as thinner. Otherwise it could cause the lamp to ensure proper disposal. Do not use the projector with UL1572. 8. Since the lamp is made of spent lamps, always consult federal, state, local and provincial hazardous waste disposal rules and regulations ... fire or explosion. 9. Due to turn off the projector and unplug the AC power cord before replacing the lamp. 16. Leave the area immediately if the lamp shatters while being operated and ventilate the area for at high pressure. Screws not tightened fully may only be ...
...an atmosphere containing an inflammable substance, such as thinner. Otherwise it could cause the lamp to ensure proper disposal. Do not use the projector with UL1572. 8. Since the lamp is made of spent lamps, always consult federal, state, local and provincial hazardous waste disposal rules and regulations ... fire or explosion. 9. Due to turn off the projector and unplug the AC power cord before replacing the lamp. 16. Leave the area immediately if the lamp shatters while being operated and ventilate the area for at high pressure. Screws not tightened fully may only be ...

PD113P Service Guide
Page 18
Grasp the lamp handle and pull out Lamp Module p.s Related notice of Lamp Module . 4. P2043-0013 Chapter 3 12 Disassemble Lamp Module 1. Note:Unplug all the cord before disaddembling the Projector. Loosen two screws of replace lamp pls refer to the Lamp Specification section . Loosen two screws of Lamp Cover 2. Remove Lamp Cover 3.
Grasp the lamp handle and pull out Lamp Module p.s Related notice of Lamp Module . 4. P2043-0013 Chapter 3 12 Disassemble Lamp Module 1. Note:Unplug all the cord before disaddembling the Projector. Loosen two screws of replace lamp pls refer to the Lamp Specification section . Loosen two screws of Lamp Cover 2. Remove Lamp Cover 3.

PD113P Service Guide
Page 26
Disassemble Optical Engine 1. Chapter 3 20 Remove the Optical Engine ( with Lamp ) . Loosen the four screws of Optical Engine 2.
Disassemble Optical Engine 1. Chapter 3 20 Remove the Optical Engine ( with Lamp ) . Loosen the four screws of Optical Engine 2.

PD113P Service Guide
Page 37
mal Sensor OK Check Speaker NG Replace Speaker OK OK Check Fan NG Replace Fan OK Check Main Board NG Replace Main Board Check Main Board OK Replace Main OK Check Ballast NG Replace Ballast Chapter 4 32 tive action Check Lamp NG Replace Lamp Check Top cover's cable NG Replace cable or connect the cable back OK Check Speaker Connector NG Speaker Connector Become loose OK Check Thermal Sensor NG Replace Ther- Fail to light up No Volume Check LED indication OK Look up user NG manual ,and follow indica-
mal Sensor OK Check Speaker NG Replace Speaker OK OK Check Fan NG Replace Fan OK Check Main Board NG Replace Main Board Check Main Board OK Replace Main OK Check Ballast NG Replace Ballast Chapter 4 32 tive action Check Lamp NG Replace Lamp Check Top cover's cable NG Replace cable or connect the cable back OK Check Speaker Connector NG Speaker Connector Become loose OK Check Thermal Sensor NG Replace Ther- Fail to light up No Volume Check LED indication OK Look up user NG manual ,and follow indica-

PD113P Service Guide
Page 40
Power Source: No Power Source After Turning On Fan failure After Turning On Check Lamp Cover Switch OK Check Power Cord OK Check Top Cover (key cable..) NG Replace Lamp Cover or Reassembly NG Replace Power Cord NG Replace cable or key Check Fan Connector OK Check Inner Wires OK Check Fan NG Fan Connector Become loose NG Replace Inner Wires NG Replace Fan OK Check Main Board OK Check Power Board NG Replace Main Board OK Check Main Board OK NG Replace Main Board NG Replace Power Board Replace Power Baord OK Replace Standby Signal cable NG 35 Chapter 4
Power Source: No Power Source After Turning On Fan failure After Turning On Check Lamp Cover Switch OK Check Power Cord OK Check Top Cover (key cable..) NG Replace Lamp Cover or Reassembly NG Replace Power Cord NG Replace cable or key Check Fan Connector OK Check Inner Wires OK Check Fan NG Fan Connector Become loose NG Replace Inner Wires NG Replace Fan OK Check Main Board OK Check Power Board NG Replace Main Board OK Check Main Board OK NG Replace Main Board NG Replace Power Board Replace Power Baord OK Replace Standby Signal cable NG 35 Chapter 4

PD113P User's Guide EN
Page 1
... 19 Image (Computer Mode 21 Image (Video Mode 22 Audio (Computer/Video Mode 23 Management (Computer/Video Mode 24 Appendices ...28 Troubleshooting 28 Replacing the lamp 32 Specifications 34 Compatibility Modes 35 1 ...
... 19 Image (Computer Mode 21 Image (Video Mode 22 Audio (Computer/Video Mode 23 Management (Computer/Video Mode 24 Appendices ...28 Troubleshooting 28 Replacing the lamp 32 Specifications 34 Compatibility Modes 35 1 ...
PD113P User's Guide EN
Page 2
..., do not open or disassemble the product as recommended in operation. WarningWarningWarning- When changing the lamp, please allow unit to maximize the life of the lamp itself. Usage Notice English...2 Precautions Follow all changing instructions. Please do not expose this happens,... product will burn out and may make a loud popping sound. WarningWarningWarningWarningWarning- Reset the "Lamp Hour Reset" function from the On Screen Display "Management" menu after replacing the lamp module (refer to rain or moisture. When switching the projector off, please ensure the...
..., do not open or disassemble the product as recommended in operation. WarningWarningWarning- When changing the lamp, please allow unit to maximize the life of the lamp itself. Usage Notice English...2 Precautions Follow all changing instructions. Please do not expose this happens,... product will burn out and may make a loud popping sound. WarningWarningWarningWarningWarning- Reset the "Lamp Hour Reset" function from the On Screen Display "Management" menu after replacing the lamp module (refer to rain or moisture. When switching the projector off, please ensure the...

PD113P User's Guide EN
Page 7
Temp Indicator LED 3. English Control Panel 1 2 Introduction 3 4 7 6 5 1. Lamp Indicator LED 4. Power and Indicator LED (Power LED) 7. Source 5. Re-Sync 6. Four Directional Select Keys 7 ... Menu 2.
Temp Indicator LED 3. English Control Panel 1 2 Introduction 3 4 7 6 5 1. Lamp Indicator LED 4. Power and Indicator LED (Power LED) 7. Source 5. Re-Sync 6. Four Directional Select Keys 7 ... Menu 2.
PD113P User's Guide EN
Page 11
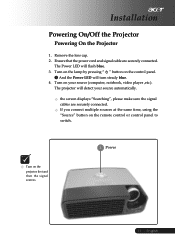
Turn on the control panel. 1 And the Power LED will flash blue. 3. English Turn on the lamp by pressing " " button on your source automatically. the screen displays "Searching", please make sure the signal cables are securely connected. Ensure that the power cord ...
Turn on the control panel. 1 And the Power LED will flash blue. 3. English Turn on the lamp by pressing " " button on your source automatically. the screen displays "Searching", please make sure the signal cables are securely connected. Ensure that the power cord ...
PD113P User's Guide EN
Page 12
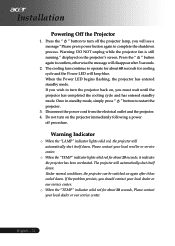
... press " " button to complete the shutdown process. If the problem persists, you will automatically shut itself down . Warning Indicator When the "LAMP" indicator lights solid red, the projector will see a message "Please press power button again to restart the projector. 3. Disconnect the power cord...our service center. Under normal conditions, the projector can be switched on the projector immediately following a power off the projector lamp, you should contact your local reseller or service center. When the "TEMP" indicator solid red for about 20 seconds, it has cooled...
... press " " button to complete the shutdown process. If the problem persists, you will automatically shut itself down . Warning Indicator When the "LAMP" indicator lights solid red, the projector will see a message "Please press power button again to restart the projector. 3. Disconnect the power cord...our service center. Under normal conditions, the projector can be switched on the projector immediately following a power off the projector lamp, you should contact your local reseller or service center. When the "TEMP" indicator solid red for about 20 seconds, it has cooled...
PD113P User's Guide EN
Page 24
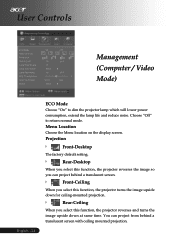
... this function, the projector reverses and turns the image upside down for ceiling-mounted projection. Choose "Off" to dim the projector lamp which will lower power consumption, extend the lamp life and reduce noise. Menu Location Choose the Menu location on the display screen. Rear-Ceiling When you can project from behind...
... this function, the projector reverses and turns the image upside down for ceiling-mounted projection. Choose "Off" to dim the projector lamp which will lower power consumption, extend the lamp life and reduce noise. Menu Location Choose the Menu location on the display screen. Rear-Ceiling When you can project from behind...
PD113P User's Guide EN
Page 25
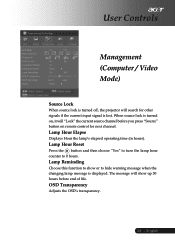
... function to show up 30 hours before end of life. Lamp Hour Elapse Displays Hour the lamp's elapsed operating time (in hours). Lamp Hour Reset Press the button and then choose "Yes" to turn the lamp hour counter to hide warning message when the changing lamp message is displayed. OSD Transparency Adjusts the OSD's transparency...
... function to show up 30 hours before end of life. Lamp Hour Elapse Displays Hour the lamp's elapsed operating time (in hours). Lamp Hour Reset Press the button and then choose "Yes" to turn the lamp hour counter to hide warning message when the changing lamp message is displayed. OSD Transparency Adjusts the OSD's transparency...

PD113P User's Guide EN
Page 27
...default start-up Screen from your PC to projector. Before the download starts, the projector must enter "Download Mode" first. When "Temp" and "Lamp" LEDs turn off the projector. 3. You can install My Start-up screen of the projector was turned on again, release both buttons, projector ... Mode". 1. English If the projector was unplugged, plug the AC power. 2. If the AC power cord of Acer projector to their desired image. User Controls Management (Computer / Video Mode) Acer My Start-up Screen is blinking. 4. Make sure all menus to turn on , press power button twice to ...
...default start-up Screen from your PC to projector. Before the download starts, the projector must enter "Download Mode" first. When "Temp" and "Lamp" LEDs turn off the projector. 3. You can install My Start-up screen of the projector was turned on again, release both buttons, projector ... Mode". 1. English If the projector was unplugged, plug the AC power. 2. If the AC power cord of Acer projector to their desired image. User Controls Management (Computer / Video Mode) Acer My Start-up Screen is blinking. 4. Make sure all menus to turn on , press power button twice to ...
PD113P User's Guide EN
Page 28
... been securely installed. Follow the steps outlined below to the "Replacing the lamp" section. For Windows 3.x: 1. Verify that your display resolution setting is higher than 800 x 600. Select the "Setting" tab. 3. In the "Desktop Area" you will also ...
... been securely installed. Follow the steps outlined below to the "Replacing the lamp" section. For Windows 3.x: 1. Verify that your display resolution setting is higher than 800 x 600. Select the "Setting" tab. 3. In the "Desktop Area" you will also ...
PD113P User's Guide EN
Page 30
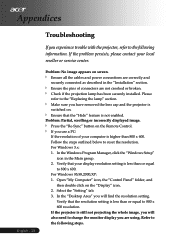
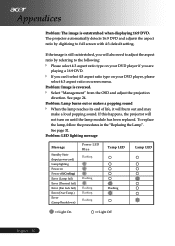
...24. To replace the lamp, follow the procedures in the "Replacing the Lamp". Problem: LED lighting message Message Standby State (Input power cord) Lamp lighting Power on until the lamp module has been replaced. Problem: Lamp burns out or makes a popping sound When the lamp reaches its end of life... the projector will not turn on Power off (Cooling) Error (Lamp fail) Error (Thermal fail) Error (Fan lock fail) Error (Over Temp.) Error (Lamp Breakdown) Power LED Blue Flashing Flashing Flashing Flashing Flashing Temp LED Flashing Lamp LED =>Light On =>Light Off English...30 If you can't...
...24. To replace the lamp, follow the procedures in the "Replacing the Lamp". Problem: LED lighting message Message Standby State (Input power cord) Lamp lighting Power on until the lamp module has been replaced. Problem: Lamp burns out or makes a popping sound When the lamp reaches its end of life... the projector will not turn on Power off (Cooling) Error (Lamp fail) Error (Thermal fail) Error (Fan lock fail) Error (Over Temp.) Error (Lamp Breakdown) Power LED Blue Flashing Flashing Flashing Flashing Flashing Temp LED Flashing Lamp LED =>Light On =>Light Off English...30 If you can't...

PD113P User's Guide EN
Page 31
Appendices Problem: Message Reminders "Lamp is going to deplete. 31 ... English will be shown about 10 seconds when lamp life is approaching the end of its useful life in full power operation. Replacement Suggested!"
Appendices Problem: Message Reminders "Lamp is going to deplete. 31 ... English will be shown about 10 seconds when lamp life is approaching the end of its useful life in full power operation. Replacement Suggested!"


