
PD100 and PD120 Service Guide
Page 11
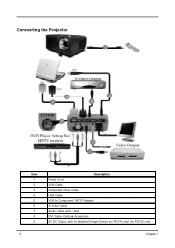
Connecting the Projector Item 1 2 3 4 5 6 7 8 9 5 Description Power Cord VGA Cable Composite Video Cable USB Cable VGA to Component / HDTV Adapter S-Video Cable Audio Cable Jack / Jack DVI Cable (Optional Accessory) 5V DC Output Jack for attached Dongle Device (for PD100 only) (for PD120 only) Chapter 1
Connecting the Projector Item 1 2 3 4 5 6 7 8 9 5 Description Power Cord VGA Cable Composite Video Cable USB Cable VGA to Component / HDTV Adapter S-Video Cable Audio Cable Jack / Jack DVI Cable (Optional Accessory) 5V DC Output Jack for attached Dongle Device (for PD100 only) (for PD120 only) Chapter 1
PD100 and PD120 Service Guide
Page 13
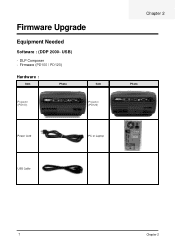
DLP Composer - USB) - Firmware Upgrade Equipment Needed Software : (DDP 2000- Firmware (PD100 / PD120) Hardware : Item Photo Item Projector (PD100) Projector (PD120) Chapter 2 Photo Power Cord PC or Laptop USB Cable 7 Chapter 2
DLP Composer - USB) - Firmware Upgrade Equipment Needed Software : (DDP 2000- Firmware (PD100 / PD120) Hardware : Item Photo Item Projector (PD100) Projector (PD120) Chapter 2 Photo Power Cord PC or Laptop USB Cable 7 Chapter 2
PD100 and PD120 Service Guide
Page 19
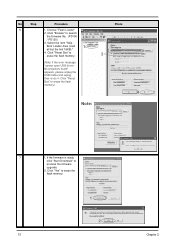
No Step Procedure 6 1. Click "Reset Bus" to search the firmware file. (PD100 / PD120) 3. Click "Browse" to erase the flash memory. (Note: If the error message "cannot open USB driver No projectors found" appears, please unplug the USB Cable and replug, then re-do 4. If the firmware is ready, click "Start Download" to erase...
No Step Procedure 6 1. Click "Reset Bus" to search the firmware file. (PD100 / PD120) 3. Click "Browse" to erase the flash memory. (Note: If the error message "cannot open USB driver No projectors found" appears, please unplug the USB Cable and replug, then re-do 4. If the firmware is ready, click "Start Download" to erase...
PD100 and PD120 Service Guide
Page 21
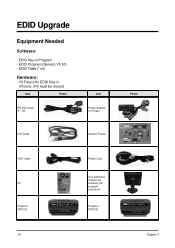
EDID Key-in (Fixture: JP3 must be closed) Item Photo RS-232 Cable (F - EDID Table (*.ini) Hardware: - V3 Fixture for checking the program execution) Projector (PD120) 15 Photo Chapter 2 EDID Upgrade Equipment Needed Software: - EDID Program (Generic V0.51) - M) Item Power Adapter for Fixture DVI Cable Generic Fixture VGA Cable PC Projector (PD100) Power Cord One additional monitor (for EDID Key-in Program -
EDID Key-in (Fixture: JP3 must be closed) Item Photo RS-232 Cable (F - EDID Table (*.ini) Hardware: - V3 Fixture for checking the program execution) Projector (PD120) 15 Photo Chapter 2 EDID Upgrade Equipment Needed Software: - EDID Program (Generic V0.51) - M) Item Power Adapter for Fixture DVI Cable Generic Fixture VGA Cable PC Projector (PD100) Power Cord One additional monitor (for EDID Key-in Program -
PD100 and PD120 Service Guide
Page 25
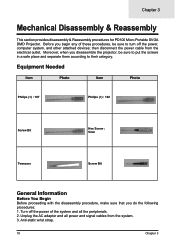
... their category. Turn off the power, computer system, and other attached devices; Chapter 3 Mechanical Disassembly & Reassembly This section provides disassembly & Reassembly procedures for PD100 Micro Portable SVGA DMD Projector. Unplug the AC adapter and all the peripherals. 2. Anti-static wrist strap. 19 Chapter 3 Equipment Needed Item Photo Item Photo Philips (+) : 107 Philips...
... their category. Turn off the power, computer system, and other attached devices; Chapter 3 Mechanical Disassembly & Reassembly This section provides disassembly & Reassembly procedures for PD100 Micro Portable SVGA DMD Projector. Unplug the AC adapter and all the peripherals. 2. Anti-static wrist strap. 19 Chapter 3 Equipment Needed Item Photo Item Photo Philips (+) : 107 Philips...
PD100 and PD120 Service Guide
Page 59
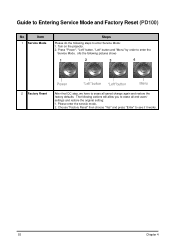
...: 1. Please enter the servcie mode, 2. The following actions will allow you to erase all end-users' settings and restore the original setting: 1. Turn on the projector. 2. Guide to Entering Service Mode and Factory Reset (PD100) No Item 1 Service Mode Steps Please do the following steps to see if it works. 53 Chapter 4
...: 1. Please enter the servcie mode, 2. The following actions will allow you to erase all end-users' settings and restore the original setting: 1. Turn on the projector. 2. Guide to Entering Service Mode and Factory Reset (PD100) No Item 1 Service Mode Steps Please do the following steps to see if it works. 53 Chapter 4
PD100 User's Guide
Page 10
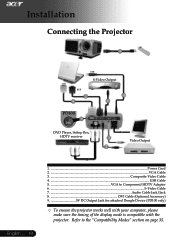
Installation Connecting the Projector 1 USB S-Video Output DVI RGB 2 8 4 6 PD100 9 5 DVD Player, Settop Box, HDTV receiver 3 7 Video Output English ... 10 1...Power Cord 2...VGA Cable 3 Composite Video Cable 4...USB Cable 5 VGA to the "Compatibility Modes" section ... page 35. Refer to Component/HDTV Adapter 6...S-Video Cable 7 Audio Cable Jack/Jack 8 DVI Cable (Optional Accessory) 9 5V DC Output Jack for attached Dongle Device (PD100 only) To ensure the projector works well with your computer, please make sure the timing of the display mode is compatible with the...
Installation Connecting the Projector 1 USB S-Video Output DVI RGB 2 8 4 6 PD100 9 5 DVD Player, Settop Box, HDTV receiver 3 7 Video Output English ... 10 1...Power Cord 2...VGA Cable 3 Composite Video Cable 4...USB Cable 5 VGA to the "Compatibility Modes" section ... page 35. Refer to Component/HDTV Adapter 6...S-Video Cable 7 Audio Cable Jack/Jack 8 DVI Cable (Optional Accessory) 9 5V DC Output Jack for attached Dongle Device (PD100 only) To ensure the projector works well with your computer, please make sure the timing of the display mode is compatible with the...


