
PD100 and PD120 Service Guide
Page 7
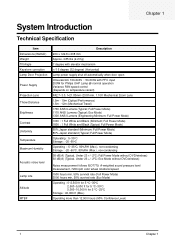
... operation Variance FAN speed control (Depends on temperature variant) F#2.7~3.0, f=21.83mm~23.81mm, 1.10X Mechanical Zoom Lens 1.5m - 10m (Optical Performance) 1.5m - 12m (Mechanical Travel) 1700 ANSI Lumens (Typical; Full Power Mode) 1000 : 1 Full White and Black (Minimum; Chapter 1 System Introduction Technical Specification Item Dimensions (WxHxD) Weight Tilt Angle Keystone correction Lamp Door Projection Power Supply Projection Lens Throw Distance Brightness Contrast Uniformity Temperature Maximum Humidity Acoustic noise level Lamp Life...
... operation Variance FAN speed control (Depends on temperature variant) F#2.7~3.0, f=21.83mm~23.81mm, 1.10X Mechanical Zoom Lens 1.5m - 10m (Optical Performance) 1.5m - 12m (Mechanical Travel) 1700 ANSI Lumens (Typical; Full Power Mode) 1000 : 1 Full White and Black (Minimum; Chapter 1 System Introduction Technical Specification Item Dimensions (WxHxD) Weight Tilt Angle Keystone correction Lamp Door Projection Power Supply Projection Lens Throw Distance Brightness Contrast Uniformity Temperature Maximum Humidity Acoustic noise level Lamp Life...
PD100 and PD120 Service Guide
Page 12
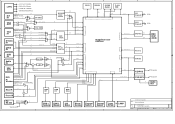
... Bits 3 2 DDC I2C 2 / / VGA EDID 2 VGA RS-232 / Sync / ALF HV VGA IN VGA RGB VGA HV 3 / VGA RGB 3 DVD YPbPr RGB 3 / 24 / Digital RGB Ctrl & Reset 23 DAD1000 / DMD H S-Video 2 IN CVBS 1 / ADC 2 / 2 / VGA HVSync WS HVSync HV 2 / 9883A 1 / SCART Sync 2 / RGB 3 / 8 / S-Video CVBS Video Decoder 8 / Digital UV Digital Y Image Processor DDP2000 DDR Data CHIP 64 / (DDR) 2 IN / 2 SAA7117A 4 Power Sense / / DVD S-Video DVD CVBS / Ctrl/CLK Reset IC USB IN Audio IN R/L 1 2 / 2 Vol...
... Bits 3 2 DDC I2C 2 / / VGA EDID 2 VGA RS-232 / Sync / ALF HV VGA IN VGA RGB VGA HV 3 / VGA RGB 3 DVD YPbPr RGB 3 / 24 / Digital RGB Ctrl & Reset 23 DAD1000 / DMD H S-Video 2 IN CVBS 1 / ADC 2 / 2 / VGA HVSync WS HVSync HV 2 / 9883A 1 / SCART Sync 2 / RGB 3 / 8 / S-Video CVBS Video Decoder 8 / Digital UV Digital Y Image Processor DDP2000 DDR Data CHIP 64 / (DDR) 2 IN / 2 SAA7117A 4 Power Sense / / DVD S-Video DVD CVBS / Ctrl/CLK Reset IC USB IN Audio IN R/L 1 2 / 2 Vol...
PD100 and PD120 Service Guide
Page 16
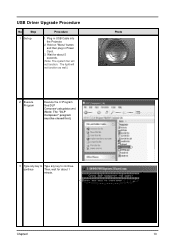
Plug in Power Cord. 3. Chapter2 10 Wait for about 5 seconds. (Note: The system fan will not function as well.) 2 Execute Program Execute the C:\Program files\DLP Composer\usbupdata.cmd. (Note: The "DLP Composer" program must be closed first.) Photo 3 Type any key to Type any key to continue. The light will not function. continue Then, wait for about 1 minute. USB Driver Upgrade Procedure No Step 1 Set-up Procedure 1. Hold on "Menu" button and then plug in USB Cable into the Projector. 2.
Plug in Power Cord. 3. Chapter2 10 Wait for about 5 seconds. (Note: The system fan will not function as well.) 2 Execute Program Execute the C:\Program files\DLP Composer\usbupdata.cmd. (Note: The "DLP Composer" program must be closed first.) Photo 3 Type any key to Type any key to continue. The light will not function. continue Then, wait for about 1 minute. USB Driver Upgrade Procedure No Step 1 Set-up Procedure 1. Hold on "Menu" button and then plug in USB Cable into the Projector. 2.
PD100 and PD120 Service Guide
Page 19
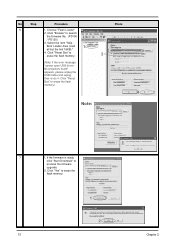
Click "Browse" to process the firmware upgrade. 2. If the firmware is ready, click "Start Download" to search the firmware file. (PD100 / PD120) 3. No Step Procedure 6 1. Choose "Flash Loader" 2. Click "Reset Bus" to erase the flash memory. (Note: If the error message "cannot open USB driver No projectors found" appears, please unplug the USB Cable and replug, then re-do 4. Click "Reset Bus" to erase the flash memory.) Photo 2 3 4 Note: 7 1. Click "Yes...
Click "Browse" to process the firmware upgrade. 2. If the firmware is ready, click "Start Download" to search the firmware file. (PD100 / PD120) 3. No Step Procedure 6 1. Choose "Flash Loader" 2. Click "Reset Bus" to erase the flash memory. (Note: If the error message "cannot open USB driver No projectors found" appears, please unplug the USB Cable and replug, then re-do 4. Click "Reset Bus" to erase the flash memory.) Photo 2 3 4 Note: 7 1. Click "Yes...
PD100 and PD120 Service Guide
Page 53
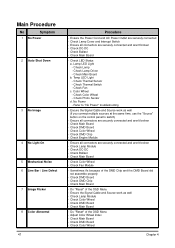
Check Lamp Cover and Interrupt Switch - Check LED Status a. Color Wheel - Ensure the Signal Cable and Source work as well (If you connect multiple sources at the same time, use the "Source" button on the control panel to "No Power" troubleshooting - Do "Reset" of the DMD Chip and the DMD Board did not assemble properly - Check DMD Board - Check Color Wheel Chapter 4 Check Ballast - Check Lamp - Temp LED Light - Check Photo Sensor d. Ensure all connectors are securely connected and aren't broken - Check Lamp Module - Sometimes it's because of the OSD...
Check Lamp Cover and Interrupt Switch - Check LED Status a. Color Wheel - Ensure the Signal Cable and Source work as well (If you connect multiple sources at the same time, use the "Source" button on the control panel to "No Power" troubleshooting - Do "Reset" of the DMD Chip and the DMD Board did not assemble properly - Check DMD Board - Check Color Wheel Chapter 4 Check Ballast - Check Lamp - Temp LED Light - Check Photo Sensor d. Ensure all connectors are securely connected and aren't broken - Check Lamp Module - Sometimes it's because of the OSD...

PD100 and PD120 Service Guide
Page 54
... Signal Cable and Source work as well - Check Remote Control c. Check Main Board - Ensure the Projection Lens is clean - Check Engine Module 11 Garbage Image - Check Main Board - Ensure the Projection Lens is clean - Ensure the Projection Screen without dirt - Check Main Board 13 Function Abnormal - Check DMD Board Chapter 4 48 No Symptom Procedure 9 Poor Uniformity / Shadow - Ensure the Brightness is within spec. (Replace the Lamp if the Brightness is less than spec.) - Do "Reset" of spec.) - Check Battery b. Clean DMD Chip...
... Signal Cable and Source work as well - Check Remote Control c. Check Main Board - Ensure the Projection Lens is clean - Check Engine Module 11 Garbage Image - Check Main Board - Ensure the Projection Lens is clean - Ensure the Projection Screen without dirt - Check Main Board 13 Function Abnormal - Check DMD Board Chapter 4 48 No Symptom Procedure 9 Poor Uniformity / Shadow - Ensure the Brightness is within spec. (Replace the Lamp if the Brightness is less than spec.) - Do "Reset" of spec.) - Check Battery b. Clean DMD Chip...
PD100 and PD120 Service Guide
Page 57
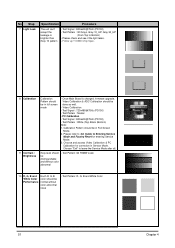
..." to 4-6. No Step 7 Light Leak Specification Procedure The unit can't accept the leakage is changed, firmware upgrade, Video Calibration & ADC Calibration should be done as well. - Video Calibration - Test Signal : 800x600@75Hz (PD100) - Test Pattern: 64 RGBW scale 10 R, G, B and Each R, G, B White Color color should be in Full Screen Mode. 2. Test Pattern: R, G, B and White Color 51 Chapter 4 Please refer to leave the Service Mode after all. Gray level...
..." to 4-6. No Step 7 Light Leak Specification Procedure The unit can't accept the leakage is changed, firmware upgrade, Video Calibration & ADC Calibration should be done as well. - Video Calibration - Test Signal : 800x600@75Hz (PD100) - Test Pattern: 64 RGBW scale 10 R, G, B and Each R, G, B White Color color should be in Full Screen Mode. 2. Test Pattern: R, G, B and White Color 51 Chapter 4 Please refer to leave the Service Mode after all. Gray level...
PD100 Quick Start Guide
Page 1
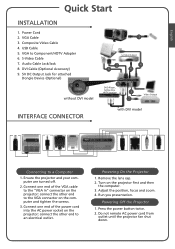
... screws. 3. connect the other end to a Computer 1. Connect one end of the power cord into the AC power socket on the projector first and then the computer. 3. Adjust the position, focus and zoom. 4. Run you presentation. Press the power button twice. 2. VGA Cable 3. Audio Cable Jack/Jack 8. Turn on the projector; Powering On the Projector Powering On the Projector 1. Remove the lens cap. 2. Ensure the projector and your computer are turned off. 2. Power Cord 2. Powering Off the Projector 1. English Quick Start INSTALLATION 1. VGA...
... screws. 3. connect the other end to a Computer 1. Connect one end of the power cord into the AC power socket on the projector first and then the computer. 3. Adjust the position, focus and zoom. 4. Run you presentation. Press the power button twice. 2. VGA Cable 3. Audio Cable Jack/Jack 8. Turn on the projector; Powering On the Projector Powering On the Projector 1. Remove the lens cap. 2. Ensure the projector and your computer are turned off. 2. Power Cord 2. Powering Off the Projector 1. English Quick Start INSTALLATION 1. VGA...
PD100 User's Guide
Page 1
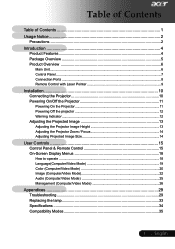
... Connection Ports ...8 Remote Control with Laser Pointer 9 Installation 10 Connecting the Projector 10 Powering On/Off the Projector 11 Powering On the Projector 11 Powering Off the projector 12 Warning Indicator ...12 Adjusting the Projected Image 13 Adjusting the Projector Image Height 13 Adjusting the Projector Zoom / Focus 14 Adjusting Projected Image Size 14 User Controls 15 Control Panel & Remote Control 15 On-Screen Display Menus 18 How to operate ...18 Language(Computer/Video Mode 19 Color (Computer/Video Mode 20 Image (Computer/Video Mode 22 Audio (Computer/Video Mode...
... Connection Ports ...8 Remote Control with Laser Pointer 9 Installation 10 Connecting the Projector 10 Powering On/Off the Projector 11 Powering On the Projector 11 Powering Off the projector 12 Warning Indicator ...12 Adjusting the Projected Image 13 Adjusting the Projector Image Height 13 Adjusting the Projector Zoom / Focus 14 Adjusting Projected Image Size 14 User Controls 15 Control Panel & Remote Control 15 On-Screen Display Menus 18 How to operate ...18 Language(Computer/Video Mode 19 Color (Computer/Video Mode 20 Image (Computer/Video Mode 22 Audio (Computer/Video Mode...
PD100 User's Guide
Page 2
... signal sources. The bright light may make a loud popping sound. This product will burn out and may hurt your unit. WarningWarningWarningWarningWarning- Do not look into the projector's lens when the lamp is in this happens, the projector will not turn back on until the lamp module has been replaced. English ... 2 Usage Notice Precautions Follow all changing instructions. Reset the "Lamp Hour Reset" function from the On Screen Display "Management" menu...
... signal sources. The bright light may make a loud popping sound. This product will burn out and may hurt your unit. WarningWarningWarningWarningWarning- Do not look into the projector's lens when the lamp is in this happens, the projector will not turn back on until the lamp module has been replaced. English ... 2 Usage Notice Precautions Follow all changing instructions. Reset the "Lamp Hour Reset" function from the On Screen Display "Management" menu...
PD100 User's Guide
Page 9
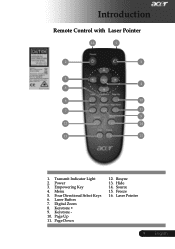
Menu 5. Keystone + 9. Resync 13. Source 15. Freeze 16. Empowering Key 4. Keystone 10. Four Directional Select Keys 6. Laser Button 7. Page Down 12. Hide 14. Transmit Indicator Light 2. Page Up 11. Digital Zoom 8. Laser Pointer 9 ... Introduction Remote Control with Laser Pointer 16 1 2 3 5 4 8 6 10 7 11 9 12 14 13 15 1. Power 3. English
Menu 5. Keystone + 9. Resync 13. Source 15. Freeze 16. Empowering Key 4. Keystone 10. Four Directional Select Keys 6. Laser Button 7. Page Down 12. Hide 14. Transmit Indicator Light 2. Page Up 11. Digital Zoom 8. Laser Pointer 9 ... Introduction Remote Control with Laser Pointer 16 1 2 3 5 4 8 6 10 7 11 9 12 14 13 15 1. Power 3. English

PD100 User's Guide
Page 12
... turn off the projector lamp, you will see a message "Fan fail. Lamp will automatically turn off soon." The projector will be switched on -screen display. Press the "Power/Standby" button to confirm, otherwise the message will automatically shut itself down . Installation Powering Off the Projector 1. The cooling fans continue to restart the projector. 3. Disconnect the power cord from the electrical outlet and the projector. 4. Please contact your local reseller or service center. When the "TEMP" indicator lights...
... turn off the projector lamp, you will see a message "Fan fail. Lamp will automatically turn off soon." The projector will be switched on -screen display. Press the "Power/Standby" button to confirm, otherwise the message will automatically shut itself down . Installation Powering Off the Projector 1. The cooling fans continue to restart the projector. 3. Disconnect the power cord from the electrical outlet and the projector. 4. Please contact your local reseller or service center. When the "TEMP" indicator lights...
PD100 User's Guide
Page 20
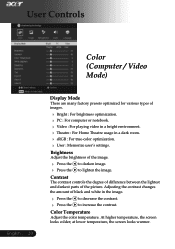
... screen looks warmer. Adjusting the contrast changes the amount of black and white in a dark room. sRGB : For true-color optimization. User : Memorize user's settings. Color Temperature Adjust the color temperature. Contrast The contrast controls the degree of difference between the lightest and darkest parts of the picture. to increase the contrast. User Controls Color (Computer / Video Mode) English ... 20 Display Mode There are many factory presets optimized for various types of images...
... screen looks warmer. Adjusting the contrast changes the amount of black and white in a dark room. sRGB : For true-color optimization. User : Memorize user's settings. Color Temperature Adjust the color temperature. Contrast The contrast controls the degree of difference between the lightest and darkest parts of the picture. to increase the contrast. User Controls Color (Computer / Video Mode) English ... 20 Display Mode There are many factory presets optimized for various types of images...
PD100 User's Guide
Page 21
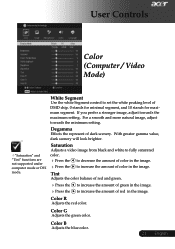
... represent of DMD chip. 0 stands for minimal segment, and 10 stands for maximum segment. to increase the amount of color in the image. Color R Adjusts the red color. User Controls Color (Computer / Video Mode) White Segment Use the white Segment control to set the white peaking level of dark scenery. Color B Adjusts the blue color. 21 ... Tint Adjusts the color balance of red and green. Press the to increase the amount of green in the image. Press...
... represent of DMD chip. 0 stands for minimal segment, and 10 stands for maximum segment. to increase the amount of color in the image. Color R Adjusts the red color. User Controls Color (Computer / Video Mode) White Segment Use the white Segment control to set the white peaking level of dark scenery. Color B Adjusts the blue color. 21 ... Tint Adjusts the color balance of red and green. Press the to increase the amount of green in the image. Press...
PD100 User's Guide
Page 26
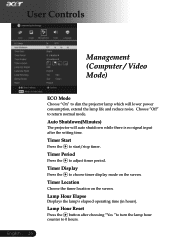
... adjust timer period. Lamp Hour Reset Press the button after the setting time. Timer Period Press the to start/stop timer. Timer Display Press the to return normal mode. Lamp Hour Elapse Displays the lamp's elapsed operating time (in hours). Timer Location Choose the timer location on the screen. Auto Shutdown(Minutes) The projector will lower power consumption, extend the lamp life and reduce noise. Choose "Off" to choose timer display mode on the screen. User Controls Management (Computer / Video Mode) English ... 26 ECO Mode Choose "On" to dim the projector lamp...
... adjust timer period. Lamp Hour Reset Press the button after the setting time. Timer Period Press the to start/stop timer. Timer Display Press the to return normal mode. Lamp Hour Elapse Displays the lamp's elapsed operating time (in hours). Timer Location Choose the timer location on the screen. Auto Shutdown(Minutes) The projector will lower power consumption, extend the lamp life and reduce noise. Choose "Off" to choose timer display mode on the screen. User Controls Management (Computer / Video Mode) English ... 26 ECO Mode Choose "On" to dim the projector lamp...
PD100 User's Guide
Page 28
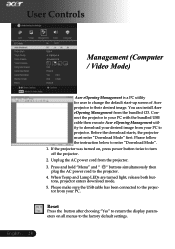
... instruction below to the factory default settings. When Temp and Lamp LEDs are turned light, release both buttons, projector enters download mode. 5. English ... 28 Before the download starts, the projector must enter "Download Mode" first. If the projector was turned on all menus to enter "Download Mode". 1. Press and hold "Menu" and " " buttons simultaneously then plug the AC power cord to turn off the projector. 2. Please make sure the USB cable has been connected to the projector from your PC. User Controls Management (Computer / Video Mode) Acer...
... instruction below to the factory default settings. When Temp and Lamp LEDs are turned light, release both buttons, projector enters download mode. 5. English ... 28 Before the download starts, the projector must enter "Download Mode" first. If the projector was turned on all menus to enter "Download Mode". 1. Press and hold "Menu" and " " buttons simultaneously then plug the AC power cord to turn off the projector. 2. Please make sure the USB cable has been connected to the projector from your PC. User Controls Management (Computer / Video Mode) Acer...

PD100 User's Guide
Page 29
... projector, refer to 800 x 600. Problem: Partial, scrolling or incorrectly displayed image. Press the "Resync" button on the Remote Control. If If you use a PC: the resolution of connectors are not crooked or broken. Check if the projection refer to the "Replacing lamp has been securely the lamp" section. Verify that your display resolution setting is higher than 800 x 600. Refer to reset the resolution. Problem: No image...
... projector, refer to 800 x 600. Problem: Partial, scrolling or incorrectly displayed image. Press the "Resync" button on the Remote Control. If If you use a PC: the resolution of connectors are not crooked or broken. Check if the projection refer to the "Replacing lamp has been securely the lamp" section. Verify that your display resolution setting is higher than 800 x 600. Refer to reset the resolution. Problem: No image...
PD100 User's Guide
Page 31
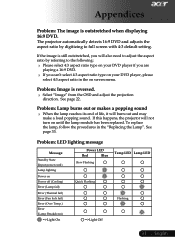
... the lamp reaches its end of life, it will also need to adjust the aspect ratio by digitizing to the following: Please select 4:3 aspect ratio type on your DVD player, please select 4:3 aspect ratio in the "Replacing the Lamp". English Problem: LED lighting message Message Standby State (Input power cord) Lamp lighting Power on Power off (Cooling) Error (Lamp fail) Error (Thermal fail) Error (Fan lock fail) Error (Over Temp.) Error (Lamp Breakdown) =>Light On Power LED Red Blue Slow Flashing Quick Flashing =>Light Off Temp LED Lamp LED Flashing 31...
... the lamp reaches its end of life, it will also need to adjust the aspect ratio by digitizing to the following: Please select 4:3 aspect ratio type on your DVD player, please select 4:3 aspect ratio in the "Replacing the Lamp". English Problem: LED lighting message Message Standby State (Input power cord) Lamp lighting Power on Power off (Cooling) Error (Lamp fail) Error (Thermal fail) Error (Fan lock fail) Error (Over Temp.) Error (Lamp Breakdown) =>Light On Power LED Red Blue Slow Flashing Quick Flashing =>Light Off Temp LED Lamp LED Flashing 31...

PD100 User's Guide
Page 32
Lamp will automatically turn off soon." Appendices Problem: Message Reminders "Lamp is going to deplete. "Projector Overheated. Lamp will be shown about 10 seconds when lamp life is approaching the end of order. Replacement Suggested!" English ... 32 will automatically turn off soon." will be shown when the system temperature is out of its useful life in full power opera- will be shown when the fan is over heat. "Fan fail. tion.
Lamp will automatically turn off soon." Appendices Problem: Message Reminders "Lamp is going to deplete. "Projector Overheated. Lamp will be shown about 10 seconds when lamp life is approaching the end of order. Replacement Suggested!" English ... 32 will automatically turn off soon." will be shown when the system temperature is out of its useful life in full power opera- will be shown when the fan is over heat. "Fan fail. tion.
PD100 User's Guide
Page 34
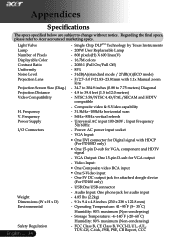
... - Audio Input: One phone jack for VGA, component and HDTV signal - Frequency - 56Hz~85Hz vertical refresh Power Supply I/O Connectors - Video Input: One Composite video RCA input One S-Video input - Operating Temperature: 41~95 F (5~ 35 C) Humidity: 80% maximum (Non-condensing) o o - Storage Temperature: -4~140 F (-20~60 C) Humidity: 80% maximum (Non-condensing) - Universal AC input 100-240V ; Power: AC power input socket - VGA Input: One DVI connector for Digital signal with 1.1x Manual zoom lens Projection Screen Size (Diag...
... - Audio Input: One phone jack for VGA, component and HDTV signal - Frequency - 56Hz~85Hz vertical refresh Power Supply I/O Connectors - Video Input: One Composite video RCA input One S-Video input - Operating Temperature: 41~95 F (5~ 35 C) Humidity: 80% maximum (Non-condensing) o o - Storage Temperature: -4~140 F (-20~60 C) Humidity: 80% maximum (Non-condensing) - Universal AC input 100-240V ; Power: AC power input socket - VGA Input: One DVI connector for Digital signal with 1.1x Manual zoom lens Projection Screen Size (Diag...


