User Manual
Page 5
... not look into the projector's lens when the lamp is on the projector first and then signal sources • Do not place the product in following the operating instructions Note: Adjust only those controls that are higher than 10000 feet. • Unplug immediately if there is necessary. • Locations where temperatures may become excessively high, such as opening or removing covers may expose you to dangerous...
... not look into the projector's lens when the lamp is on the projector first and then signal sources • Do not place the product in following the operating instructions Note: Adjust only those controls that are higher than 10000 feet. • Unplug immediately if there is necessary. • Locations where temperatures may become excessively high, such as opening or removing covers may expose you to dangerous...
User Manual
Page 6
... the remote control. • The lamp becomes extremely hot during operation. The temperature inside which may rise and cause damage when the filter/ventilation slots clogged with any electronic components unless the projector is showing warning message. • When changing the lamp, please allow unit to cool down, and follow all changing instructions. • Reset the "Lamp Hour Reset" function from the Onscreen display "Management" menu after replacing the lamp module...
... the remote control. • The lamp becomes extremely hot during operation. The temperature inside which may rise and cause damage when the filter/ventilation slots clogged with any electronic components unless the projector is showing warning message. • When changing the lamp, please allow unit to cool down, and follow all changing instructions. • Reset the "Lamp Hour Reset" function from the Onscreen display "Management" menu after replacing the lamp module...

User Manual
Page 8
... its life, it shows warning messages. • Reset the "Lamp Hour Reset" function from the Onscreen display "Management" menu after replacing the lamp module. • When switching the projector off the product before disconnecting power. • Turn on the projector first and then the signal sources. • Do not use lens cap when projector is on until the lamp module has been replaced. The bright light may cause electric shock. • When changing the lamp, please...
... its life, it shows warning messages. • Reset the "Lamp Hour Reset" function from the Onscreen display "Management" menu after replacing the lamp module. • When switching the projector off the product before disconnecting power. • Turn on the projector first and then the signal sources. • Do not use lens cap when projector is on until the lamp module has been replaced. The bright light may cause electric shock. • When changing the lamp, please...

User Manual
Page 9
... 3 Projector Outlook 3 Control Panel 4 Remote Control Layout 5 MHL (Mobile High-Definition Link) Control 7 Getting Started 8 Connecting the Projector 8 Turning the Projector On/Off 10 Turning on the Projector 10 Turning the projector off 11 Adjusting the Projected Image 12 Adjusting the Height of Projected Image 12 How to optimize image size and distance 13 How to get a preferred image size by adjusting distance and zoom 17 User Controls 21 Installation menu 21 Onscreen Display (OSD) Menus 22 Color 23 Image 25 Setting 27 Management 30 Audio 31...
... 3 Projector Outlook 3 Control Panel 4 Remote Control Layout 5 MHL (Mobile High-Definition Link) Control 7 Getting Started 8 Connecting the Projector 8 Turning the Projector On/Off 10 Turning on the Projector 10 Turning the projector off 11 Adjusting the Projected Image 12 Adjusting the Height of Projected Image 12 How to optimize image size and distance 13 How to get a preferred image size by adjusting distance and zoom 17 User Controls 21 Installation menu 21 Onscreen Display (OSD) Menus 22 Color 23 Image 25 Setting 27 Management 30 Audio 31...
User Manual
Page 10
How to login in 33 Home 34 Control Panel 34 Network Setting 35 Alert Setting 35 Logout 36 Appendices 37 Troubleshooting 37 LED & Alarm Definition Listing 41 Cleaning and replacing the dust filters 42 Replacing the Lamp 43 Ceiling Mount Installation 44 Specifications 47 Compatibility modes 51 Regulations and safety notices 56
How to login in 33 Home 34 Control Panel 34 Network Setting 35 Alert Setting 35 Logout 36 Appendices 37 Troubleshooting 37 LED & Alarm Definition Listing 41 Cleaning and replacing the dust filters 42 Replacing the Lamp 43 Ceiling Mount Installation 44 Specifications 47 Compatibility modes 51 Regulations and safety notices 56
User Manual
Page 11
... (ECO) mode extends lamp life • Acer EcoProjeciton Technology delivers Intelligent power management approach and physical efficiency improvement • Equipped with HDMI™ & MHL connection supporting HDCP • Advanced digital keystone correction optimizes presentations • Smart detection delivers quick, intelligent source detection • Multi-language onscreen display (OSD) menus • Manual focus projection lens zooms up to 1.1x • 2x digital zoom and pan function • Microsoft® Windows®...
... (ECO) mode extends lamp life • Acer EcoProjeciton Technology delivers Intelligent power management approach and physical efficiency improvement • Equipped with HDMI™ & MHL connection supporting HDCP • Advanced digital keystone correction optimizes presentations • Smart detection delivers quick, intelligent source detection • Multi-language onscreen display (OSD) menus • Manual focus projection lens zooms up to 1.1x • 2x digital zoom and pan function • Microsoft® Windows®...
User Manual
Page 12
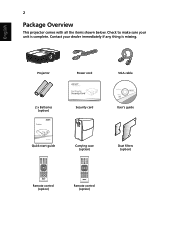
Check to make sure your dealer immediately if any thing is complete. Contact your unit is missing. English 2 Package Overview This projector comes with all the items shown below. Projector Power cord VGA cable 2 x Batteries (option) Security card User's guide Quick start guide MEDIA SETUP MODE SOURCE HIDE ZOOM RATIO FREEZE Carrying case (option) MEDIA SETUP MODE SOURCE HIDE ZOOM FREEZE Remote control (option) Remote control (option) Dust filters (option)
Check to make sure your dealer immediately if any thing is complete. Contact your unit is missing. English 2 Package Overview This projector comes with all the items shown below. Projector Power cord VGA cable 2 x Batteries (option) Security card User's guide Quick start guide MEDIA SETUP MODE SOURCE HIDE ZOOM RATIO FREEZE Carrying case (option) MEDIA SETUP MODE SOURCE HIDE ZOOM FREEZE Remote control (option) Remote control (option) Dust filters (option)
User Manual
Page 14
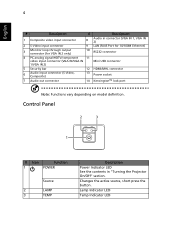
... VGA IN 2 only) 10 RS232 connector 4 PC analog signal/HDTV/component 11 video input connector (VGA IN/VGA IN Mini USB connector 1/VGA IN 2) 5 Security bar 12 HDMI/MHL connector 6 Audio input connector (S-Video, Composite) 13 Power socket 7 Audio out connector 14 KensingtonTM lock port Note: Functions vary depending on model definition. English 4 # Description # Description 1 Composite video input connector 8 Audio in "Turning the Projector On/Off" section. Lamp Indicator LED Temp Indicator LED Changes the active source, short press the button...
... VGA IN 2 only) 10 RS232 connector 4 PC analog signal/HDTV/component 11 video input connector (VGA IN/VGA IN Mini USB connector 1/VGA IN 2) 5 Security bar 12 HDMI/MHL connector 6 Audio input connector (S-Video, Composite) 13 Power socket 7 Audio out connector 14 KensingtonTM lock port Note: Functions vary depending on model definition. English 4 # Description # Description 1 Composite video input connector 8 Audio in "Turning the Projector On/Off" section. Lamp Indicator LED Temp Indicator LED Changes the active source, short press the button...

User Manual
Page 15
... screen image. 11 MENU • Press "MENU" to launch the Onscreen display (OSD) menu, back to the previous step for the OSD menu operation or exit the OSD menu. • Confirm your selection of items. 12 KEYSTONE Adjusts the image to compensate for distortion caused by tilting the projector (± 40 degrees). English 5 Remote Control Layout 1 25 3 2 SOURCE 4 5 MEDIA 6 SETUP MODE HIDE 7 8 MEDIA SETUP MODE SOURCE HIDE 26 9 ZOOM RATIO FREEZE 10 ZOOM...
... screen image. 11 MENU • Press "MENU" to launch the Onscreen display (OSD) menu, back to the previous step for the OSD menu operation or exit the OSD menu. • Confirm your selection of items. 12 KEYSTONE Adjusts the image to compensate for distortion caused by tilting the projector (± 40 degrees). English 5 Remote Control Layout 1 25 3 2 SOURCE 4 5 MEDIA 6 SETUP MODE HIDE 7 8 MEDIA SETUP MODE SOURCE HIDE 26 9 ZOOM RATIO FREEZE 10 ZOOM...

User Manual
Page 20
... locked onto a specific source type and there is no such type of input signal detected. • If the screen displays "No Signal", please make sure the signal cables are securely connected. • If you connect to multiple sources at the same time, use the "Source" button on the remote control or direct source key on the Projector 1 Ensure that the power cord and signal cable are securely connected. The Power indicator LED will flash red. 2 Turn on the projector by pressing "Power" button on the control panel...
... locked onto a specific source type and there is no such type of input signal detected. • If the screen displays "No Signal", please make sure the signal cables are securely connected. • If you connect to multiple sources at the same time, use the "Source" button on the remote control or direct source key on the Projector 1 Ensure that the power cord and signal cable are securely connected. The Power indicator LED will flash red. 2 Turn on the projector by pressing "Power" button on the control panel...
User Manual
Page 21
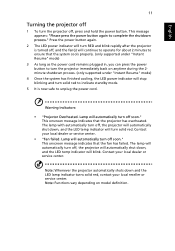
... model definition. Contact your local reseller or service center. Lamp will automatically turn off, the projector will automatically turn off soon." This onscreen message indicates that the fan has failed. The lamp will automatically shut down and the LED lamp indicator turns solid red, contact your local dealer or service center. Note: Whenever the projector automatically shuts down , and the LED temp indicator will automatically turn the projector off, press and hold the power button. Warning indicators: • "Projector Overheated...
... model definition. Contact your local reseller or service center. Lamp will automatically turn off, the projector will automatically turn off soon." This onscreen message indicates that the fan has failed. The lamp will automatically shut down and the LED lamp indicator turns solid red, contact your local dealer or service center. Note: Whenever the projector automatically shuts down , and the LED temp indicator will automatically turn the projector off, press and hold the power button. Warning indicators: • "Projector Overheated...
User Manual
Page 31
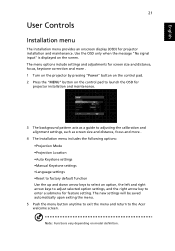
... adjustments for screen size and distance, focus, keystone correction and more . 4 The Installation menu includes the following options: •Projection Mode •Projection Location •Auto Keystone settings •Manual Keystone settings •Language settings •Reset to factory default function Use the up and down arrow keys to select an option, the left and right arrow keys to adjust selected option settings, and the right arrow key to enter a submenu for projector installation and maintenance. The new settings...
... adjustments for screen size and distance, focus, keystone correction and more . 4 The Installation menu includes the following options: •Projection Mode •Projection Location •Auto Keystone settings •Manual Keystone settings •Language settings •Reset to factory default function Use the up and down arrow keys to select an option, the left and right arrow keys to adjust selected option settings, and the right arrow key to enter a submenu for projector installation and maintenance. The new settings...
User Manual
Page 34
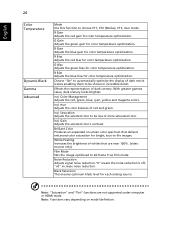
... for color temperature optimization. Color Management Adjusts the red, green, blue, cyan, yellow and magenta colors. Gain Adjusts the selected color's contrast. Brilliant Color Produces an expanded on model definition. Note: Functions vary depending on -screen color spectrum that are not supported under computer or HDMI mode. G Gain Adjusts the green gain for color temperature optimization. Ind. B Bias Adjusts the blue bias for color temperature optimization. English 24 Color Temperature Dynamic Black Gamma Advanced Mode Use this function to -life images. Effects...
... for color temperature optimization. Color Management Adjusts the red, green, blue, cyan, yellow and magenta colors. Gain Adjusts the selected color's contrast. Brilliant Color Produces an expanded on model definition. Note: Functions vary depending on -screen color spectrum that are not supported under computer or HDMI mode. G Gain Adjusts the green gain for color temperature optimization. Ind. B Bias Adjusts the blue bias for color temperature optimization. English 24 Color Temperature Dynamic Black Gamma Advanced Mode Use this function to -life images. Effects...

User Manual
Page 35
...333 times. Automatically adjusts vertical image. Press the or button to "On". Front: The factory default setting. • Projection Location • Rear: Reverses the image so you select this function, the projector reverses and inverts the image at same time. Adjusts the sharpness of image. • Desktop Aspect Ratio Auto Keystone Manual Keystone • Ceiling: Turns the image upside down for ceiling-mounted projection. Use this function to choose your desired aspect ratio. • Auto: Keep the image with ceiling mounted projection. • Projection Mode...
...333 times. Automatically adjusts vertical image. Press the or button to "On". Front: The factory default setting. • Projection Location • Rear: Reverses the image so you select this function, the projector reverses and inverts the image at same time. Adjusts the sharpness of image. • Desktop Aspect Ratio Auto Keystone Manual Keystone • Ceiling: Turns the image upside down for ceiling-mounted projection. Use this function to choose your desired aspect ratio. • Auto: Keep the image with ceiling mounted projection. • Projection Mode...
User Manual
Page 36
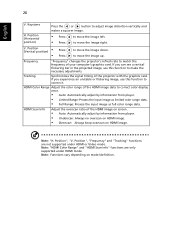
... or flickering image, use this function to make the necessary adjustments. Tracking Synchronizes the signal timing of your computer's graphics card. Position • (Vertical position) • Press Press to move the image up. Keystone H. to match the frequency of the projector with the graphics card. Note: "HDMI Color Range" and "HDMI Scan Info" functions are not supported under HDMI mode. English 26 V. V. Frequency "Frequency" changes the projector...
... or flickering image, use this function to make the necessary adjustments. Tracking Synchronizes the signal timing of your computer's graphics card. Position • (Vertical position) • Press Press to move the image up. Keystone H. to match the frequency of the projector with the graphics card. Note: "HDMI Color Range" and "HDMI Scan Info" functions are not supported under HDMI mode. English 26 V. V. Frequency "Frequency" changes the projector...
User Manual
Page 37
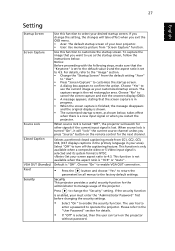
... default value 0 and the aspect ratio is set to operate the projector. Notice: Before proceeding with the following steps, make sure that you restart the projector. When source lock is turned "Off", the projector will search for other signals if the current input signal is the red rectangular area. Set your area). 27 English Setting Startup Screen Screen Capture Source Lock Closed Caption VGA OUT (Standby) Reset Security Use this function to the "User Password...
... default value 0 and the aspect ratio is set to operate the projector. Notice: Before proceeding with the following steps, make sure that you restart the projector. When source lock is turned "Off", the projector will search for other signals if the current input signal is the red rectangular area. Set your area). 27 English Setting Startup Screen Screen Capture Source Lock Closed Caption VGA OUT (Standby) Reset Security Use this function to the "User Password...
User Manual
Page 38
... time the power cord is plugged. • If you forgot your administrator password, do the following to retrieve the administrator password: • An unique 6-digit "Universal Password" which will be accepted for this security card and number, please contact with an Acer service center. If lock user startup screen is . • If losing this dialogue. Lock to unlock startup screen. User Password • Press to setup or change the "User Password...
... time the power cord is plugged. • If you forgot your administrator password, do the following to retrieve the administrator password: • An unique 6-digit "Universal Password" which will be accepted for this security card and number, please contact with an Acer service center. If lock user startup screen is . • If losing this dialogue. Lock to unlock startup screen. User Password • Press to setup or change the "User Password...
User Manual
Page 40
..." to turn the lamp hour counter to turn on model definition. Note: Functions vary depending on High Altitude mode. English 30 Management ECO Mode High Altitude Turn Off Mode Auto Shutdown Lamp Hour Elapse Lamp Reminding Lamp Hour Reset Choose "On" to allow for proper high altitude cooling of -life. Operate the fans at full speed continuously to dim the projector lamp which will automatically shutdown when there is no signal input after the allocated time. (default is pressed...
..." to turn the lamp hour counter to turn on model definition. Note: Functions vary depending on High Altitude mode. English 30 Management ECO Mode High Altitude Turn Off Mode Auto Shutdown Lamp Hour Elapse Lamp Reminding Lamp Hour Reset Choose "On" to allow for proper high altitude cooling of -life. Operate the fans at full speed continuously to dim the projector lamp which will automatically shutdown when there is no signal input after the allocated time. (default is pressed...
User Manual
Page 47
...). • Click the "Change" button under the SP box, and choose the resolution mode you are bent or broken. • Check if the projector lamp has been securely installed. 37 Appendices English Troubleshooting If you have removed the lens cap and the projector is switched on. 2 Partial, scrolling • Press "RESYNC" on the remote control or control panel. Image Problems and Solutions # Problem Solution 1 No image appears • Connected as described in...
...). • Click the "Change" button under the SP box, and choose the resolution mode you are bent or broken. • Check if the projector lamp has been securely installed. 37 Appendices English Troubleshooting If you have removed the lens cap and the projector is switched on. 2 Partial, scrolling • Press "RESYNC" on the remote control or control panel. Image Problems and Solutions # Problem Solution 1 No image appears • Connected as described in...

User Manual
Page 48
... deactivate their own screens when a second display device is within the required distance of focus • Make sure the lens cap is removed. • Adjusts the focus ring on the projector lens. • Make sure the projection screen is in use. Refer to flickering bar the "Image" section for more information. • Change the display color depth settings on the remote control or control or incorrectly panel. Refer to the or flickering "Image" section for...
... deactivate their own screens when a second display device is within the required distance of focus • Make sure the lens cap is removed. • Adjusts the focus ring on the projector lens. • Make sure the projection screen is in use. Refer to flickering bar the "Image" section for more information. • Change the display color depth settings on the remote control or control or incorrectly panel. Refer to the or flickering "Image" section for...


