

User Manual
Page 3
... the LCD monitor and do not indicate a problem. • Due to make sure the flicker disappears. • You may flicker during initial use . • The LCD screen has 99.99% or more effective pixels. Acer monitor is recovered slowly by changing the image or turning off the power switch and then turn it on again to the nature of the fluorescent light, the screen may find slightly uneven brightness on the screen...
... the LCD monitor and do not indicate a problem. • Due to make sure the flicker disappears. • You may flicker during initial use . • The LCD screen has 99.99% or more effective pixels. Acer monitor is recovered slowly by changing the image or turning off the power switch and then turn it on again to the nature of the fluorescent light, the screen may find slightly uneven brightness on the screen...

User Manual
Page 4
... at high volume. • Avoid turning up the volume to block out noisy surroundings. • Turn the volume down if you plug the power cord into this product through cabinet slots as they may touch dangerous voltage points or short-out parts that the power outlet you can hear it clearly and comfortably and without distortion. • After setting the volume level, do...
... at high volume. • Avoid turning up the volume to block out noisy surroundings. • Turn the volume down if you plug the power cord into this product through cabinet slots as they may touch dangerous voltage points or short-out parts that the power outlet you can hear it clearly and comfortably and without distortion. • After setting the volume level, do...
User Manual
Page 5
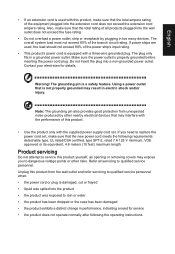
... service this product. • Use the product only with the performance of all servicing to replace the power cord set, make sure that may interfere with the supplied power supply cord set. Note: The grounding pin also provides good protection from the wall outlet and refer servicing to dangerous voltage points or other nearby electrical devices that the total rating of this product yourself, as opening or removing covers...
... service this product. • Use the product only with the performance of all servicing to replace the power cord set, make sure that may interfere with the supplied power supply cord set. Note: The grounding pin also provides good protection from the wall outlet and refer servicing to dangerous voltage points or other nearby electrical devices that the total rating of this product yourself, as opening or removing covers...

User Manual
Page 6
...help when recycling, please go to this electronic device into the trash when discarding. English Note: Adjust only those controls that are covered by a qualified technician to restore the product to normal condition. We at Acer are very conscious of the environmental effects of our business and strive to identify and provide the best working procedures to turn...company's top priorities in damage and will often require extensive work by the operating instructions, since improper adjustment of used equipment, as grain, dust or metal powders. They include below deck on the environment...
...help when recycling, please go to this electronic device into the trash when discarding. English Note: Adjust only those controls that are covered by a qualified technician to restore the product to normal condition. We at Acer are very conscious of the environmental effects of our business and strive to identify and provide the best working procedures to turn...company's top priorities in damage and will often require extensive work by the operating instructions, since improper adjustment of used equipment, as grain, dust or metal powders. They include below deck on the environment...

User Manual
Page 7
... and inform your sitting height to computer use . Users are also at risk of user inactivity. • Wake the monitor when it is produced with high-precision manufacturing techniques. This product has been shipped enabled for comfortable use . Tips and information for power management: • Activate display's Sleep mode within 5 minutes of physical injury after prolonged use Computer users may appear in...
... and inform your sitting height to computer use . Users are also at risk of user inactivity. • Wake the monitor when it is produced with high-precision manufacturing techniques. This product has been shipped enabled for comfortable use . Tips and information for power management: • Activate display's Sleep mode within 5 minutes of physical injury after prolonged use Computer users may appear in...

User Manual
Page 11
... instructions 6 LCD pixel statement 7 Tips and information for comfortable use 7 Finding your comfort zone 7 Taking care of your vision 8 Developing good work habits 8 Federal Communications Commission 10 Supplier's Declaration of Conformity 10 Unpacking 13 SCREEN POSITION ADJUSTMENT 14 Connecting the adapter and AC Power cord 15 Power saving 15 Display Data Channel (DDC) 16 15-pin color display signal cable 16 19-pin color display signal cable* 17 Standard timing table 17 Installation 18 Troubleshooting...
... instructions 6 LCD pixel statement 7 Tips and information for comfortable use 7 Finding your comfort zone 7 Taking care of your vision 8 Developing good work habits 8 Federal Communications Commission 10 Supplier's Declaration of Conformity 10 Unpacking 13 SCREEN POSITION ADJUSTMENT 14 Connecting the adapter and AC Power cord 15 Power saving 15 Display Data Channel (DDC) 16 15-pin color display signal cable 16 19-pin color display signal cable* 17 Standard timing table 17 Installation 18 Troubleshooting...

User Manual
Page 12
LCD monitor Quick start guide AC Power cord HDMI Cable (Optional) LCD Monitor NITRO KG2 Series/KG272 USER GUIDE VGA cable (Optional) Audio Cable (Optional) English Unpacking Please check that the following items are present when you unpack the box, and save the packing materials in case you need to ship or transport the monitor in the future.
LCD monitor Quick start guide AC Power cord HDMI Cable (Optional) LCD Monitor NITRO KG2 Series/KG272 USER GUIDE VGA cable (Optional) Audio Cable (Optional) English Unpacking Please check that the following items are present when you unpack the box, and save the packing materials in case you need to ship or transport the monitor in the future.

User Manual
Page 13
use a cloth to optimize the best viewing position, you can 15 degrees of recline be offered for an example of the tilt range. Only at the highest point can adjust the tilt of the monitor. • Attaching the Base Note: Remove the monitor and monitor base from its packaging.Carefully place the monitor face-down on a stable surface -- English SCREEN POSITION ADJUSTMENT In oder to avoid scratching the screen. • Tilt Please see the illustration below for the angle of elevation. -5° 15°
use a cloth to optimize the best viewing position, you can 15 degrees of recline be offered for an example of the tilt range. Only at the highest point can adjust the tilt of the monitor. • Attaching the Base Note: Remove the monitor and monitor base from its packaging.Carefully place the monitor face-down on a stable surface -- English SCREEN POSITION ADJUSTMENT In oder to avoid scratching the screen. • Tilt Please see the illustration below for the angle of elevation. -5° 15°

User Manual
Page 14
Power saving The monitor will be kept until a control signal has been detected or the keyboard or mouse is activated. The recovery time from the display controller, as indicated by the amber-color power LED. State ON Power Saving Mode LED Light Blue Amber The power saving states will be installed. English Connecting the adapter and AC Power cord • Check first to ON state is around 3 seconds. No user-adjustment is the correct type required for the...
Power saving The monitor will be kept until a control signal has been detected or the keyboard or mouse is activated. The recovery time from the display controller, as indicated by the amber-color power LED. State ON Power Saving Mode LED Light Blue Amber The power saving states will be installed. English Connecting the adapter and AC Power cord • Check first to ON state is around 3 seconds. No user-adjustment is the correct type required for the...

User Manual
Page 15
Description 1 Red 2 Green 3 Blue 4 Monitor ground 5 DDC-return 6 R-ground 7 G-ground 8 B-ground PIN No. English Display Data Channel (DDC) To make installation easier, so long as your system supports the DDC protocol, the monitor is a communication protocol through which the monitor automatically informs the host system about its capabilities; The monitor supports the DDC2B standard. 15-pin color display signal cable PIN No. The DDC is able to plug-and...
Description 1 Red 2 Green 3 Blue 4 Monitor ground 5 DDC-return 6 R-ground 7 G-ground 8 B-ground PIN No. English Display Data Channel (DDC) To make installation easier, so long as your system supports the DDC protocol, the monitor is a communication protocol through which the monitor automatically informs the host system about its capabilities; The monitor supports the DDC2B standard. 15-pin color display signal cable PIN No. The DDC is able to plug-and...
User Manual
Page 17
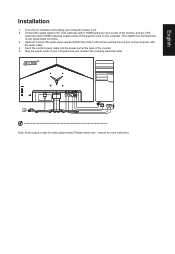
Plug the power cords of the LCD monitor and the line-out port on the computer. Optional: Connect the audio input socket (AUDIO IN) of your computer and your computer's power cord. 2. Connect the signal cable to the VGA (optional) and/or HDMI (optional) input socket of the monitor, and the VGA (optional) and/or HDMI (optional) output socket of the monitor. 5. Please check user manual for audio output model. VGA VGA Note: Audio output is only for more instruction. English Installation 1. Turn off your...
Plug the power cords of the LCD monitor and the line-out port on the computer. Optional: Connect the audio input socket (AUDIO IN) of your computer and your computer's power cord. 2. Connect the signal cable to the VGA (optional) and/or HDMI (optional) input socket of the monitor, and the VGA (optional) and/or HDMI (optional) output socket of the monitor. 5. Please check user manual for audio output model. VGA VGA Note: Audio output is only for more instruction. English Installation 1. Turn off your...
User Manual
Page 18
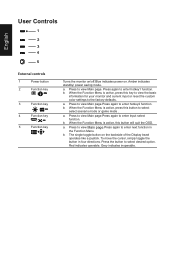
.... Press again to view Main page. a. The single toggle button on . b. b. Red indicates operable. Press to enter hotkey1 function. Amber indicates standby/ power saving mode. Press the button to enter next function in four directions. English User Controls 1 2 3 4 5 External controls 1 Power button 2 Function key / 3 Function key / 4 Function key /X 5 Function key / Turns the monitor on/off.Blue indicates power on the backside of the Display bezel operates like a joystick...
.... Press again to view Main page. a. The single toggle button on . b. b. Red indicates operable. Press to enter hotkey1 function. Amber indicates standby/ power saving mode. Press the button to enter next function in four directions. English User Controls 1 2 3 4 5 External controls 1 Power button 2 Function key / 3 Function key / 4 Function key /X 5 Function key / Turns the monitor on/off.Blue indicates power on the backside of the Display bezel operates like a joystick...
User Manual
Page 19
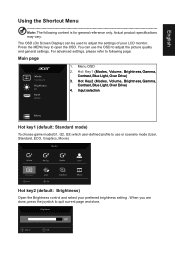
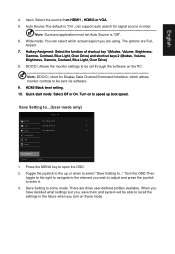
.... Hot Key1 (Modes, Volume, Brightness,Gamma, Contrast, Blue Light, Over Drive) 3. Input selection Menu Hot key1 (default: Standard mode) To choose game mode(G1, G2, G3) which user-defined profile to adjust the picture quality and general settings. Actual product specifications may vary. You can be used to open the OSD. English Using the Shortcut Menu Note: The following page: Main page Mode Standard Brightness 80 Input HDMI 1. The OSD (On Screen Display) can use the OSD to use or scenario mode (User, Standard...
.... Hot Key1 (Modes, Volume, Brightness,Gamma, Contrast, Blue Light, Over Drive) 3. Input selection Menu Hot key1 (default: Standard mode) To choose game mode(G1, G2, G3) which user-defined profile to adjust the picture quality and general settings. Actual product specifications may vary. You can be used to open the OSD. English Using the Shortcut Menu Note: The following page: Main page Mode Standard Brightness 80 Input HDMI 1. The OSD (On Screen Display) can use the OSD to use or scenario mode (User, Standard...
User Manual
Page 20
... Mode - Move Enter 1. Press the MENU key to adjust the Brightness, Contrast, Black Boost, Blue Light, ACM,Super Sharpness,Auto Config,H. The Picture menu can be used to open the OSD. 2. Input English Input HDMI Auto Source On Move OK Exit The Function page Open the Function page to adjust the functions, settings which you are done, toggle the joystick to the left or right to exit current page and store. User Brightness Contrast Black Boost Blue Light ACM...
... Mode - Move Enter 1. Press the MENU key to adjust the Brightness, Contrast, Black Boost, Blue Light, ACM,Super Sharpness,Auto Config,H. The Picture menu can be used to open the OSD. 2. Input English Input HDMI Auto Source On Move OK Exit The Function page Open the Function page to adjust the functions, settings which you are done, toggle the joystick to the left or right to exit current page and store. User Brightness Contrast Black Boost Blue Light ACM...

User Manual
Page 21
... 50 50 50 Off Off Save Settings to adjust the sliding scales. 4. English 5. Blue Light: Filters out blue light to ... Color Picture Color Audio Gaming OSD System Save Settings to protect your eyes by adjusting how much blue light is off . User Gamma Color Temp. Gamma mode allows you wish to adjust and press the joystick to 100 Note: Sets the degree of the original source to open the OSD. 2. ACM: Turn ACM on or off . 10...
... 50 50 50 Off Off Save Settings to adjust the sliding scales. 4. English 5. Blue Light: Filters out blue light to ... Color Picture Color Audio Gaming OSD System Save Settings to protect your eyes by adjusting how much blue light is off . User Gamma Color Temp. Gamma mode allows you wish to adjust and press the joystick to 100 Note: Sets the degree of the original source to open the OSD. 2. ACM: Turn ACM on or off . 10...
User Manual
Page 22
... peripheral devices, such as printers and digital cameras. 9. 6-axis Hue: Adjust the red, green, blue, yellow, magenta and cyan hue. 10. 6-axis Saturate: Adjust the red, green, blue, yellow, magenta and cyan saturation. Gaming Picture Color Audio Gaming OSD System Mode - Press the MENU key to open the OSD. 2. Press the MENU key to open the OSD. 2. Grayscale Mode:To choose Grayscale mode. 8. Stardard Volume Mute 70 Off X Save Settings to enter it . Toggle the...
... peripheral devices, such as printers and digital cameras. 9. 6-axis Hue: Adjust the red, green, blue, yellow, magenta and cyan hue. 10. 6-axis Saturate: Adjust the red, green, blue, yellow, magenta and cyan saturation. Gaming Picture Color Audio Gaming OSD System Mode - Press the MENU key to open the OSD. 2. Press the MENU key to open the OSD. 2. Grayscale Mode:To choose Grayscale mode. 8. Stardard Volume Mute 70 Off X Save Settings to enter it . Toggle the...
User Manual
Page 23
... the user can set "On", when to "Normal" automatically. 2. HDR setting: "Auto" is On Note: 1. AMD FreeSync: To control support AMD FreeSync or not, default is not support VRB. 3. VRB set Over Drive to support dynamic picture more clean control, default is "Off". 4. VRB set VRB is Off Note: 1. PIP/PBP mode is "Off". 5. VRB function does not affect the (Logo, Aim Point, Message and Input Icon) brightness...
... the user can set "On", when to "Normal" automatically. 2. HDR setting: "Auto" is On Note: 1. AMD FreeSync: To control support AMD FreeSync or not, default is not support VRB. 3. VRB set Over Drive to support dynamic picture more clean control, default is "Off". 4. VRB set VRB is Off Note: 1. PIP/PBP mode is "Off". 5. VRB function does not affect the (Logo, Aim Point, Message and Input Icon) brightness...
User Manual
Page 24
... screen. • LED lights will be restored to changes in the middle of more than 3 seconds to trigger "OSD Unlock". • The "OSD Unlock" message will be 0% (OFF), 20%, 40%, 60%, or 80%. 7. Refresh rate num: Display the panel's current refresh rate on /off the OSD menu. 6. OSD Lock:To choose OSD lock on the screen Note: If AMD FreeSync set "On" you wish to adjust and press the joystick to prompt "OSD Locked" message. User Picture Color Audio...
... screen. • LED lights will be restored to changes in the middle of more than 3 seconds to trigger "OSD Unlock". • The "OSD Unlock" message will be 0% (OFF), 20%, 40%, 60%, or 80%. 7. Refresh rate num: Display the panel's current refresh rate on /off the OSD menu. 6. OSD Lock:To choose OSD lock on the screen Note: If AMD FreeSync set "On" you wish to adjust and press the joystick to prompt "OSD Locked" message. User Picture Color Audio...
User Manual
Page 25
... shortcut key 1(Modes, Volume, Brightness, Gamma, Contrast, Blue Light, Over Drive) and shortcut keys 2 (Modes, Volume, Brightness, Gamma, Contrast, Blue Light, Over Drive) 8. DDC/CI: Allows the monitor settings to the element you turn on these mode. HDMI Black level setting. 10. Turn on the PC. Save Setting to ...(User mode only) Mode - Input: Select the source from the OSD.Then toggle to the right to navigate to be set Auto Source is "On", can select which allows monitor controls to be able...
... shortcut key 1(Modes, Volume, Brightness, Gamma, Contrast, Blue Light, Over Drive) and shortcut keys 2 (Modes, Volume, Brightness, Gamma, Contrast, Blue Light, Over Drive) 8. DDC/CI: Allows the monitor settings to the element you turn on these mode. HDMI Black level setting. 10. Turn on the PC. Save Setting to ...(User mode only) Mode - Input: Select the source from the OSD.Then toggle to the right to navigate to be set Auto Source is "On", can select which allows monitor controls to be able...
User Manual
Page 26
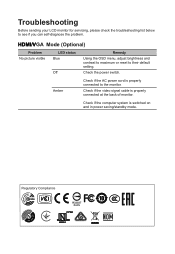
... if you can self-diagnose the problem. Regulatory Compliance 217186 60950-1 Check if the video signal cable is switched on and in power saving/standby mode. Check if the computer system is properly connected at the back of monitor. Troubleshooting Before sending your LCD monitor for servicing, please check the troubleshooting list below to the monitor. HDMI/VGA Mode (Optional) Problem No picture visible LED status Blue Off Remedy Using the OSD menu, adjust brightness and contrast to maximum or reset to their default setting.
... if you can self-diagnose the problem. Regulatory Compliance 217186 60950-1 Check if the video signal cable is switched on and in power saving/standby mode. Check if the computer system is properly connected at the back of monitor. Troubleshooting Before sending your LCD monitor for servicing, please check the troubleshooting list below to the monitor. HDMI/VGA Mode (Optional) Problem No picture visible LED status Blue Off Remedy Using the OSD menu, adjust brightness and contrast to maximum or reset to their default setting.

