
User Manual
Page 2
... of such revisions or changes. Acer Incorporated. All correspondence concerning your projector. The serial number and model number are trademarks or registered trademarks of merchantability or fitness for a particular purpose. Model number Serial number Date of purchase Place of purchase "HDMI™, the HDMI logo and High-Definition Multimedia Interface are recorded on the label affixed to the contents hereof and specifically disclaims the implied warranties...
... of such revisions or changes. Acer Incorporated. All correspondence concerning your projector. The serial number and model number are trademarks or registered trademarks of merchantability or fitness for a particular purpose. Model number Serial number Date of purchase Place of purchase "HDMI™, the HDMI logo and High-Definition Multimedia Interface are recorded on the label affixed to the contents hereof and specifically disclaims the implied warranties...
User Manual
Page 5
...; Locations where temperatures may become excessively high, such as opening or removing covers may expose you to dangerous voltage points or other controls may hurt your projector. Consult your projector. Unplug this product yourself, as inside of a car with all servicing to qualified service personnel. The bright may result in damage and will often require extensive work by the operating instructions, since improper adjustment of...
...; Locations where temperatures may become excessively high, such as opening or removing covers may expose you to dangerous voltage points or other controls may hurt your projector. Consult your projector. Unplug this product yourself, as inside of a car with all servicing to qualified service personnel. The bright may result in damage and will often require extensive work by the operating instructions, since improper adjustment of...
User Manual
Page 6
... showing warning message. • When changing the lamp, please allow unit to cool down, and follow all changing instructions. • Reset the "Lamp Hour Reset" function from the Onscreen display "Management" menu after replacing the lamp module. • Do not attempt to suitable qualified professional service personnel. • Do not stand the projector on the remote control. • The lamp becomes extremely hot during operation. Please be sure to change the lamp...
... showing warning message. • When changing the lamp, please allow unit to cool down, and follow all changing instructions. • Reset the "Lamp Hour Reset" function from the Onscreen display "Management" menu after replacing the lamp module. • Do not attempt to suitable qualified professional service personnel. • Do not stand the projector on the remote control. • The lamp becomes extremely hot during operation. Please be sure to change the lamp...
User Manual
Page 8
... changing instructions. • This product will detect the life of time. If this may make a loud popping sound. viii First things first Usage Notes Do: • Turn off , please ensure the projector completes its cooling cycle before cleaning. • Use a soft cloth moistened with mild detergent to clean the display housing. • Disconnect the power plug from the Onscreen display "Management" menu after replacing the lamp...
... changing instructions. • This product will detect the life of time. If this may make a loud popping sound. viii First things first Usage Notes Do: • Turn off , please ensure the projector completes its cooling cycle before cleaning. • Use a soft cloth moistened with mild detergent to clean the display housing. • Disconnect the power plug from the Onscreen display "Management" menu after replacing the lamp...
User Manual
Page 9
... 1 Package Overview 2 Projector Overview 3 Projector Outlook 3 Control Panel 5 Remote Control Layout 6 Getting Started 8 Connecting the Projector 8 Turning the Projector On/Off 10 Turning on the Projector 10 Turning the projector off 11 Adjusting the Projected Image 12 Adjusting the Height of Projected Image 12 How to optimize image size and distance 13 How to get a preferred image size by adjusting distance and zoom 16 User Controls 19 Installation menu 19 Onscreen Display (OSD) Menus 20 Color 21 Image 23 Setting 25 Management 27 Audio 27 3D 28...
... 1 Package Overview 2 Projector Overview 3 Projector Outlook 3 Control Panel 5 Remote Control Layout 6 Getting Started 8 Connecting the Projector 8 Turning the Projector On/Off 10 Turning on the Projector 10 Turning the projector off 11 Adjusting the Projected Image 12 Adjusting the Height of Projected Image 12 How to optimize image size and distance 13 How to get a preferred image size by adjusting distance and zoom 16 User Controls 19 Installation menu 19 Onscreen Display (OSD) Menus 20 Color 21 Image 23 Setting 25 Management 27 Audio 27 3D 28...
User Manual
Page 11
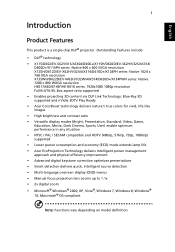
... 1280 x 800 WXGA resolution H6517ABD/E145F/HE-801K series: 1920x1080 1080p resolution Full/4:3/16:9/L.Box aspect ratio supported • Enables projecting 3D content via DLP Link Technology: Blue-Ray 3D supported and nVidia 3DTV Play Ready • Acer ColorBoost technology delivers nature's true colors for vivid, life-like images • High brightness and contrast ratio • Versatile display modes (Bright, Presentation, Standard, Video, Game, Education, Movie...
... 1280 x 800 WXGA resolution H6517ABD/E145F/HE-801K series: 1920x1080 1080p resolution Full/4:3/16:9/L.Box aspect ratio supported • Enables projecting 3D content via DLP Link Technology: Blue-Ray 3D supported and nVidia 3DTV Play Ready • Acer ColorBoost technology delivers nature's true colors for vivid, life-like images • High brightness and contrast ratio • Versatile display modes (Bright, Presentation, Standard, Video, Game, Education, Movie...
User Manual
Page 12
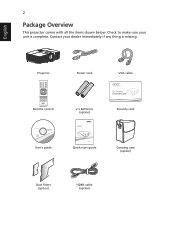
Check to make sure your dealer immediately if any thing is complete. English Projector Power cord VGA cable Remote control 2 x Batteries (option) Security card User's guide Quick start guide Carrying case (option) Dust filters (option) HDMI cable (option) 2 Package Overview This projector comes with all the items shown below. Contact your unit is missing.
Check to make sure your dealer immediately if any thing is complete. English Projector Power cord VGA cable Remote control 2 x Batteries (option) Security card User's guide Quick start guide Carrying case (option) Dust filters (option) HDMI cable (option) 2 Package Overview This projector comes with all the items shown below. Contact your unit is missing.
User Manual
Page 15
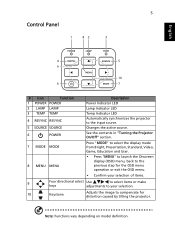
...on model definition. Changes the active source. 5 Control Panel 1 82 3 English 4 5 9 10 6 7 # Icon Function 1 POWER POWER 2 LAMP LAMP 3 TEMP TEMP 4 RESYNC RESYNC 5 SOURCE SOURCE 6 POWER Description Power Indicator LED Lamp Indicator LED Temp Indicator LED Automatically synchronizes the projector to compensate for distortion caused by tilting the projector. See the contents in "Turning the Projector On/Off" section. 7 MODE MODE 8 MENU MENU Press "MODE" to select the display mode from Bright, Presentation, Standard, Video, Game, Education and User. • Press "MENU...
...on model definition. Changes the active source. 5 Control Panel 1 82 3 English 4 5 9 10 6 7 # Icon Function 1 POWER POWER 2 LAMP LAMP 3 TEMP TEMP 4 RESYNC RESYNC 5 SOURCE SOURCE 6 POWER Description Power Indicator LED Lamp Indicator LED Temp Indicator LED Automatically synchronizes the projector to compensate for distortion caused by tilting the projector. See the contents in "Turning the Projector On/Off" section. 7 MODE MODE 8 MENU MENU Press "MODE" to select the display mode from Bright, Presentation, Standard, Video, Game, Education and User. • Press "MENU...
User Manual
Page 16
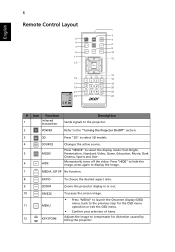
.... 9 ZOOM ZOOM Zooms the projector display in or out. 10 FREEZE FREEZE 11 MENU 12 KEYSTONE To pause the screen image. • Press "MENU" to launch the Onscreen display (OSD) menu, back to the previous step for the OSD menu operation or exit the OSD menu. • Confirm your selection of items. Adjusts the image to display the image. 7 MEDIA MEDIA_SETUP No function. Momentarily turns off the video. English 6 Remote Control Layout 1 3 2 SOURCE 4 5 MEDIA 6 SETUP MODE...
.... 9 ZOOM ZOOM Zooms the projector display in or out. 10 FREEZE FREEZE 11 MENU 12 KEYSTONE To pause the screen image. • Press "MENU" to launch the Onscreen display (OSD) menu, back to the previous step for the OSD menu operation or exit the OSD menu. • Confirm your selection of items. Adjusts the image to display the image. 7 MEDIA MEDIA_SETUP No function. Momentarily turns off the video. English 6 Remote Control Layout 1 3 2 SOURCE 4 5 MEDIA 6 SETUP MODE...

User Manual
Page 20
The Power indicator LED will flash red. 2 Turn on the projector by pressing "Power" button on the control panel or remote control, and the Power indicator LED will detect your source (computer, notebook, video player, etc.). Power button English 10 Turning the Projector On/Off Turning on the remote control to switch between inputs. The projector will turn blue. 3 Turn on your source automatically. • If the screen displays "Lock" and "Source" icons, it means the projector is locked onto a specific source type and there is no such type of input signal detected...
The Power indicator LED will flash red. 2 Turn on the projector by pressing "Power" button on the control panel or remote control, and the Power indicator LED will detect your source (computer, notebook, video player, etc.). Power button English 10 Turning the Projector On/Off Turning on the remote control to switch between inputs. The projector will turn blue. 3 Turn on your source automatically. • If the screen displays "Lock" and "Source" icons, it means the projector is locked onto a specific source type and there is no such type of input signal detected...

User Manual
Page 21
... cool down period to complete the shutdown process." Lamp will automatically turn off soon." Press the power button again. 2 The LED power indicator will turn RED and blink rapidly after the projector is now safe to unplug the power cord. This onscreen message indicates that the projector has overheated. Warning indicators: • "Projector Overheated. The lamp with automatically turn off , and the fan(s) will continue to operate for about 2 minutes to ensure that the system...
... cool down period to complete the shutdown process." Lamp will automatically turn off soon." Press the power button again. 2 The LED power indicator will turn RED and blink rapidly after the projector is now safe to unplug the power cord. This onscreen message indicates that the projector has overheated. Warning indicators: • "Projector Overheated. The lamp with automatically turn off , and the fan(s) will continue to operate for about 2 minutes to ensure that the system...
User Manual
Page 23
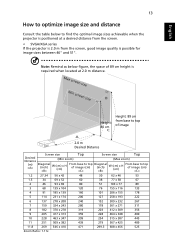
... find the optimal image sizes achievable when the projector is positioned at 2.0 m distance. Max screen size Min screen size 51" B 46" Height: 80 cm C Height: 89 cm from the screen, good image quality is required when located at a desired distance from the screen. • SVGA/XGA series If the projector is 2.0 m from base to top of image A 2.0 m Desired Distance Screen size Top Screen size Top Desired Distance (Min zoom) (Max zoom) (m) Diagonal (inch) W (cm...
... find the optimal image sizes achievable when the projector is positioned at 2.0 m distance. Max screen size Min screen size 51" B 46" Height: 80 cm C Height: 89 cm from the screen, good image quality is required when located at a desired distance from the screen. • SVGA/XGA series If the projector is 2.0 m from base to top of image A 2.0 m Desired Distance Screen size Top Screen size Top Desired Distance (Min zoom) (Max zoom) (m) Diagonal (inch) W (cm...

User Manual
Page 29
... for projector installation and maintenance. Installation Projection Mode Projection Location Auto Keystone Manual Keystone Language Reset Select Adjust Off English Press Exit 3 The background pattern acts as a guide to adjusting the calibration and alignment settings, such as screen size and distance, focus and more . 1 Turn on the projector by pressing "Power" button on the control pad. 2 Press the "MENU" button on the remote control to launch the OSD for projector installation and maintenance. Use the OSD only when the message "No signal input" is displayed on model...
... for projector installation and maintenance. Installation Projection Mode Projection Location Auto Keystone Manual Keystone Language Reset Select Adjust Off English Press Exit 3 The background pattern acts as a guide to adjusting the calibration and alignment settings, such as screen size and distance, focus and more . 1 Turn on the projector by pressing "Power" button on the control pad. 2 Press the "MENU" button on the remote control to launch the OSD for projector installation and maintenance. Use the OSD only when the message "No signal input" is displayed on model...
User Manual
Page 32
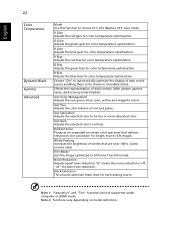
... True Film mode. Color Management Adjusts the red, green, blue, cyan, yellow and magenta colors. Note 1: "Saturation" and "Tint" functions are near 100%. (video sources only) Film Mode Sets the image optimized to automatically optimize the display of whites that delivers enhanced color saturation for each analog source. R Gain Adjusts the red gain for color temperature optimization. G Bias Adjusts the green bias for color temperature optimization. Ind. Ind. Brilliant Color Produces an expanded on model definition. Black...
... True Film mode. Color Management Adjusts the red, green, blue, cyan, yellow and magenta colors. Note 1: "Saturation" and "Tint" functions are near 100%. (video sources only) Film Mode Sets the image optimized to automatically optimize the display of whites that delivers enhanced color saturation for each analog source. R Gain Adjusts the red gain for color temperature optimization. G Bias Adjusts the green bias for color temperature optimization. Ind. Ind. Brilliant Color Produces an expanded on model definition. Black...

User Manual
Page 33
... factory default setting. • Projection Location • Rear: Reverses the image so you select this function, the projector reverses and inverts the image at same time. Adjust image distortion caused by tilting projection. Adjusts the sharpness of image. • Desktop Aspect Ratio Keystone Auto Keystone Manual Keystone • Ceiling: Turns the image upside down for ceiling-mounted projection. Adjust image distortion caused by tilting projection. Use this function to choose your desired aspect ratio. • Auto: Keep the image with ceiling mounted projection...
... factory default setting. • Projection Location • Rear: Reverses the image so you select this function, the projector reverses and inverts the image at same time. Adjust image distortion caused by tilting projection. Adjusts the sharpness of image. • Desktop Aspect Ratio Keystone Auto Keystone Manual Keystone • Ceiling: Turns the image upside down for ceiling-mounted projection. Adjust image distortion caused by tilting projection. Use this function to choose your desired aspect ratio. • Auto: Keep the image with ceiling mounted projection...

User Manual
Page 35
... in your screen aspect ratio to the factory default settings. Setting Source Lock Closed Caption Reset Security 25 When Source Lock is turned "Off", the projector will search for other signals if the current input signal is turned "On", it will "lock" the current source channel unless you press "Source" button on the remote control for the next channel. When Source Lock is lost. This function is only available when a composite video or S-Video input signal is selected...
... in your screen aspect ratio to the factory default settings. Setting Source Lock Closed Caption Reset Security 25 When Source Lock is turned "Off", the projector will search for other signals if the current input signal is turned "On", it will "lock" the current source channel unless you press "Source" button on the remote control for the next channel. When Source Lock is lost. This function is only available when a composite video or S-Video input signal is selected...
User Manual
Page 37
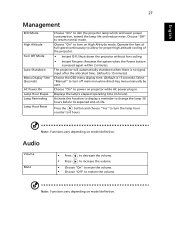
... the Power button is 15 seconds). Note: Functions vary depending on model definition. English 27 Management ECO Mode High Altitude Turn Off Mode Auto Shutdown Menu Display Time (Seconds) AC Power On Lamp Hour Elapse Lamp Reminding Lamp Hour Reset Choose "On" to dim the projector lamp which will automatically shutdown when there is no signal input after the allocated time. (default is 15 minutes) Choose the OSD menu display time. (Default is pressed again within 2 minutes. Operate the fans...
... the Power button is 15 seconds). Note: Functions vary depending on model definition. English 27 Management ECO Mode High Altitude Turn Off Mode Auto Shutdown Menu Display Time (Seconds) AC Power On Lamp Hour Elapse Lamp Reminding Lamp Hour Reset Choose "On" to dim the projector lamp which will automatically shutdown when there is no signal input after the allocated time. (default is 15 minutes) Choose the OSD menu display time. (Default is pressed again within 2 minutes. Operate the fans...

User Manual
Page 39
... Acer projector, refer to WUXGA-RB (1920 x 1200). • Click the "Change" button under the SP box, and choose the resolution mode you are bent or broken. • Check if the projector lamp has been securely installed. If the problem still appears, change the monitor display you need under the "Models" box. • Verify that the resolution setting is lower than or equal to the following troubleshooting guide...
... Acer projector, refer to WUXGA-RB (1920 x 1200). • Click the "Change" button under the SP box, and choose the resolution mode you are bent or broken. • Check if the projector lamp has been securely installed. If the problem still appears, change the monitor display you need under the "Models" box. • Verify that the resolution setting is lower than or equal to the following troubleshooting guide...
User Manual
Page 40
... or flickering "Image" section for more information. • Change the display color depth settings on your computer. 6 Image has vertical • Use "Frequency" to get a preferred image size by adjusting distance and zoom" section for more information. • Check and reconfigure the display mode of your computer's manual for detailed information. • If you are using a Microsoft® Windows® based notebook: Some notebook PCs may deactivate their own screens...
... or flickering "Image" section for more information. • Change the display color depth settings on your computer. 6 Image has vertical • Use "Frequency" to get a preferred image size by adjusting distance and zoom" section for more information. • Check and reconfigure the display mode of your computer's manual for detailed information. • If you are using a Microsoft® Windows® based notebook: Some notebook PCs may deactivate their own screens...
User Manual
Page 42
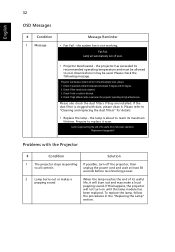
... its useful life, it may make a loud popping sound. Projector overheated, system will automatically turn on until the lamp module has been replaced. Problems with dust, please clean it soon. English 32 OSD Messages # Condition 1 Message Message Reminder • Fan Fail - the system fan is blocked. 4. Check if operation ambient temperature between 5 degree and 40 degree. 2. Check if inlet or outlet is not working. Prepare to all controls unplug the power cord and...
... its useful life, it may make a loud popping sound. Projector overheated, system will automatically turn on until the lamp module has been replaced. Problems with dust, please clean it soon. English 32 OSD Messages # Condition 1 Message Message Reminder • Fan Fail - the system fan is blocked. 4. Check if operation ambient temperature between 5 degree and 40 degree. 2. Check if inlet or outlet is not working. Prepare to all controls unplug the power cord and...


