
User Manual
Page 2
...by photocopy, recording or otherwise, without obligation to your unit should include the serial number, model number and purchase information. Acer Projector H6500/E-140/HE-802 Series User's Guide Original Issue: 09/2011 Changes may be made periodically to their respective companies. Record ...Acer and the Acer logo are trademarks or registered trademarks of this publication may be reproduced, stored in a retrieval system, or transmitted, in this publication without the prior written permission of such revisions or changes. The serial number and model number are used ...
...by photocopy, recording or otherwise, without obligation to your unit should include the serial number, model number and purchase information. Acer Projector H6500/E-140/HE-802 Series User's Guide Original Issue: 09/2011 Changes may be made periodically to their respective companies. Record ...Acer and the Acer logo are trademarks or registered trademarks of this publication may be reproduced, stored in a retrieval system, or transmitted, in this publication without the prior written permission of such revisions or changes. The serial number and model number are used ...

User Manual
Page 3
...sources of power, disconnect power from the system by placing the product on the product. Caution for future reference. Warnings! • Do not use liquid cleaners or aerosol cleaners. These openings must not be blocked by unplugging all warnings and instructions marked on a bed, sofa, rug or ...the product. iii Information for ventilation to ensure reliable operation of the product and to protect it could result in a fire or electric shock. Use a damp cloth for plug as possible. Caution for cleaning. When you plug the power cord into is provided. • Never push objects...
...sources of power, disconnect power from the system by placing the product on the product. Caution for future reference. Warnings! • Do not use liquid cleaners or aerosol cleaners. These openings must not be blocked by unplugging all warnings and instructions marked on a bed, sofa, rug or ...the product. iii Information for ventilation to ensure reliable operation of the product and to protect it could result in a fire or electric shock. Use a damp cloth for plug as possible. Caution for cleaning. When you plug the power cord into is provided. • Never push objects...
User Manual
Page 4
... sure the power outlet is not properly grounded may interfere with the performance of this product. • Use the product only with a three-wire grounded plug. Warning! Using a power outlet that is properly grounded before inserting the AC adapter plug. Note: The grounding pin also... requirements: detachable type, UL listed/CSA certified, VDE approved or its equivalent, 4.5 meters (15 feet) maximum length. If you are used with this product where people will probably cause unexpected short current or damage rotor devices, lamp. Contact your dealer or local power company. ...
... sure the power outlet is not properly grounded may interfere with the performance of this product. • Use the product only with a three-wire grounded plug. Warning! Using a power outlet that is properly grounded before inserting the AC adapter plug. Note: The grounding pin also... requirements: detachable type, UL listed/CSA certified, VDE approved or its equivalent, 4.5 meters (15 feet) maximum length. If you are used with this product where people will probably cause unexpected short current or damage rotor devices, lamp. Contact your dealer or local power company. ...
User Manual
Page 5
... altitudes are covered by a qualified technician to restore the product to normal condition. The bright may hurt your projector. Warning! For safety reasons, do not use non-compliant parts when adding or changing components. Additional safety information • Do not look into the product • the product was exposed to rain...
... altitudes are covered by a qualified technician to restore the product to normal condition. The bright may hurt your projector. Warning! For safety reasons, do not use non-compliant parts when adding or changing components. Additional safety information • Do not look into the product • the product was exposed to rain...
User Manual
Page 6
... temporarily turn off . • Do not touch air outlet grille and bottom plate which becomes hot. • Clean the air filter frequently if have. Only use acer ceiling mount kit for ceiling mount installation. In this case, unplug immediately and contact your dealer. • Do not keep... using this case contact your eyes. • Always open the lens shutter or remove the lens cap when the projector is on rare occasions. • Never ...
... temporarily turn off . • Do not touch air outlet grille and bottom plate which becomes hot. • Clean the air filter frequently if have. Only use acer ceiling mount kit for ceiling mount installation. In this case, unplug immediately and contact your dealer. • Do not keep... using this case contact your eyes. • Always open the lens shutter or remove the lens cap when the projector is on rare occasions. • Never ...
User Manual
Page 8
...your unit. viii First things first Usage Notes Do: • Turn off , please ensure the projector completes its cooling cycle before cleaning. • Use a soft cloth moistened with mild detergent to clean the display housing. • Disconnect the power plug from the Onscreen display "Management" menu after ..., follow all changing instructions. • This product will not turn back on the projector first and then the signal sources. • Do not use lens cap when projector is on the unit provided for a long period of its life, it shows warning messages. • Reset the "Lamp...
...your unit. viii First things first Usage Notes Do: • Turn off , please ensure the projector completes its cooling cycle before cleaning. • Use a soft cloth moistened with mild detergent to clean the display housing. • Disconnect the power plug from the Onscreen display "Management" menu after ..., follow all changing instructions. • This product will not turn back on the projector first and then the signal sources. • Do not use lens cap when projector is on the unit provided for a long period of its life, it shows warning messages. • Reset the "Lamp...
User Manual
Page 14
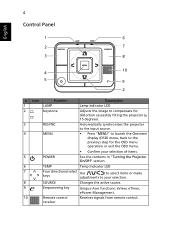
... items. 5 POWER See the contents in "Turning the Projector On/Off" section. 6 TEMP Temp Indicator LED 7 Four directional select Use to select items or make keys adjustments to your selection. 8 SOURCE Changes the active source. 9 Empowering key Unique Acer functions: eView, eTimer, ePower Management. 10 Remote control Receives signals from remote control.
... items. 5 POWER See the contents in "Turning the Projector On/Off" section. 6 TEMP Temp Indicator LED 7 Four directional select Use to select items or make keys adjustments to your selection. 8 SOURCE Changes the active source. 9 Empowering key Unique Acer functions: eView, eTimer, ePower Management. 10 Remote control Receives signals from remote control.
User Manual
Page 15
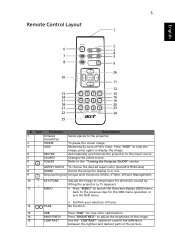
... RATIO To choose the desired aspect ratio (Auto/4:3/16:9/L.Box) 8 ZOOM Zooms the projector display in or out. 9 Empowering key Unique Acer functions: eView, eTimer, ePower Management. 10 KEYSTONE Adjusts the image to compensate for distortion caused by tilting the projector (± 15 degrees...RGB Press "RGB" for true-color optimization. 14 BRIGHTNESS Press "BRIGHTNESS" to adjust the brightness of the image. 15 CONTRAST Use the "CONTRAST" option to the input source. Automatically synchronizes the projector to control the difference between the lightest and darkest parts of...
... RATIO To choose the desired aspect ratio (Auto/4:3/16:9/L.Box) 8 ZOOM Zooms the projector display in or out. 9 Empowering key Unique Acer functions: eView, eTimer, ePower Management. 10 KEYSTONE Adjusts the image to compensate for distortion caused by tilting the projector (± 15 degrees...RGB Press "RGB" for true-color optimization. 14 BRIGHTNESS Press "BRIGHTNESS" to adjust the brightness of the image. 15 CONTRAST Use the "CONTRAST" option to the input source. Automatically synchronizes the projector to control the difference between the lightest and darkest parts of...

User Manual
Page 16
... source to HDMI™. 23 MUTE No function. 24 WIRELESS No function. 25 KeyPad 0~9 Press "0~9" to input a password in the "Security settings". 26 Four directional Use up, down, left, right buttons to select items or make select keys adjustments to your selection.
... source to HDMI™. 23 MUTE No function. 24 WIRELESS No function. 25 KeyPad 0~9 Press "0~9" to input a password in the "Security settings". 26 Four directional Use up, down, left, right buttons to select items or make select keys adjustments to your selection.
User Manual
Page 18
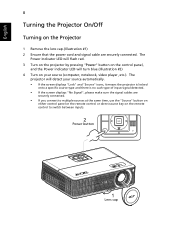
... sure the signal cables are securely connected. English 8 Turning the Projector On/Off Turning on the remote control to multiple sources at the same time, use the "Source" button on either control panel or the remote control or direct source key on the Projector 1 Remove the lens cap.(Illustration #1) 2 Ensure that...
... sure the signal cables are securely connected. English 8 Turning the Projector On/Off Turning on the remote control to multiple sources at the same time, use the "Source" button on either control panel or the remote control or direct source key on the Projector 1 Remove the lens cap.(Illustration #1) 2 Ensure that...
User Manual
Page 20
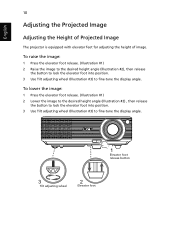
...release. (Illustration #1) 2 Raise the image to the desired height angle (Illustration #2), then release the button to lock the elevator foot into position. 3 Use Tilt adjusting wheel (Illustration #3) to fine-tune the display angle. To lower the image: 1 Press the elevator foot release. (Illustration #1) 2 Lower ...the image to the desired height angle (Illustration #2) , then release the button to lock the elevator foot into position. 3 Use Tilt adjusting wheel (Illustration #3) to fine-tune the display angle. 1 Elevator foot release button 3 Tilt adjusting wheel 2 Elevator foot
...release. (Illustration #1) 2 Raise the image to the desired height angle (Illustration #2), then release the button to lock the elevator foot into position. 3 Use Tilt adjusting wheel (Illustration #3) to fine-tune the display angle. To lower the image: 1 Press the elevator foot release. (Illustration #1) 2 Lower ...the image to the desired height angle (Illustration #2) , then release the button to lock the elevator foot into position. 3 Use Tilt adjusting wheel (Illustration #3) to fine-tune the display angle. 1 Elevator foot release button 3 Tilt adjusting wheel 2 Elevator foot
User Manual
Page 25
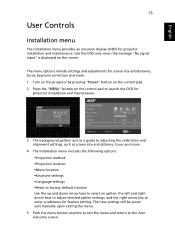
... 5 Push the menu button anytime to exit the menu and return to adjusting the calibration and alignment settings, such as a guide to the Acer welcome screen. The menu options include settings and adjustments for screen size and distance, focus, keystone correction and more . 4 The Installation menu ...: •Projection method •Projection location •Menu location •Keystone settings •Language settings •Reset to factory default function Use the up and down arrow keys to select an option, the left and right arrow keys to adjust selected option settings, and the right...
... 5 Push the menu button anytime to exit the menu and return to adjusting the calibration and alignment settings, such as a guide to the Acer welcome screen. The menu options include settings and adjustments for screen size and distance, focus, keystone correction and more . 4 The Installation menu ...: •Projection method •Projection location •Menu location •Keystone settings •Language settings •Reset to factory default function Use the up and down arrow keys to select an option, the left and right arrow keys to adjust selected option settings, and the right...
User Manual
Page 27
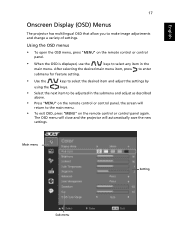
... menus • To open the OSD menu, press "MENU" on the remote control or control panel. • When the OSD is displayed, use the keys to the main menu. • To exit OSD, press "MENU" on the remote control or control panel, the screen will automatically save the ...main menu. Main menu Setting Sub menu After selecting the desired main menu item, press to enter submenu for feature setting. • Use the keys to select the desired item and adjust the settings by using the keys. • Select the next item to make image adjustments and change a variety of settings.
... menus • To open the OSD menu, press "MENU" on the remote control or control panel. • When the OSD is displayed, use the keys to the main menu. • To exit OSD, press "MENU" on the remote control or control panel, the screen will automatically save the ...main menu. Main menu Setting Sub menu After selecting the desired main menu item, press to enter submenu for feature setting. • Use the keys to select the desired item and adjust the settings by using the keys. • Select the next item to make image adjustments and change a variety of settings.
User Manual
Page 28
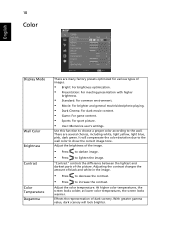
...: For dark movie content. • Game: For game content. • Sports: For sport picture. • User: Memorize user's settings. Adjust the brightness of the picture. Use this function to choose a proper color according to increase the contrast. Effects the representation of black and white in the image. • Press to decrease...
...: For dark movie content. • Game: For game content. • Sports: For sport picture. • User: Memorize user's settings. Adjust the brightness of the picture. Use this function to choose a proper color according to increase the contrast. Effects the representation of black and white in the image. • Press to decrease...
User Manual
Page 30
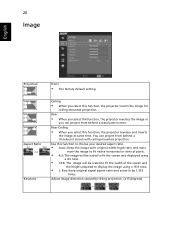
Rear-Ceiling • When you select this function to choose your desired aspect ratio. • Auto: Keep the image with ceiling mounted projection. Use this function, the projector reverses and inverts the image at same time. 20 Image English Projection Front • The factory default setting. Rear • ... and maxi mize the image to fit native horizontal or vertical pixels. • 4:3: The image will be scaled to fit the screen and displayed using a 4:3 ratio. • 16:9: The image will be scaled to fit the width of the screen and the height adjusted to display the image...
Rear-Ceiling • When you select this function to choose your desired aspect ratio. • Auto: Keep the image with ceiling mounted projection. Use this function, the projector reverses and inverts the image at same time. 20 Image English Projection Front • The factory default setting. Rear • ... and maxi mize the image to fit native horizontal or vertical pixels. • 4:3: The image will be scaled to fit the screen and displayed using a 4:3 ratio. • 16:9: The image will be scaled to fit the width of the screen and the height adjusted to display the image...
User Manual
Page 31
... again within 2 minutes. Operate the fans at full speed continuously to return normal mode. If you experience an unstable or flickering image, use this function to move the image right. Choose "On" to make the necessary adjustments. English 21 H. Position (Horizontal position) •...to move the image left. • Press to to move the image down the projector after the allocated time. (in the projected image, use this function to turn on HDMI image. Position • (Vertical position) • Press Press to move the image up. Frequency Tracking ...
... again within 2 minutes. Operate the fans at full speed continuously to return normal mode. If you experience an unstable or flickering image, use this function to move the image right. Choose "On" to make the necessary adjustments. English 21 H. Position (Horizontal position) •...to move the image left. • Press to to move the image down the projector after the allocated time. (in the projected image, use this function to turn on HDMI image. Position • (Vertical position) • Press Press to move the image up. Frequency Tracking ...
User Manual
Page 33
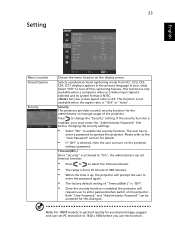
... a composite video or S-Video input signal is selected and its system format is "16:9" or "Auto" . Security This projector provides a useful security function for this function. Both "User Password" and "Administrator Password" can be accepted for the administrator to manage usage of "Timeout(Min.)" ...can set PC resolution to enter password when switch on the projector . Set your must enter the "Administrator Password" first before you use this dialogue. If the security function is up, the projector will prompt the user to enable the security function. Please refer to ...
... a composite video or S-Video input signal is selected and its system format is "16:9" or "Auto" . Security This projector provides a useful security function for this function. Both "User Password" and "Administrator Password" can be accepted for the administrator to manage usage of "Timeout(Min.)" ...can set PC resolution to enter password when switch on the projector . Set your must enter the "Administrator Password" first before you use this dialogue. If the security function is up, the projector will prompt the user to enable the security function. Please refer to ...
User Manual
Page 34
... be used in the box). If you select "Always request the password when turning the projector on.", the user has to enter the password every time when the projector is turned on the display screen. Default is "On", the down/up move of electronic screen will be related with an Acer service...
... be used in the box). If you select "Always request the password when turning the projector on.", the user has to enter the password every time when the projector is turned on the display screen. Default is "On", the down/up move of electronic screen will be related with an Acer service...
User Manual
Page 35
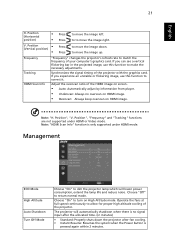
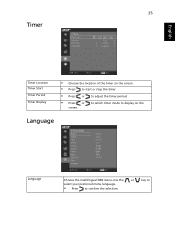
English 25 Timer Timer Location Timer Start Timer Period Timer Display • Choose the location of the timer on the Language Language Choose the multilingual OSD menu. Use the or key to select your preferred menu language. • Press to adjust the timer period. • Press or screen. to which timer mode to display on the screen. • Press to start or stop the timer. • Press or to confirm the selection.
English 25 Timer Timer Location Timer Start Timer Period Timer Display • Choose the location of the timer on the Language Language Choose the multilingual OSD menu. Use the or key to select your preferred menu language. • Press to adjust the timer period. • Press or screen. to which timer mode to display on the screen. • Press to start or stop the timer. • Press or to confirm the selection.
User Manual
Page 36
... UXGA (1600 x 1200). 26 Appendices English Troubleshooting If you need under the "Models" box. • Verify that the resolution setting of the connector pins are using and follow the steps below: • Verify that the resolution setting is lower than or equal to UXGA (1600 x 1200). • Click the "Advanced Properties...
... UXGA (1600 x 1200). 26 Appendices English Troubleshooting If you need under the "Models" box. • Verify that the resolution setting of the connector pins are using and follow the steps below: • Verify that the resolution setting is lower than or equal to UXGA (1600 x 1200). • Click the "Advanced Properties...


