

User Manual
Page 3
... guidelines when connecting and disconnecting power to the external power supply unit: • Install the power supply unit before connecting the power cord to protect it from the projector. • If the system has multiple sources of any kind into the product. Use a damp cloth for your safety and comfort Read these instructions carefully. The openings should never be blocked by unplugging all warnings and instructions marked...
... guidelines when connecting and disconnecting power to the external power supply unit: • Install the power supply unit before connecting the power cord to protect it from the projector. • If the system has multiple sources of any kind into the product. Use a damp cloth for your safety and comfort Read these instructions carefully. The openings should never be blocked by unplugging all warnings and instructions marked...
User Manual
Page 5
... free flow of air around the projector is necessary. • Locations where temperatures may become excessively high, such as opening or removing covers may expose you to qualified service personnel. For safety reasons, do not use non-compliant parts when adding or changing components. Consult your projector. Additional safety information • Do not look into the product • the product was spilled into the projector's lens...
... free flow of air around the projector is necessary. • Locations where temperatures may become excessively high, such as opening or removing covers may expose you to qualified service personnel. For safety reasons, do not use non-compliant parts when adding or changing components. Consult your projector. Additional safety information • Do not look into the product • the product was spilled into the projector's lens...
User Manual
Page 6
... the life of displaying inverted images for ceiling mount installation. To temporarily turn off the main power abruptly or unplug the projector during operation. Refer servicing only to break on end vertically. It could cause the object to the sun. Please be sure to change the lamp when is showing warning message. • When changing the lamp, please allow unit to cool down, and follow all changing instructions. • Reset the "Lamp Hour Reset...
... the life of displaying inverted images for ceiling mount installation. To temporarily turn off the main power abruptly or unplug the projector during operation. Refer servicing only to break on end vertically. It could cause the object to the sun. Please be sure to change the lamp when is showing warning message. • When changing the lamp, please allow unit to cool down, and follow all changing instructions. • Reset the "Lamp Hour Reset...
User Manual
Page 8
... Lamp". To replace the lamp, follow all warnings, precautions and maintenance as recommended in operation. • When the lamp reaches the end of its life, it shows warning messages. • Reset the "Lamp Hour Reset" function from the Onscreen display "Management" menu after replacing the lamp module. • When switching the projector off the product before cleaning. • Use a soft cloth moistened with mild detergent to clean the display housing. • Disconnect the power...
... Lamp". To replace the lamp, follow all warnings, precautions and maintenance as recommended in operation. • When the lamp reaches the end of its life, it shows warning messages. • Reset the "Lamp Hour Reset" function from the Onscreen display "Management" menu after replacing the lamp module. • When switching the projector off the product before cleaning. • Use a soft cloth moistened with mild detergent to clean the display housing. • Disconnect the power...

User Manual
Page 9
... 2 Projector Overview 3 Projector Outlook 3 Control Panel 4 Remote Control Layout 5 Getting Started 7 Connecting the Projector 7 Turning the Projector On/Off 8 Turning on the Projector 8 Turning the projector off 9 Adjusting the Projected Image 10 Adjusting the Height of Projected Image 10 How to optimize image size and distance 11 How to get a preferred image size by adjusting distance and zoom 13 User Controls 15 Installation menu 15 Acer Empowering Technology 16 Onscreen Display (OSD) Menus 17 Color 18 Image 20 Management 21 Setting 23 Timer 25...
... 2 Projector Overview 3 Projector Outlook 3 Control Panel 4 Remote Control Layout 5 Getting Started 7 Connecting the Projector 7 Turning the Projector On/Off 8 Turning on the Projector 8 Turning the projector off 9 Adjusting the Projected Image 10 Adjusting the Height of Projected Image 10 How to optimize image size and distance 11 How to get a preferred image size by adjusting distance and zoom 13 User Controls 15 Installation menu 15 Acer Empowering Technology 16 Onscreen Display (OSD) Menus 17 Color 18 Image 20 Management 21 Setting 23 Timer 25...
User Manual
Page 11
... a single-chip DLP® projector. Outstanding features include: • DLP® technology • Native 1920 x 1080 1080p resolution 4:3 / 16:9 / L.Box aspect ratio supported • Acer ColorBoost technology delivers nature's true colors for vivid, life-like images • Acer ColorSafe II technology ensures consistent color rendition over time. • High brightness and contrast ratio • Versatile display modes (Bright, Presentation, Standard, Movie, Dark Cinema, Game, Sports, User) enable...
... a single-chip DLP® projector. Outstanding features include: • DLP® technology • Native 1920 x 1080 1080p resolution 4:3 / 16:9 / L.Box aspect ratio supported • Acer ColorBoost technology delivers nature's true colors for vivid, life-like images • Acer ColorSafe II technology ensures consistent color rendition over time. • High brightness and contrast ratio • Versatile display modes (Bright, Presentation, Standard, Movie, Dark Cinema, Game, Sports, User) enable...
User Manual
Page 14
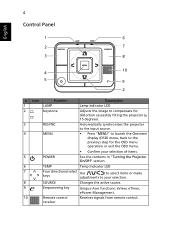
... display (OSD) menu, back to the previous step for the OSD menu operation or exit the OSD menu. • Confirm your selection of items. 5 POWER See the contents in "Turning the Projector On/Off" section. 6 TEMP Temp Indicator LED 7 Four directional select Use to select items or make keys adjustments to your selection. 8 SOURCE Changes the active source. 9 Empowering key Unique Acer functions: eView, eTimer, ePower Management. 10 Remote control...
... display (OSD) menu, back to the previous step for the OSD menu operation or exit the OSD menu. • Confirm your selection of items. 5 POWER See the contents in "Turning the Projector On/Off" section. 6 TEMP Temp Indicator LED 7 Four directional select Use to select items or make keys adjustments to your selection. 8 SOURCE Changes the active source. 9 Empowering key Unique Acer functions: eView, eTimer, ePower Management. 10 Remote control...
User Manual
Page 15
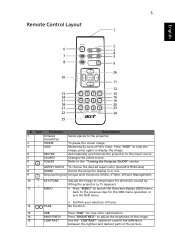
... 14 17 18 21 22 25 POWER FREEZE HIDE ASPECT RATIO RESYNC SOURCE ZOOM RGB BRIGHTNESS COLOR CONTRAST PgUp PgDn VGA COMPONENT VIDEO S-VIDEO DVI HDMI WIRELESS MUTE 2 3 4 5 9 26 11 12 15 16 19 20 23 24 # Icon Function 1 Infrared transmitter 2 FREEZE 3 HIDE 4 RESYNC 5 SOURCE 6 POWER Description Sends signals to control the difference between the lightest and darkest parts of the picture. To pause the screen image.
... 14 17 18 21 22 25 POWER FREEZE HIDE ASPECT RATIO RESYNC SOURCE ZOOM RGB BRIGHTNESS COLOR CONTRAST PgUp PgDn VGA COMPONENT VIDEO S-VIDEO DVI HDMI WIRELESS MUTE 2 3 4 5 9 26 11 12 15 16 19 20 23 24 # Icon Function 1 Infrared transmitter 2 FREEZE 3 HIDE 4 RESYNC 5 SOURCE 6 POWER Description Sends signals to control the difference between the lightest and darkest parts of the picture. To pause the screen image.
User Manual
Page 18
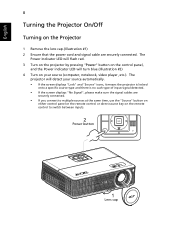
... the screen displays "No Signal", please make sure the signal cables are securely connected. • If you connect to switch between inputs. 2 Power button 1 Lens cap English 8 Turning the Projector On/Off Turning on the remote control to multiple sources at the same time, use the "Source" button on either control panel or the remote control or direct source key on the Projector 1 Remove the lens cap.(Illustration #1) 2 Ensure that the power cord and signal cable are securely connected. The Power indicator LED will flash red. 3 Turn on the projector by pressing "Power" button...
... the screen displays "No Signal", please make sure the signal cables are securely connected. • If you connect to switch between inputs. 2 Power button 1 Lens cap English 8 Turning the Projector On/Off Turning on the remote control to multiple sources at the same time, use the "Source" button on either control panel or the remote control or direct source key on the Projector 1 Remove the lens cap.(Illustration #1) 2 Ensure that the power cord and signal cable are securely connected. The Power indicator LED will flash red. 3 Turn on the projector by pressing "Power" button...
User Manual
Page 25
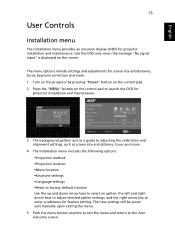
... only when the message "No signal input" is displayed on the control pad to launch the OSD for projector installation and maintenance. 3 The background pattern acts as a guide to adjusting the calibration and alignment settings, such as screen size and distance, focus and more. 4 The Installation menu includes the following options: •Projection method •Projection location •Menu location •Keystone settings •Language settings •Reset to factory default function Use the up and down arrow...
... only when the message "No signal input" is displayed on the control pad to launch the OSD for projector installation and maintenance. 3 The background pattern acts as a guide to adjusting the calibration and alignment settings, such as screen size and distance, focus and more. 4 The Installation menu includes the following options: •Projection method •Projection location •Menu location •Keystone settings •Language settings •Reset to factory default function Use the up and down arrow...

User Manual
Page 29
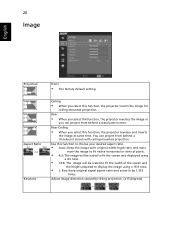
... the image. Note: "HDMI Color Range" function is only supported under computer mode or HDMI mode. Dynamic Black Choose "On" to automatically optimize the display of the HDMI image data to correct color display error. • Auto: Automatically adjust by default. Color C Adjusts the cyan color. Adjusts the color balance of red and green. • Press to increase the amount of color in incredible detail. Color B Adjusts the blue color. Note: "Saturation" and "Tint" functions are not supported under HDMI mode. Sharpeness Adjusts...
... the image. Note: "HDMI Color Range" function is only supported under computer mode or HDMI mode. Dynamic Black Choose "On" to automatically optimize the display of the HDMI image data to correct color display error. • Auto: Automatically adjust by default. Color C Adjusts the cyan color. Adjusts the color balance of red and green. • Press to increase the amount of color in incredible detail. Color B Adjusts the blue color. Note: "Saturation" and "Tint" functions are not supported under HDMI mode. Sharpeness Adjusts...
User Manual
Page 30
...; The factory default setting. Rear • When you select this function, the projector reverses and inverts the image at same time. Rear-Ceiling • When you select this function, the projector reverses the image so you select this function to choose your desired aspect ratio. • Auto: Keep the image with ceiling mounted projection. Box: Keep original signal aspect ratio and zoom in by tilting projection. (±15 degrees) Adjust image distortion...
...; The factory default setting. Rear • When you select this function, the projector reverses and inverts the image at same time. Rear-Ceiling • When you select this function, the projector reverses the image so you select this function to choose your desired aspect ratio. • Auto: Keep the image with ceiling mounted projection. Box: Keep original signal aspect ratio and zoom in by tilting projection. (±15 degrees) Adjust image distortion...
User Manual
Page 31
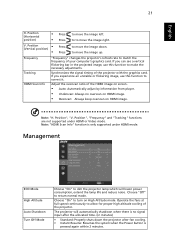
... no signal input after fan cooling. • Instant Resume: Resumes the system when the Power button is only supported under HDMI or Video mode. Management ECO Mode High Altitude Auto Shutdown Turn Off Mode Choose "On" to make the necessary adjustments. If you experience an unstable or flickering image, use this function to move the image down the projector after the allocated time. (in the projected image, use this function to dim the projector lamp which...
... no signal input after fan cooling. • Instant Resume: Resumes the system when the Power button is only supported under HDMI or Video mode. Management ECO Mode High Altitude Auto Shutdown Turn Off Mode Choose "On" to make the necessary adjustments. If you experience an unstable or flickering image, use this function to move the image down the projector after the allocated time. (in the projected image, use this function to dim the projector lamp which...
User Manual
Page 33
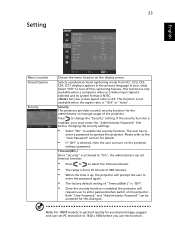
... password when switch on the display screen. This function is not available when the aspect ratio is NTSC. 23 Setting English Menu Location Closed Caption Security Choose the menu location on the projector . Selects a preferred closed captioning mode from 10 minute to 990 minutes. • When the time is up, the projector will request user to 4:3. This function is only available when a composite video or S-Video input signal...
... password when switch on the display screen. This function is not available when the aspect ratio is NTSC. 23 Setting English Menu Location Closed Caption Security Choose the menu location on the projector . Selects a preferred closed captioning mode from 10 minute to 990 minutes. • When the time is up, the projector will request user to 4:3. This function is only available when a composite video or S-Video input signal...
User Manual
Page 34
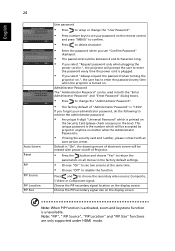
... activated, zoom and keystone function is turned on. Choose the PIP secondary signal location on the display screen. Note: "PIP", " PIP Source", "PIP Location" and "PIP Size" functions are only supported under HDMI mode. English 24 Auto Screen Reset PIP PIP Source PIP Location PIP Size User password • Press to setup or change the "User Password". • Press number keys to set your administrator password, do the following to retrieve the administrator password: • An unique 6-digit "Universal Password" which...
... activated, zoom and keystone function is turned on. Choose the PIP secondary signal location on the display screen. Note: "PIP", " PIP Source", "PIP Location" and "PIP Size" functions are only supported under HDMI mode. English 24 Auto Screen Reset PIP PIP Source PIP Location PIP Size User password • Press to setup or change the "User Password". • Press number keys to set your administrator password, do the following to retrieve the administrator password: • An unique 6-digit "Universal Password" which...
User Manual
Page 36
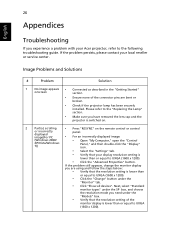
... problem still appears, change the monitor display you are bent or broken. • Check if the projector lamp has been securely installed. Please refer to the "Replacing the Lamp" section. • Make sure you have removed the lens cap and the projector is switched on. 2 Partial, scrolling • Press "RESYNC" on the remote control or control or incorrectly displayed image(For PC panel. • For an incorrectly displayed image: (Windows 2000/ • Open...
... problem still appears, change the monitor display you are bent or broken. • Check if the projector lamp has been securely installed. Please refer to the "Replacing the Lamp" section. • Make sure you have removed the lens cap and the projector is switched on. 2 Partial, scrolling • Press "RESYNC" on the remote control or control or incorrectly displayed image(For PC panel. • For an incorrectly displayed image: (Windows 2000/ • Open...
User Manual
Page 37
... will also need to Get a Preferred Image Size by Adjusting Distance and Zoom" section for more information. • Change the display color depth settings on the remote control or control or incorrectly panel. displayed image (For notebooks) • For an incorrectly displayed image: • Follow the steps for more information. • Check and reconfigure the display mode of your computer. • Press the toggle output settings. 27 English 3 Partial, scrolling •...
... will also need to Get a Preferred Image Size by Adjusting Distance and Zoom" section for more information. • Change the display color depth settings on the remote control or control or incorrectly panel. displayed image (For notebooks) • For an incorrectly displayed image: • Follow the steps for more information. • Check and reconfigure the display mode of your computer. • Press the toggle output settings. 27 English 3 Partial, scrolling •...
User Manual
Page 38
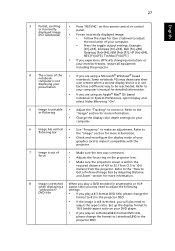
... a popping sound When the lamp reaches the end of its useful life, it is reversed • Adjust the zoom ring on the top of the projector. If this happens, the projector will burn out and may make a loud popping sound. Go to or further from the screen. Press "MENU" on the remote control or on the OSD and adjust the projection direction. 28 English 9 Image is...
... a popping sound When the lamp reaches the end of its useful life, it is reversed • Adjust the zoom ring on the top of the projector. If this happens, the projector will burn out and may make a loud popping sound. Go to or further from the screen. Press "MENU" on the remote control or on the OSD and adjust the projection direction. 28 English 9 Image is...
User Manual
Page 41
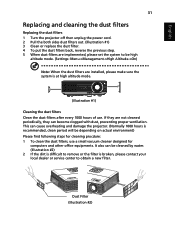
... 31 Replacing and cleaning the dust filters Replacing the dust filters 1 Turn the projector off then unplug the power cord. 2 Pull the both sides dust filters out. (Illustration #1) 3 Clean or replace the dust filter. 4 To put the dust filters back, reverse the previous step. 5 When dust filters are installed, please make sure the system is at high altitude mode. (Illustration #1) Cleaning the dust filters Clean the dust filters after every 1000 hours of use...
... 31 Replacing and cleaning the dust filters Replacing the dust filters 1 Turn the projector off then unplug the power cord. 2 Pull the both sides dust filters out. (Illustration #1) 3 Clean or replace the dust filter. 4 To put the dust filters back, reverse the previous step. 5 When dust filters are installed, please make sure the system is at high altitude mode. (Illustration #1) Cleaning the dust filters Clean the dust filters after every 1000 hours of use...

User Manual
Page 46
36 English Specifications The specifications listed below are subject to Acer's published marketing specifications. For final specs, please refer to change without notice. Projection system Resolution Computer compatibility Video compatibility Aspect ratio Displayable colors Projection lens Projection screen size (diagonal) Projection distance Throw ratio Horizontal scan rate Vertical refresh scan rate Lamp type Keystone correction Weight Dimensions (W x D x H) Digital Zoom Power supply Power consumption Operating temperature I/O connectors DLP® Native: 1080P (1920 x 1080), ...
36 English Specifications The specifications listed below are subject to Acer's published marketing specifications. For final specs, please refer to change without notice. Projection system Resolution Computer compatibility Video compatibility Aspect ratio Displayable colors Projection lens Projection screen size (diagonal) Projection distance Throw ratio Horizontal scan rate Vertical refresh scan rate Lamp type Keystone correction Weight Dimensions (W x D x H) Digital Zoom Power supply Power consumption Operating temperature I/O connectors DLP® Native: 1080P (1920 x 1080), ...


