User Manual
Page 2
... place of purchase information in new editions of this manual or supplementary documents and publications. All correspondence concerning your projector. No part of this publication without the prior written permission of merchantability or fitness for identification purposes only and ... or registered trademarks of purchase Acer and the Acer logo are used herein for a particular purpose. Copyright © 2013. Model number Serial number Date of purchase Place of HDMI Licensing LLC." All Rights Reserved. Acer Incorporated. Acer Projector User's Guide Original Issue: ...
... place of purchase information in new editions of this manual or supplementary documents and publications. All correspondence concerning your projector. No part of this publication without the prior written permission of merchantability or fitness for identification purposes only and ... or registered trademarks of purchase Acer and the Acer logo are used herein for a particular purpose. Copyright © 2013. Model number Serial number Date of purchase Place of HDMI Licensing LLC." All Rights Reserved. Acer Incorporated. Acer Projector User's Guide Original Issue: ...
User Manual
Page 3
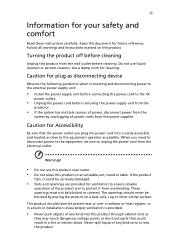
... product should never be placed near water. • Do not place this product from the wall outlet before removing the power supply unit from the projector. • If the system has multiple sources of any kind onto or into this document for your safety and comfort Read these instructions carefully. These...
... product should never be placed near water. • Do not place this product from the wall outlet before removing the power supply unit from the projector. • If the system has multiple sources of any kind onto or into this document for your safety and comfort Read these instructions carefully. These...
User Manual
Page 5
...that is poorly ventilated or confined. Keep them out of the reach of air around the projector is something wrong with your projector. Do not operate if smoke, strange noise or odor comes out of your projector. Consult your eyes. • Turn on . Your device and its enhancements may expose ... personnel when: • the power cord or plug is damaged, cut or frayed • liquid was spilled into the projector's lens when the lamp is on the projector first and then signal sources • Do not place the product in damage and will often require extensive work by the ...
...that is poorly ventilated or confined. Keep them out of the reach of air around the projector is something wrong with your projector. Do not operate if smoke, strange noise or odor comes out of your projector. Consult your eyes. • Turn on . Your device and its enhancements may expose ... personnel when: • the power cord or plug is damaged, cut or frayed • liquid was spilled into the projector's lens when the lamp is on the projector first and then signal sources • Do not place the product in damage and will often require extensive work by the ...
User Manual
Page 6
...assembly for ceiling mount installation. Allow the projector to cool for approximately 45 minutes prior to break on the remote control. • The lamp becomes extremely hot during operation. There are dangerous high voltages inside may hurt you. Only use acer ceiling mount kit for inspection. •... Do not face the projector lens to break or drop it. In this product to the sun. To temporarily turn off the main ...
...assembly for ceiling mount installation. Allow the projector to cool for approximately 45 minutes prior to break on the remote control. • The lamp becomes extremely hot during operation. There are dangerous high voltages inside may hurt you. Only use acer ceiling mount kit for inspection. •... Do not face the projector lens to break or drop it. In this product to the sun. To temporarily turn off the main ...

User Manual
Page 7
... the volume gradually until you . For more information on the Waste from Electrical and Electronics Equipment (WEEE) regulations, visit http://www.acer-group.com/public/ Sustainability/sustainability01.htm Mercury advisory For projectors or electronic products containing an LCD/CRT monitor or display: "Lamp(s) contain Mercury, Dispose Properly." To minimize pollution and ensure...
... the volume gradually until you . For more information on the Waste from Electrical and Electronics Equipment (WEEE) regulations, visit http://www.acer-group.com/public/ Sustainability/sustainability01.htm Mercury advisory For projectors or electronic products containing an LCD/CRT monitor or display: "Lamp(s) contain Mercury, Dispose Properly." To minimize pollution and ensure...

User Manual
Page 8
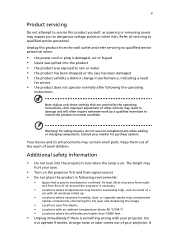
...a soft cloth moistened with mild detergent to clean the unit. • Use under "Replacing the Lamp". Warning: • Do not look into the projector's lens when the lamp is not being used for a long period of time. To replace the lamp, follow all warnings, precautions and maintenance as this...the "Lamp Hour Reset" function from AC outlet if the product is on until the lamp module has been replaced. If this happens, the projector will detect the life of the lamp itself. Precautions Follow all changing instructions. • This product will not turn back on . viii First...
...a soft cloth moistened with mild detergent to clean the unit. • Use under "Replacing the Lamp". Warning: • Do not look into the projector's lens when the lamp is not being used for a long period of time. To replace the lamp, follow all warnings, precautions and maintenance as this...the "Lamp Hour Reset" function from AC outlet if the product is on until the lamp module has been replaced. If this happens, the projector will detect the life of the lamp itself. Precautions Follow all changing instructions. • This product will not turn back on . viii First...

User Manual
Page 9
... 3 Control Panel 4 Remote Control Layout 5 MHL (Mobile High-Definition Link) Control 7 Getting Started 8 Connecting the Projector 8 Turning the Projector On/Off 10 Turning on the Projector 10 Turning the projector off 11 Adjusting the Projected Image 12 Adjusting the Height of Projected Image 12 How to optimize image size and distance 13 How to... User Controls 21 Installation menu 21 Onscreen Display (OSD) Menus 22 Color 23 Image 25 Setting 27 Management 30 Audio 31 3D 32 Language 32 Acer LAN webpage management 33
... 3 Control Panel 4 Remote Control Layout 5 MHL (Mobile High-Definition Link) Control 7 Getting Started 8 Connecting the Projector 8 Turning the Projector On/Off 10 Turning on the Projector 10 Turning the projector off 11 Adjusting the Projected Image 12 Adjusting the Height of Projected Image 12 How to optimize image size and distance 13 How to... User Controls 21 Installation menu 21 Onscreen Display (OSD) Menus 22 Color 23 Image 25 Setting 27 Management 30 Audio 31 3D 32 Language 32 Acer LAN webpage management 33
User Manual
Page 11
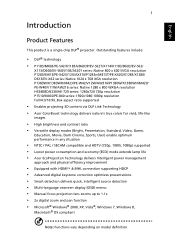
...-W42/V12W/AW316/P1380W/X1380WH/M420/ PE-W40/V11W/AW216 series: Native 1280 x 800 WXGA resolution H5380BD/E230/HE-720 series: 1280x720 720p resolution P1510/M450/PE-840 series: 1920x1080 1080p resolution Full/4:3/16:9/L.Box...HDTV (720p, 1080i, 1080p) supported • Lower power consumption and economy (ECO) mode extends lamp life • Acer EcoProjeciton Technology delivers Intelligent power management approach and physical efficiency improvement • Equipped with HDMI™ & MHL connection supporting... 1 Introduction Product Features This product is a single-chip DLP® projector.
...-W42/V12W/AW316/P1380W/X1380WH/M420/ PE-W40/V11W/AW216 series: Native 1280 x 800 WXGA resolution H5380BD/E230/HE-720 series: 1280x720 720p resolution P1510/M450/PE-840 series: 1920x1080 1080p resolution Full/4:3/16:9/L.Box...HDTV (720p, 1080i, 1080p) supported • Lower power consumption and economy (ECO) mode extends lamp life • Acer EcoProjeciton Technology delivers Intelligent power management approach and physical efficiency improvement • Equipped with HDMI™ & MHL connection supporting... 1 Introduction Product Features This product is a single-chip DLP® projector.
User Manual
Page 12
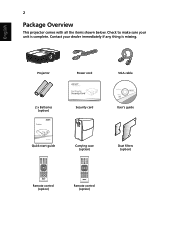
Projector Power cord VGA cable 2 x Batteries (option) Security card User's guide Quick start guide MEDIA SETUP MODE SOURCE HIDE ZOOM RATIO FREEZE Carrying case (option) MEDIA SETUP MODE SOURCE HIDE ZOOM FREEZE Remote control (option) Remote control (option) Dust filters (option) Check to make sure your dealer immediately if any thing is complete. Contact your unit is missing. English 2 Package Overview This projector comes with all the items shown below.
Projector Power cord VGA cable 2 x Batteries (option) Security card User's guide Quick start guide MEDIA SETUP MODE SOURCE HIDE ZOOM RATIO FREEZE Carrying case (option) MEDIA SETUP MODE SOURCE HIDE ZOOM FREEZE Remote control (option) Remote control (option) Dust filters (option) Check to make sure your dealer immediately if any thing is complete. Contact your unit is missing. English 2 Package Overview This projector comes with all the items shown below.
User Manual
Page 13
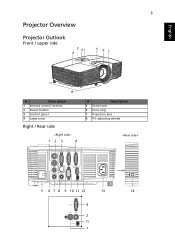
English 3 Projector Overview Projector Outlook Front / upper side 4 3 21 5 67 8 # Description 1 Remote control receiver 2 Power button 3 Control panel 4 Lamp cover Right / Rear side 12 3 4 # Description 5 Zoom lever 6 Focus ring 7 Projection lens 8 Tilt adjusting wheels VGA OUT VGA IN 2 VGA IN 1 S-VIDEO VIDEO AUDIO IN / MHL AUDIO OUT AUDIO IN RS232 USB CTRL 5 6 7 8 9 10 11 12 13 14 VGA IN VIDEO S-VIDEO USB CTRL 4 2 11 1
English 3 Projector Overview Projector Outlook Front / upper side 4 3 21 5 67 8 # Description 1 Remote control receiver 2 Power button 3 Control panel 4 Lamp cover Right / Rear side 12 3 4 # Description 5 Zoom lever 6 Focus ring 7 Projection lens 8 Tilt adjusting wheels VGA OUT VGA IN 2 VGA IN 1 S-VIDEO VIDEO AUDIO IN / MHL AUDIO OUT AUDIO IN RS232 USB CTRL 5 6 7 8 9 10 11 12 13 14 VGA IN VIDEO S-VIDEO USB CTRL 4 2 11 1
User Manual
Page 14
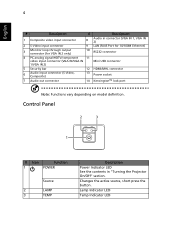
... port Note: Functions vary depending on model definition. Lamp Indicator LED Temp Indicator LED English 4 # Description # Description 1 Composite video input connector 8 Audio in "Turning the Projector On/Off" section. Changes the active source, short press the button.
... port Note: Functions vary depending on model definition. Lamp Indicator LED Temp Indicator LED English 4 # Description # Description 1 Composite video input connector 8 Audio in "Turning the Projector On/Off" section. Changes the active source, short press the button.

User Manual
Page 15
... hide the image, press again to display the image. 7 MEDIA_SETUP No function. 8 RATIO To choose the desired aspect ratio. 9 ZOOM Zooms the projector display in or out. 10 FREEZE To pause the screen image. 11 MENU • Press "MENU" to launch the Onscreen display (OSD) menu,... back to the previous step for distortion caused by tilting the projector (± 40 degrees). No. 2018, Zhonghuayuan west road, Yushan town,Kunshan city, China MC.JG811.008 # Icon Function 1 Infrared transmitter 2 POWER...
... hide the image, press again to display the image. 7 MEDIA_SETUP No function. 8 RATIO To choose the desired aspect ratio. 9 ZOOM Zooms the projector display in or out. 10 FREEZE To pause the screen image. 11 MENU • Press "MENU" to launch the Onscreen display (OSD) menu,... back to the previous step for distortion caused by tilting the projector (± 40 degrees). No. 2018, Zhonghuayuan west road, Yushan town,Kunshan city, China MC.JG811.008 # Icon Function 1 Infrared transmitter 2 POWER...

User Manual
Page 18
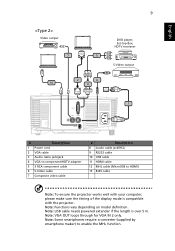
English Y RBG 8 Getting Started Connecting the Projector S-Video output WR 8 6 Video output WR Y DVD player, Set-top Box, HDTV receiever D-Sub 5 D-Sub 2 R BG 2 4 11 12 D-Sub D-Sub HDTV adapter HDMI HDMI HDMI DVD player USB MHL 7 8 VGA OUT VGA IN 2 VGA IN 1 S-VIDEO VIDEO / MHL AUDIO IN AUDIO OUT AUDIO IN RS232 USB CTRL USB 1 RS232 8 RW 13 9 3 Internet RS232 RS232 10 USB
English Y RBG 8 Getting Started Connecting the Projector S-Video output WR 8 6 Video output WR Y DVD player, Set-top Box, HDTV receiever D-Sub 5 D-Sub 2 R BG 2 4 11 12 D-Sub D-Sub HDTV adapter HDMI HDMI HDMI DVD player USB MHL 7 8 VGA OUT VGA IN 2 VGA IN 1 S-VIDEO VIDEO / MHL AUDIO IN AUDIO OUT AUDIO IN RS232 USB CTRL USB 1 RS232 8 RW 13 9 3 Internet RS232 RS232 10 USB
User Manual
Page 19
... through for VGA IN 2 only. Note: Some smartphones require a converter (supplied by smartphone maker) to HDMI) 13 RJ45 cable Note: To ensure the projector works well with the projector. Note: USB cable needs powered extender if the length is compatible with your computer, please make sure the timing of the display mode...
... through for VGA IN 2 only. Note: Some smartphones require a converter (supplied by smartphone maker) to HDMI) 13 RJ45 cable Note: To ensure the projector works well with the projector. Note: USB cable needs powered extender if the length is compatible with your computer, please make sure the timing of the display mode...

User Manual
Page 20
... turn blue. 3 Turn on your source automatically. • If the screen displays "Lock" and "Source" icons, it means the projector is locked onto a specific source type and there is no such type of input signal detected. • If the screen displays "No Signal", please make... sure the signal cables are securely connected. English 10 Turning the Projector On/Off Turning on the Projector 1 Ensure that the power cord and signal cable are securely connected. • If you connect to multiple sources at the same time, use...
... turn blue. 3 Turn on your source automatically. • If the screen displays "Lock" and "Source" icons, it means the projector is locked onto a specific source type and there is no such type of input signal detected. • If the screen displays "No Signal", please make... sure the signal cables are securely connected. English 10 Turning the Projector On/Off Turning on the Projector 1 Ensure that the power cord and signal cable are securely connected. • If you connect to multiple sources at the same time, use...
User Manual
Page 21
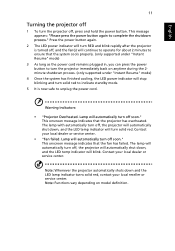
... Resume" mode) 4 Once the system has finished cooling, the LED power indicator will turn solid red. English 11 Turning the projector off 1 To turn the projector off , and the fan(s) will continue to operate for about 2 minutes to ensure that the system cools properly. (only supported...This message appears: "Please press the power button again to unplug the power cord. Warning indicators: • "Projector Overheated. The lamp will automatically turn off, the projector will automatically shut down , and the LED temp indicator will stop blinking and turn RED and blink rapidly after...
... Resume" mode) 4 Once the system has finished cooling, the LED power indicator will turn solid red. English 11 Turning the projector off 1 To turn the projector off , and the fan(s) will continue to operate for about 2 minutes to ensure that the system cools properly. (only supported...This message appears: "Please press the power button again to unplug the power cord. Warning indicators: • "Projector Overheated. The lamp will automatically turn off, the projector will automatically shut down , and the LED temp indicator will stop blinking and turn RED and blink rapidly after...
User Manual
Page 22
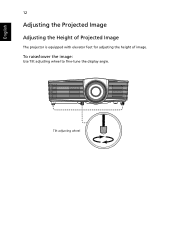
English 12 Adjusting the Projected Image Adjusting the Height of Projected Image The projector is equipped with elevator feet for adjusting the height of image. Tilt adjusting wheel To raise/lower the image: Use Tilt adjusting wheel to fine-tune the display angle.
English 12 Adjusting the Projected Image Adjusting the Height of Projected Image The projector is equipped with elevator feet for adjusting the height of image. Tilt adjusting wheel To raise/lower the image: Use Tilt adjusting wheel to fine-tune the display angle.
User Manual
Page 23
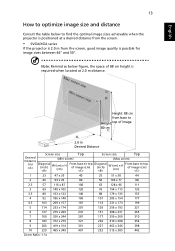
... table below figure, the space of 88 cm height is required when located at a desired distance from the screen. • SVGA/XGA series If the projector is 2.0 m from base to Height:top of image 80 cmC A 2.0 m Desired Distance Screen size Top Screen size Top Desired Distance (Min zoom) (Max zoom) (m) Diagonal...: 1.1x Note: Remind as below to top of image (cm) Diagonal (inch) W (cm) x H (cm) From base to find the optimal image sizes achievable when the projector is positioned at 2.0 m distance.
... table below figure, the space of 88 cm height is required when located at a desired distance from the screen. • SVGA/XGA series If the projector is 2.0 m from base to Height:top of image 80 cmC A 2.0 m Desired Distance Screen size Top Screen size Top Desired Distance (Min zoom) (Max zoom) (m) Diagonal...: 1.1x Note: Remind as below to top of image (cm) Diagonal (inch) W (cm) x H (cm) From base to find the optimal image sizes achievable when the projector is positioned at 2.0 m distance.
User Manual
Page 24
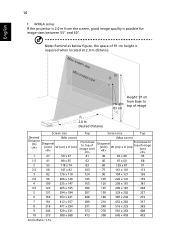
14 • WXGA series If the projector is 2.0 m from base to Height: top of image 83 cm C Screen size Top Screen size Top Desired (Min zoom) Distance (m) Diagonal (inch) W (cm) x H (cm) From ...
14 • WXGA series If the projector is 2.0 m from base to Height: top of image 83 cm C Screen size Top Screen size Top Desired (Min zoom) Distance (m) Diagonal (inch) W (cm) x H (cm) From ...
User Manual
Page 25
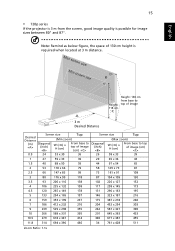
... 618 x 347 414 306 677 x 381 455 11.8 314 694 x 390 466 34 761 x 428 511 Zoom Ratio: 1.1x 15 • 720p series If the projector is 3 m from base to Height: top of image 118 cm C Screen size Top Desired Distance (Min zoom) (m) Diagonal (inch) W (cm) x H (cm) From base to top...
... 618 x 347 414 306 677 x 381 455 11.8 314 694 x 390 466 34 761 x 428 511 Zoom Ratio: 1.1x 15 • 720p series If the projector is 3 m from base to Height: top of image 118 cm C Screen size Top Desired Distance (Min zoom) (m) Diagonal (inch) W (cm) x H (cm) From base to top...


