
User Manual
Page 3
... components and to block out noisy surroundings. • Turn the volume down if you can hear it clearly and comfortably and without distortion. • After setting the volume level, do not increase it afteryour ears adjust. • Limit the amount of any kind onto or into this document for future reference...
... components and to block out noisy surroundings. • Turn the volume down if you can hear it clearly and comfortably and without distortion. • After setting the volume level, do not increase it afteryour ears adjust. • Limit the amount of any kind onto or into this document for future reference...

User Manual
Page 8
... a proper AC outlet. • For unit using at 120 V AC: Use a UL Listed Cord Set, Type SVT wire and plug rated 10 A/125 V. • For unit using at 220/240 V AC (outside of U.S.): ...Use a Cord Set consisting of H05VV-F cord and plug rated 10 A, 250 V. No user-adjustment is fragile. light or other...CORD • Check first to make sure that allows operation in which the equipment will be installed. The cord set should have the appropriate safety approvals for your area. • This monitor has a universal power supply that ...
... a proper AC outlet. • For unit using at 120 V AC: Use a UL Listed Cord Set, Type SVT wire and plug rated 10 A/125 V. • For unit using at 220/240 V AC (outside of U.S.): ...Use a Cord Set consisting of H05VV-F cord and plug rated 10 A, 250 V. No user-adjustment is fragile. light or other...CORD • Check first to make sure that allows operation in which the equipment will be installed. The cord set should have the appropriate safety approvals for your area. • This monitor has a universal power supply that ...
User Manual
Page 14
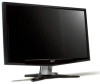
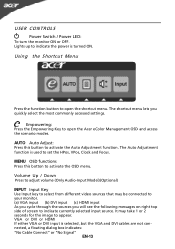
... either VGA or DVI input is turned ON. The shortcut menu lets you will see the following messages on right top side of screen to set the HPos, VPos, Clock and Focus. MENU OSD functions Press this button to appear. USER CONTROLS Power Switch / Power LED: To turn the monitor... Signal" EN-13 Using the Shortcut Menu Press the function button to open the shortcut menu. Empowering: Press the Empowering Key to open the Acer eColor Management OSD and access the scenario modes. The Auto Adjustment function is used to indicate currently selected input source. It may be connected to...
... either VGA or DVI input is turned ON. The shortcut menu lets you will see the following messages on right top side of screen to set the HPos, VPos, Clock and Focus. MENU OSD functions Press this button to appear. USER CONTROLS Power Switch / Power LED: To turn the monitor... Signal" EN-13 Using the Shortcut Menu Press the function button to open the shortcut menu. Empowering: Press the Empowering Key to open the Acer eColor Management OSD and access the scenario modes. The Auto Adjustment function is used to indicate currently selected input source. It may be connected to...
User Manual
Page 15
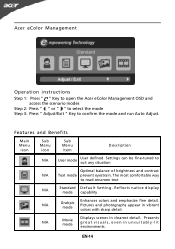
... Description N/A User mode User defined. The most comfortable way to confirm the mode and run Auto Adjust. EN-14 Acer eColor Management Operation instructions Step 1: Press " " Key to open the Acer eColor Management OSD and access the scenario modes Step 2: Press " " or " " to select the mode Step... 3: Press " Adjust/Exit " Key to read onscreen text N/A Standard D efau lt Settin g . Settings can be fine-tuned to suit any situation ...
... Description N/A User mode User defined. The most comfortable way to confirm the mode and run Auto Adjust. EN-14 Acer eColor Management Operation instructions Step 1: Press " " Key to open the Acer eColor Management OSD and access the scenario modes Step 2: Press " " or " " to select the mode Step... 3: Press " Adjust/Exit " Key to read onscreen text N/A Standard D efau lt Settin g . Settings can be fine-tuned to suit any situation ...

User Manual
Page 16
...to adjust the current Brightness, Contrast, Colour Temp, Auto Config and other image-related qualities. For advanced settings, please refer to following content is for adjusting the settings of your LCD Monitor. EN-15 The OSD can be used for general reference only. Use the to ...adjust the sliding scales. 4 The Picture menu can use the OSD to adjust the picture quality, OSD Timeout and general settings. Actual product specifications may vary. Adjusting the OSD settings Note: The following page: Adjusting the picture quality 1 Press the MENU key to bring up the OSD. 2 Using...
...to adjust the current Brightness, Contrast, Colour Temp, Auto Config and other image-related qualities. For advanced settings, please refer to following content is for adjusting the settings of your LCD Monitor. EN-15 The OSD can be used for general reference only. Use the to ...adjust the sliding scales. 4 The Picture menu can use the OSD to adjust the picture quality, OSD Timeout and general settings. Actual product specifications may vary. Adjusting the OSD settings Note: The following page: Adjusting the picture quality 1 Press the MENU key to bring up the OSD. 2 Using...
User Manual
Page 18
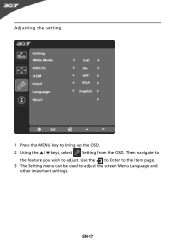
Use the to Enter to the item page. 3 The Setting menu can be used to adjust. EN-17 Then navigate to the feature you wish to adjust the screen Menu Language and other important settings. Adjusting the setting 1 Press the MENU key to bring up the OSD. 2 Using the / keys, select Setting from the OSD.
Use the to Enter to the item page. 3 The Setting menu can be used to adjust. EN-17 Then navigate to the feature you wish to adjust the screen Menu Language and other important settings. Adjusting the setting 1 Press the MENU key to bring up the OSD. 2 Using the / keys, select Setting from the OSD.
User Manual
Page 20
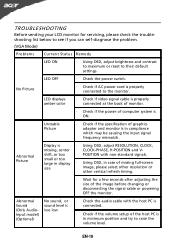
...-diagnose the problem. (VGA Mode) Problems Current Status Remedy LED ON · Using OSD, adjust brightness and contrast to maximum or reset to their default settings. small or too large in display · Using OSD, in minimum position and try to the monitor. Unstable Picture · Check if the specification of...
...-diagnose the problem. (VGA Mode) Problems Current Status Remedy LED ON · Using OSD, adjust brightness and contrast to maximum or reset to their default settings. small or too large in display · Using OSD, in minimum position and try to the monitor. Unstable Picture · Check if the specification of...
User Manual
Page 21
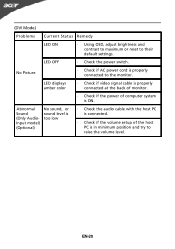
... signal cable is properly connected at the back of monitor. · Check if the power of the host PC is properly connected to their default settings. (DVI Mode) Problems Current Status Remedy LED ON · Using OSD, adjust brightness and contrast to maximum or reset to the monitor. EN-20...
... signal cable is properly connected at the back of monitor. · Check if the power of the host PC is properly connected to their default settings. (DVI Mode) Problems Current Status Remedy LED ON · Using OSD, adjust brightness and contrast to maximum or reset to the monitor. EN-20...


