

Quick Start Guide
Page 1
... rated to operate with this test. Connecting Your Monitor to the trouble- Make sure both the monitor and computer are any unusual sounds or smells coming from it carefully. If the monitor still does not function properly, please refer to a Computer 1. 1-1 Connect Video Cable a. shooting section to the computer. 1-2 DCoignintaelcCt aDbigleit(aOl nClaybDleu(aOl-nInlypDutuMal-oindpeul)t model) a. Try another power cable on the monitor. Turn off . LCD Monitor Quick Setup Guide...
... rated to operate with this test. Connecting Your Monitor to the trouble- Make sure both the monitor and computer are any unusual sounds or smells coming from it carefully. If the monitor still does not function properly, please refer to a Computer 1. 1-1 Connect Video Cable a. shooting section to the computer. 1-2 DCoignintaelcCt aDbigleit(aOl nClaybDleu(aOl-nInlypDutuMal-oindpeul)t model) a. Try another power cable on the monitor. Turn off . LCD Monitor Quick Setup Guide...
Quick Start Guide
Page 2
...user author- Notice: Shielded cables All connections to other computing devices must not be disposed of Conformity Hereby, Acer... Canada. FOR LAMP SPECIFIC DISPOSAL INFORMATION CHECK WWW.LAMPRECYCLE.ORG. English Regulations and safety notices...frequency energy and, if not installed and used in accordance with non-certified peripherals is in a residential installation. CE declaration of with the Class B limits may cause harmful interference to dispose of waste electrical and electronic equipment. LCD Monitor Quick Setup Guide Notice: Peripheral devices Only peripherals (input...
...user author- Notice: Shielded cables All connections to other computing devices must not be disposed of Conformity Hereby, Acer... Canada. FOR LAMP SPECIFIC DISPOSAL INFORMATION CHECK WWW.LAMPRECYCLE.ORG. English Regulations and safety notices...frequency energy and, if not installed and used in accordance with non-certified peripherals is in a residential installation. CE declaration of with the Class B limits may cause harmful interference to dispose of waste electrical and electronic equipment. LCD Monitor Quick Setup Guide Notice: Peripheral devices Only peripherals (input...

User Manual
Page 1
TABLE OF CONTENTS Special notes on LCD monitors 1 Information for your safety and comfort 2 Unpacking 5 Attaching/Removing the base 6 Screen position adjustment 6 Connecting the power cord 7 Safety precaution 7 Cleaning your monitor 7 Power saving 8 DDC 8 Connector Pin Assignment 9 Standard Timing Table 11 Installation 12 User controls 13 Troubleshooting 19
TABLE OF CONTENTS Special notes on LCD monitors 1 Information for your safety and comfort 2 Unpacking 5 Attaching/Removing the base 6 Screen position adjustment 6 Connecting the power cord 7 Safety precaution 7 Cleaning your monitor 7 Power saving 8 DDC 8 Connector Pin Assignment 9 Standard Timing Table 11 Installation 12 User controls 13 Troubleshooting 19

User Manual
Page 2
... brightness on the screen depending on again to the nature of 99.99% or more. In this case, the screen is displayed for hours. EN-1 SPECIAL NOTES ON LCD MONITORS The following symptoms are normal with LCD monitor and do not indicate a problem. Turn off the Power Switch for hours. It may include blemishes of 0.01% or less such as a missing pixel or a pixel...
... brightness on the screen depending on again to the nature of 99.99% or more. In this case, the screen is displayed for hours. EN-1 SPECIAL NOTES ON LCD MONITORS The following symptoms are normal with LCD monitor and do not indicate a problem. Turn off the Power Switch for hours. It may include blemishes of 0.01% or less such as a missing pixel or a pixel...

User Manual
Page 3
... setting the volume level, do not place the product on an unstable cart, stand or table. Safe listening Follow these instructions, suggested by placing the product on the product. The openings should never be sure to the equipment operator as they may touch dangerous voltage points or short-out parts that the power outlet you need to disconnect power to...
... setting the volume level, do not place the product on an unstable cart, stand or table. Safe listening Follow these instructions, suggested by placing the product on the product. The openings should never be sure to the equipment operator as they may touch dangerous voltage points or short-out parts that the power outlet you need to disconnect power to...

User Manual
Page 4
... often require extensive work habits, stress, inadequate working in one fixed posture • avoid slouching forward and/or leaning backward • stand up and walk around regularly to remove the strain on the recorded image and does not constitute a malfunction. Tips and information for more comfortable computer use . The following the operating instructions Note: Adjust only those controls that are...
... often require extensive work habits, stress, inadequate working in one fixed posture • avoid slouching forward and/or leaning backward • stand up and walk around regularly to remove the strain on the recorded image and does not constitute a malfunction. Tips and information for more comfortable computer use . The following the operating instructions Note: Adjust only those controls that are...
User Manual
Page 5
.... Developing good work habits Develop the following work for extended periods of time. We do some stretching exercises. For more information and help in such a way that the side faces the window or any light source • minimizing room light by using drapes, shades or blinds • using a task light • changing the display's viewing angle • using a glare-reduction filter • using the product...
.... Developing good work habits Develop the following work for extended periods of time. We do some stretching exercises. For more information and help in such a way that the side faces the window or any light source • minimizing room light by using drapes, shades or blinds • using a task light • changing the display's viewing angle • using a glare-reduction filter • using the product...
User Manual
Page 6
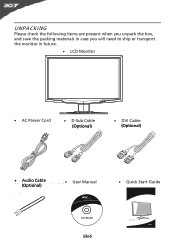
UNPACKING Please check the following items are present when you unpack the box, and save the packing materials in case you will need to ship or transport the monitor in future. · LCD Monitor · AC Power Cord · D-Sub Cable (Optional) · DVI Cable (Onl(yODputiaoln-Ianlp) ut Model) · Audio Cable (Onl(yOAputidoinoa-Iln) put Model) · (Optional) User Manual · Quick Start Guide Acer Monitor EN-5
UNPACKING Please check the following items are present when you unpack the box, and save the packing materials in case you will need to ship or transport the monitor in future. · LCD Monitor · AC Power Cord · D-Sub Cable (Optional) · DVI Cable (Onl(yODputiaoln-Ianlp) ut Model) · Audio Cable (Onl(yOAputidoinoa-Iln) put Model) · (Optional) User Manual · Quick Start Guide Acer Monitor EN-5
User Manual
Page 7
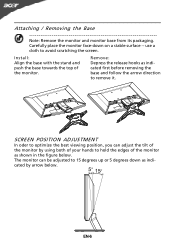
... . EN-6 Install: Align the base with the stand and push the base towards the top of the monitor as indicated first before removing the base and follow the arrow direction to 15 degrees up or 5 degrees down on a stable surface -- Attaching / Removing the Base Note: Remove the monitor and monitor base from its packaging. SCREEN POSITION ADJUSTMENT In oder to optimize the best viewing position, you can be adjusted to remove it...
... . EN-6 Install: Align the base with the stand and push the base towards the top of the monitor as indicated first before removing the base and follow the arrow direction to 15 degrees up or 5 degrees down on a stable surface -- Attaching / Removing the Base Note: Remove the monitor and monitor base from its packaging. SCREEN POSITION ADJUSTMENT In oder to optimize the best viewing position, you can be adjusted to remove it...

User Manual
Page 8
... the screen, as screen is adequate ventilation. · Avoid placing the monitor against a bright background or where sun- The cord set should have the appropriate safety approvals for your area. · This monitor has a universal power supply that allows operation in either 100/120V AC or 220/240 V AC voltage area. CONNECTING THE POWER CORD · Check first to make sure that the power cord you use...
... the screen, as screen is adequate ventilation. · Avoid placing the monitor against a bright background or where sun- The cord set should have the appropriate safety approvals for your area. · This monitor has a universal power supply that allows operation in either 100/120V AC or 220/240 V AC voltage area. CONNECTING THE POWER CORD · Check first to make sure that the power cord you use...
User Manual
Page 9
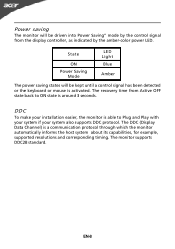
.... EN-8 The monitor supports DDC2B standard. The recovery time from the display controller, as indicated by the control signal from Active OFF state back to Plug and Play with your system if your system also supports DDC protocol. Power saving The monitor will be driven into Power Saving" mode by the amber-color power LED. State ON Power Saving Mode LED Light Blue Amber The power saving states will be kept until a control signal has been detected...
.... EN-8 The monitor supports DDC2B standard. The recovery time from the display controller, as indicated by the control signal from Active OFF state back to Plug and Play with your system if your system also supports DDC protocol. Power saving The monitor will be driven into Power Saving" mode by the amber-color power LED. State ON Power Saving Mode LED Light Blue Amber The power saving states will be kept until a control signal has been detected...
User Manual
Page 10
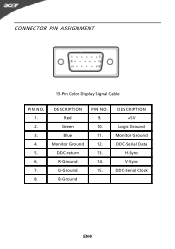
CONNECTOR PIN ASSIGNMENT 15-Pin Color Display Signal Cable PIN NO. 1. 2. 3. 4. 5. 6. 7. 8. DESCRIPTION +5V Logic Ground Monitor Ground DDC-Serial Data H-Sync V-Sync DDC-Serial Clock EN-9 DESCRIPTION Red Green Blue Monitor Ground DDC-return R-Ground G-Ground B-Ground PIN NO. 9. 10. 11. 12. 13. 14. 15.
CONNECTOR PIN ASSIGNMENT 15-Pin Color Display Signal Cable PIN NO. 1. 2. 3. 4. 5. 6. 7. 8. DESCRIPTION +5V Logic Ground Monitor Ground DDC-Serial Data H-Sync V-Sync DDC-Serial Clock EN-9 DESCRIPTION Red Green Blue Monitor Ground DDC-return R-Ground G-Ground B-Ground PIN NO. 9. 10. 11. 12. 13. 14. 15.
User Manual
Page 13
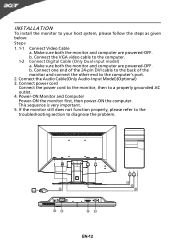
...) t model) a. EN-12 Connect the VGA video cable to diagnose the problem. Connect the Audio Cable(Only Audio-Input Model)(Optional) 3. Make sure both the monitor and computer are powered-OFF. Power-ON Monitor and Computer Power-ON the monitor first, then power-ON the computer. Make sure both the monitor and computer are powered-OFF. Connect power cord Connect the power cord to the monitor, then to your host system, please follow the steps as given below: Steps 1. 1-1 Connect Video Cable a. b. INSTALLATION To install...
...) t model) a. EN-12 Connect the VGA video cable to diagnose the problem. Connect the Audio Cable(Only Audio-Input Model)(Optional) 3. Make sure both the monitor and computer are powered-OFF. Power-ON Monitor and Computer Power-ON the monitor first, then power-ON the computer. Make sure both the monitor and computer are powered-OFF. Connect power cord Connect the power cord to the monitor, then to your host system, please follow the steps as given below: Steps 1. 1-1 Connect Video Cable a. b. INSTALLATION To install...
User Manual
Page 14
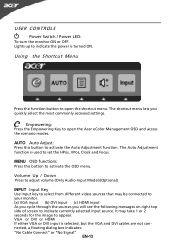
... Menu Press the function button to your monitor. (a) VGA input (b) DVI input (c) HDMI input As you cycle through the sources you quickly select the most commonly accessed settings. VGA or DVI or HDMI If either VGA or DVI input is selected ,but the VGA and DVI cables are not connected, a floating dialog box indicates: "No Cable Connect" or "No Signal" EN-13 It may be connected to open the Acer eColor Management OSD and access the scenario modes. USER CONTROLS Power Switch / Power LED: To turn the monitor...
... Menu Press the function button to your monitor. (a) VGA input (b) DVI input (c) HDMI input As you cycle through the sources you quickly select the most commonly accessed settings. VGA or DVI or HDMI If either VGA or DVI input is selected ,but the VGA and DVI cables are not connected, a floating dialog box indicates: "No Cable Connect" or "No Signal" EN-13 It may be connected to open the Acer eColor Management OSD and access the scenario modes. USER CONTROLS Power Switch / Power LED: To turn the monitor...
User Manual
Page 15
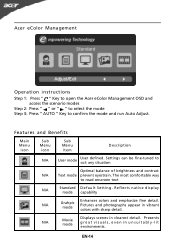
... colors and emphasize fine detail. N/A Movie mode Displays scenes in vibrant colors with sharp detail. Presents great visuals, even in unsuitably-lit environments. Acer eColor Management Operation instructions Step 1: Press " " Key to open the Acer eColor Management OSD and access the scenario modes Step 2: Press " " or " " to select the mode Step 3: Press " AUTO " Key to suit any situation Optimal balance of brightness and contrast N/A Text mode...
... colors and emphasize fine detail. N/A Movie mode Displays scenes in vibrant colors with sharp detail. Presents great visuals, even in unsuitably-lit environments. Acer eColor Management Operation instructions Step 1: Press " " Key to open the Acer eColor Management OSD and access the scenario modes Step 2: Press " " or " " to select the mode Step 3: Press " AUTO " Key to suit any situation Optimal balance of brightness and contrast N/A Text mode...
User Manual
Page 16
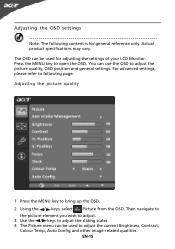
... be used to adjust the current Brightness, Contrast, Colour Temp, Auto Config and other image-related qualities. For advanced settings, please refer to following content is for adjusting the settings of your LCD Monitor. The OSD can be used for general reference only. Press the MENU key to adjust the picture quality, OSD position and general settings. Actual product specifications may vary. EN-15 Adjusting the OSD settings Note: The following page: Adjusting the picture...
... be used to adjust the current Brightness, Contrast, Colour Temp, Auto Config and other image-related qualities. For advanced settings, please refer to following content is for adjusting the settings of your LCD Monitor. The OSD can be used for general reference only. Press the MENU key to adjust the picture quality, OSD position and general settings. Actual product specifications may vary. EN-15 Adjusting the OSD settings Note: The following page: Adjusting the picture...
User Manual
Page 18
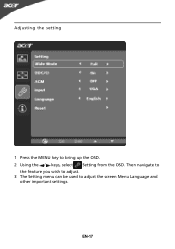
EN-17 Then navigate to the feature you wish to adjust. 3 The Setting menu can be used to bring up the OSD. 2 Using the / keys, select Setting from the OSD. Adjusting the setting 1 Press the MENU key to adjust the screen Menu Language and other important settings.
EN-17 Then navigate to the feature you wish to adjust. 3 The Setting menu can be used to bring up the OSD. 2 Using the / keys, select Setting from the OSD. Adjusting the setting 1 Press the MENU key to adjust the screen Menu Language and other important settings.

User Manual
Page 20
... the problem. (VGA Mode) Problems Current Status Remedy LED ON · Using OSD, adjust brightness and contrast to maximum or reset to their default settings. shift, or too POSITION with the host PC is connected. · Check if the volume setup of the host PC is in compliance which may be causing the input signal frequency mismatch. small or too large in display · Using OSD, in minimum position and try to the monitor. Unstable Picture · Check...
... the problem. (VGA Mode) Problems Current Status Remedy LED ON · Using OSD, adjust brightness and contrast to maximum or reset to their default settings. shift, or too POSITION with the host PC is connected. · Check if the volume setup of the host PC is in compliance which may be causing the input signal frequency mismatch. small or too large in display · Using OSD, in minimum position and try to the monitor. Unstable Picture · Check...

User Manual
Page 21
...) No sound, or sound level is too low · Check the audio cable with the host PC is connected. · Check if the volume setup of computer system is in minimum position and try to raise the volume level. LED OFF · Check the power switch. No Picture · Check if AC power cord is properly connected to their default settings. (DVI Mode) Problems Current Status Remedy LED ON · Using OSD, adjust brightness and contrast to maximum or reset to the monitor.
...) No sound, or sound level is too low · Check the audio cable with the host PC is connected. · Check if the volume setup of computer system is in minimum position and try to raise the volume level. LED OFF · Check the power switch. No Picture · Check if AC power cord is properly connected to their default settings. (DVI Mode) Problems Current Status Remedy LED ON · Using OSD, adjust brightness and contrast to maximum or reset to the monitor.
User Manual
Page 22
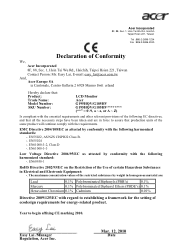
... with the requirements. Year to establishing a framework for the setting of ecodesign requirements for energy-related product. Mar. 12, 2010 Date EN61000-3-2, Class D -. EN55024 -. EN55022, AS/NZS CISPR22 Class B. -. Acer Incorporated 8F, 88, Sec. 1, Hsin Tai Wu Rd... 221, Taiwan Contact Person: Mr. Easy Lai, E-mail: easy_lai@acer.com.tw And, Acer Europe SA Via Cantonale, Centro Galleria 2 6928 Manno Switzerland Hereby declare that: Product: Trade Name: Model Number: SKU Number: LCD Monitor Acer G195HQV/G185HV G195HQV/G185HV 0~9, a ~ z, or A ~ Z) Is compliant with the ...
... with the requirements. Year to establishing a framework for the setting of ecodesign requirements for energy-related product. Mar. 12, 2010 Date EN61000-3-2, Class D -. EN55024 -. EN55022, AS/NZS CISPR22 Class B. -. Acer Incorporated 8F, 88, Sec. 1, Hsin Tai Wu Rd... 221, Taiwan Contact Person: Mr. Easy Lai, E-mail: easy_lai@acer.com.tw And, Acer Europe SA Via Cantonale, Centro Galleria 2 6928 Manno Switzerland Hereby declare that: Product: Trade Name: Model Number: SKU Number: LCD Monitor Acer G195HQV/G185HV G195HQV/G185HV 0~9, a ~ z, or A ~ Z) Is compliant with the ...


