

User Manual
Page 3
... may find slightly uneven brightness on the screen depending on the product. Keep this case, the screen is displayed for your monitor Please carefully follow these instructions carefully. Connecting/disconnecting the device Observe the following are turned off before cleaning. • Use a soft cloth to wipe the screen and cabinet front and sides. Follow all power cords from the power supplies. Turn off the power switch for future reference...
... may find slightly uneven brightness on the screen depending on the product. Keep this case, the screen is displayed for your monitor Please carefully follow these instructions carefully. Connecting/disconnecting the device Observe the following are turned off before cleaning. • Use a soft cloth to wipe the screen and cabinet front and sides. Follow all power cords from the power supplies. Turn off the power switch for future reference...
User Manual
Page 4
... close to the equipment operator as they may touch dangerous voltage points or short-out parts that could be blocked by placing the product on the power cord. These openings must not be placed near you plug the power cord into this product, make sure that the total Manufacturer/ Trademark Type/ Model Power Adapter DELTA APD ADP-65JH DB ADP-65VH D DA...
... close to the equipment operator as they may touch dangerous voltage points or short-out parts that could be blocked by placing the product on the power cord. These openings must not be placed near you plug the power cord into this product, make sure that the total Manufacturer/ Trademark Type/ Model Power Adapter DELTA APD ADP-65JH DB ADP-65VH D DA...
User Manual
Page 5
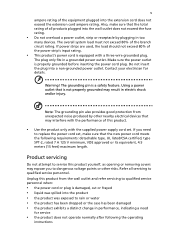
... service this product. • Use the product only with the supplied power supply cord set , make sure that is equipped with the performance of this product yourself, as opening or removing covers may result in performance, indicating a need to qualified service personnel. Using a power outlet that the total rating of all servicing to replace the power cord set . Make sure the power outlet is a safety feature. v ampere rating of the equipment plugged into a non-grounded power...
... service this product. • Use the product only with the supplied power supply cord set , make sure that is equipped with the performance of this product yourself, as opening or removing covers may result in performance, indicating a need to qualified service personnel. Using a power outlet that the total rating of all servicing to replace the power cord set . Make sure the power outlet is a safety feature. v ampere rating of the equipment plugged into a non-grounded power...

User Manual
Page 6
... require extensive work by the operating instructions, since improper adjustment of our other controls may contain small parts. For more information and help when recycling, please go to turn off the device near gas pumps at Acer are often, but not always, marked. acer-group .com for further information on the environment. vi Note: Adjust only those controls that are covered by...
... require extensive work by the operating instructions, since improper adjustment of our other controls may contain small parts. For more information and help when recycling, please go to turn off the device near gas pumps at Acer are often, but not always, marked. acer-group .com for further information on the environment. vi Note: Adjust only those controls that are covered by...
User Manual
Page 8
... zone by pushing the power button. Long work periods, bad posture, poor work habits, stress, inadequate working in front of a computer. The following tips: • refrain from Sleep mode by adjusting the viewing angle of the monitor, using a footrest, or raising your sitting height to achieve maximum comfort. Observe the following section provides tips for more comfortable computer use Computer users may complain of...
... zone by pushing the power button. Long work periods, bad posture, poor work habits, stress, inadequate working in front of a computer. The following tips: • refrain from Sleep mode by adjusting the viewing angle of the monitor, using a footrest, or raising your sitting height to achieve maximum comfort. Observe the following section provides tips for more comfortable computer use Computer users may complain of...
User Manual
Page 9
... the side faces the window or any light source • minimizing room light by looking at bright light sources, such as open windows, for extended periods of time. ix Taking care of cardboard extended from the display's top front edge • Avoid adjusting your display to an awkward viewing angle. • Avoid looking away from drying out. The following work habits Develop the following...
... the side faces the window or any light source • minimizing room light by looking at bright light sources, such as open windows, for extended periods of time. ix Taking care of cardboard extended from the display's top front edge • Avoid adjusting your display to an awkward viewing angle. • Avoid looking away from drying out. The following work habits Develop the following...
User Manual
Page 12
... Disposal instructions vii LCD pixel statement vii Tips and information for comfortable use viii Federal Communications Commission Declaration of Conformity xi Unpacking 1 Screen position adjustment 2 Connecting the power cord 3 Power saving 3 Display Data Channel (DDC) 3 Connector pin assignment 4 Standard timing table 6 Installation 7 MHL (Mobile High-Definition Link) 8 User controls 9 How to adjust a setting 10 eColor Management 10 Adjusting the OSD 11 Troubleshooting 15 VGA mode 15 HDMI mode 16 Getting started with Windows 8 on your 17 new touch...
... Disposal instructions vii LCD pixel statement vii Tips and information for comfortable use viii Federal Communications Commission Declaration of Conformity xi Unpacking 1 Screen position adjustment 2 Connecting the power cord 3 Power saving 3 Display Data Channel (DDC) 3 Connector pin assignment 4 Standard timing table 6 Installation 7 MHL (Mobile High-Definition Link) 8 User controls 9 How to adjust a setting 10 eColor Management 10 Adjusting the OSD 11 Troubleshooting 15 VGA mode 15 HDMI mode 16 Getting started with Windows 8 on your 17 new touch...
User Manual
Page 15
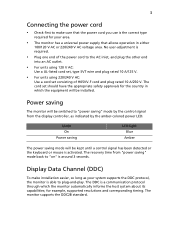
... (DDC) To make sure that the power cord you use is the correct type required for your system supports the DDC protocol, the monitor is able to plug-and-play. The DDC is activated. Power saving The monitor will be switched to "power saving" mode by the amber-colored power LED. The cord set consisting of H05VV-F cord and plug rated 10 A/250 V. Mode On Power saving LED light Blue Amber The power saving mode will be kept until a control signal has been...
... (DDC) To make sure that the power cord you use is the correct type required for your system supports the DDC protocol, the monitor is able to plug-and-play. The DDC is activated. Power saving The monitor will be switched to "power saving" mode by the amber-colored power LED. The cord set consisting of H05VV-F cord and plug rated 10 A/250 V. Mode On Power saving LED light Blue Amber The power saving mode will be kept until a control signal has been...
User Manual
Page 16
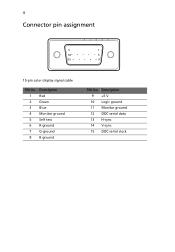
Description 9 +5 V 10 Logic ground 11 Monitor ground 12 DDC-serial data 13 H-sync 14 V-sync 15 DDC-serial clock Description 1 Red 2 Green 3 Blue 4 Monitor ground 5 Self test 6 R-ground 7 G-ground 8 B-ground PIN No. 4 Connector pin assignment 5 1 10 6 15 11 15-pin color display signal cable PIN No.
Description 9 +5 V 10 Logic ground 11 Monitor ground 12 DDC-serial data 13 H-sync 14 V-sync 15 DDC-serial clock Description 1 Red 2 Green 3 Blue 4 Monitor ground 5 Self test 6 R-ground 7 G-ground 8 B-ground PIN No. 4 Connector pin assignment 5 1 10 6 15 11 15-pin color display signal cable PIN No.
User Manual
Page 17
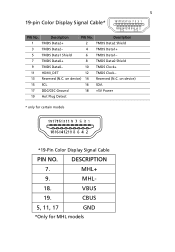
...) 15 SCL 16 SDA 17 DDC/CEC Ground 18 +5V Power 19 Hot Plug Detect * only for MHL models on device) 14 Reserved (N.C. VBUS 19. Description PIN No. 5 19-pin Color Display Signal Cable* 1917151311 9 7 5 3 1 1816141210 8 6 4 2 PIN No. CBUS 5, 11, 17 GND *Only for certain models *19-Pin Color Display Signal Cable PIN NO. Description 1 TMDS Data2+ 2 TMDS Data2 Shield 3 TMDS Data2...
...) 15 SCL 16 SDA 17 DDC/CEC Ground 18 +5V Power 19 Hot Plug Detect * only for MHL models on device) 14 Reserved (N.C. VBUS 19. Description PIN No. 5 19-pin Color Display Signal Cable* 1917151311 9 7 5 3 1 1816141210 8 6 4 2 PIN No. CBUS 5, 11, 17 GND *Only for certain models *19-Pin Color Display Signal Cable PIN NO. Description 1 TMDS Data2+ 2 TMDS Data2 Shield 3 TMDS Data2...
User Manual
Page 19
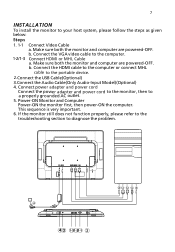
Connect power adapter and power cord Connect the power adapter and power cord to the monitor, then to the computer. 1-2/1-3 Connect HDMI or MHL Cable a. This sequence is very important. 6. Connect the VGA video cable to a properly grounded AC outlet. 5. If the monitor still does not function properly, please refer to the troubleshooting section to the portable device. 2.Connect the USB Cable(Optional) 3.Connect the Audio Cable(Only Audio-Input Model)(Optional) 4. HDMI HDMI VGA USB 4 4 3 1-31-21-1 2 2 1-1 1-2 1-3 3 VGA USB HDMI HDMI Make sure both the monitor and computer are...
Connect power adapter and power cord Connect the power adapter and power cord to the monitor, then to the computer. 1-2/1-3 Connect HDMI or MHL Cable a. This sequence is very important. 6. Connect the VGA video cable to a properly grounded AC outlet. 5. If the monitor still does not function properly, please refer to the troubleshooting section to the portable device. 2.Connect the USB Cable(Optional) 3.Connect the Audio Cable(Only Audio-Input Model)(Optional) 4. HDMI HDMI VGA USB 4 4 3 1-31-21-1 2 2 1-1 1-2 1-3 3 VGA USB HDMI HDMI Make sure both the monitor and computer are...
User Manual
Page 20
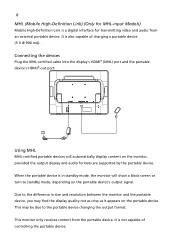
... device (5 V @ 900 mA). This monitor only receives content from an external portable device. MHL MHL Using MHL MHL-certified portable devices will show a black screen or turn to the portable device changing the output format. 8 MHL (Mobile High-Definition Link) (Only for MHL-input Models) Mobile High-Definition Link is a digital interface for transmitting video and audio from the portable device.
... device (5 V @ 900 mA). This monitor only receives content from an external portable device. MHL MHL Using MHL MHL-certified portable devices will show a black screen or turn to the portable device changing the output format. 8 MHL (Mobile High-Definition Link) (Only for MHL-input Models) Mobile High-Definition Link is a digital interface for transmitting video and audio from the portable device.
User Manual
Page 21
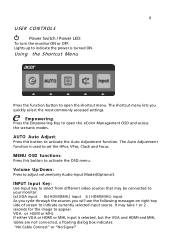
... menu. 9 USER CONTROLS Power Switch / Power LED: To turn the monitor ON or OFF. AUTO Auto Adjust: Press this botton to indicate currently selected input source. INPUT Input Key: Use Input key to select from different video sources that may take 1 or 2 seconds for the image to your monitor. (a) VGA input (b) HDMI(MHL) input (c ) HDMI(MHL) input As you cycle through the sources you quickly select the most commonly accessed settings. It may be connected to appear. Lights up to open the eColor Management OSD...
... menu. 9 USER CONTROLS Power Switch / Power LED: To turn the monitor ON or OFF. AUTO Auto Adjust: Press this botton to indicate currently selected input source. INPUT Input Key: Use Input key to select from different video sources that may take 1 or 2 seconds for the image to your monitor. (a) VGA input (b) HDMI(MHL) input (c ) HDMI(MHL) input As you cycle through the sources you quickly select the most commonly accessed settings. It may be connected to appear. Lights up to open the eColor Management OSD...
User Manual
Page 22
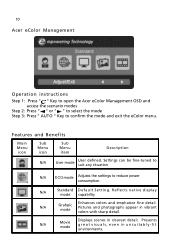
... mode Adjusts the settings to confirm the mode and exit the eColor menu. R eflects n a tive d isp lay mode capability N/A Grahpic mode Enhances colors and emphasize fine detail. N/A Movie mode Displays scenes in clearest detail. 10 Acer eColor Management Operation instructions Step 1: Press " " Key to open the Acer eColor Management OSD and access the scenario modes Step 2: Press " " or " " to select the mode Step 3: Press " AUTO " Key to reduce power...
... mode Adjusts the settings to confirm the mode and exit the eColor menu. R eflects n a tive d isp lay mode capability N/A Grahpic mode Enhances colors and emphasize fine detail. N/A Movie mode Displays scenes in clearest detail. 10 Acer eColor Management Operation instructions Step 1: Press " " Key to open the Acer eColor Management OSD and access the scenario modes Step 2: Press " " or " " to select the mode Step 3: Press " AUTO " Key to reduce power...
User Manual
Page 23
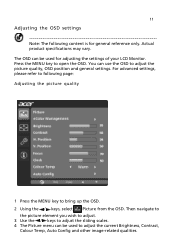
... adjust. 3 Use the / keys to adjust the sliding scales. 4 The Picture menu can use the OSD to adjust the picture quality, OSD position and general settings. For advanced settings, please refer to following content is for adjusting the settings of your LCD Monitor. You can be used to adjust the current Brightness, Contrast, Colour Temp, Auto Config and other image-related qualities. Actual product specifications may vary. 11 Adjusting the OSD settings Note: The following page: Adjusting the picture...
... adjust. 3 Use the / keys to adjust the sliding scales. 4 The Picture menu can use the OSD to adjust the picture quality, OSD position and general settings. For advanced settings, please refer to following content is for adjusting the settings of your LCD Monitor. You can be used to adjust the current Brightness, Contrast, Colour Temp, Auto Config and other image-related qualities. Actual product specifications may vary. 11 Adjusting the OSD settings Note: The following page: Adjusting the picture...

User Manual
Page 25
Then navigate to the feature you wish to adjust. 3 The Setting menu can be used to bring up the OSD. 2 Using the / keys, select Setting from the OSD. 13 Adjusting the setting 1 Press the MENU key to adjust the screen Menu Language and other important settings.
Then navigate to the feature you wish to adjust. 3 The Setting menu can be used to bring up the OSD. 2 Using the / keys, select Setting from the OSD. 13 Adjusting the setting 1 Press the MENU key to adjust the screen Menu Language and other important settings.
User Manual
Page 27
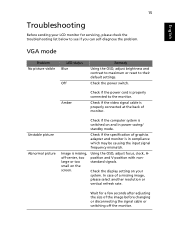
...LCD monitor for a few seconds after adjusting the size of graphics adapter and monitor is switched on the screen. Using the OSD, adjust focus, clock, Hposition and V-position with nonstandard signals. Amber Check if the power cord is properly connected at the back of a missing image, please select another resolution or vertical refresh rate. Check if the video signal cable is properly connected to their default settings. VGA mode Problem No picture visible LED status Blue Off Remedy Using the OSD, adjust brightness and contrast to maximum or reset to the monitor. Check...
...LCD monitor for a few seconds after adjusting the size of graphics adapter and monitor is switched on the screen. Using the OSD, adjust focus, clock, Hposition and V-position with nonstandard signals. Amber Check if the power cord is properly connected at the back of a missing image, please select another resolution or vertical refresh rate. Check if the video signal cable is properly connected to their default settings. VGA mode Problem No picture visible LED status Blue Off Remedy Using the OSD, adjust brightness and contrast to maximum or reset to the monitor. Check...
User Manual
Page 28
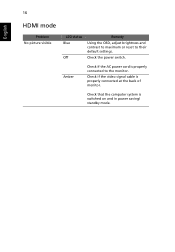
Check if the video signal cable is switched on and in power saving/ standby mode. Check that the computer system is properly connected at the back of monitor. Check the power switch. Amber Check if the AC power cord is properly connected to their default settings. 16 English HDMI mode Problem No picture visible LED status Blue Off Remedy Using the OSD, adjust brightness and contrast to maximum or reset to the monitor.
Check if the video signal cable is switched on and in power saving/ standby mode. Check that the computer system is properly connected at the back of monitor. Check the power switch. Amber Check if the AC power cord is properly connected to their default settings. 16 English HDMI mode Problem No picture visible LED status Blue Off Remedy Using the OSD, adjust brightness and contrast to maximum or reset to the monitor.

User Manual
Page 29
... the touchscreen & USB function to work, you need to connect the USB cable to Start? 17 Getting started with Windows 8 on your new touchenabled Monitor We know this is a new operating system that will take some getting used to, so we've created a few pointers to help you get to the NB or PC, as well as connecting through a VGA or HDMI cable. Tiles Live tiles...
... the touchscreen & USB function to work, you need to connect the USB cable to Start? 17 Getting started with Windows 8 on your new touchenabled Monitor We know this is a new operating system that will take some getting used to, so we've created a few pointers to help you get to the NB or PC, as well as connecting through a VGA or HDMI cable. Tiles Live tiles...

User Manual
Page 30
... will be displayed on Start using live tiles?" "Metro" is this thing called "Metro?" How do I turn off my computer? For more information please refer to work well with new content whenever you can view weather or stock updates without needing to take . Windows 8 tutorials: www.acer.com/windows8-tutorial - Alternatively you 're connected to take . Support FAQs: www.acer.com/support.acer.com What...
... will be displayed on Start using live tiles?" "Metro" is this thing called "Metro?" How do I turn off my computer? For more information please refer to work well with new content whenever you can view weather or stock updates without needing to take . Windows 8 tutorials: www.acer.com/windows8-tutorial - Alternatively you 're connected to take . Support FAQs: www.acer.com/support.acer.com What...

