
User Manual
Page 2
... Record the model number, serial number, purchase date and place of Acer Incorporated. Acer LCD Monitor User's Guide Model number Serial number Date of purchase Place of purchase Acer and the Acer logo are registered trademarks of purchase information in new editions of merchantability or... fitness for identification purposes only and belong to their respective companies. Acer Incorporated. No part of this publication without the prior written permission of such revisions or changes. Acer LCD Monitor User's Guide Original Issue: 01/2015 Changes may be reproduced, stored ...
... Record the model number, serial number, purchase date and place of Acer Incorporated. Acer LCD Monitor User's Guide Model number Serial number Date of purchase Place of purchase Acer and the Acer logo are registered trademarks of purchase information in new editions of merchantability or... fitness for identification purposes only and belong to their respective companies. Acer Incorporated. No part of this publication without the prior written permission of such revisions or changes. Acer LCD Monitor User's Guide Original Issue: 01/2015 Changes may be reproduced, stored ...
User Manual
Page 3
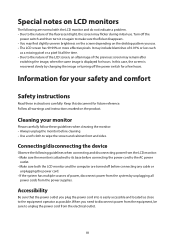
...attached to its base before connecting the power cord to the AC power outlet. • Make sure both the LCD monitor and the computer are normal with the LCD monitor and do not indicate a problem. • Due to the nature of the fluorescent light, the screen may flicker during... pixels. Turn off the power switch for hours. Cleaning your safety and comfort Safety instructions Read these guidelines when cleaning the monitor: • Always unplug the monitor before connecting any cable or unplugging the power cord. • If the system has multiple sources of power, disconnect power ...
...attached to its base before connecting the power cord to the AC power outlet. • Make sure both the LCD monitor and the computer are normal with the LCD monitor and do not indicate a problem. • Due to the nature of the fluorescent light, the screen may flicker during... pixels. Turn off the power switch for hours. Cleaning your safety and comfort Safety instructions Read these guidelines when cleaning the monitor: • Always unplug the monitor before connecting any cable or unplugging the power cord. • If the system has multiple sources of power, disconnect power ...
User Manual
Page 7
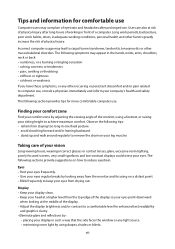
...front of physical injury. Users are also at the middle of the display so your eyes point downward when looking away from the monitor and focusing on your leg muscles Taking care of your vision Long viewing hours, wearing incorrect glasses or contact lenses, glare, excessive... of working conditions, personal health and other musculoskeletal disorders. Finding your comfort zone Find your comfort zone by looking at risk of the monitor, using drapes, shades or blinds vii Tips and information for more comfortable computer use. Long work periods, bad posture, poor work habits...
...front of physical injury. Users are also at the middle of the display so your eyes point downward when looking away from the monitor and focusing on your leg muscles Taking care of your vision Long viewing hours, wearing incorrect glasses or contact lenses, glare, excessive... of working conditions, personal health and other musculoskeletal disorders. Finding your comfort zone Find your comfort zone by looking at risk of the monitor, using drapes, shades or blinds vii Tips and information for more comfortable computer use. Long work periods, bad posture, poor work habits...
User Manual
Page 9
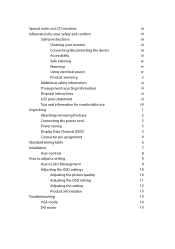
... Information for your safety and comfort iii Safety instructions iii Cleaning your monitor iii Connecting/disconnecting the device iii Accessibility iii Safe listening iv Warnings iv Using electrical power iv Product ...3 Power saving 3 Display Data Channel (DDC) 3 Connector pin assignment 4 Standard timing table 6 Installation 7 User controls 8 How to adjust a setting 9 Acer eColor Management 9 Adjusting the OSD settings 10 Adjusting the picture quality 10 Adjusting the OSD setting 11 Adjusting the setting 12 Product information 13 Troubleshooting...
... Information for your safety and comfort iii Safety instructions iii Cleaning your monitor iii Connecting/disconnecting the device iii Accessibility iii Safe listening iv Warnings iv Using electrical power iv Product ...3 Power saving 3 Display Data Channel (DDC) 3 Connector pin assignment 4 Standard timing table 6 Installation 7 User controls 8 How to adjust a setting 9 Acer eColor Management 9 Adjusting the OSD settings 10 Adjusting the picture quality 10 Adjusting the OSD setting 11 Adjusting the setting 12 Product information 13 Troubleshooting...
User Manual
Page 10
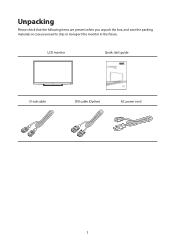
Unpacking Please check that the following items are present when you unpack the box, and save the packing materials in case you need to ship or transport the monitor in the future. LCD monitor Quick start guide D-sub cable DVI cable (Option) AC power cord 1
Unpacking Please check that the following items are present when you unpack the box, and save the packing materials in case you need to ship or transport the monitor in the future. LCD monitor Quick start guide D-sub cable DVI cable (Option) AC power cord 1

User Manual
Page 12
... V AC or 220/240 V AC voltage area. Model On Power saving LED light Blue Orange The power saving mode will be installed. Power saving The monitor will be kept until a control signal has been detected or the keyboard or mouse is the correct type required for example, supported resolutions and corresponding... required. • Plug one end of H05VV-F cord and plug rated 10 A/250 V. The recovery time from the display controller, as your area. • The monitor has a universal power supply that the power cord you use is activated. for your system supports the DDC protocol, the...
... V AC or 220/240 V AC voltage area. Model On Power saving LED light Blue Orange The power saving mode will be installed. Power saving The monitor will be kept until a control signal has been detected or the keyboard or mouse is the correct type required for example, supported resolutions and corresponding... required. • Plug one end of H05VV-F cord and plug rated 10 A/250 V. The recovery time from the display controller, as your area. • The monitor has a universal power supply that the power cord you use is activated. for your system supports the DDC protocol, the...
User Manual
Page 13
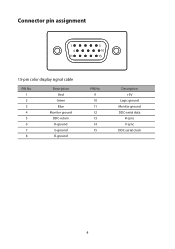
Connector pin assignment 15-pin color display signal cable PIN No. 1 2 3 4 5 6 7 8 Description Red Green Blue Monitor ground DDC-return R-ground G-ground B-ground PIN No. 9 10 11 12 13 14 15 Description +5V Logic ground Monitor ground DDC-serial data H-sync V-sync DDC-serial clock 4
Connector pin assignment 15-pin color display signal cable PIN No. 1 2 3 4 5 6 7 8 Description Red Green Blue Monitor ground DDC-return R-ground G-ground B-ground PIN No. 9 10 11 12 13 14 15 Description +5V Logic ground Monitor ground DDC-serial data H-sync V-sync DDC-serial clock 4
User Manual
Page 16
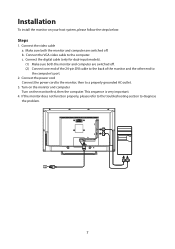
... dual-input models). (1) Make sure both the monitor and computer are switched off . b. Connect the video cable a. Turn on the monitor and computer Turn on your host system, please follow the steps below: Steps 1. If the monitor does not function properly, please refer to the ...to the computer. Installation To install the monitor on the monitor first, then the computer. Connect the power cord Connect the power cord to the monitor, then to the computer's port. 2. c. This sequence is very important. 4. Make sure both the monitor and computer are switched off . (2) Connect...
... dual-input models). (1) Make sure both the monitor and computer are switched off . b. Connect the video cable a. Turn on the monitor and computer Turn on your host system, please follow the steps below: Steps 1. If the monitor does not function properly, please refer to the ...to the computer. Installation To install the monitor on the monitor first, then the computer. Connect the power cord Connect the power cord to the monitor, then to the computer's port. 2. c. This sequence is very important. 4. Make sure both the monitor and computer are switched off . (2) Connect...
User Manual
Page 17
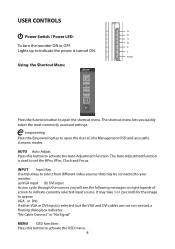
The shortcut menu lets youquickly select the most commonly accessed settings. USER CONTROLS A Power Switch / Power LED: B C D To turn the monitor ON or OFF. F Power Using the Shortcut Menu Press the function button to indicate currently selected input source. INPUT Input Key Use Input key ...menu. AUTO Auto Adjust Press this botton to set the HPos, VPos, Clock and Focus. E Lights up to appear. It may be connected to your monitor. (a) VGA input (b) DVI input As you cycle through the sources you will see the following messages on right topside of screen to open the...
The shortcut menu lets youquickly select the most commonly accessed settings. USER CONTROLS A Power Switch / Power LED: B C D To turn the monitor ON or OFF. F Power Using the Shortcut Menu Press the function button to indicate currently selected input source. INPUT Input Key Use Input key ...menu. AUTO Auto Adjust Press this botton to set the HPos, VPos, Clock and Focus. E Lights up to appear. It may be connected to your monitor. (a) VGA input (b) DVI input As you cycle through the sources you will see the following messages on right topside of screen to open the...
User Manual
Page 19
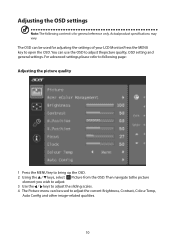
... to adjust thepicture quality, OSD setting and general settings. For advanced settings,please refer to following content is for adjusting the settings of your LCD Monitor.Press the MENU key to open the OSD. You can be used for general reference only. Then navigate tothe picture element you wish to adjust...
... to adjust thepicture quality, OSD setting and general settings. For advanced settings,please refer to following content is for adjusting the settings of your LCD Monitor.Press the MENU key to open the OSD. You can be used for general reference only. Then navigate tothe picture element you wish to adjust...

User Manual
Page 22
Product information 1 Press the MENU key to bring up for current input. 13 Then thebasic information of LCD monitor will show up the OSD. 2 Using the / keys, select Information from the OSD.
Product information 1 Press the MENU key to bring up for current input. 13 Then thebasic information of LCD monitor will show up the OSD. 2 Using the / keys, select Information from the OSD.
User Manual
Page 23
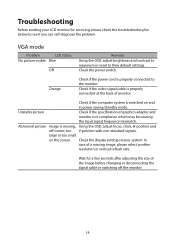
... display setting on the screen. Orange Check if the power cord is missing, Using the OSD, adjust focus, clock, H-position and off the monitor. 14 Wait for servicing, please check the troubleshooting list below to see if you can self-diagnose the problem VGA mode Problem LED status No... picture visible Blue Off Remedy Using the OSD, adjust brightness and contrast to maximum or reset to the monitor. Abnormal picture Image is properly connected to their default settings. Check if the video signal cable is switched on and in compliance which may...
... display setting on the screen. Orange Check if the power cord is missing, Using the OSD, adjust focus, clock, H-position and off the monitor. 14 Wait for servicing, please check the troubleshooting list below to see if you can self-diagnose the problem VGA mode Problem LED status No... picture visible Blue Off Remedy Using the OSD, adjust brightness and contrast to maximum or reset to the monitor. Abnormal picture Image is properly connected to their default settings. Check if the video signal cable is switched on and in compliance which may...
User Manual
Page 24
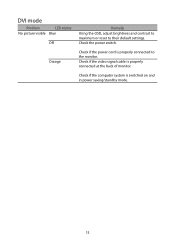
DVI mode Problem LED status No picture visible Blue Off Orange Remedy Using the OSD, adjust brightness and contrast to maximum or reset to the monitor. Check the power switch. Check if the computer system is properly connected at the back of monitor. Check if the video signal cable is switched on and in power saving/standby mode. 15 Check if the power cord is properly connected to their default settings.
DVI mode Problem LED status No picture visible Blue Off Orange Remedy Using the OSD, adjust brightness and contrast to maximum or reset to the monitor. Check the power switch. Check if the computer system is properly connected at the back of monitor. Check if the video signal cable is switched on and in power saving/standby mode. 15 Check if the power cord is properly connected to their default settings.


