User Manual
Page 2
... and specifically disclaims the implied warranties of Acer Incorporated. All Rights Reserved. All correspondence concerning your computer. Acer LCD Monitor User's Guide Original Issue: 01/2015 Changes may be incorporated in new editions of purchase information in any form or by photocopy, recording or otherwise, without obligation to your unit should include the serial number, model number and purchase information. This company makes...
... and specifically disclaims the implied warranties of Acer Incorporated. All Rights Reserved. All correspondence concerning your computer. Acer LCD Monitor User's Guide Original Issue: 01/2015 Changes may be incorporated in new editions of purchase information in any form or by photocopy, recording or otherwise, without obligation to your unit should include the serial number, model number and purchase information. This company makes...

User Manual
Page 3
... Safety instructions Read these guidelines when cleaning the monitor: • Always unplug the monitor before connecting the power cord to the AC power outlet. • Make sure both the LCD monitor and the computer are normal with the LCD monitor and do not indicate a problem. • Due to unplug the power cord from the power supplies. Connecting/disconnecting the device Observe the following are turned off the power switch and then turn it...
... Safety instructions Read these guidelines when cleaning the monitor: • Always unplug the monitor before connecting the power cord to the AC power outlet. • Make sure both the LCD monitor and the computer are normal with the LCD monitor and do not indicate a problem. • Due to unplug the power cord from the power supplies. Connecting/disconnecting the device Observe the following are turned off the power switch and then turn it...
User Manual
Page 4
...-in installation unless proper ventilation is used , the load should never be blocked or covered. This product should not exceed 80% of the power strip's input rating. • This product's power cord is a safety feature. Make sure the power outlet is not properly grounded may touch dangerous voltage points or short-out parts that the total rating of the equipment plugged into the wall outlet...
...-in installation unless proper ventilation is used , the load should never be blocked or covered. This product should not exceed 80% of the power strip's input rating. • This product's power cord is a safety feature. Make sure the power outlet is not properly grounded may touch dangerous voltage points or short-out parts that the total rating of the equipment plugged into the wall outlet...

User Manual
Page 5
...change in performance, indicating a need to replace the power cord set . If you need for service • the product does not operate normally after following requirements: detachable type, UL listed/CSA certified, type SPT-2, rated 7 A 125 V minimum, VDE approved or its enhancements may expose you would normally be advised to turn... and obey all servicing to service this product. • Use the product only with the supplied power supply cord set , make sure that the new power cord meets the following the operating instructions Note: Adjust only those controls that may interfere ...
...change in performance, indicating a need to replace the power cord set . If you need for service • the product does not operate normally after following requirements: detachable type, UL listed/CSA certified, type SPT-2, rated 7 A 125 V minimum, VDE approved or its enhancements may expose you would normally be advised to turn... and obey all servicing to service this product. • Use the product only with the supplied power supply cord set , make sure that the new power cord meets the following the operating instructions Note: Adjust only those controls that may interfere ...

User Manual
Page 6
... provide the best working procedures to reduce the environmental impact of the global environment, please recycle. Disposal instructions Do not throw this website: http://www.acergroup.com/public/Sustainability/ Visit www.acer-group.com for power management: • Activate display's Sleep mode within 15 minutes of user inactivity. • Activate computer's Sleep mode within 30 minutes of used equipment, as black or red dots...
... provide the best working procedures to reduce the environmental impact of the global environment, please recycle. Disposal instructions Do not throw this website: http://www.acergroup.com/public/Sustainability/ Visit www.acer-group.com for power management: • Activate display's Sleep mode within 15 minutes of user inactivity. • Activate computer's Sleep mode within 30 minutes of used equipment, as black or red dots...
User Manual
Page 7
... your vision Long viewing hours, wearing incorrect glasses or contact lenses, glare, excessive room lighting, poorly focused screens, very small typefaces and low-contrast displays could stress your sitting height to a comfortable level for more comfortable computer use. Observe the following sections provide suggestions on how to remove the strain on a distant point. • Blink frequently to keep your eyes...
... your vision Long viewing hours, wearing incorrect glasses or contact lenses, glare, excessive room lighting, poorly focused screens, very small typefaces and low-contrast displays could stress your sitting height to a comfortable level for more comfortable computer use. Observe the following sections provide suggestions on how to remove the strain on a distant point. • Blink frequently to keep your eyes...
User Manual
Page 8
...; Avoid adjusting your computer use more relaxing and productive: • Take short breaks regularly and often. • Perform some stretching exercises. • Breathe fresh air as often as open windows, for extended periods of time. Developing good work habits Develop the following work habits to make your display to an awkward viewing angle. • Avoid looking at bright light sources, such as...
...; Avoid adjusting your computer use more relaxing and productive: • Take short breaks regularly and often. • Perform some stretching exercises. • Breathe fresh air as often as open windows, for extended periods of time. Developing good work habits Develop the following work habits to make your display to an awkward viewing angle. • Avoid looking at bright light sources, such as...
User Manual
Page 9
... recycling information vi Disposal instructions vi LCD pixel statement vi Tips and information for comfortable use vii Unpacking 1 Attaching/removing the base 2 Connecting the power cord 3 Power saving 3 Display Data Channel (DDC) 3 Connector pin assignment 4 Standard timing table 6 Installation 7 User controls 8 How to adjust a setting 9 Acer eColor Management 9 Adjusting the OSD settings 10 Adjusting the picture quality 10 Adjusting the OSD setting 11 Adjusting the setting 12 Product information 13 Troubleshooting 14 VGA mode 14 DVI mode 15
... recycling information vi Disposal instructions vi LCD pixel statement vi Tips and information for comfortable use vii Unpacking 1 Attaching/removing the base 2 Connecting the power cord 3 Power saving 3 Display Data Channel (DDC) 3 Connector pin assignment 4 Standard timing table 6 Installation 7 User controls 8 How to adjust a setting 9 Acer eColor Management 9 Adjusting the OSD settings 10 Adjusting the picture quality 10 Adjusting the OSD setting 11 Adjusting the setting 12 Product information 13 Troubleshooting 14 VGA mode 14 DVI mode 15

User Manual
Page 11
Remove: Reverse the steps to remove the base. 2 Attaching/removing the base Installation: Place the stand onto the display by aligning the screw holes on them, and fix the stand onto the display by screwing the four screws clockwise.
Remove: Reverse the steps to remove the base. 2 Attaching/removing the base Installation: Place the stand onto the display by aligning the screw holes on them, and fix the stand onto the display by screwing the four screws clockwise.

User Manual
Page 12
...; The monitor has a universal power supply that the power cord you use is the correct type required for your system supports the DDC protocol, the monitor is required. • Plug one end of H05VV-F cord and plug rated 10 A/250 V. Model On Power saving LED light Blue Orange The power saving mode will be switched to "power saving" mode by the orange-colored power LED. Connecting the power cord • Check first to make installation easier, so long as indicated by the control signal from "power saving" mode back...
...; The monitor has a universal power supply that the power cord you use is the correct type required for your system supports the DDC protocol, the monitor is required. • Plug one end of H05VV-F cord and plug rated 10 A/250 V. Model On Power saving LED light Blue Orange The power saving mode will be switched to "power saving" mode by the orange-colored power LED. Connecting the power cord • Check first to make installation easier, so long as indicated by the control signal from "power saving" mode back...
User Manual
Page 13
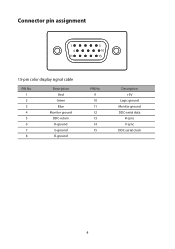
Connector pin assignment 15-pin color display signal cable PIN No. 1 2 3 4 5 6 7 8 Description Red Green Blue Monitor ground DDC-return R-ground G-ground B-ground PIN No. 9 10 11 12 13 14 15 Description +5V Logic ground Monitor ground DDC-serial data H-sync V-sync DDC-serial clock 4
Connector pin assignment 15-pin color display signal cable PIN No. 1 2 3 4 5 6 7 8 Description Red Green Blue Monitor ground DDC-return R-ground G-ground B-ground PIN No. 9 10 11 12 13 14 15 Description +5V Logic ground Monitor ground DDC-serial data H-sync V-sync DDC-serial clock 4
User Manual
Page 14
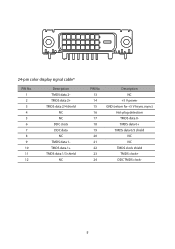
24-pin color display signal cable* PIN No. 1 2 3 4 5 6 7 8 9 10 11 12 Description TMDS data 2TMDS data 2+ TMDS data 2/4 shield NC NC DDC clock DDC data NC TMDS data 1TMDS data 1+ TMDS data 1/3 shield NC PIN No. 13 14 15 16 17 18 19 20 21 22 23 24 Description NC +5 V power GND (return for +5 V hsync.vsync) Hot-plug detection TMDS data 0TMDS data 0+ TMDS data 0/5 shield NC NC TMDS clock shield TMDS clock+ DDC TMDS clock- 5
24-pin color display signal cable* PIN No. 1 2 3 4 5 6 7 8 9 10 11 12 Description TMDS data 2TMDS data 2+ TMDS data 2/4 shield NC NC DDC clock DDC data NC TMDS data 1TMDS data 1+ TMDS data 1/3 shield NC PIN No. 13 14 15 16 17 18 19 20 21 22 23 24 Description NC +5 V power GND (return for +5 V hsync.vsync) Hot-plug detection TMDS data 0TMDS data 0+ TMDS data 0/5 shield NC NC TMDS clock shield TMDS clock+ DDC TMDS clock- 5
User Manual
Page 16
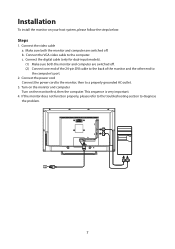
Connect the video cable a. Connect the VGA video cable to a properly grounded AC outlet. 3. Turn on the monitor and computer Turn on your host system, please follow the steps below: Steps 1. Connect the power cord Connect the power cord to the monitor, then to the computer. b. Connect the digital cable (only for dual-input models). (1) Make sure both the monitor and computer are switched off . c. This sequence is very important. 4. If the monitor does not function properly...
Connect the video cable a. Connect the VGA video cable to a properly grounded AC outlet. 3. Turn on the monitor and computer Turn on your host system, please follow the steps below: Steps 1. Connect the power cord Connect the power cord to the monitor, then to the computer. b. Connect the digital cable (only for dual-input models). (1) Make sure both the monitor and computer are switched off . c. This sequence is very important. 4. If the monitor does not function properly...
User Manual
Page 17
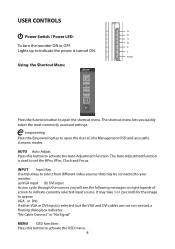
USER CONTROLS A Power Switch / Power LED: B C D To turn the monitor ON or OFF. empowering Press the Empowering Key to open the Acer eColor Management OSD and accessthe scenario modes. INPUT Input Key Use Input key to select from different video sources that may take 1 or 2seconds for the image to activate the Auto Adjustment function. F Power Using the Shortcut Menu Press the function button to open the shortcut menu. The Auto Adjustmentfunction is used to indicate currently selected input source. It may...
USER CONTROLS A Power Switch / Power LED: B C D To turn the monitor ON or OFF. empowering Press the Empowering Key to open the Acer eColor Management OSD and accessthe scenario modes. INPUT Input Key Use Input key to select from different video sources that may take 1 or 2seconds for the image to activate the Auto Adjustment function. F Power Using the Shortcut Menu Press the function button to open the shortcut menu. The Auto Adjustmentfunction is used to indicate currently selected input source. It may...

User Manual
Page 18
... tosuit any situation N/A ECO mode Adjusts thesettings to confirm the mode and exit the eColor menu. N/A Grahpic mode Pictures and photographs appear in vibrantcolors with sharp detail. How to adjust a setting Acer eColor Management Operation instructions Acer eColor Management Step 1: Press " " Key to open the Acer eColor Management OSD andaccess the scenario modes Step 2: Press " " or " " to select the mode Step 3: Press " AUTO " Key to reduce power consumption.
... tosuit any situation N/A ECO mode Adjusts thesettings to confirm the mode and exit the eColor menu. N/A Grahpic mode Pictures and photographs appear in vibrantcolors with sharp detail. How to adjust a setting Acer eColor Management Operation instructions Acer eColor Management Step 1: Press " " Key to open the Acer eColor Management OSD andaccess the scenario modes Step 2: Press " " or " " to select the mode Step 3: Press " AUTO " Key to reduce power consumption.
User Manual
Page 19
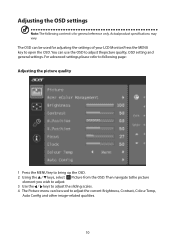
... MENU key to adjust the current Brightness, Contrast, Colour Temp, Auto Config and other image-related qualities. 10 You can use the OSD to open the OSD. The OSD can be used to bring up the OSD. 2 Using the / keys, select Picture from the OSD. For advanced settings,please refer to following content is for adjusting the settings of your LCD Monitor.Press the MENU key to adjust thepicture quality, OSD setting and general settings. Actualproduct specifications...
... MENU key to adjust the current Brightness, Contrast, Colour Temp, Auto Config and other image-related qualities. 10 You can use the OSD to open the OSD. The OSD can be used to bring up the OSD. 2 Using the / keys, select Picture from the OSD. For advanced settings,please refer to following content is for adjusting the settings of your LCD Monitor.Press the MENU key to adjust thepicture quality, OSD setting and general settings. Actualproduct specifications...
User Manual
Page 20
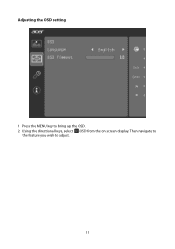
Then navigate to the feature you wish to bring up the OSD. 2 Using the directional keys, select OSD from the on screen display. Adjusting the OSD setting 1 Press the MENU key to adjust. 11
Then navigate to the feature you wish to bring up the OSD. 2 Using the directional keys, select OSD from the on screen display. Adjusting the OSD setting 1 Press the MENU key to adjust. 11
User Manual
Page 21
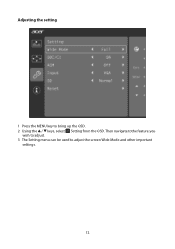
Adjusting the setting 1 Press the MENU key to adjust the screen Wide Mode and other important settings. 12 Then navigate tothe feature you wish to adjust. 3 The Setting menu can be used to bring up the OSD. 2 Using the / keys, select Setting from the OSD.
Adjusting the setting 1 Press the MENU key to adjust the screen Wide Mode and other important settings. 12 Then navigate tothe feature you wish to adjust. 3 The Setting menu can be used to bring up the OSD. 2 Using the / keys, select Setting from the OSD.
User Manual
Page 23
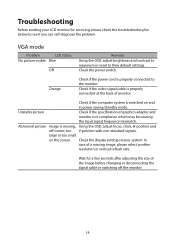
... input signal frequency mismatch. In case of monitor. Wait for servicing, please check the troubleshooting list below to see if you can self-diagnose the problem VGA mode Problem LED status No picture visible Blue Off Remedy Using the OSD, adjust brightness and contrast to maximum or reset to the monitor. Orange Check if the power cord is switched on the screen. Abnormal picture Image is in power saving/standby mode. Unstable picture Check if the specification of the image before changing or disconnecting the signal cable or switching...
... input signal frequency mismatch. In case of monitor. Wait for servicing, please check the troubleshooting list below to see if you can self-diagnose the problem VGA mode Problem LED status No picture visible Blue Off Remedy Using the OSD, adjust brightness and contrast to maximum or reset to the monitor. Orange Check if the power cord is switched on the screen. Abnormal picture Image is in power saving/standby mode. Unstable picture Check if the specification of the image before changing or disconnecting the signal cable or switching...
User Manual
Page 24
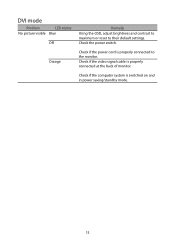
Check the power switch. Check if the computer system is properly connected at the back of monitor. Check if the video signal cable is switched on and in power saving/standby mode. 15 DVI mode Problem LED status No picture visible Blue Off Orange Remedy Using the OSD, adjust brightness and contrast to maximum or reset to the monitor. Check if the power cord is properly connected to their default settings.
Check the power switch. Check if the computer system is properly connected at the back of monitor. Check if the video signal cable is switched on and in power saving/standby mode. 15 DVI mode Problem LED status No picture visible Blue Off Orange Remedy Using the OSD, adjust brightness and contrast to maximum or reset to the monitor. Check if the power cord is properly connected to their default settings.

