
User Manual
Page 2
... Place of Acer Incorporated. Acer Incorporated. Acer LCD Monitor User Guide Original Issue: 12/2013 Changes may be made periodically to your unit should include the serial number, model number and purchase information. The serial number and model number are registered trademarks of purchase Acer and the Acer logo are recorded on the label affixed to the information in this manual or supplementary documents and publications. No part of this...
... Place of Acer Incorporated. Acer Incorporated. Acer LCD Monitor User Guide Original Issue: 12/2013 Changes may be made periodically to your unit should include the serial number, model number and purchase information. The serial number and model number are registered trademarks of purchase Acer and the Acer logo are recorded on the label affixed to the information in this manual or supplementary documents and publications. No part of this...

User Manual
Page 3
... a problem. • Due to wipe the screen and cabinet front and sides. Cleaning your safety and comfort Safety instructions Read these guidelines when cleaning the monitor: • Always unplug the monitor before cleaning. • Use a soft cloth to the nature of the previous screen may remain after switching the image, when the same image is recovered slowly by changing the image or turning off the power switch and...
... a problem. • Due to wipe the screen and cabinet front and sides. Cleaning your safety and comfort Safety instructions Read these guidelines when cleaning the monitor: • Always unplug the monitor before cleaning. • Use a soft cloth to the nature of the previous screen may remain after switching the image, when the same image is recovered slowly by changing the image or turning off the power switch and...
User Manual
Page 4
...• After setting the volume level, do not be used for this monitor, do not increase it from the equipment, be placed near you plug the adapter into this product on an unstable cart, stand or table. These openings must not be seriously damaged. • Slots and openings are not sure ...8226; The adapter is easily accessible and located as they may touch dangerous voltage points or short-out parts that the power outlet you . This product should be blocked by placing the product on the marking label. When you can hear it could result in installation unless proper ...
...• After setting the volume level, do not be used for this monitor, do not increase it from the equipment, be placed near you plug the adapter into this product on an unstable cart, stand or table. These openings must not be seriously damaged. • Slots and openings are not sure ...8226; The adapter is easily accessible and located as they may touch dangerous voltage points or short-out parts that the power outlet you . This product should be blocked by placing the product on the marking label. When you can hear it could result in installation unless proper ...

User Manual
Page 5
... an extension cord is damaged, cut or frayed • liquid was spilled into the wall outlet does not exceed the fuse rating. • Do not overload a power outlet, strip or receptacle by plugging in performance, indicating a need for service • the product does not operate normally after following the operating instructions v Unplug this product yourself, as opening or removing covers may...
... an extension cord is damaged, cut or frayed • liquid was spilled into the wall outlet does not exceed the fuse rating. • Do not overload a power outlet, strip or receptacle by plugging in performance, indicating a need for service • the product does not operate normally after following the operating instructions v Unplug this product yourself, as opening or removing covers may...
User Manual
Page 6
... other controls may contain small parts. Disposal instructions Do not throw this website: http://www.acer-group.com/public/Sustainability/sustainability01.htm Visit www.acer-group.com for further information on the environment. English Note: Adjust only those controls that are very conscious of the environmental effects of our business and strive to identify and provide the best working procedures...
... other controls may contain small parts. Disposal instructions Do not throw this website: http://www.acer-group.com/public/Sustainability/sustainability01.htm Visit www.acer-group.com for further information on the environment. English Note: Adjust only those controls that are very conscious of the environmental effects of our business and strive to identify and provide the best working procedures...

User Manual
Page 7
... adjusting the viewing angle of a computer. Finding your comfort zone Find your comfort zone by pushing the power button. Observe the following section provides tips for power management: • Activate display's Sleep mode within 15 minutes of user inactivity. • Activate computer's Sleep mode within 30 minutes of user inactivity. • Wake the computer from staying too long in front of the monitor, using...
... adjusting the viewing angle of a computer. Finding your comfort zone Find your comfort zone by pushing the power button. Observe the following section provides tips for power management: • Activate display's Sleep mode within 15 minutes of user inactivity. • Activate computer's Sleep mode within 30 minutes of user inactivity. • Wake the computer from staying too long in front of the monitor, using...

User Manual
Page 8
... middle of the display. • Adjust the display brightness and/or contrast to a comfortable level for extended periods of time. Display • Keep your display clean. • Keep your head at a higher level than the top edge of the display so your eyes point downward when looking at bright light sources, such as possible. • Exercise regularly and maintain a healthy body. viii English Taking care...
... middle of the display. • Adjust the display brightness and/or contrast to a comfortable level for extended periods of time. Display • Keep your display clean. • Keep your head at a higher level than the top edge of the display so your eyes point downward when looking at bright light sources, such as possible. • Exercise regularly and maintain a healthy body. viii English Taking care...
User Manual
Page 9
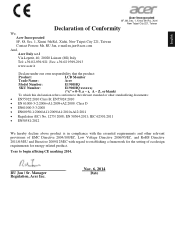
... • EN55022:2010 Class B; RU Jan / Sr. Manager Regulation, Acer Inc. Year to establishing a framework for the setting of ecodesign requirements for energy-related product. EN 50564:2011; English Acer Incorporated 8F, 88, Sec. 1, Xintai 5th Rd., Xizhi New Taipei City..., 20020 Lainate (MI) Italy Tel: +39-02-939-921 ,Fax: +39-02 9399-2913 www.acer.it Declare under our own responsibility that the product: Product: LCD Monitor Trade Name: Acer Model Number: SKU Number: E1900HQ E1900HQ xxxxxx; ("x" = 0~9, a ~ z, A ~ Z, or blank) To which this declaration refers ...
... • EN55022:2010 Class B; RU Jan / Sr. Manager Regulation, Acer Inc. Year to establishing a framework for the setting of ecodesign requirements for energy-related product. EN 50564:2011; English Acer Incorporated 8F, 88, Sec. 1, Xintai 5th Rd., Xizhi New Taipei City..., 20020 Lainate (MI) Italy Tel: +39-02-939-921 ,Fax: +39-02 9399-2913 www.acer.it Declare under our own responsibility that the product: Product: LCD Monitor Trade Name: Acer Model Number: SKU Number: E1900HQ E1900HQ xxxxxx; ("x" = 0~9, a ~ z, A ~ Z, or blank) To which this declaration refers ...
User Manual
Page 10
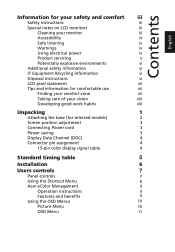
... comfortable use vii Finding your comfort zone vii Taking care of your vision viii Developing good work habits viii Unpacking 1 Attaching the base (for selected models) 2 Screen position adjustment 3 Connecting Power cord 3 Power saving 3 Display Data Channel (DDC) 4 Connector pin assignment 4 15-pin color display signal cable 4 Standard timing table 5 Installation 6 Users controls 7 Panel controls 7 Using the Shortcut Menu 8 Acer eColor Management 9 Operation instructions 9 Features and benefits 9 Using the OSD Menus 10 Picture Menu 10 OSD Menu 11
... comfortable use vii Finding your comfort zone vii Taking care of your vision viii Developing good work habits viii Unpacking 1 Attaching the base (for selected models) 2 Screen position adjustment 3 Connecting Power cord 3 Power saving 3 Display Data Channel (DDC) 4 Connector pin assignment 4 15-pin color display signal cable 4 Standard timing table 5 Installation 6 Users controls 7 Panel controls 7 Using the Shortcut Menu 8 Acer eColor Management 9 Operation instructions 9 Features and benefits 9 Using the OSD Menus 10 Picture Menu 10 OSD Menu 11
User Manual
Page 13
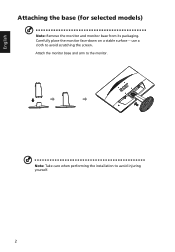
English Attaching the base (for selected models) Note: Remove the monitor and monitor base from its packaging. Attach the monitor base and arm to avoid injuring yourself. 2 Note: Take care when performing the installation to the monitor. Carefully place the monitor face-down on a stable surface -- use a cloth to avoid scratching the screen.
English Attaching the base (for selected models) Note: Remove the monitor and monitor base from its packaging. Attach the monitor base and arm to avoid injuring yourself. 2 Note: Take care when performing the installation to the monitor. Carefully place the monitor face-down on a stable surface -- use a cloth to avoid scratching the screen.
User Manual
Page 14
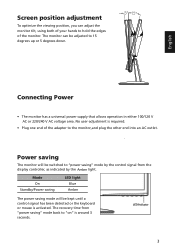
... 15 degrees up or 5 degrees down. No user-adjustment is activated. The recovery time from "power saving" mode back to "power saving" mode by the control signal from the display controller, as indicated by the Amber light. Screen position adjustment To optimize the viewing position, you can be switched to "on" is around 3 seconds. 3 The monitor can adjust the monitor tilt, using both of the adapter to the monitor,and plug the other end into an AC outlet. .
... 15 degrees up or 5 degrees down. No user-adjustment is activated. The recovery time from "power saving" mode back to "power saving" mode by the control signal from the display controller, as indicated by the Amber light. Screen position adjustment To optimize the viewing position, you can be switched to "on" is around 3 seconds. 3 The monitor can adjust the monitor tilt, using both of the adapter to the monitor,and plug the other end into an AC outlet. .
User Manual
Page 15
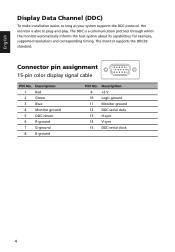
... 1 Red 2 Green 3 Blue 4 Monitor ground 5 DDC-return 6 R-ground 7 G-ground 8 B-ground PIN No. The monitor supports the DDC2B standard. Description 9 +5 V 10 Logic ground 11 Monitor ground 12 DDC-serial data 13 H-sync 14 V-sync 15 DDC-serial clock 4 for example, supported resolutions and corresponding timing. Connector pin assignment 15-pin color display signal cable 1 5 6 10 11 15 PIN No. English Display Data Channel (DDC) To make installation easier, so long as your system supports...
... 1 Red 2 Green 3 Blue 4 Monitor ground 5 DDC-return 6 R-ground 7 G-ground 8 B-ground PIN No. The monitor supports the DDC2B standard. Description 9 +5 V 10 Logic ground 11 Monitor ground 12 DDC-serial data 13 H-sync 14 V-sync 15 DDC-serial clock 4 for example, supported resolutions and corresponding timing. Connector pin assignment 15-pin color display signal cable 1 5 6 10 11 15 PIN No. English Display Data Channel (DDC) To make installation easier, so long as your system supports...
User Manual
Page 17
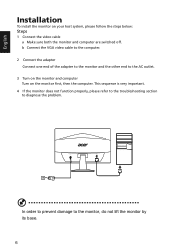
English Installation To install the monitor on the monitor first, then the computer. b Connect the VGA video cable to the computer. 2 Connect the adapter Connect one end of the adapter to the monitor and the other end to diagnose the problem. This sequence is very important. 4 If the monitor does not function properly, please refer to the troubleshooting section to the AC outlet. 3 Turn on the monitor and computer Turn on...
English Installation To install the monitor on the monitor first, then the computer. b Connect the VGA video cable to the computer. 2 Connect the adapter Connect one end of the adapter to the monitor and the other end to diagnose the problem. This sequence is very important. 4 If the monitor does not function properly, please refer to the troubleshooting section to the AC outlet. 3 Turn on the monitor and computer Turn on...
User Manual
Page 18
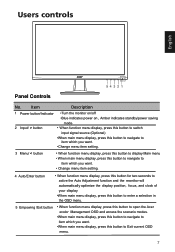
Users controls English Panel Controls 54 321 No. Item Description 1 Power button/Indicator •Turn the monitor on/off •Blue indicates power on , Amber indicates standby/power saving mode 2 Input/ > button • When function menu display, press this button to switch input signal source (Optional) •When main menu display, press this button to navigate to item which you want. •Change menu item setting. 3 Menu/ < button • When function menu display, press this button to display Main menu • When main menu display, press this button to navigate...
Users controls English Panel Controls 54 321 No. Item Description 1 Power button/Indicator •Turn the monitor on/off •Blue indicates power on , Amber indicates standby/power saving mode 2 Input/ > button • When function menu display, press this button to switch input signal source (Optional) •When main menu display, press this button to navigate to item which you want. •Change menu item setting. 3 Menu/ < button • When function menu display, press this button to display Main menu • When main menu display, press this button to navigate...

User Manual
Page 19
Menu Press the Menu button to your display. Input Input Press the Input button to select from different video sources that may be connected to activate the OSD menu. Auto Press the Auto button to open the shortcut menu. Icon AUTO Item Empowering Description Press the Empowering Key to activate the Auto Adjustment function and the monitor will automatically optimize the display position, focus, and clock of the function buttons (Empowering Key, Auto button, or Menu button) to open the Acer eColor Management...
Menu Press the Menu button to your display. Input Input Press the Input button to select from different video sources that may be connected to activate the OSD menu. Auto Press the Auto button to open the shortcut menu. Icon AUTO Item Empowering Description Press the Empowering Key to activate the Auto Adjustment function and the monitor will automatically optimize the display position, focus, and clock of the function buttons (Empowering Key, Auto button, or Menu button) to open the Acer eColor Management...
User Manual
Page 20
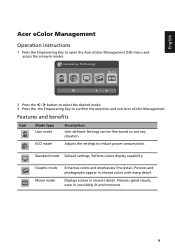
... Empowering Key to open the Acer eColor Management OSD menu and access the scenario modes. Standard mode Default settings. Pictures and photographs appear in clearest detail. Displays scenes in vibrant colors with sharp detail. Features and benefits Icon Mode type User mode Description User-defined. Graphic mode Movie mode Enhances colors and emphasizes fine detail. Presents great visuals, even in unsuitably-lit environments. 9 English Acer eColor Management Operation instructions 1 Press the...
... Empowering Key to open the Acer eColor Management OSD menu and access the scenario modes. Standard mode Default settings. Pictures and photographs appear in clearest detail. Displays scenes in vibrant colors with sharp detail. Features and benefits Icon Mode type User mode Description User-defined. Graphic mode Movie mode Enhances colors and emphasizes fine detail. Presents great visuals, even in unsuitably-lit environments. 9 English Acer eColor Management Operation instructions 1 Press the...
User Manual
Page 21
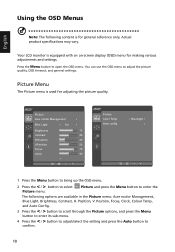
...-menu. 4 Press the < / > button to adjust/select the setting and press the Auto button to enter the Picture menu. English Using the OSD Menus Note: The following options are available in the Picture menu: Acer ecolor Management, Blue Light, Brightness, Contrast, H. Actual product specifications may vary. Position, V. Your LCD monitor is equipped with an on-screen display (OSD) menu for adjusting the picture quality. Picture Acer eColor Management Blue Light On Brightness 70 Contrast 50 H.Position 20 V.Position 50 Focus 70 Clock 50 Picture Color Temp Auto...
...-menu. 4 Press the < / > button to adjust/select the setting and press the Auto button to enter the Picture menu. English Using the OSD Menus Note: The following options are available in the Picture menu: Acer ecolor Management, Blue Light, Brightness, Contrast, H. Actual product specifications may vary. Position, V. Your LCD monitor is equipped with an on-screen display (OSD) menu for adjusting the picture quality. Picture Acer eColor Management Blue Light On Brightness 70 Contrast 50 H.Position 20 V.Position 50 Focus 70 Clock 50 Picture Color Temp Auto...
User Manual
Page 22
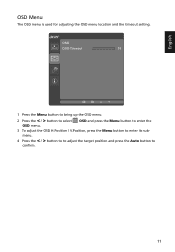
English OSD Menu The OSD menu is used for adjusting the OSD menu location and the timeout setting. OSD OSD Timeout 10 1 Press the Menu button to bring up the OSD menu. 2 Press the < / > button to select OSD and press the Menu button to enter the OSD menu. 3 To adjust the OSD H.Position / V.Position, press the Menu button to enter its submenu. 4 Press the < / > button to to adjust the target position and press the Auto button to confirm. 11
English OSD Menu The OSD menu is used for adjusting the OSD menu location and the timeout setting. OSD OSD Timeout 10 1 Press the Menu button to bring up the OSD menu. 2 Press the < / > button to select OSD and press the Menu button to enter the OSD menu. 3 To adjust the OSD H.Position / V.Position, press the Menu button to enter its submenu. 4 Press the < / > button to to adjust the target position and press the Auto button to confirm. 11
User Manual
Page 23
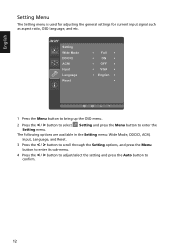
... Menu button to confirm. 12 The following options are available in the Setting menu: Wide Mode, DDC/CI, ACM, Input, Language, and Reset. 3 Press the < / > button to scroll through the Setting options, and press the Menu button to enter its sub-menu. 4 Press the < / > button to adjust/select the setting and press the Auto button to enter the Setting menu. English Setting Menu The Setting menu is used for adjusting the general settings for current input signal such as aspect ratio, OSD language...
... Menu button to confirm. 12 The following options are available in the Setting menu: Wide Mode, DDC/CI, ACM, Input, Language, and Reset. 3 Press the < / > button to scroll through the Setting options, and press the Menu button to enter its sub-menu. 4 Press the < / > button to adjust/select the setting and press the Auto button to enter the Setting menu. English Setting Menu The Setting menu is used for adjusting the general settings for current input signal such as aspect ratio, OSD language...
User Manual
Page 25
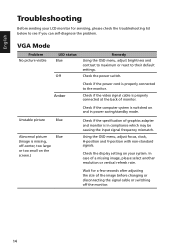
... Blue Abnormal picture (Image is in power saving/standby mode. Check if the video signal cable is properly connected to their default settings. VGA Mode Problem No picture visible LED status Blue Off Remedy Using the OSD menu, adjust brightness and contrast to maximum or reset to the monitor. In case of monitor. Check the power switch. Using the OSD menu, adjust focus, clock, H-position and V-position with non-standard signals. Amber Check if the power cord is properly connected at the back of a missing image, please select another resolution or vertical refresh rate...
... Blue Abnormal picture (Image is in power saving/standby mode. Check if the video signal cable is properly connected to their default settings. VGA Mode Problem No picture visible LED status Blue Off Remedy Using the OSD menu, adjust brightness and contrast to maximum or reset to the monitor. In case of monitor. Check the power switch. Using the OSD menu, adjust focus, clock, H-position and V-position with non-standard signals. Amber Check if the power cord is properly connected at the back of a missing image, please select another resolution or vertical refresh rate...


