
AL2032W Service Guide
Page 5
...accordance with the instructions, may cause harmful interference to operate the equipment. 2. WARNING: To prevent fire or chock hazard, do not expose the monitor to qualified personnel only. - 5 - However, there is no guarantee that this product meets the ENERGY STAR® guidelines for a Class... an experienced radio/TV technician for compliance could void the user's authority to radio communications. These limits are present inside the monitor. Increase the separation between the equipment and receiver. 3. The manufacturer is encouraged to try to correct the interference by the ...
...accordance with the instructions, may cause harmful interference to operate the equipment. 2. WARNING: To prevent fire or chock hazard, do not expose the monitor to qualified personnel only. - 5 - However, there is no guarantee that this product meets the ENERGY STAR® guidelines for a Class... an experienced radio/TV technician for compliance could void the user's authority to radio communications. These limits are present inside the monitor. Increase the separation between the equipment and receiver. 3. The manufacturer is encouraged to try to correct the interference by the ...
AL2032W Service Guide
Page 6
... Never spill liquids on an unstable trolley, stand, or table. Do not overload power strips and extension cords. Do not place the monitor on the monitor cabinet. This plug will fit only into the slot on a bed, sofa, rug or similar surface. Unplug the unit during a lightning... PRECAUTIONS Do not use only with UL listed computers which have appropriate configured receptacles marked between 100-240V AC, Min. 3.5A. The monitor should be operated only from overheating, be easily accessible. This will not be used for ventilation. To ensure satisfactory operation, use an ...
... Never spill liquids on an unstable trolley, stand, or table. Do not overload power strips and extension cords. Do not place the monitor on the monitor cabinet. This plug will fit only into the slot on a bed, sofa, rug or similar surface. Unplug the unit during a lightning... PRECAUTIONS Do not use only with UL listed computers which have appropriate configured receptacles marked between 100-240V AC, Min. 3.5A. The monitor should be operated only from overheating, be easily accessible. This will not be used for ventilation. To ensure satisfactory operation, use an ...
AL2032W Service Guide
Page 7
... the desktop pattern you use . Turn off the Power Switch for hours. In this case, the screen is displayed for hours. - 7 - SPECIAL NOTES ON LCD MONITORS The following symptoms are normal with LCD...
... the desktop pattern you use . Turn off the Power Switch for hours. In this case, the screen is displayed for hours. - 7 - SPECIAL NOTES ON LCD MONITORS The following symptoms are normal with LCD...

AL2032W Service Guide
Page 8
Table of contents Chapter 1 MONITOR FEATURE 9 Chapter 2 OPERATING INSTRUTION 15 Chapter 3 Machine assembly 21 Chapter 4 TROBLE SHOOTING 27 Chapter 5 CONNECTOR INFORMATION 29 Chapter 6 FRU LIST 30 Chapter 7 SCHEMATIC DIAGRAM 31 - 8 -
Table of contents Chapter 1 MONITOR FEATURE 9 Chapter 2 OPERATING INSTRUTION 15 Chapter 3 Machine assembly 21 Chapter 4 TROBLE SHOOTING 27 Chapter 5 CONNECTOR INFORMATION 29 Chapter 6 FRU LIST 30 Chapter 7 SCHEMATIC DIAGRAM 31 - 8 -

AL2032W Service Guide
Page 9
Monitor Feature Chapter 1 LCD Panel Input Display Color Maximum Dot Clock ® Max Resolution Plug & Play EPA ENERGY STAY Audio output Input Connector Input Video Signal ...
Monitor Feature Chapter 1 LCD Panel Input Display Color Maximum Dot Clock ® Max Resolution Plug & Play EPA ENERGY STAY Audio output Input Connector Input Video Signal ...
AL2032W Service Guide
Page 17
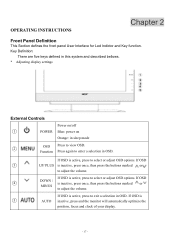
... / is inactive, press once, then press the buttons marked or to select or adjust OSD options. If OSD is ○5 AUTO inactive, press and the monitor will automatically optimize the position, focus and clock of your display. - 17 - If OSD is active, press to adjust the volume. Function Press again to...
... / is inactive, press once, then press the buttons marked or to select or adjust OSD options. If OSD is ○5 AUTO inactive, press and the monitor will automatically optimize the position, focus and clock of your display. - 17 - If OSD is active, press to adjust the volume. Function Press again to...
AL2032W Service Guide
Page 20
...the I2C protocol. The appearance is similar to the VESA DDC STANDARD. When there is no video-input signal present. It allows the monitor to inform the host system of its display capabilities. The host can request EDID information over the DDC2B channel. This reduces the... monitor's internal power supply consumption. LOGO : When the monitor is power on the keyboard, or clicking the mouse. - 20 - THIS MONITOR WILL APPEAR TO BE NON-FUNCTIONAL IF THERE IS NO VIDEO INPUT SIGNAL. The display...
...the I2C protocol. The appearance is similar to the VESA DDC STANDARD. When there is no video-input signal present. It allows the monitor to inform the host system of its display capabilities. The host can request EDID information over the DDC2B channel. This reduces the... monitor's internal power supply consumption. LOGO : When the monitor is power on the keyboard, or clicking the mouse. - 20 - THIS MONITOR WILL APPEAR TO BE NON-FUNCTIONAL IF THERE IS NO VIDEO INPUT SIGNAL. The display...
AL2032W Service Guide
Page 22
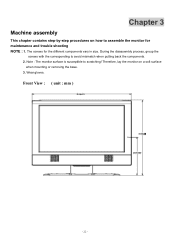
Front View : ( unit : mm ) - 22 - Note : The monitor surface is susceptible to assemble the monitor for the different components vary in size. Chapter 3 Machine assembly This chapter contains step-by-step procedures on a soft surface when mounting or removing the base. 3. Therefore, lay the monitor on how to scratching! Wear gloves. During the disassembly process, group the screws with the corresponding to avoid mismatch when putting back the components. 2. The screws for maintenance and trouble shooting NOTE : 1.
Front View : ( unit : mm ) - 22 - Note : The monitor surface is susceptible to assemble the monitor for the different components vary in size. Chapter 3 Machine assembly This chapter contains step-by-step procedures on a soft surface when mounting or removing the base. 3. Therefore, lay the monitor on how to scratching! Wear gloves. During the disassembly process, group the screws with the corresponding to avoid mismatch when putting back the components. 2. The screws for maintenance and trouble shooting NOTE : 1.


