
AL2032W Service Guide
Page 2
... cost of all necessary servicing, repair, and any incidental or consequential damages resulting from any defect in any form or by Acer Incorporated. Acer Incorporated makes no representations or warranties, either expresses or implied, with respect to change without the prior written permission of Acer Incorporated. Intel is subject to the contents hereof and specifically disclaims any warranties...
... cost of all necessary servicing, repair, and any incidental or consequential damages resulting from any defect in any form or by Acer Incorporated. Acer Incorporated makes no representations or warranties, either expresses or implied, with respect to change without the prior written permission of Acer Incorporated. Intel is subject to the contents hereof and specifically disclaims any warranties...
AL2032W Service Guide
Page 3
Gives precautionary measures to avoid possible hardware or software problems. Reminds you to any damage that appear on screen Gives bits and pieces of additional information related to the accomplishment of procedures. - 3 - Conventions The following conventions are used in this manual: Screen messages Note Warning Caution Important Denotes actual messages that might result from doing or not doing specific actions. Alerts you to do specific actions relevant to the current topic.
Gives precautionary measures to avoid possible hardware or software problems. Reminds you to any damage that appear on screen Gives bits and pieces of additional information related to the accomplishment of procedures. - 3 - Conventions The following conventions are used in this manual: Screen messages Note Warning Caution Important Denotes actual messages that might result from doing or not doing specific actions. Alerts you to do specific actions relevant to the current topic.
AL2032W Service Guide
Page 4
... in the printed Service Guide, for ACER-AUTHORIZED SERVICE PROVIDERS, your regional office MAY have a DIFFERENT part number code to the BASICCONFIGURATION decided for Acer's "global" product offering. If, for whatever reason, a part number change is made, it supports, please read the following general information. 1. You MUST use the list provided by your regional Acer office to order FRU parts for repair and Service of a machine (e.g. add...
... in the printed Service Guide, for ACER-AUTHORIZED SERVICE PROVIDERS, your regional office MAY have a DIFFERENT part number code to the BASICCONFIGURATION decided for Acer's "global" product offering. If, for whatever reason, a part number change is made, it supports, please read the following general information. 1. You MUST use the list provided by your regional Acer office to order FRU parts for repair and Service of a machine (e.g. add...
AL2032W Service Guide
Page 5
...a Class B digital device, pursuant to Part 15 of the user to correct such interference. WARNING: (FOR FCC CERTIFIED MODELS) NOTE: this product meets the ENERGY STAR® guidelines for energy efficiency. However, there is connected. 4. Shielded interface cables and AC power cord, if any ... against harmful interference in order to comply with the instructions, may cause harmful interference to radio or television reception, Which can radiate radio frequency energy, and if not installed and used in a residential installation. Reorient or relocate the receiving antenna. 2. Increase the...
...a Class B digital device, pursuant to Part 15 of the user to correct such interference. WARNING: (FOR FCC CERTIFIED MODELS) NOTE: this product meets the ENERGY STAR® guidelines for energy efficiency. However, there is connected. 4. Shielded interface cables and AC power cord, if any ... against harmful interference in order to comply with the instructions, may cause harmful interference to radio or television reception, Which can radiate radio frequency energy, and if not installed and used in a residential installation. Reorient or relocate the receiving antenna. 2. Increase the...
AL2032W Service Guide
Page 6
...power surges. Do not place the monitor on a wall or shelf, use a mounting kit approved by the manufacture or sold with the attached power adapter (output 12V DC) which have an electrician install the correct outlet, or use an adapter to your home, consult your outlet does not accommodate the three-wire plug...used for ventilation. It could short circuit parts causing a fire or electric shock. opening or removing covers can result in the back and bottom of the cabinet area provided for long periods of power source indicated on the monitor. Do not place the monitor on the monitor...
...power surges. Do not place the monitor on a wall or shelf, use a mounting kit approved by the manufacture or sold with the attached power adapter (output 12V DC) which have an electrician install the correct outlet, or use an adapter to your home, consult your outlet does not accommodate the three-wire plug...used for ventilation. It could short circuit parts causing a fire or electric shock. opening or removing covers can result in the back and bottom of the cabinet area provided for long periods of power source indicated on the monitor. Do not place the monitor on the monitor...
AL2032W Service Guide
Page 7
..., the screen is displayed for hours. - 7 - The LCD screen has effective pixels of the time. SPECIAL NOTES ON LCD MONITORS The following symptoms are normal with LCD monitor and do not indicate a problem. It may remain after switching the image, when the same image is recovered slowly by changing the image or turning off the Power Switch and then turn it on the desktop pattern you use . Turn off the Power Switch for...
..., the screen is displayed for hours. - 7 - The LCD screen has effective pixels of the time. SPECIAL NOTES ON LCD MONITORS The following symptoms are normal with LCD monitor and do not indicate a problem. It may remain after switching the image, when the same image is recovered slowly by changing the image or turning off the Power Switch and then turn it on the desktop pattern you use . Turn off the Power Switch for...

AL2032W Service Guide
Page 9
Monitor Feature Chapter 1 LCD Panel Input Display Color Maximum Dot Clock ® Max Resolution Plug & Play EPA ENERGY STAY Audio output Input Connector Input Video Signal Screen Size (Active) Power Source Environmental Considerations Weight (N.W.) Dimension Driving system Size Pixel pitch Viewable angle Brightness Contrast Ratio Response time Video Separate Sync H-Frequency V-Frequency ON Mode OFF Mode TFT Color LCD 20.1" wide 0.258 mm 178(H) x 178 (V) degree LG panel: 300 cd/m2(typ) 600:1 (typ) 16ms (Tr+Tf) R,G,B Analog & DVI box (optional) H/V TTL 31-81KHZ 50-75HZ...
Monitor Feature Chapter 1 LCD Panel Input Display Color Maximum Dot Clock ® Max Resolution Plug & Play EPA ENERGY STAY Audio output Input Connector Input Video Signal Screen Size (Active) Power Source Environmental Considerations Weight (N.W.) Dimension Driving system Size Pixel pitch Viewable angle Brightness Contrast Ratio Response time Video Separate Sync H-Frequency V-Frequency ON Mode OFF Mode TFT Color LCD 20.1" wide 0.258 mm 178(H) x 178 (V) degree LG panel: 300 cd/m2(typ) 600:1 (typ) 16ms (Tr+Tf) R,G,B Analog & DVI box (optional) H/V TTL 31-81KHZ 50-75HZ...

AL2032W Service Guide
Page 10
MODE NO. 1 2 3 4 RESOLUTION 720 x 400 640 x 480 640x480 640 x 480 Dot clock(MHz) 28.321 25.175 30.24 31.5 f h H-Total ( us ) H-Sync ( us ) H-B-P ( us ) H-...Switch * Power Switch * MENU/ENTER * / Volume * / Volume * Auto Adjust KEY Function External Controls : Regulatory Compliance * Contrast/brightness * Focus * Clock * H.Position * W.Position * Language * OSD Color temperature * OSD Position & Timeout * Auto Config * Input * Information * Reset * Exit cUL, FCC, TUV, CE, ISO13406-2 Timeings The product has 29 memory modes in total. 19 modes are preset and 10 modes are user...
MODE NO. 1 2 3 4 RESOLUTION 720 x 400 640 x 480 640x480 640 x 480 Dot clock(MHz) 28.321 25.175 30.24 31.5 f h H-Total ( us ) H-Sync ( us ) H-B-P ( us ) H-...Switch * Power Switch * MENU/ENTER * / Volume * / Volume * Auto Adjust KEY Function External Controls : Regulatory Compliance * Contrast/brightness * Focus * Clock * H.Position * W.Position * Language * OSD Color temperature * OSD Position & Timeout * Auto Config * Input * Information * Reset * Exit cUL, FCC, TUV, CE, ISO13406-2 Timeings The product has 29 memory modes in total. 19 modes are preset and 10 modes are user...
AL2032W Service Guide
Page 17
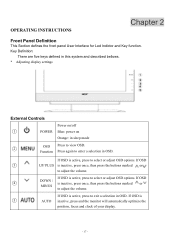
... ○1 POWER Blue: power on Orange: in sleep mode ○2 OSD Press to exit a selection in OSD. If OSD ○4 DOWN / is active, press to view OSD. Function Press again to adjust the volume. If OSD is ○5 AUTO inactive, press and the monitor will automatically optimize the position, focus and clock of your display. - 17 - OPERATING INSTRUCTIONS Chapter 2 Front Panel Definition This Section defines the front panel User Interface for Led Indictor...
... ○1 POWER Blue: power on Orange: in sleep mode ○2 OSD Press to exit a selection in OSD. If OSD ○4 DOWN / is active, press to view OSD. Function Press again to adjust the volume. If OSD is ○5 AUTO inactive, press and the monitor will automatically optimize the position, focus and clock of your display. - 17 - OPERATING INSTRUCTIONS Chapter 2 Front Panel Definition This Section defines the front panel User Interface for Led Indictor...

AL2032W Service Guide
Page 18
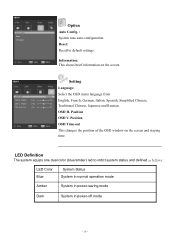
... their size. V-Position: This adjusts the vertical screen position. Audio Volume: Adjusts the volume. OSD Menu Picture Brightness: This adjusts the brightness of the picture on /off - 18 - Clock: If there are three ways of adjusting color: Warm (Reddish white) Cool (Bluish white) User : You can adjust the colors red, green and blue to achieve a comfortable contrast. Color temp. : There are any horizontal distortion and makes the picture clear and sharp. Contrast: This adjusts dark and light shades of the horizontal screen. It also changes the size of color relative...
... their size. V-Position: This adjusts the vertical screen position. Audio Volume: Adjusts the volume. OSD Menu Picture Brightness: This adjusts the brightness of the picture on /off - 18 - Clock: If there are three ways of adjusting color: Warm (Reddish white) Cool (Bluish white) User : You can adjust the colors red, green and blue to achieve a comfortable contrast. Color temp. : There are any horizontal distortion and makes the picture clear and sharp. Contrast: This adjusts dark and light shades of the horizontal screen. It also changes the size of color relative...
AL2032W Service Guide
Page 19
... one dual color (blue/amber) led to default settings. OSD H. Reset: Recall to indict system status and defined as bellows : LED Color Blue System Status System in normal operation mode Amber System in power-saving mode Dark System in power-off mode - 19 - Position OSD Time-out This changes the position of the OSD window on the screen. Information: This shows brief information on the screen and staying time. Setting Language: Select the OSD menu language from English, French, German...
... one dual color (blue/amber) led to default settings. OSD H. Reset: Recall to indict system status and defined as bellows : LED Color Blue System Status System in normal operation mode Amber System in power-saving mode Dark System in power-off mode - 19 - Position OSD Time-out This changes the position of the OSD window on the screen. Information: This shows brief information on the screen and staying time. Setting Language: Select the OSD menu language from English, French, German...
AL2032W Service Guide
Page 20
... Employees (NUTEK). The display is no video-input signal present. The DDC2B is defined in the center, and disappear slowly. This reduces the monitor's internal power supply consumption. The communication channel is a bi-directional data channel based on the keyboard, or clicking the mouse. - 20 - HOW TO OPTIMIZE THE DOS-MODE Plug and play Plug & play DDC2B feature This monitor is automatically redrawn.
... Employees (NUTEK). The display is no video-input signal present. The DDC2B is defined in the center, and disappear slowly. This reduces the monitor's internal power supply consumption. The communication channel is a bi-directional data channel based on the keyboard, or clicking the mouse. - 20 - HOW TO OPTIMIZE THE DOS-MODE Plug and play Plug & play DDC2B feature This monitor is automatically redrawn.

AL2032W Service Guide
Page 21
USING THE RIGHT POWER CORD The accessory power cord for the Northern American region is the wallet plug with a grounding type attachment plug, rated 10A, 250V,CEE-22 male configuration. Please note that power supply card needs to power outlet of personal computer: Please use VDE 0602, 0625, 0821 approval power cord ...end terminates with units intended for the power cord shall be 125 volt AC. Supplied with a molded-on type connector body, rated 10A, 250V, having standard CEE-22 female configuration. The voltage rating for connection to use a cord set consisting of a minimum No. 18 ...
USING THE RIGHT POWER CORD The accessory power cord for the Northern American region is the wallet plug with a grounding type attachment plug, rated 10A, 250V,CEE-22 male configuration. Please note that power supply card needs to power outlet of personal computer: Please use VDE 0602, 0625, 0821 approval power cord ...end terminates with units intended for the power cord shall be 125 volt AC. Supplied with a molded-on type connector body, rated 10A, 250V, having standard CEE-22 female configuration. The voltage rating for connection to use a cord set consisting of a minimum No. 18 ...
AL2032W Service Guide
Page 22
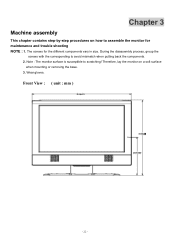
Front View : ( unit : mm ) - 22 - Chapter 3 Machine assembly This chapter contains step-by-step procedures on a soft surface when mounting or removing the base. 3. Wear gloves. Therefore, lay the monitor on how to assemble the monitor for the different components vary in size. Note : The monitor surface is susceptible to avoid mismatch when putting back the components. 2. During the disassembly process, group the screws with the corresponding to scratching! The screws for maintenance and trouble shooting NOTE : 1.
Front View : ( unit : mm ) - 22 - Chapter 3 Machine assembly This chapter contains step-by-step procedures on a soft surface when mounting or removing the base. 3. Wear gloves. Therefore, lay the monitor on how to assemble the monitor for the different components vary in size. Note : The monitor surface is susceptible to avoid mismatch when putting back the components. 2. During the disassembly process, group the screws with the corresponding to scratching! The screws for maintenance and trouble shooting NOTE : 1.

AL2032W Service Guide
Page 25
Assemble speaker on the L/R of BKT 2. Insert LCD cable in panel connector 1. Lock screw * 3 pcs to fasten bezel and right side bracket (BKT). 1. 1. Tidy speaker cable as picture shows - 25 - Lock screw * 3 pcs to fasten bezel and left side bracket (BKT) . 2. Tidy cable as picture shows. 1. Assemble PCB BKT on the bezel 1. Assemble panel into bezel 1. Get bezel and put it on the table 2.
Assemble speaker on the L/R of BKT 2. Insert LCD cable in panel connector 1. Lock screw * 3 pcs to fasten bezel and right side bracket (BKT). 1. 1. Tidy speaker cable as picture shows - 25 - Lock screw * 3 pcs to fasten bezel and left side bracket (BKT) . 2. Tidy cable as picture shows. 1. Assemble PCB BKT on the bezel 1. Assemble panel into bezel 1. Get bezel and put it on the table 2.

AL2032W Service Guide
Page 26
Insert INV-M/B cable, then tidy button cable and inv-m/b - 26 - Lock 4*pcs screw to fasten m/b on the pcb BKT 1. Lock 4 pcs screw to fasten m/b and PCB BKT 1. First to lock 4*pcs screw to fasten Inverter board on the 1. Get m/b and insert speaker cable, then assemble it on the PCB BKT 2. Get inverter and insert cable 2. Insert button cable in main board connector 1. 1.
Insert INV-M/B cable, then tidy button cable and inv-m/b - 26 - Lock 4*pcs screw to fasten m/b on the pcb BKT 1. Lock 4 pcs screw to fasten m/b and PCB BKT 1. First to lock 4*pcs screw to fasten Inverter board on the 1. Get m/b and insert speaker cable, then assemble it on the PCB BKT 2. Get inverter and insert cable 2. Insert button cable in main board connector 1. 1.

AL2032W Service Guide
Page 27
Lock 7pcs screw to fasten panel hold 1. insert LCD cable in VGA connector 1. Stick al foil *2pcs on ccft connector of into inverter/b connector 1. Assemble shielding and pcb BKT 2. Insert ccft cable L/R of pcb shielding 1. Lock screw*2pcs to fasten shielding 3. Assemble button/b and back cover - 27 - Lock io nut 2pcs in m/b connector 1. 1.
Lock 7pcs screw to fasten panel hold 1. insert LCD cable in VGA connector 1. Stick al foil *2pcs on ccft connector of into inverter/b connector 1. Assemble shielding and pcb BKT 2. Insert ccft cable L/R of pcb shielding 1. Lock screw*2pcs to fasten shielding 3. Assemble button/b and back cover - 27 - Lock io nut 2pcs in m/b connector 1. 1.

AL2032W Service Guide
Page 28
Assembly VESA cover and back cover. - 28 - lock screw *6 pcs to fasten and back cover 1. Lock screw * 6 pcs to fix it. 1. Assembly stand base and back cover. 2. Insert button/b cable in button/b connector 1. Lock screw*2 pcs to fasten bezel and PCB shielding. 2. 1. Assembly back cover and bezel 2. Assembly DVI box, if necessary. 1.
Assembly VESA cover and back cover. - 28 - lock screw *6 pcs to fasten and back cover 1. Lock screw * 6 pcs to fix it. 1. Assembly stand base and back cover. 2. Insert button/b cable in button/b connector 1. Lock screw*2 pcs to fasten bezel and PCB shielding. 2. 1. Assembly back cover and bezel 2. Assembly DVI box, if necessary. 1.
AL2032W Service Guide
Page 34
... Acer office to this printed Service Guide. Refer to order FRU parts repair and service of AL2032W. NOTE: To scrap or to return the defective parts, you should check the most up-to-date information available on how to dispose it, or follow the rules set by your regional web or channel(http://aicsl.acer.com.tw/spl/). For whatever reasons a part number change...
... Acer office to this printed Service Guide. Refer to order FRU parts repair and service of AL2032W. NOTE: To scrap or to return the defective parts, you should check the most up-to-date information available on how to dispose it, or follow the rules set by your regional web or channel(http://aicsl.acer.com.tw/spl/). For whatever reasons a part number change...

AL2032W Service Guide
Page 36
... inch total... C67 22pF/6 3 VGA_SCL 3 VGA_SDA 3 BLUE3 BLUE+ 3 GREEN3 GREEN+ 3 RED3 RED+ 3 SOG 3 AHS 3 AVS 17 K ...5V 3 C76 C78 C80 C C V OUT 1 /RESET /RESET 0.1uF/6 0.1uF/6 0.1uF/6 GND D N G U8... R153 4K7/6 2 3 Q13 1 MMBT3904L 1 MENU SEL PWR DOWN UP RIGHT LEFT 154 K336/ ... TO BUTTON BOARD 2.0mm pitch GND PROJECT : M0TW Junction from A change to the...AF12 TXB3+ TXB3- gm1601 Size Document Number Rev M0TW A 04. E...5 FSDQM[0..3] 5Place Series term ination resistors on all address and control lines (RN601,RN603...U23 FSCLKU+ FSCLKU- SCHEMATIC DIAGRAM Main Board Circuit Chapter 7 ...
... inch total... C67 22pF/6 3 VGA_SCL 3 VGA_SDA 3 BLUE3 BLUE+ 3 GREEN3 GREEN+ 3 RED3 RED+ 3 SOG 3 AHS 3 AVS 17 K ...5V 3 C76 C78 C80 C C V OUT 1 /RESET /RESET 0.1uF/6 0.1uF/6 0.1uF/6 GND D N G U8... R153 4K7/6 2 3 Q13 1 MMBT3904L 1 MENU SEL PWR DOWN UP RIGHT LEFT 154 K336/ ... TO BUTTON BOARD 2.0mm pitch GND PROJECT : M0TW Junction from A change to the...AF12 TXB3+ TXB3- gm1601 Size Document Number Rev M0TW A 04. E...5 FSDQM[0..3] 5Place Series term ination resistors on all address and control lines (RN601,RN603...U23 FSCLKU+ FSCLKU- SCHEMATIC DIAGRAM Main Board Circuit Chapter 7 ...

