

AL1931 Service Guide
Page 1
......42 7.10 Test Procedure: ...42 8. INTRODUCTION ...2 1.1 Scope...2 1.2 Description ...2 2. ELECTRICAL REQUIREMENTS...3 2.1 Standard Test Conditions ...3 2.2 LCD monitor General specification...3 2.3 LCD Panel Specification ...4 2.4 Input Signals ...11 2.5 CONTROLS ...16 2.6 White Color Temperature ...20 2.7 POWER SUPPLY ...21 ... & Play (EDID) ...23 2.9 Audio Technical specification ...24 3. TROUBLESHOOTING ...33 5.1 Main Procedure ...33 6. AL1931(AM939) TFT LCD MONITOR CONTENTS 1. VL-903 DISPLAY CONTROL BOARD...25 3.1 Description ...25 3.2 Features...25 3.3 BLOCK DIAGRAM ...26 3.4 ...
......42 7.10 Test Procedure: ...42 8. INTRODUCTION ...2 1.1 Scope...2 1.2 Description ...2 2. ELECTRICAL REQUIREMENTS...3 2.1 Standard Test Conditions ...3 2.2 LCD monitor General specification...3 2.3 LCD Panel Specification ...4 2.4 Input Signals ...11 2.5 CONTROLS ...16 2.6 White Color Temperature ...20 2.7 POWER SUPPLY ...21 ... & Play (EDID) ...23 2.9 Audio Technical specification ...24 3. TROUBLESHOOTING ...33 5.1 Main Procedure ...33 6. AL1931(AM939) TFT LCD MONITOR CONTENTS 1. VL-903 DISPLAY CONTROL BOARD...25 3.1 Description ...25 3.2 Features...25 3.3 BLOCK DIAGRAM ...26 3.4 ...

AL1931 Service Guide
Page 3
...to general 15 pin D-sub VGA connector and DVI-D digital connector, eliminates the requirement of speakers. Monitor also can be directly connected to the traditional CRT monitor, it consumes less power and gets less weight in stereo audio amplifier with volume control to provide... the requirements for the 19" MICRO-PROCESSOR based Multi-mode supported high resolution color LCD monitor, Monitor can support multi-media function as Composite signal and S-Video signal input. 1.2 Description The LCD monitor is also a space saving design, allowing more . 2 It is designed with no radiation...
...to general 15 pin D-sub VGA connector and DVI-D digital connector, eliminates the requirement of speakers. Monitor also can be directly connected to the traditional CRT monitor, it consumes less power and gets less weight in stereo audio amplifier with volume control to provide... the requirements for the 19" MICRO-PROCESSOR based Multi-mode supported high resolution color LCD monitor, Monitor can support multi-media function as Composite signal and S-Video signal input. 1.2 Description The LCD monitor is also a space saving design, allowing more . 2 It is designed with no radiation...

AL1931 Service Guide
Page 4
...= in front of LCD panel 30 minutes 5 seconds Chroma 2250 signal generator or equivalent, directly Connected to the monitor under the following conditions, unless otherwise specified. ELECTRICAL REQUIREMENTS 2.1 Standard Test Conditions All tests shall be performed under ... 12y + 3) x = (27u'/4)/[(9u'/2) - 12v' + 9] y = (3v')/[(9u'/2) - 12v' + 9] nits = cd/(m2) = Ft-L x 3.426 lux = foot-candle x 10.76 2.2 LCD monitor General specification Panel Type : 19 " active matrix color TFT LCD 1). SANYO TM190SX-70N01 Display size : 376.32mm(H) x 301.056mm(V) Display mode : VGA 720 X 400 (70...
...= in front of LCD panel 30 minutes 5 seconds Chroma 2250 signal generator or equivalent, directly Connected to the monitor under the following conditions, unless otherwise specified. ELECTRICAL REQUIREMENTS 2.1 Standard Test Conditions All tests shall be performed under ... 12y + 3) x = (27u'/4)/[(9u'/2) - 12v' + 9] y = (3v')/[(9u'/2) - 12v' + 9] nits = cd/(m2) = Ft-L x 3.426 lux = foot-candle x 10.76 2.2 LCD monitor General specification Panel Type : 19 " active matrix color TFT LCD 1). SANYO TM190SX-70N01 Display size : 376.32mm(H) x 301.056mm(V) Display mode : VGA 720 X 400 (70...
AL1931 Service Guide
Page 13
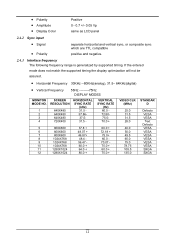
... supported timing the display optimization will not be assured. • Horizontal Frequency 30KHz --80KHz(analog), 31.5- 64KHz(digital) • Vertical Frequency 56Hz ---------75Hz DISPLAY MODES MONITOR MODE NO. 1 2 3 4 SCREEN RESOLUTION 640X480 640X480 640X480 720X400 HORIZONTAL SYNC RATE (kHz) 31.5 37.8637.531.5 - 5 800X600 37.8 + 6 800X600 48.07 + 7 800X600 46.87+ 8 1024X768...
... supported timing the display optimization will not be assured. • Horizontal Frequency 30KHz --80KHz(analog), 31.5- 64KHz(digital) • Vertical Frequency 56Hz ---------75Hz DISPLAY MODES MONITOR MODE NO. 1 2 3 4 SCREEN RESOLUTION 640X480 640X480 640X480 720X400 HORIZONTAL SYNC RATE (kHz) 31.5 37.8637.531.5 - 5 800X600 37.8 + 6 800X600 48.07 + 7 800X600 46.87+ 8 1024X768...
AL1931 Service Guide
Page 14
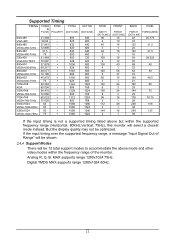
...input timing is not a supported timing listed above mode and other video modes within the supported frequency range (Horizontal: 80KHz,Vertical: 75Hz), this monitor will be optimized. XGA 60.004 - 1024x768 56.476 - MAX supports range 1280x1024 75Hz. VESA-480-72Hz 72.809 - 640x480 37.5... - But the display quality may not be 12 total support modes to accommodate the above but within the frequency range of the monitor. If the input timing over the supported frequency range, a message "Input Signal Out of Range" will be shown. 2.4.4 Support Modes There...
...input timing is not a supported timing listed above mode and other video modes within the supported frequency range (Horizontal: 80KHz,Vertical: 75Hz), this monitor will be optimized. XGA 60.004 - 1024x768 56.476 - MAX supports range 1280x1024 75Hz. VESA-480-72Hz 72.809 - 640x480 37.5... - But the display quality may not be 12 total support modes to accommodate the above but within the frequency range of the monitor. If the input timing over the supported frequency range, a message "Input Signal Out of Range" will be shown. 2.4.4 Support Modes There...
AL1931 Service Guide
Page 15
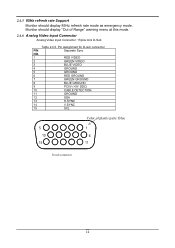
... 14 V.SYNC 15 SCL Color of Range" warning menu at this mode. 2.4.6 Analog Video input Connector Analog Video input Connector: 15pins mini D-Sub Table 2.4.5. Monitor should display 85Hz refresh rate mode as emergency mode. 2.4.5 85Hz refresh rate Support Monitor should display "Out of plastic parts: Blue 5 1 10 6 15 11 D-sub connector 14
... 14 V.SYNC 15 SCL Color of Range" warning menu at this mode. 2.4.6 Analog Video input Connector Analog Video input Connector: 15pins mini D-Sub Table 2.4.5. Monitor should display 85Hz refresh rate mode as emergency mode. 2.4.5 85Hz refresh rate Support Monitor should display "Out of plastic parts: Blue 5 1 10 6 15 11 D-sub connector 14

AL1931 Service Guide
Page 16
AV1-input S-Video (Y/C): Monitor rear side 4 Pin Mini-DIN female. Assignment of DVI -D connector : 1 TX2- 9 TX1- 17 TX0- 2 TX2+ 10 TX1+ 18 TX0+ 3 Shield (TX2 / TX4) 11 Shield (TX1 / ... detect 24 TXC- *) In case, the power of the PC unit is switched off and the power of the monitor is switched on, no voltage may occur at pin 14. Composite Video: Monitor rear side RCA female (Yellow). Digital Video input Connector: DVI-D (T.B.D) Table 4-3-3. S-Video 2.4.7 Support Composite Video & S - Pin assignment for S-Video...
AV1-input S-Video (Y/C): Monitor rear side 4 Pin Mini-DIN female. Assignment of DVI -D connector : 1 TX2- 9 TX1- 17 TX0- 2 TX2+ 10 TX1+ 18 TX0+ 3 Shield (TX2 / TX4) 11 Shield (TX1 / ... detect 24 TXC- *) In case, the power of the PC unit is switched off and the power of the monitor is switched on, no voltage may occur at pin 14. Composite Video: Monitor rear side RCA female (Yellow). Digital Video input Connector: DVI-D (T.B.D) Table 4-3-3. S-Video 2.4.7 Support Composite Video & S - Pin assignment for S-Video...

AL1931 Service Guide
Page 17
... either left or right control button can Press the left side) function selection. 1. LED lights Blue color --- Press the Auto Buttons Monitor will enable selection function. 16 When selection you want adjusting function then press Menu Buttons buttons again for OSD first menu (left button ...to decrease the OSD setting and press the right button to switch the monitor ON/OFF. 2 Soft Power Switch (DC Power-On 2. LED lights Yellow --- When OSD (On Screen Display) Menus display press Menu Buttons...
... either left or right control button can Press the left side) function selection. 1. LED lights Blue color --- Press the Auto Buttons Monitor will enable selection function. 16 When selection you want adjusting function then press Menu Buttons buttons again for OSD first menu (left button ...to decrease the OSD setting and press the right button to switch the monitor ON/OFF. 2 Soft Power Switch (DC Power-On 2. LED lights Yellow --- When OSD (On Screen Display) Menus display press Menu Buttons...

AL1931 Service Guide
Page 18
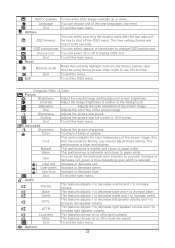
2.5.1 Adjusting the Monitor's Display The monitor has four function control buttons to select among functions shown on or off to paper white. Phase To improve focus clarity an image stability. Color ...
2.5.1 Adjusting the Monitor's Display The monitor has four function control buttons to select among functions shown on or off to paper white. Phase To improve focus clarity an image stability. Color ...
AL1931 Service Guide
Page 19
... is selected Increase or decrease red. This features adjusts < to decrease right speaker volume and > to the background. Language You can select how long the monitor waits after the last adjust of the screen image. Reset Memory recall Reset the currently highlight control to increase base. Scaling Adjusts the picture size...
... is selected Increase or decrease red. This features adjusts < to decrease right speaker volume and > to the background. Language You can select how long the monitor waits after the last adjust of the screen image. Reset Memory recall Reset the currently highlight control to increase base. Scaling Adjusts the picture size...
AL1931 Service Guide
Page 20
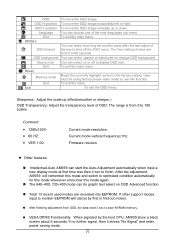
...;400, 720×400 mode can choose one of the nine languages you need 3 sec to 60 seconds. If other support modes input to monitor EEPROM will remember this mode and switch to finish. OSD background You can start the Auto-Adjustment automatically when input a new display mode at first... memory. Other features: Intellectual-Auto AM939 can select opaque or translucent to use this mode again. Source icon You can select how long the monitor waits after the last adjust of OSD. User must be using factory preset video mode to change OSD background. OSD V-position To move the ...
...;400, 720×400 mode can choose one of the nine languages you need 3 sec to 60 seconds. If other support modes input to monitor EEPROM will remember this mode and switch to finish. OSD background You can start the Auto-Adjustment automatically when input a new display mode at first... memory. Other features: Intellectual-Auto AM939 can select opaque or translucent to use this mode again. Source icon You can select how long the monitor waits after the last adjust of OSD. User must be using factory preset video mode to change OSD background. OSD V-position To move the ...

AL1931 Service Guide
Page 22
2.7 POWER SUPPLY (PK10V000000, LAE LAD6019AB5 BLK) (PK10V000010, LAE LAD6019AB5 IVO) (PK100005000, LSE9901B1260 BLK) (PK100005010, LSE9901B1260 IVO) 2.7.1 Input Voltage Range The monitor shall operate within specification over the range of 90 to 265 VAC power supply. 2.7.2 Input Frequency Range Input power frequency range shall be from 47.5 ...
2.7 POWER SUPPLY (PK10V000000, LAE LAD6019AB5 BLK) (PK10V000010, LAE LAD6019AB5 IVO) (PK100005000, LSE9901B1260 BLK) (PK100005010, LSE9901B1260 IVO) 2.7.1 Input Voltage Range The monitor shall operate within specification over the range of 90 to 265 VAC power supply. 2.7.2 Input Frequency Range Input power frequency range shall be from 47.5 ...

AL1931 Service Guide
Page 24
...,J980,J941,J981) Connector type: ACES 88225-0211 P8.0 or alternative Pin No. 1 2 Symbol HV LV Description High Voltage Low Voltage 2.8 Plug & Play (EDID) The monitor will be capable of sending a VESA standardized EDID file through the DDC (pins 12, 15 of the VGA connector). 23
...,J980,J941,J981) Connector type: ACES 88225-0211 P8.0 or alternative Pin No. 1 2 Symbol HV LV Description High Voltage Low Voltage 2.8 Plug & Play (EDID) The monitor will be capable of sending a VESA standardized EDID file through the DDC (pins 12, 15 of the VGA connector). 23

AL1931 Service Guide
Page 26
... to directly convert the analog RGB signals from standard VGA display card to optimum LCD timing signals so as to construct a high display quality LCD monitor. 3.2 Features • On board embedded micro-processor to detect display timings and control user functions. • Using PixelWorks PW131 design to generate optimum LCD timings...
... to directly convert the analog RGB signals from standard VGA display card to optimum LCD timing signals so as to construct a high display quality LCD monitor. 3.2 Features • On board embedded micro-processor to detect display timings and control user functions. • Using PixelWorks PW131 design to generate optimum LCD timings...

AL1931 Service Guide
Page 31
3.6.6 CN10 Pin NO. 1 2 4 5 6 7 8 9 Signal LED-Y LED-G GND KEY-POWER KEY-AUTO KEY-MENU KEY-UP KEY-DOWN Comment Power saving mode Monitor is ON GND Power ON/OFF key Auto Adjusting and Channel Selection Function Selection enable Function select and Adjust UP Function select and Adjust Down 3.6.7 ...) 23 TXC- 8 No Connect 16 Hot plug detect 24 TXC+ *)In case, the power of the PC unit is switched off and the power the monitor is switched on, no voltage may occur at pin 14. 30
3.6.6 CN10 Pin NO. 1 2 4 5 6 7 8 9 Signal LED-Y LED-G GND KEY-POWER KEY-AUTO KEY-MENU KEY-UP KEY-DOWN Comment Power saving mode Monitor is ON GND Power ON/OFF key Auto Adjusting and Channel Selection Function Selection enable Function select and Adjust UP Function select and Adjust Down 3.6.7 ...) 23 TXC- 8 No Connect 16 Hot plug detect 24 TXC+ *)In case, the power of the PC unit is switched off and the power the monitor is switched on, no voltage may occur at pin 14. 30
AL1931 Service Guide
Page 32
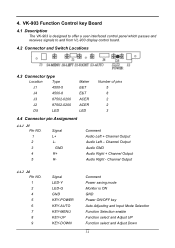
... R+ R- Channel Output 4.4.2 J4 Pin NO. 1 2 4 5 6 7 8 9 Signal LED-Y LED-G GND KEY-POWER KEY-AUTO KEY-MENU KEY-UP KEY-DOWN Comment Power saving mode Monitor is designed to offer a user interfaced control panel which passes and receives signals to and from VL-903 display control board. 4.2 Connector and Switch Locations... 4.3 Connector type Location Type J1 4500-5 J4 4500-8 J3 87502-0200 J2 87502-0200 D5 LED Maker E&T E&T ACER ACER LED Number of pins 5 8 2 2 3 4.4 Connector pin Assignment 4.4.1 J1 Pin NO. 1 2 3 4 5 Signal L+ L-
... R+ R- Channel Output 4.4.2 J4 Pin NO. 1 2 4 5 6 7 8 9 Signal LED-Y LED-G GND KEY-POWER KEY-AUTO KEY-MENU KEY-UP KEY-DOWN Comment Power saving mode Monitor is designed to offer a user interfaced control panel which passes and receives signals to and from VL-903 display control board. 4.2 Connector and Switch Locations... 4.3 Connector type Location Type J1 4500-5 J4 4500-8 J3 87502-0200 J2 87502-0200 D5 LED Maker E&T E&T ACER ACER LED Number of pins 5 8 2 2 3 4.4 Connector pin Assignment 4.4.1 J1 Pin NO. 1 2 3 4 5 Signal L+ L-
AL1931 Service Guide
Page 39
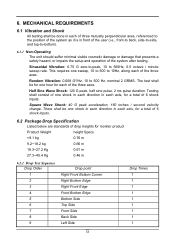
... front of the user (i.e., front-to back, side-to-side, and top-to 500 Hz, nominal 2 GRMS. The test shall be for each axis, for monitor product Product Weight height Specs There shall be done in each axis, for a total of 6 shock inputs. 6.2 Package Drop Specification Listed below are standards of...
... front of the user (i.e., front-to back, side-to-side, and top-to 500 Hz, nominal 2 GRMS. The test shall be for each axis, for monitor product Product Weight height Specs There shall be done in each axis, for a total of 6 shock inputs. 6.2 Package Drop Specification Listed below are standards of...

AL1931 Service Guide
Page 43
... burst. 42 7.2 Polarity : + / 7.3 Repetition Frequency of the impulse : 5 KHz. 7.4 Rise-Time : 5ns ± 30% 7.5 Impulse Duration: 50 nS ± 30% 7.6 Relation to monitor the rise-time, impulse, duration, and repetition rate of wave-shape generated by different generator, so the test must uses a scope with at least 400... Burst Period: 300 ms ± 20% 7.9 Climatic Conditions: - Atmospheric Pressure: 86 kPa to 75% - Relative Humidity: 45% to 106 kPa 7.10 Test Procedure: The monitor Display set high-resolution mode, AC input use AC 240V. Ambient Temperature: 15°C to 35°C -
... burst. 42 7.2 Polarity : + / 7.3 Repetition Frequency of the impulse : 5 KHz. 7.4 Rise-Time : 5ns ± 30% 7.5 Impulse Duration: 50 nS ± 30% 7.6 Relation to monitor the rise-time, impulse, duration, and repetition rate of wave-shape generated by different generator, so the test must uses a scope with at least 400... Burst Period: 300 ms ± 20% 7.9 Climatic Conditions: - Atmospheric Pressure: 86 kPa to 75% - Relative Humidity: 45% to 106 kPa 7.10 Test Procedure: The monitor Display set high-resolution mode, AC input use AC 240V. Ambient Temperature: 15°C to 35°C -

AL1931 User Guide
Page 1
...matériel brouilleur du Canada. 1 Table of Contents Preface ...1 Chapter 1 Installation...2 Unpacking ...2 Connecting the LCD Monitor and Base 2 Viewing Angle Adjustment...2 Detaching LCD Monitor from that to which can radiate radio frequency energy, and if not installed and used . These limits are reserved.... the user's authority to operate this document is essential that interference will not occur in setting up and using the LCD Monitor. Any changes or modifications not expressly approved by copyright. It is subject to the correctness of the contents. The information ...
...matériel brouilleur du Canada. 1 Table of Contents Preface ...1 Chapter 1 Installation...2 Unpacking ...2 Connecting the LCD Monitor and Base 2 Viewing Angle Adjustment...2 Detaching LCD Monitor from that to which can radiate radio frequency energy, and if not installed and used . These limits are reserved.... the user's authority to operate this document is essential that interference will not occur in setting up and using the LCD Monitor. Any changes or modifications not expressly approved by copyright. It is subject to the correctness of the contents. The information ...

AL1931 User Guide
Page 2
... the case is designed to allow users to have a comfortable viewing angle. Excess pressure may cause permanent damage to the LCD screen. Storing the LCD Monitor outside this device to -PC DVI-D Cable * 1.8M Power Cord * 1.8M Stereo Jack Audio Cable * 1.8M S-Video Cable * 1.8M RCA Jack Audio ... nominal current up to ensure that any of these items is required to take the base and put on the desk first. Though the LCD Monitor uses very little power, some ventilation is needed to 6A and a device weight above . The viewing angle can severely damage it for sufficient airflow...
... the case is designed to allow users to have a comfortable viewing angle. Excess pressure may cause permanent damage to the LCD screen. Storing the LCD Monitor outside this device to -PC DVI-D Cable * 1.8M Power Cord * 1.8M Stereo Jack Audio Cable * 1.8M S-Video Cable * 1.8M RCA Jack Audio ... nominal current up to ensure that any of these items is required to take the base and put on the desk first. Though the LCD Monitor uses very little power, some ventilation is needed to 6A and a device weight above . The viewing angle can severely damage it for sufficient airflow...


