

AL1931 Service Guide
Page 1
... 2.1 Standard Test Conditions ...3 2.2 LCD monitor General specification...3 2.3 LCD Panel Specification ...4 2.4 Input Signals ...11 2.5 CONTROLS ...16 2.6 White Color Temperature ...20 2.7 POWER SUPPLY ...21 2.8 Plug & Play (EDID) ...23 2.9 Audio Technical specification ...24 3. MECHANICAL REQUIREMENTS ...38 6.1 Vibration and Shock...38 6.2 Package Drop Specification ...38 6.3 Dimension Size and Weight...39 6.4 Gap Spec...39 6.5 Tilt Base Rotation ...41 6.6 Plastic Material...41 6.7 GAP Spec...41 7. AL1931(AM939) TFT LCD MONITOR CONTENTS 1. TROUBLESHOOTING ...33 5.1 Main Procedure ...33...
... 2.1 Standard Test Conditions ...3 2.2 LCD monitor General specification...3 2.3 LCD Panel Specification ...4 2.4 Input Signals ...11 2.5 CONTROLS ...16 2.6 White Color Temperature ...20 2.7 POWER SUPPLY ...21 2.8 Plug & Play (EDID) ...23 2.9 Audio Technical specification ...24 3. MECHANICAL REQUIREMENTS ...38 6.1 Vibration and Shock...38 6.2 Package Drop Specification ...38 6.3 Dimension Size and Weight...39 6.4 Gap Spec...39 6.5 Tilt Base Rotation ...41 6.6 Plastic Material...41 6.7 GAP Spec...41 7. AL1931(AM939) TFT LCD MONITOR CONTENTS 1. TROUBLESHOOTING ...33 5.1 Main Procedure ...33...

AL1931 Service Guide
Page 3
... with no radiation. It also supports VESA DPMS power management and plug & play function. It is designed with the latest LCD technology to provide a performance oriented product with volume control to general 15 pin D-sub VGA connector and DVI-D digital connector, eliminates the requirement of speakers. This will alleviate the growing health concerns. 1. Monitor also can be directly connected to drive a pair of optional special display card.
... with no radiation. It also supports VESA DPMS power management and plug & play function. It is designed with the latest LCD technology to provide a performance oriented product with volume control to general 15 pin D-sub VGA connector and DVI-D digital connector, eliminates the requirement of speakers. This will alleviate the growing health concerns. 1. Monitor also can be directly connected to drive a pair of optional special display card.

AL1931 Service Guide
Page 4
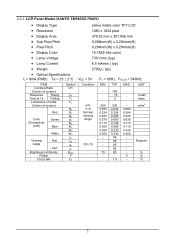
SANYO TM190SX-70N01 Display size : 376.32mm(H) x 301.056mm(V) Display mode : VGA 720 X 400 (70 Hz) VGA 640 X 480 (60/70...LCD panel 30 minutes 5 seconds Chroma 2250 signal generator or equivalent, directly Connected to the monitor under the following conditions, unless otherwise specified. Ambient light: Viewing distance : Warrn up time All specifications: Fully functional: Measuring Equipment: Control settings User brightness control: User contrast control: User red/white balance, Green/white balance and Blue/white balance control: Power input : Ambient temperature : Analog input mode...
SANYO TM190SX-70N01 Display size : 376.32mm(H) x 301.056mm(V) Display mode : VGA 720 X 400 (70 Hz) VGA 640 X 480 (60/70...LCD panel 30 minutes 5 seconds Chroma 2250 signal generator or equivalent, directly Connected to the monitor under the following conditions, unless otherwise specified. Ambient light: Viewing distance : Warrn up time All specifications: Fully functional: Measuring Equipment: Control settings User brightness control: User contrast control: User red/white balance, Green/white balance and Blue/white balance control: Power input : Ambient temperature : Analog input mode...
AL1931 Service Guide
Page 8
... ± 2°C active matrix color TFT LCD 1280 x 1024 pixel 376.32 mm x 301.056 mm 0.098mm(W) x 0.294mm(H) 0.294mm(W) x 0.294mm(H) 16.7M(8 bite color) 730 Vrms (typ) 6.5 mArms ( typ) 2700g ( typ) VDD = 5V FV = 60Hz FDCLK = 54MHz ITEM Contrast Ratio (Center of screen) Response Rising Time at Ta Falling Luminance of white (Center of screen) Red Color Chromaticity (CIE) Green Blue White Viewing Angle Hori.
... ± 2°C active matrix color TFT LCD 1280 x 1024 pixel 376.32 mm x 301.056 mm 0.098mm(W) x 0.294mm(H) 0.294mm(W) x 0.294mm(H) 16.7M(8 bite color) 730 Vrms (typ) 6.5 mArms ( typ) 2700g ( typ) VDD = 5V FV = 60Hz FDCLK = 54MHz ITEM Contrast Ratio (Center of screen) Response Rising Time at Ta Falling Luminance of white (Center of screen) Red Color Chromaticity (CIE) Green Blue White Viewing Angle Hori.

AL1931 Service Guide
Page 12
... A&C or B&D. It will only be turned off for alignment purpose only) Display the background only at level Gbkg. Turn off . (Btgt is observed. The box causing the worst case is the shadowing source, or Bsrc. Using the correct distance, angle, and measurement ...source box Bsrc. Look for shadowing in any gray scale or color level suitable for shadowing determination.(Note that it that box Eight be measuring the shadowing level, Lsh. 2.4 Input Signals 2.4.1 Video input • Type • Input Impedance Analog R, G, B., Digital TMDS 75 ohm +/- 2% 11 Turn on then off Btgt. Use...
... A&C or B&D. It will only be turned off for alignment purpose only) Display the background only at level Gbkg. Turn off . (Btgt is observed. The box causing the worst case is the shadowing source, or Bsrc. Using the correct distance, angle, and measurement ...source box Bsrc. Look for shadowing in any gray scale or color level suitable for shadowing determination.(Note that it that box Eight be measuring the shadowing level, Lsh. 2.4 Input Signals 2.4.1 Video input • Type • Input Impedance Analog R, G, B., Digital TMDS 75 ohm +/- 2% 11 Turn on then off Btgt. Use...
AL1931 Service Guide
Page 13
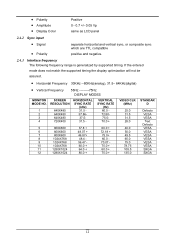
...8226; Display Color Positive 0 - 0.7 +/- 0.05 Vp same as LCD panel 2.4.2 Sync input • Signal • Polarity separate horizontal and vertical sync, or composite sync which are TTL compatible positive and negative. 2.4.3 Interface frequency The following frequency range is generalized by supported timing. If the entered mode does not match the supported timing the display optimization will not be assured. • Horizontal Frequency 30KHz --80KHz(analog), 31.5- 64KHz(digital) • Vertical Frequency 56Hz ---------75Hz DISPLAY MODES MONITOR MODE NO. 1 2 3 4 SCREEN RESOLUTION...
...8226; Display Color Positive 0 - 0.7 +/- 0.05 Vp same as LCD panel 2.4.2 Sync input • Signal • Polarity separate horizontal and vertical sync, or composite sync which are TTL compatible positive and negative. 2.4.3 Interface frequency The following frequency range is generalized by supported timing. If the entered mode does not match the supported timing the display optimization will not be assured. • Horizontal Frequency 30KHz --80KHz(analog), 31.5- 64KHz(digital) • Vertical Frequency 56Hz ---------75Hz DISPLAY MODES MONITOR MODE NO. 1 2 3 4 SCREEN RESOLUTION...

AL1931 Service Guide
Page 17
...in "Power Saving Mode". Monitor is ON. 3. Press the Auto Buttons Monitor will show OSD (On Screen Display) Function 5 Menu Menus table. 2. Power is off --- Press the soft power switch to increase the OSD setting. 1. When OSD (On Screen Display) Menus display press Menu Buttons will enable selection function. 16 You can adjusting speaker Volume control. 2. LED is OFF. 1. Direct press either left button to decrease the OSD setting and press the right button to switch the monitor ON/OFF. 2 Soft Power Switch (DC Power-On 2. LED lights Blue color --- LED lights...
...in "Power Saving Mode". Monitor is ON. 3. Press the Auto Buttons Monitor will show OSD (On Screen Display) Function 5 Menu Menus table. 2. Power is off --- Press the soft power switch to increase the OSD setting. 1. When OSD (On Screen Display) Menus display press Menu Buttons will enable selection function. 16 You can adjusting speaker Volume control. 2. LED is OFF. 1. Direct press either left button to decrease the OSD setting and press the right button to switch the monitor ON/OFF. 2 Soft Power Switch (DC Power-On 2. LED lights Blue color --- LED lights...

AL1931 Service Guide
Page 18
... Description Figure 2-2 2.5.2.1.1.1 Analog RGB / Digital RGB Picture Auto adjust Brightness Contrast Press > button, auto adjust the display mode to its utmost performance according to paper white. Exit To exit the main menu. V-position To move the OSD image horizontally left speaker volume and > to mute the sound. Natural This performance is bluer and brighter. Options OSD To move the picture image horizontally left speaker volume. Cool This control adjusts the color temperature of the Function Select control buttons, and the menu diagram will pop up...
... Description Figure 2-2 2.5.2.1.1.1 Analog RGB / Digital RGB Picture Auto adjust Brightness Contrast Press > button, auto adjust the display mode to its utmost performance according to paper white. Exit To exit the main menu. V-position To move the OSD image horizontally left speaker volume and > to mute the sound. Natural This performance is bluer and brighter. Options OSD To move the picture image horizontally left speaker volume. Cool This control adjusts the color temperature of the Function Select control buttons, and the menu diagram will pop up...
AL1931 Service Guide
Page 19
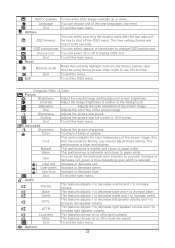
... Adjusts the picture size full screen or 16:9 screen. Advanced Sharpness Color Cool Natural Warm User User red User green User blue Exit Adjusts the picture sharpness. Utilities OSD timeout You can adjust the individual color intensity by factory, you need. The time setting choices are preset by yourself. Saturation Adjusts the color saturation of the screen image. Exit To exit the main menu. To exit the main menu. This features adjusts < to decrease left speaker volume. OSD V-position To move the OSD image vertically...
... Adjusts the picture size full screen or 16:9 screen. Advanced Sharpness Color Cool Natural Warm User User red User green User blue Exit Adjusts the picture sharpness. Utilities OSD timeout You can adjust the individual color intensity by factory, you need. The time setting choices are preset by yourself. Saturation Adjusts the color saturation of the screen image. Exit To exit the main menu. To exit the main menu. This features adjusts < to decrease left speaker volume. OSD V-position To move the OSD image vertically...
AL1931 Service Guide
Page 20
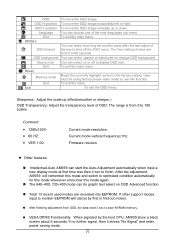
...: Current mode resolution. The 640×400, 720×400 mode can select opaque or translucent to use this mode again. User must be using factory preset video mode to change OSD background. Exit To exit the menu. Firmware revision. After the adjustment, AM939 will cancel by the host CPU, AM939 show a black screen about 5 seconds. OSD V-position To move the OSD image vertically up effect(smoother or sharper.) OSD Transparency: Adjust the transparency...
...: Current mode resolution. The 640×400, 720×400 mode can select opaque or translucent to use this mode again. User must be using factory preset video mode to change OSD background. Exit To exit the menu. Firmware revision. After the adjustment, AM939 will cancel by the host CPU, AM939 show a black screen about 5 seconds. OSD V-position To move the OSD image vertically up effect(smoother or sharper.) OSD Transparency: Adjust the transparency...

AL1931 Service Guide
Page 22
...) (PK100005010, LSE9901B1260 IVO) 2.7.1 Input Voltage Range The monitor shall operate within specification over the range of 90 to 265 VAC power supply. 2.7.2 Input Frequency Range Input power frequency range shall be from 47.5 to 63 Hz over the specified input voltage range. 2.7.3 Quick specification review • Input current 1.2A (max) at 90VAC input and full load , 0.6A (max) at 264 VAC input and full load. • Inrush current @ cold start 30A(0-peak)@ 110Vac...
...) (PK100005010, LSE9901B1260 IVO) 2.7.1 Input Voltage Range The monitor shall operate within specification over the range of 90 to 265 VAC power supply. 2.7.2 Input Frequency Range Input power frequency range shall be from 47.5 to 63 Hz over the specified input voltage range. 2.7.3 Quick specification review • Input current 1.2A (max) at 90VAC input and full load , 0.6A (max) at 264 VAC input and full load. • Inrush current @ cold start 30A(0-peak)@ 110Vac...

AL1931 User Guide
Page 1
...Display to your Computer 3 Connecting the AC Power...3 Connecting the Audio Cable ...3 Connecting the AV and S-Video cable 3 Setting Up the LCD Monitor...4 Power Management System ...4 Chapter 2 Display Controls 4 User Controls ...4 Adjusting the Monitor's Display...5 Function Description ...5 Chapter 3 Technical Information 7 Specifications ...7 Standard Timing Table...10 Troubleshooting ...10 Preface This manual is essential that interference will not occur in accordance with the instruction, may void the user's authority to operate this document has been carefully checked for help...
...Display to your Computer 3 Connecting the AC Power...3 Connecting the Audio Cable ...3 Connecting the AV and S-Video cable 3 Setting Up the LCD Monitor...4 Power Management System ...4 Chapter 2 Display Controls 4 User Controls ...4 Adjusting the Monitor's Display...5 Function Description ...5 Chapter 3 Technical Information 7 Specifications ...7 Standard Timing Table...10 Troubleshooting ...10 Preface This manual is essential that interference will not occur in accordance with the instruction, may void the user's authority to operate this document has been carefully checked for help...

AL1931 User Guide
Page 2
... Monitor and Monitor stand. 2 After you unpack the LCD Monitor, make sure that the following instructions carefully. Do not apply pressure to the display. 4. Important Safety Instructions Please read the following items were included in the box: * LCD Monitor * User's Manual * 1.8M Monitor-to-PC VGA Cable * AC Adapter * 1.8M Monitor-to-PC DVI-D Cable * 1.8M Power Cord * 1.8M Stereo Jack Audio Cable * 1.8M S-Video Cable * 1.8M RCA Jack Audio Video Cable If you open the box to take the base...
... Monitor and Monitor stand. 2 After you unpack the LCD Monitor, make sure that the following instructions carefully. Do not apply pressure to the display. 4. Important Safety Instructions Please read the following items were included in the box: * LCD Monitor * User's Manual * 1.8M Monitor-to-PC VGA Cable * AC Adapter * 1.8M Monitor-to-PC DVI-D Cable * 1.8M Power Cord * 1.8M Stereo Jack Audio Cable * 1.8M S-Video Cable * 1.8M RCA Jack Audio Video Cable If you open the box to take the base...

AL1931 User Guide
Page 3
... 1. These specifications meet the VESA Flat Panel Monitor Physical Mounting Interface Standard (paragraphs 2.1 and 2.1.3, version 1, dated 13 November 1997). Connect the other side connect to the VGA port or DVI port on your CD ROM drive. Connect the AV cable to RCA Jack and follow the color and the other end of your PC's audio card or to the LCD Monitor's " LINE IN " jack. Connect the power cord to AV source. Connecting the Audio Cable 1. The...
... 1. These specifications meet the VESA Flat Panel Monitor Physical Mounting Interface Standard (paragraphs 2.1 and 2.1.3, version 1, dated 13 November 1997). Connect the other side connect to the VGA port or DVI port on your CD ROM drive. Connect the AV cable to RCA Jack and follow the color and the other end of your PC's audio card or to the LCD Monitor's " LINE IN " jack. Connect the power cord to AV source. Connecting the Audio Cable 1. The...

AL1931 User Guide
Page 4
... Select and Adjustment Control Buttons control button for OSD second menu (right side) function selection. You can adjusting speaker Volume control. 2. When the LCD Monitor is off --- The VESA DPMS provides four power saving modes through detecting a horizontal or vertical sync. LED is in "Power Saving Mode". 4. Power is ON. 3. When press after Menu buttons then Press either left or right control button can Press the left side) function selection. 3. When OSD (On Screen Display) Menus display press Menu Buttons will Auto-Adjusting. 3 Auto 2. signal. When...
... Select and Adjustment Control Buttons control button for OSD second menu (right side) function selection. You can adjusting speaker Volume control. 2. When the LCD Monitor is off --- The VESA DPMS provides four power saving modes through detecting a horizontal or vertical sync. LED is in "Power Saving Mode". 4. Power is ON. 3. When press after Menu buttons then Press either left or right control button can Press the left side) function selection. 3. When OSD (On Screen Display) Menus display press Menu Buttons will Auto-Adjusting. 3 Auto 2. signal. When...

AL1931 User Guide
Page 5
... main menu. H-position To move the picture image vertically up on the screen as shown on or off to the background. Contrast Adjust the image brightness in relation to mute the sound. User blue Increase or decrease blue. This features choose on OSD menu, designed for easy user-viewing environments. Figure 2-2 Function Description Analog RGB / Digital RGB Picture Auto adjust Press > button, auto adjust the display mode to its utmost performance according to increase left speaker volume and > to VGA setting. This features adjusts < to...
... main menu. H-position To move the picture image vertically up on the screen as shown on or off to the background. Contrast Adjust the image brightness in relation to mute the sound. User blue Increase or decrease blue. This features choose on OSD menu, designed for easy user-viewing environments. Figure 2-2 Function Description Analog RGB / Digital RGB Picture Auto adjust Press > button, auto adjust the display mode to its utmost performance according to increase left speaker volume and > to VGA setting. This features adjusts < to...

AL1931 User Guide
Page 6
OSD V-position To move the OSD image. Reset Memory recall Reset the currently highlight control to increase volume. Hue Adjusts the color hue of options. Scaling Adjusts the picture size full screen or 16:9 screen. This control adjusts the color temperature of the nine languages you can select on or off the OSD menu. User green Increase or decrease green. Audio Volume Base Treble This features adjusts < to decrease volume and > to the factory setting. Options OSD To move the OSD image vertically up or down...
OSD V-position To move the OSD image. Reset Memory recall Reset the currently highlight control to increase volume. Hue Adjusts the color hue of options. Scaling Adjusts the picture size full screen or 16:9 screen. This control adjusts the color temperature of the nine languages you can select on or off the OSD menu. User green Increase or decrease green. Audio Volume Base Treble This features adjusts < to decrease volume and > to the factory setting. Options OSD To move the OSD image vertically up or down...
AL1931 User Guide
Page 7
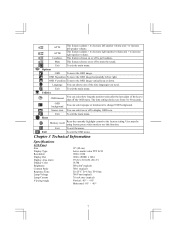
... change OSD background. OSD H-position To move the OSD image vertically up or down. OSD V-position To move the OSD image horizontally left or right. Reset Memory recall Reset the currently highlight control to 60 seconds. Exit To exit the OSD menu. Language You can select opaque or translucent to get loudness. Utilities OSD timeout You can select on or off the OSD menu. Chapter 3 Technical Information Specifications LCD Panel Size Display Type Resolution Display Dot Display Area (mm) Display Color Brightness Contrast...
... change OSD background. OSD H-position To move the OSD image vertically up or down. OSD V-position To move the OSD image horizontally left or right. Reset Memory recall Reset the currently highlight control to 60 seconds. Exit To exit the OSD menu. Language You can select opaque or translucent to get loudness. Utilities OSD timeout You can select on or off the OSD menu. Chapter 3 Technical Information Specifications LCD Panel Size Display Type Resolution Display Dot Display Area (mm) Display Color Brightness Contrast...

AL1931 User Guide
Page 8
..., 1.8M with 24-pin DVI-D Audio Cable 1.8M with Stereo Jack Audio Video Cable 1.8M with Audio Video Jack (Red + White + Yellow) S-Video Cable 1.8M with LED indicator OSD Brightness Digital Contrast Digital Horizontal Position Digital Vertical Position Digital Phase Digital Clock Digital Display Mode Setup Use EEPROM to 85% 8 Sync Input Signal Separate TTL compatible horizontal and vertical synchronization Digital TMDS Polarity Positive and negative Plug & Play Supports VESA DDC1 and DDC2B functions External Connection Power Input (DC input) +12VDC / 5A min...
..., 1.8M with 24-pin DVI-D Audio Cable 1.8M with Stereo Jack Audio Video Cable 1.8M with Audio Video Jack (Red + White + Yellow) S-Video Cable 1.8M with LED indicator OSD Brightness Digital Contrast Digital Horizontal Position Digital Vertical Position Digital Phase Digital Clock Digital Display Mode Setup Use EEPROM to 85% 8 Sync Input Signal Separate TTL compatible horizontal and vertical synchronization Digital TMDS Polarity Positive and negative Plug & Play Supports VESA DDC1 and DDC2B functions External Connection Power Input (DC input) +12VDC / 5A min...

AL1931 User Guide
Page 10
... Windows" status while you have chosen an output timing that is smoothly expanded to 1280 x 1024 dots with the LCD Monitor, the output timing of the VGA card may be out of modes supported by increment or decrement numbers) until those bars disappear. 3. Refer to its most suitable available timing. Also, if the signal cable is NOT included in OSD menu and adjust...
... Windows" status while you have chosen an output timing that is smoothly expanded to 1280 x 1024 dots with the LCD Monitor, the output timing of the VGA card may be out of modes supported by increment or decrement numbers) until those bars disappear. 3. Refer to its most suitable available timing. Also, if the signal cable is NOT included in OSD menu and adjust...

