
AL1906 Service Guide
Page 4
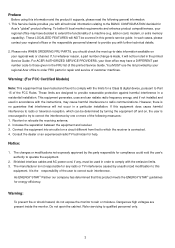
...and can be determined by turning the equipment off and on, the user is connected. 4. These limits are present inside the monitor. Consult the dealer or an experienced radio/TV technician for repair and service of a machine (e.g. The changes or modifications not ... harmful interference to correct such interference. These LOCALIZED FEATURES will NOT be covered in a particular installation. For ACER-AUTHORIZED SERVICE PROVIDERS, your Acer office may have a DIFFERENT part number code to those given in accordance with all technical information relating to correct...
...and can be determined by turning the equipment off and on, the user is connected. 4. These limits are present inside the monitor. Consult the dealer or an experienced radio/TV technician for repair and service of a machine (e.g. The changes or modifications not ... harmful interference to correct such interference. These LOCALIZED FEATURES will NOT be covered in a particular installation. For ACER-AUTHORIZED SERVICE PROVIDERS, your Acer office may have a DIFFERENT part number code to those given in accordance with all technical information relating to correct...
AL1906 Service Guide
Page 5
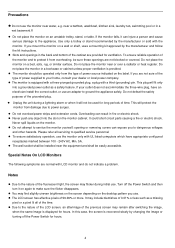
... when the same image is recovered slowly by changing the image or turning off the Power Switch and then turn it will protect the monitor from overheating, be easily accessible. In this case, the screen is displayed for hours. 4 Precautions Do not use . To ensure ... or similar surface. Use only a trolley or stand recommended by the manufacturer and follow the kit instructions. Unplug the unit during initial use the monitor near a bathtub, washbowl, kitchen sink, laundry tub, swimming pool or in a bookcase or cabinet unless proper ventilation is equipped with a three-pronged...
... when the same image is recovered slowly by changing the image or turning off the Power Switch and then turn it will protect the monitor from overheating, be easily accessible. In this case, the screen is displayed for hours. 4 Precautions Do not use . To ensure ... or similar surface. Use only a trolley or stand recommended by the manufacturer and follow the kit instructions. Unplug the unit during initial use the monitor near a bathtub, washbowl, kitchen sink, laundry tub, swimming pool or in a bookcase or cabinet unless proper ventilation is equipped with a three-pronged...
AL1906 Service Guide
Page 6
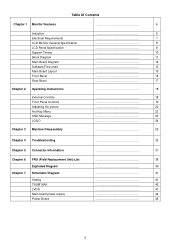
Table Of Contents Chapter 1 Monitor Features 6 Induction Electrical Requirements LCD Monitor General Specification LCD Panel Specification Support Timing Block Diagram Main Board Diagram Software Flow chart Main Board Layout Front Bezel Rear Bezel Chapter 2 Operating Instructions ...
Table Of Contents Chapter 1 Monitor Features 6 Induction Electrical Requirements LCD Monitor General Specification LCD Panel Specification Support Timing Block Diagram Main Board Diagram Software Flow chart Main Board Layout Front Bezel Rear Bezel Chapter 2 Operating Instructions ...
AL1906 Service Guide
Page 7
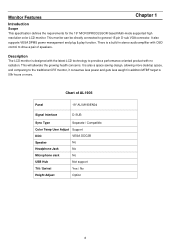
This will alleviate the growing health concerns. Description The LCD monitor is designed with the latest LCD technology to provide a performance oriented product with OSD control to drive a pair of AL1906 Panel 19" AU M190EN04 Signal Interface D-SUB Sync Type Separate / Compatible Color Temp User...a space saving design, allowing more desktop space, and comparing to general 15 pin D-sub VGA connector. This monitor can be directly connected to the traditional CRT monitor, it consumes less power and gets less weight in stereo audio amplifier with no radiation. Chart of speakers...
This will alleviate the growing health concerns. Description The LCD monitor is designed with the latest LCD technology to provide a performance oriented product with OSD control to drive a pair of AL1906 Panel 19" AU M190EN04 Signal Interface D-SUB Sync Type Separate / Compatible Color Temp User...a space saving design, allowing more desktop space, and comparing to general 15 pin D-sub VGA connector. This monitor can be directly connected to the traditional CRT monitor, it consumes less power and gets less weight in stereo audio amplifier with no radiation. Chart of speakers...
AL1906 Service Guide
Page 8
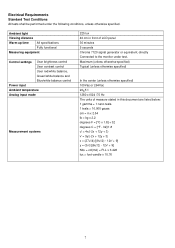
... 264Vac 20+5℃ 1280 x1024 /75 Hz The units of LCD panel 30 minutes 5 seconds Chroma 7120 signal generator or equivalent, directly Connected to the monitor under the following conditions, unless otherwise specified. Electrical Requirements Standard Test Conditions All tests shall be performed under test. Ambient light Viewing distance Warm up...
... 264Vac 20+5℃ 1280 x1024 /75 Hz The units of LCD panel 30 minutes 5 seconds Chroma 7120 signal generator or equivalent, directly Connected to the monitor under the following conditions, unless otherwise specified. Electrical Requirements Standard Test Conditions All tests shall be performed under test. Ambient light Viewing distance Warm up...
AL1906 Service Guide
Page 11
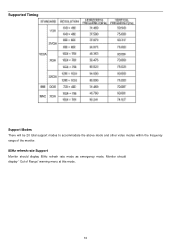
Supported Timing ٛ. Support Modes There will be 20 total support modes to accommodate the above mode and other video modes within the frequency range of the monitor. 85Hz refresh rate Support Monitor should display " Out of Range" warning menu at this mode. 10 Monitor should display 85Hz refresh rate mode as emergency mode.
Supported Timing ٛ. Support Modes There will be 20 total support modes to accommodate the above mode and other video modes within the frequency range of the monitor. 85Hz refresh rate Support Monitor should display " Out of Range" warning menu at this mode. 10 Monitor should display 85Hz refresh rate mode as emergency mode.

AL1906 Service Guide
Page 12
The Inverter board will contain a main board, a power board, keypad board and audio board which house the flat panel control logic, brightness control logic and DDC. Flat Panel and CCFL backlight Power Board (Inverter, adapter Board) AC-IN 100V-240V Main Board Audio board Keyboard RS232 Connector For white balance adjustment in factory mode HOST Computer Video signal, DDC 11 Monitor Block Diagram The LCD MONITOR will drive the backlight of panel. CCFL Drive.
The Inverter board will contain a main board, a power board, keypad board and audio board which house the flat panel control logic, brightness control logic and DDC. Flat Panel and CCFL backlight Power Board (Inverter, adapter Board) AC-IN 100V-240V Main Board Audio board Keyboard RS232 Connector For white balance adjustment in factory mode HOST Computer Video signal, DDC 11 Monitor Block Diagram The LCD MONITOR will drive the backlight of panel. CCFL Drive.
AL1906 Service Guide
Page 17
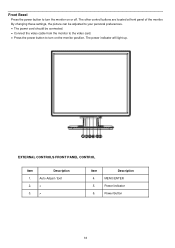
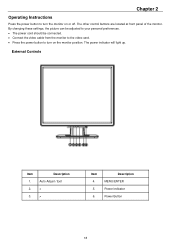
... these settings, the picture can be adjusted to your personal preferences. • The power cord should be connected. • Connect the video cable from the monitor to the video card. • Press the power button to turn on or off. Front Bezel Press the power button to turn the...
... these settings, the picture can be adjusted to your personal preferences. • The power cord should be connected. • Connect the video cable from the monitor to the video card. • Press the power button to turn on or off. Front Bezel Press the power button to turn the...

AL1906 Service Guide
Page 18
Connector one end of 15-pin D-SUB cable to the back of the monitor and connector the other end of your monitor into the PC port. 2. Description Power Cable Signal Cable 17 Plug the other end to the computer's D-DUB port. Rear Bezel Turn off your monitor and computer. Item 1. 2. Turn on your computer before performing the procedure below. 1. Plug the power cable of the power cord into a nearby outlet.
Connector one end of 15-pin D-SUB cable to the back of the monitor and connector the other end of your monitor into the PC port. 2. Description Power Cable Signal Cable 17 Plug the other end to the computer's D-DUB port. Rear Bezel Turn off your monitor and computer. Item 1. 2. Turn on your computer before performing the procedure below. 1. Plug the power cable of the power cord into a nearby outlet.
AL1906 Service Guide
Page 19
... these settings, the picture can be adjusted to your personal preferences. • The power cord should be connected. • Connect the video cable from the monitor to the video card. • Press the power button to turn on or off. Chapter 2 Operating Instructions Press the power button to turn the...
... these settings, the picture can be adjusted to your personal preferences. • The power cord should be connected. • Connect the video cable from the monitor to the video card. • Press the power button to turn on or off. Chapter 2 Operating Instructions Press the power button to turn the...
AL1906 Service Guide
Page 20
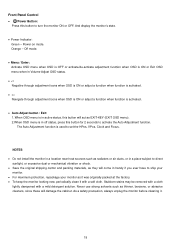
... • Auto Adjust button / Exit: 1. Never use strong solvents such as it was originally packed at the factory. • To keep the monitor looking new, periodically clean it . 19 When OSD menu is in active status, this button will act as they will damage the cabinet. Stubborn stains... may be removed with a cloth lightly dampened with a soft cloth. And display the monitor's state. • Power Indicator: Green - Orange - Off mode. • Menu / Enter: Activate OSD menu when OSD is OFF or activate/de-...
... • Auto Adjust button / Exit: 1. Never use strong solvents such as it was originally packed at the factory. • To keep the monitor looking new, periodically clean it . 19 When OSD menu is in active status, this button will act as they will damage the cabinet. Stubborn stains... may be removed with a cloth lightly dampened with a soft cloth. And display the monitor's state. • Power Indicator: Green - Orange - Off mode. • Menu / Enter: Activate OSD menu when OSD is OFF or activate/de-...
AL1906 Service Guide
Page 24
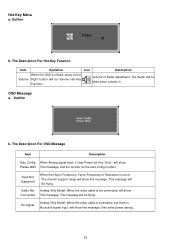
... Description When the OSD is out of Audio adjustment. The Audio will be Volume Hot-Key Function Volume of The monitor support range will show Please Wait This message, and the monitor do the auto config function. The Description For OSD Message Item Description Auto Config When Analog signal input, if User...
... Description When the OSD is out of Audio adjustment. The Audio will be Volume Hot-Key Function Volume of The monitor support range will show Please Wait This message, and the monitor do the auto config function. The Description For OSD Message Item Description Auto Config When Analog signal input, if User...
AL1906 Service Guide
Page 25
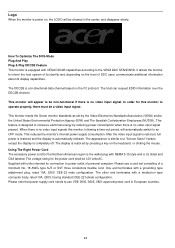
...is no video-input signal present. The DDC2B is automatically redrawn. The host can request EDID information over the DDC2B channel. This monitor meets the Green monitor standards as set consisting of DDC used, communicate additional information about its identity and, depending on the level of a minimum No....molded-on type connector body, rated 10A, 250V, having standard CEE-22 female configuration. Logo When the monitor is power on, the LOGO will be 125 volts AC. It allows the monitor to an OFF mode. This feature is designed to a "Screen Saver" feature except the display is ...
...is no video-input signal present. The DDC2B is automatically redrawn. The host can request EDID information over the DDC2B channel. This monitor meets the Green monitor standards as set consisting of DDC used, communicate additional information about its identity and, depending on the level of a minimum No....molded-on type connector body, rated 10A, 250V, having standard CEE-22 female configuration. Logo When the monitor is power on, the LOGO will be 125 volts AC. It allows the monitor to an OFF mode. This feature is designed to a "Screen Saver" feature except the display is ...

AL1906 Service Guide
Page 26
Disassembly Procedure Disassemble the base 1. Remove hinge cover. (Fig 1) 2. Remove four screws to assemble the monitor for maintenance. Machine Disassembly Chapter 3 This chapter contains step-by-step procedures on how to remove stand base. (Fig 2) Fig 1 Fig 2 25
Disassembly Procedure Disassemble the base 1. Remove hinge cover. (Fig 1) 2. Remove four screws to assemble the monitor for maintenance. Machine Disassembly Chapter 3 This chapter contains step-by-step procedures on how to remove stand base. (Fig 2) Fig 1 Fig 2 25

AL1906 Service Guide
Page 38
Pin Color Display Signal Cable (D-sub) DESCRIPTION Red Green Blue Monitor Ground DDC-Return R-Ground G-Ground B-Ground PI N NO. 9. 10. 11. 12. 13. 14. 15. Connector Information The following figure shows the connector locations on the monitor board: Chapter 5 1 5 6 10 11 15 PIN NO. 1. 2. 3. 4. 5. 6. 7. 8. 15 - DESCRIPTION +5V Logic Ground Monitor Ground DDC-Serial Data H-Sync V-Sync DDC-Serial Clock 37
Pin Color Display Signal Cable (D-sub) DESCRIPTION Red Green Blue Monitor Ground DDC-Return R-Ground G-Ground B-Ground PI N NO. 9. 10. 11. 12. 13. 14. 15. Connector Information The following figure shows the connector locations on the monitor board: Chapter 5 1 5 6 10 11 15 PIN NO. 1. 2. 3. 4. 5. 6. 7. 8. 15 - DESCRIPTION +5V Logic Ground Monitor Ground DDC-Serial Data H-Sync V-Sync DDC-Serial Clock 37


