

AL1515 LCD Monitor Service Guide
Page 6
...screen may flicker during initial use . Due to make sure the flicker disappears. The LCD screen has effective pixels of the time. SPECIAL NOTES ON LCD MONITORS The following symptoms are normal with LCD monitor and do not indicate a problem. It may find slightly uneven brightness in the screen... depending on again to the nature of the LCD screen, an afterimage of the fluorescent light, ...
...screen may flicker during initial use . Due to make sure the flicker disappears. The LCD screen has effective pixels of the time. SPECIAL NOTES ON LCD MONITORS The following symptoms are normal with LCD monitor and do not indicate a problem. It may find slightly uneven brightness in the screen... depending on again to the nature of the LCD screen, an afterimage of the fluorescent light, ...
AL1515 LCD Monitor Service Guide
Page 8
... health concerns. It is also a space saving design, allowing more . - 8 - This monitor can be directly connected to drive a pair of optional special display card. Description The LCD monitor is 20k hours or more desktop space, and comparing to the traditional CRT monitor, it consumes less power and gets less weight in stereo audio amplifier...
... health concerns. It is also a space saving design, allowing more . - 8 - This monitor can be directly connected to drive a pair of optional special display card. Description The LCD monitor is 20k hours or more desktop space, and comparing to the traditional CRT monitor, it consumes less power and gets less weight in stereo audio amplifier...
AL1515 LCD Monitor Service Guide
Page 9
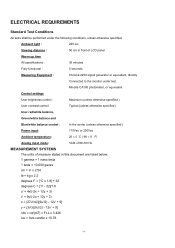
...± 5 ˚C ( 68 ± 9 ˚ F) Analog input mode: 1024 x768 /60 Hz MEASUREMENT SYSTEMS The units of LCD panel Warrn up time All specifications : 30 minutes Fully functional : 5 seconds Measuring Equipment : Chroma 2250 signal generator or equivalent, directly Connected to the... monitor under the following conditions, unless otherwise specified. Ambient light : 225 lux Viewing distance : 50 cm in front of measure ...
...± 5 ˚C ( 68 ± 9 ˚ F) Analog input mode: 1024 x768 /60 Hz MEASUREMENT SYSTEMS The units of LCD panel Warrn up time All specifications : 30 minutes Fully functional : 5 seconds Measuring Equipment : Chroma 2250 signal generator or equivalent, directly Connected to the... monitor under the following conditions, unless otherwise specified. Ambient light : 225 lux Viewing distance : 50 cm in front of measure ...

AL1515 LCD Monitor Service Guide
Page 10
LCD monitor General specification Panel Type: 15 " active matrix color TFT LCD LCD Panel Type Size Display Type Resolution Display Dot Display color Brightness Contrast Ratio Response Time Lamp Voltage Lamp Current Viewing Angle Hannstar HSD150SX84 HSD150SX87 15.0" (38cm) 15.0" (38cm) Active matrix color TFT LCD Active matrix color TFT LCD... D type, (standard VGA video) 3.5 mm stereo audio jack (Audio) (For AL1515 m only) Audio power: 0.5Wrms + 0.5Wrms (300Hz - 10kHz (S.P.L. - 10 dB))(AL1515 m only) Front control: power on/off with LED select adjustment (+,-) Interface frequency ...
LCD monitor General specification Panel Type: 15 " active matrix color TFT LCD LCD Panel Type Size Display Type Resolution Display Dot Display color Brightness Contrast Ratio Response Time Lamp Voltage Lamp Current Viewing Angle Hannstar HSD150SX84 HSD150SX87 15.0" (38cm) 15.0" (38cm) Active matrix color TFT LCD Active matrix color TFT LCD... D type, (standard VGA video) 3.5 mm stereo audio jack (Audio) (For AL1515 m only) Audio power: 0.5Wrms + 0.5Wrms (300Hz - 10kHz (S.P.L. - 10 dB))(AL1515 m only) Front control: power on/off with LED select adjustment (+,-) Interface frequency ...

AL1515 LCD Monitor Service Guide
Page 14
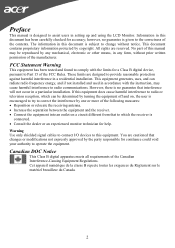
MONITOR BLOCK DIAGRAM The LCD monitor will drive the backlight of panel and the DC-DC conversion. The inverter board will contain an main board, an inverter/ power board, key board and internal adapter which house the flat panel control logic, brightness control logic and DDC. The Adapter will provide thr 12V DC-power to inverter/ power board. Power board (include: AC/DC,inverter) - 14 -
MONITOR BLOCK DIAGRAM The LCD monitor will drive the backlight of panel and the DC-DC conversion. The inverter board will contain an main board, an inverter/ power board, key board and internal adapter which house the flat panel control logic, brightness control logic and DDC. The Adapter will provide thr 12V DC-power to inverter/ power board. Power board (include: AC/DC,inverter) - 14 -
AL1515 LCD Monitor Service Guide
Page 19
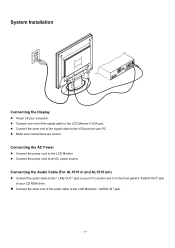
Connecting the AC Power Connect the power cord to an AC power source. Connecting the Audio Cable (For AL1515 m and AL1515 bm) Connect the audio cable to the front panel's "AUDIO OUT" jack of your computer. Connect the other end of the signal cable to the ... the " LINE OUT " jack on your PC. Make sure connections are secure. Connect one end of the audio cable to the LCD Monitor's VGA port. Connect the power cord to the LCD Monitor. System Installation Connecting the Display Power off your CD ROM drive. Connect the other end of the signal cable to the...
Connecting the AC Power Connect the power cord to an AC power source. Connecting the Audio Cable (For AL1515 m and AL1515 bm) Connect the audio cable to the front panel's "AUDIO OUT" jack of your computer. Connect the other end of the signal cable to the ... the " LINE OUT " jack on your PC. Make sure connections are secure. Connect one end of the audio cable to the LCD Monitor's VGA port. Connect the power cord to the LCD Monitor. System Installation Connecting the Display Power off your CD ROM drive. Connect the other end of the signal cable to the...
AL1515 User's Guide
Page 1
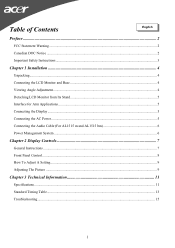
... Warning ...2 Canadian DOC Notice ...2 Important Safety Instructions ...3 Chapter 1 Installation ...4 Unpacking...4 Connecting the LCD Monitor and Base 4 Viewing Angle Adjustment...4 Detaching LCD Monitor from Its Stand 5 Interface for Arm Applications ...5 Connecting the Display ...5 Connecting the AC Power...5 Connecting the Audio Cable (For AL1515 m and AL1515 bm 6 Power Management System ...6 Chapter 2 Display Controls 7 General Instructions ...7 Front Panel Control...
... Warning ...2 Canadian DOC Notice ...2 Important Safety Instructions ...3 Chapter 1 Installation ...4 Unpacking...4 Connecting the LCD Monitor and Base 4 Viewing Angle Adjustment...4 Detaching LCD Monitor from Its Stand 5 Interface for Arm Applications ...5 Connecting the Display ...5 Connecting the AC Power...5 Connecting the Audio Cable (For AL1515 m and AL1515 bm 6 Power Management System ...6 Chapter 2 Display Controls 7 General Instructions ...7 Front Panel Control...
AL1515 User's Guide
Page 2
...If this equipment does cause harmful interference to radio or television reception, which the receiver is connected. • Consult the dealer or an experienced monitor technician for a Class B digital device, pursuant to assist users in a particular installation. Cet appareil numérique de la classe B repecte... • Connect the equipment into an outlet on a circuit different from that interference will not occur in setting up and using the LCD Monitor. This equipment generates, uses, and can be reproduced by turning the equipment off and on, the user is no guarantee is given ...
...If this equipment does cause harmful interference to radio or television reception, which the receiver is connected. • Consult the dealer or an experienced monitor technician for a Class B digital device, pursuant to assist users in a particular installation. Cet appareil numérique de la classe B repecte... • Connect the equipment into an outlet on a circuit different from that interference will not occur in setting up and using the LCD Monitor. This equipment generates, uses, and can be reproduced by turning the equipment off and on, the user is no guarantee is given ...
AL1515 User's Guide
Page 3
... the following occurs, immediately unplug your monitor and call an authorized technician. * Monitor to PC signal cable is frayed or damaged. * Liquid spilled into LCD Monitor or the monitor has been exposed to rain. * LCD Monitor or the case is damaged. 7. Power off LCD Monitor and unplug the AC Cord. -- Exposing the monitor to the LCD screen. Servicing of any of...
... the following occurs, immediately unplug your monitor and call an authorized technician. * Monitor to PC signal cable is frayed or damaged. * Liquid spilled into LCD Monitor or the monitor has been exposed to rain. * LCD Monitor or the case is damaged. 7. Power off LCD Monitor and unplug the AC Cord. -- Exposing the monitor to the LCD screen. Servicing of any of...
AL1515 User's Guide
Page 4
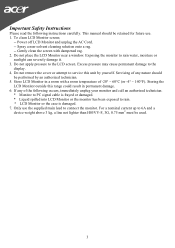
... 1. Ensure that the arrow on the base as stated above. AUDIO AL1515 No AL1515 b No AL1515 m Yes AL1515 bm Yes After you find that the following items were included in the box: * LCD Monitor * User's Manual * Quick Guide * 1.8M Monitor-to have a comfortable viewing angle. Place the LCD securely on the base faces forward. 3. Viewing Angle Adjustment The...
... 1. Ensure that the arrow on the base as stated above. AUDIO AL1515 No AL1515 b No AL1515 m Yes AL1515 bm Yes After you find that the following items were included in the box: * LCD Monitor * User's Manual * Quick Guide * 1.8M Monitor-to have a comfortable viewing angle. Place the LCD securely on the base faces forward. 3. Viewing Angle Adjustment The...
AL1515 User's Guide
Page 5
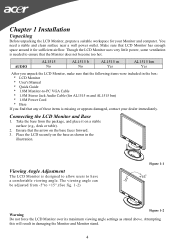
...the power cord to release. These specifications meet the VESA Flat Panel Monitor Physical Mounting Interface Standard (paragraphs 2.1 and 2.1.3, version 1, dated 13 November 1997). Connecting the AC Power 1. Detaching LCD Monitor from Its Stand Unscrew screws the swivel base support column and pull down... the hinge to the LCD Monitor.(See Fig. 1-6) 2. Power off your PC. 4. Connect the power cord to Fig...
...the power cord to release. These specifications meet the VESA Flat Panel Monitor Physical Mounting Interface Standard (paragraphs 2.1 and 2.1.3, version 1, dated 13 November 1997). Connecting the AC Power 1. Detaching LCD Monitor from Its Stand Unscrew screws the swivel base support column and pull down... the hinge to the LCD Monitor.(See Fig. 1-6) 2. Power off your PC. 4. Connect the power cord to Fig...

AL1515 User's Guide
Page 6
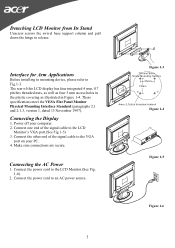
Connecting the Audio Cable (For AL1515 m and AL1515 bm) 1. The VESA DPMS provides four power saving modes through detecting a horizontal or vertical sync. Figure 1-7 Power Management System This LCD Monitor complies with the VESA DPMS (version 1.0) Power Management guidelines. signal. Connect the other end of your PC's...audio card or to the front panel's "AUDIO OUT" jack of the audio cable to the LCD Monitor's " AUDIO IN " jack. When the LCD Monitor is in power saving mode, the monitor screen will be blank and the power LED indicator will light yellow. 6 Connect the audio cable...
Connecting the Audio Cable (For AL1515 m and AL1515 bm) 1. The VESA DPMS provides four power saving modes through detecting a horizontal or vertical sync. Figure 1-7 Power Management System This LCD Monitor complies with the VESA DPMS (version 1.0) Power Management guidelines. signal. Connect the other end of your PC's...audio card or to the front panel's "AUDIO OUT" jack of the audio cable to the LCD Monitor's " AUDIO IN " jack. When the LCD Monitor is in power saving mode, the monitor screen will be blank and the power LED indicator will light yellow. 6 Connect the audio cable...
AL1515 User's Guide
Page 13
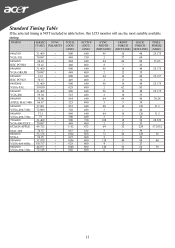
Standard Timing Table If the selected timing is NOT included in table below, this LCD monitor will use the most suitable available timing. TIMING FH(KHZ) SYNC TOTAL FV(HZ) POLARITY (DOT/ LINE) ACTIVE (DOT/ LINE) SYNC WIDTH (DOT/LINE) FRONT ...
Standard Timing Table If the selected timing is NOT included in table below, this LCD monitor will use the most suitable available timing. TIMING FH(KHZ) SYNC TOTAL FV(HZ) POLARITY (DOT/ LINE) ACTIVE (DOT/ LINE) SYNC WIDTH (DOT/LINE) FRONT ...
AL1515 User's Guide
Page 15
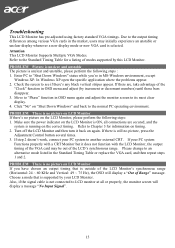
...clear display. 4. Please change to an alternative mode listed in OSD menu again and adjust the monitor screen to LCD monitor at all connections are , take advantage of the LCD's synchronous range. Check the screen to "Shut Down Windows" status while you have chosen an output..., press the Adjustment Control button several times. 3. Make sure the power indicator on the LCD Monitor, please perform the following steps : 1. If there is still no picture on the LCD Monitor is outside of the LCD Monitor's synchronous range (Horizontal: 24 ~ 60 KHz and Vertical: 49 ~ 75 Hz), the...
...clear display. 4. Please change to an alternative mode listed in OSD menu again and adjust the monitor screen to LCD monitor at all connections are , take advantage of the LCD's synchronous range. Check the screen to "Shut Down Windows" status while you have chosen an output..., press the Adjustment Control button several times. 3. Make sure the power indicator on the LCD Monitor, please perform the following steps : 1. If there is still no picture on the LCD Monitor is outside of the LCD Monitor's synchronous range (Horizontal: 24 ~ 60 KHz and Vertical: 49 ~ 75 Hz), the...


