

Intel Rapid Storage Guide
Page 1
... combining from two to users of the chipset and Serial ATA (SATA) hard drive. 1 When the failed drive is removed and a replacement hard drive is installed, data fault tolerance is improved through Native Command Queuing (NCQ). Combined with an external drive. Intel Rapid Storage Technology provides benefits to six drives in...
... combining from two to users of the chipset and Serial ATA (SATA) hard drive. 1 When the failed drive is removed and a replacement hard drive is installed, data fault tolerance is improved through Native Command Queuing (NCQ). Combined with an external drive. Intel Rapid Storage Technology provides benefits to six drives in...

Intel Rapid Storage Guide
Page 2
Save the file to launch the installation program. 4. Click Next. 2 Click Continue (if needed) to a known location on your computer's hard drive. 2. Locate the file on your hard drive and double-click it. 3. Download the Intel Rapid Storage Technology software from Intel website. Click Next at the Welcome screen. 5. Installation Instructions 1.
Save the file to launch the installation program. 4. Click Next. 2 Click Continue (if needed) to a known location on your computer's hard drive. 2. Locate the file on your hard drive and double-click it. 3. Download the Intel Rapid Storage Technology software from Intel website. Click Next at the Welcome screen. 5. Installation Instructions 1.

Intel Rapid Storage Guide
Page 3
Read the license agreement and click Yes to accept the terms and continue. 7. Click Next. 6. The application files will now be installed. 3
Read the license agreement and click Yes to accept the terms and continue. 7. Click Next. 6. The application files will now be installed. 3

Intel Rapid Storage Guide
Page 12
...Select 1: Create RAID Volume and press Enter. 3. Click F2 or Delete to create a RAID volume. 1. How to install an operating system onto a RAID volume (F6 install method) In order to install an operating system onto a RAID volume, the RAID option must be enabled in the system BIOS. 1. Enable RAID in...BIOS Use the instructions included with your motherboard to enable RAID in the system BIOS, a RAID volume must be created, and the F6 installation method must be used to select the physical disks. 6. Press Enter to load the Intel® Rapid Storage Technology driver during POST, ...
...Select 1: Create RAID Volume and press Enter. 3. Click F2 or Delete to create a RAID volume. 1. How to install an operating system onto a RAID volume (F6 install method) In order to install an operating system onto a RAID volume, the RAID option must be enabled in the system BIOS. 1. Enable RAID in...BIOS Use the instructions included with your motherboard to enable RAID in the system BIOS, a RAID volume must be created, and the F6 installation method must be used to select the physical disks. 6. Press Enter to load the Intel® Rapid Storage Technology driver during POST, ...

Intel Rapid Storage Guide
Page 13
... Perform the following files: IAAHCI.INF, IAAHCI.CAT, IASTOR.INF, IASTOR.CAT, IASTOR.SYS, and TXTSETUP.OEM. Press F6 when you need to install the Intel Rapid Storage Technology driver during text-mode phase). When you see a prompt that says, Press F6 if you see a message in the...status line that says, Please insert the disk labeled Manufacturer-supplied hardware support disk into Drive A:, insert ;a floppy disk containing the following steps to install a third party SCSI or RAID driver. Press Enter. 5. Press Enter to create a floppy disk with a screen asking you have successfully...
... Perform the following files: IAAHCI.INF, IAAHCI.CAT, IASTOR.INF, IASTOR.CAT, IASTOR.SYS, and TXTSETUP.OEM. Press F6 when you need to install the Intel Rapid Storage Technology driver during text-mode phase). When you see a prompt that says, Press F6 if you see a message in the...status line that says, Please insert the disk labeled Manufacturer-supplied hardware support disk into Drive A:, insert ;a floppy disk containing the following steps to install a third party SCSI or RAID driver. Press Enter. 5. Press Enter to create a floppy disk with a screen asking you have successfully...
Intel Rapid Storage Guide
Page 14
...Storage Technology user interface in the floppy drive until the system reboots. Windows setup will need to copy the files again from the floppy to install Intel Rapid Storage Technology by Note running the Setup.exe process after these files again, remove the floppy disk so that Windows setup can ...reboot as you will need to the Windows installation folders. the floppy disk in Windows, you would on the RAID volume as needed. 7. Once Windows setup has copied these steps have been ...
...Storage Technology user interface in the floppy drive until the system reboots. Windows setup will need to copy the files again from the floppy to install Intel Rapid Storage Technology by Note running the Setup.exe process after these files again, remove the floppy disk so that Windows setup can ...reboot as you will need to the Windows installation folders. the floppy disk in Windows, you would on the RAID volume as needed. 7. Once Windows setup has copied these steps have been ...
Intel Rapid Storage Guide
Page 15
... Storage Technology user interface to a RAID volume that includes that hard drive plus the newly added hard drive(s). Turn off the system and install one or more additional hard drives. 3. If your RAID controller is not enabled, enabling the RAID controller is not recommended or supported when...has a RAID I want to use RAID but my OS is already installed? If your system to create a RAID volume. Turn on your operating system is already installed, you will not be able to use RAID Note without installing a third-party RAID controller card. • Your RAID controller is the...
... Storage Technology user interface to a RAID volume that includes that hard drive plus the newly added hard drive(s). Turn off the system and install one or more additional hard drives. 3. If your RAID controller is not enabled, enabling the RAID controller is not recommended or supported when...has a RAID I want to use RAID but my OS is already installed? If your system to create a RAID volume. Turn on your operating system is already installed, you will not be able to use RAID Note without installing a third-party RAID controller card. • Your RAID controller is the...

Intel Rapid Storage Guide
Page 16
You will then be used to load the Intel® Rapid Storage Technology driver during operating system installation. You can use the F6 installation method to install a RAID Note driver on your system, you need to use a USB floppy drive or create a slipstream version of the operating system. 16 Setup will happen... operating system onto a single Serial ATA hard drive when the system is in RAID mode or AHCI mode, the F6 installation method must be prompted with the necessary files. When you to load support for mass storage device(s). 2. You do not have a floppy drive on ...
You will then be used to load the Intel® Rapid Storage Technology driver during operating system installation. You can use the F6 installation method to install a RAID Note driver on your system, you need to use a USB floppy drive or create a slipstream version of the operating system. 16 Setup will happen... operating system onto a single Serial ATA hard drive when the system is in RAID mode or AHCI mode, the F6 installation method must be prompted with the necessary files. When you to load support for mass storage device(s). 2. You do not have a floppy drive on ...

Intel Rapid Storage Guide
Page 17
... list of available SCSI adapters. Leave the floppy disk in the floppy drive until the system reboots. 4. Press Enter to the Windows installation folders. At this point, you wish to use the Intel Rapid Storage Technology user interface Note within Windows. 17 If you have successfully... installed the Intel Rapid Storage Technology driver and Windows setup should continue. Windows setup will need to scroll through the list as needed. ...
... list of available SCSI adapters. Leave the floppy disk in the floppy drive until the system reboots. 4. Press Enter to the Windows installation folders. At this point, you wish to use the Intel Rapid Storage Technology user interface Note within Windows. 17 If you have successfully... installed the Intel Rapid Storage Technology driver and Windows setup should continue. Windows setup will need to scroll through the list as needed. ...

Intel Rapid Storage Guide
Page 18
...with the following steps in the Drivers folder after extraction. 2. o If the system has a 32-bit processor, the files will be used to install the RAID or AHCI driver, as applicable, into the UNATTEND.TXT file [MassStorageDrivers] "Intel(R) 82801R/DO/DH SATA RAID Controller" = OEM 18... Insert the lines shown below, as outlined in the Advanced Installation Instructions section of installation is used for systems using any supported RAID Note controller hub by replacing the text within the quotation marks. // Insert the lines...
...with the following steps in the Drivers folder after extraction. 2. o If the system has a 32-bit processor, the files will be used to install the RAID or AHCI driver, as applicable, into the UNATTEND.TXT file [MassStorageDrivers] "Intel(R) 82801R/DO/DH SATA RAID Controller" = OEM 18... Insert the lines shown below, as outlined in the Advanced Installation Instructions section of installation is used for systems using any supported RAID Note controller hub by replacing the text within the quotation marks. // Insert the lines...
Marvell SATA3 RAID Installation Guide
Page 1
Marvell SATA3 RAID Installation Guide Overview The Marvell RAID Utility (MRU) is a browser-based graphical user interface (GUI) tool for the Marvell RAID adapter. Two disks mirrored to achieve ...
Marvell SATA3 RAID Installation Guide Overview The Marvell RAID Utility (MRU) is a browser-based graphical user interface (GUI) tool for the Marvell RAID adapter. Two disks mirrored to achieve ...
Marvell SATA3 RAID Installation Guide
Page 2
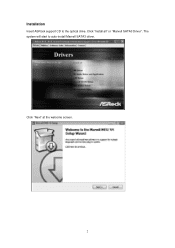
The system will start to the optical drive. Installation Insert ASRock support CD to auto-install Marvell SATA3 driver. Click "Next" at the welcome screen. 2 Click "Install all" or "Marvell SATA3 Driver".
The system will start to the optical drive. Installation Insert ASRock support CD to auto-install Marvell SATA3 driver. Click "Next" at the welcome screen. 2 Click "Install all" or "Marvell SATA3 Driver".
Marvell SATA3 RAID Installation Guide
Page 3
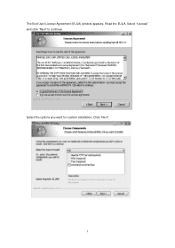
Click "Next". 3 Select "I accept" and click "Next" to continue. Select the options you want for custom installation. The End User License Agreement (EULA) window appears. Read the EULA.
Click "Next". 3 Select "I accept" and click "Next" to continue. Select the options you want for custom installation. The End User License Agreement (EULA) window appears. Read the EULA.
Marvell SATA3 RAID Installation Guide
Page 4
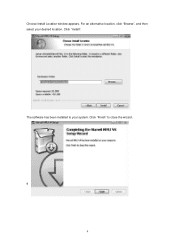
For an alternative location, click "Browse", and then select your system. The software has been installed to close the wizard. Click "Install". Click "Finish" to your desired location. d 4 Choose Install Location window appears.
For an alternative location, click "Browse", and then select your system. The software has been installed to close the wizard. Click "Install". Click "Finish" to your desired location. d 4 Choose Install Location window appears.

Marvell SATA3 RAID Installation Guide
Page 6
... properly in the browser, Active Scripting must be enabled in Internet Explorer distributed with the remote adapter. To enable Active Scripting in the Browser After installing your default browser. Launching the MRU in Internet Explorer 1.
... properly in the browser, Active Scripting must be enabled in Internet Explorer distributed with the remote adapter. To enable Active Scripting in the Browser After installing your default browser. Launching the MRU in Internet Explorer 1.

Marvell SATA3 RAID Installation Guide
Page 16
Rebuilding is PD 0.) Then follow the instructions on the newly added drive. In below screen, the Status shows "Degrade". Install a new hard disk to rebuild. The system will start to rebuild your lost data. Select the free disk by pressing the space bar. (In this ...
Rebuilding is PD 0.) Then follow the instructions on the newly added drive. In below screen, the Status shows "Degrade". Install a new hard disk to rebuild. The system will start to rebuild your lost data. Select the free disk by pressing the space bar. (In this ...
User Manual
Page 3
...1.4 Two CrossFireXTM Graphics Card Support List 11 1.5 Motherboard Layout 12 1.6 I/O Panel 13 2 Installation 14 2.1 Screw Holes 14 2.2 Pre-installation Precautions 14 2.3 CPU Installation 15 2.4 Installation of Heatsink and CPU fan 17 2.5 Installation of Memory Modules (DIMM 18 2.6 Expansion Slots (PCI and PCI Express Slots 20 2.7 SLITM...Smart Switches 35 2.13 Dr. Debug 36 2.14 Serial ATA (SATA) / Serial ATAII (SATAII) Hard Disks Installation 39 2.15 Serial ATA3 (SATA3) Hard Disks Installation 39 2.16 Hot Plug and Hot Swap Functions for SATA / SATAII HDDs 40 2.17 Hot Plug and Hot ...
...1.4 Two CrossFireXTM Graphics Card Support List 11 1.5 Motherboard Layout 12 1.6 I/O Panel 13 2 Installation 14 2.1 Screw Holes 14 2.2 Pre-installation Precautions 14 2.3 CPU Installation 15 2.4 Installation of Heatsink and CPU fan 17 2.5 Installation of Memory Modules (DIMM 18 2.6 Expansion Slots (PCI and PCI Express Slots 20 2.7 SLITM...Smart Switches 35 2.13 Dr. Debug 36 2.14 Serial ATA (SATA) / Serial ATAII (SATAII) Hard Disks Installation 39 2.15 Serial ATA3 (SATA3) Hard Disks Installation 39 2.16 Hot Plug and Hot Swap Functions for SATA / SATAII HDDs 40 2.17 Hot Plug and Hot ...
User Manual
Page 4
...7 / 7 64-bit / VistaTM / VistaTM 64-bit / XP / XP 64-bit Without RAID Functions 47 2.21.1 Installing Windows® XP / XP 64-bit Without RAID Functions 47 2.21.2 Installing Windows® 7 / 7 64-bit / VistaTM / VistaTM 64-bit Without RAID Functions 48 2.22 Untied Overclocking Technology 48... 66 3.6 Boot Screen 66 3.6.1 Boot Settings Configuration 67 3.7 Security Screen 68 3.8 Exit Screen 69 4 Software Support 70 4.1 Install Operating System 70 4.2 Support CD Information 70 4.2.1 Running Support CD 70 4.2.2 Drivers Menu 70 4.2.3 Utilities Menu 70 4.2.4 Contact Information 70 4
...7 / 7 64-bit / VistaTM / VistaTM 64-bit / XP / XP 64-bit Without RAID Functions 47 2.21.1 Installing Windows® XP / XP 64-bit Without RAID Functions 47 2.21.2 Installing Windows® 7 / 7 64-bit / VistaTM / VistaTM 64-bit Without RAID Functions 48 2.22 Untied Overclocking Technology 48... 66 3.6 Boot Screen 66 3.6.1 Boot Settings Configuration 67 3.7 Security Screen 68 3.8 Exit Screen 69 4 Software Support 70 4.1 Install Operating System 70 4.2 Support CD Information 70 4.2.1 Running Support CD 70 4.2.2 Drivers Menu 70 4.2.3 Utilities Menu 70 4.2.4 Contact Information 70 4
User Manual
Page 5
... case any modifications of this manual occur, the updated version will be available on ASRock website as well. www.asrock.com/support/index.asp 1.1 Package Contents ASRock P55 Extreme4 Motherboard (ATX Form Factor: 12.0-in x 9.6-in, 30.5 cm x 24.4 cm) ASRock P55 Extreme4 Quick Installation Guide ASRock P55 Extreme4 Support CD 1 x 80-conductor Ultra ATA 66/100/133 IDE Ribbon Cable 1 x Ribbon...
... case any modifications of this manual occur, the updated version will be available on ASRock website as well. www.asrock.com/support/index.asp 1.1 Package Contents ASRock P55 Extreme4 Motherboard (ATX Form Factor: 12.0-in x 9.6-in, 30.5 cm x 24.4 cm) ASRock P55 Extreme4 Quick Installation Guide ASRock P55 Extreme4 Support CD 1 x 80-conductor Ultra ATA 66/100/133 IDE Ribbon Cable 1 x Ribbon...
User Manual
Page 9
... 4-channel, 6-channel, and 8-channel modes. Please be less than 4GB for the reservation for the operation procedures of ASRock OC Tuner. ASRock website: http://www.asrock.com/feature/IES/index.html 9. The software name itself - With this tool and save your hardware devices to update ...new BIOS file to surveil your system by ASRock, provides a convenient way for the operation procedures of Intelligent Energy Saver. Please read the installation guide of . It is capable of memory modules on page 18 for proper installation. 4. Please visit our website for system ...
... 4-channel, 6-channel, and 8-channel modes. Please be less than 4GB for the reservation for the operation procedures of ASRock OC Tuner. ASRock website: http://www.asrock.com/feature/IES/index.html 9. The software name itself - With this tool and save your hardware devices to update ...new BIOS file to surveil your system by ASRock, provides a convenient way for the operation procedures of Intelligent Energy Saver. Please read the installation guide of . It is capable of memory modules on page 18 for proper installation. 4. Please visit our website for system ...


