
User Manual
Page 10
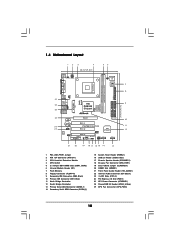
... PCIE1 LAN PHY IDE1 IDE2 CMOS Battery CD1 PCI 1 P4VM900-SATA2 PCI 2 VIA VT8237S Audio CODEC 1 HD_AUDIO1 PCI 3 USB2.0 CHA_FAN1 CLRCMOS1 HDMR1 5.1CH HD 1 ATA133 1 SPEAKER1 USB67 PANEL 1 PLED PWRBTN 1 HDLED RESET SATAII_2 SATAII_1 10 11 12 21 20 19 18 17 16 15 14 13 1 PS2_USB_PWR1 Jumper 2 ATX 12V Connector (ATX12V1) 3 CPU Heatsink Retention Module 4 CPU Socket 5 2 x 184-pin DDR DIMM Slots (DDR1, DDR2) 6 Infrared Module Header (IR1) 7 Flash Memory 8 Floppy Connector (FLOPPY1) 9 Secondary IDE Connector...
... PCIE1 LAN PHY IDE1 IDE2 CMOS Battery CD1 PCI 1 P4VM900-SATA2 PCI 2 VIA VT8237S Audio CODEC 1 HD_AUDIO1 PCI 3 USB2.0 CHA_FAN1 CLRCMOS1 HDMR1 5.1CH HD 1 ATA133 1 SPEAKER1 USB67 PANEL 1 PLED PWRBTN 1 HDLED RESET SATAII_2 SATAII_1 10 11 12 21 20 19 18 17 16 15 14 13 1 PS2_USB_PWR1 Jumper 2 ATX 12V Connector (ATX12V1) 3 CPU Heatsink Retention Module 4 CPU Socket 5 2 x 184-pin DDR DIMM Slots (DDR1, DDR2) 6 Infrared Module Header (IR1) 7 Flash Memory 8 Floppy Connector (FLOPPY1) 9 Secondary IDE Connector...
User Manual
Page 19
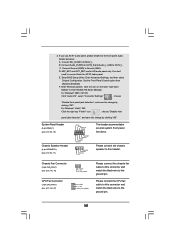
... to [Enabled]. Connect Audio_R (RIN) to OUT2_R and Audio_L (LIN) to this header. D. Enter Advanced Settings, and then select Chipset Configuration. For Windows® 2000 / XP OS: Click "Audio I/O", select "Connector Settings" , choose "Disable front panel jack detection", and save the change by clicking "OK". C. Enter Windows system. Chassis Fan Connector (3-pin CHA_FAN1) (see p.10, No. 18) CPU Fan Connector (3-pin CPU_FAN1) (see p.10, No. 17) PLED+ PLEDPWRBTN# GND 1 DUMMY RESET# GND HDLEDHDLED+ 1 SPEAKER DUMMY DUMMY...
... to [Enabled]. Connect Audio_R (RIN) to OUT2_R and Audio_L (LIN) to this header. D. Enter Advanced Settings, and then select Chipset Configuration. For Windows® 2000 / XP OS: Click "Audio I/O", select "Connector Settings" , choose "Disable front panel jack detection", and save the change by clicking "OK". C. Enter Windows system. Chassis Fan Connector (3-pin CHA_FAN1) (see p.10, No. 18) CPU Fan Connector (3-pin CPU_FAN1) (see p.10, No. 17) PLED+ PLEDPWRBTN# GND 1 DUMMY RESET# GND HDLEDHDLED+ 1 SPEAKER DUMMY DUMMY...
User Manual
Page 25
... the message on this motherboard, please follow the order from our support CD to your system can work T properly. STEP 2: Make a SATA / SATAII driver diskette. Set the "SATA Operation Mode" option to [RAID]. During POST at the beginning of system boot-up, press key, and then a window for boot devices selection appears. Insert the ASRock Support CD into floppy drive A: 25 ROM as the boot device. D. S 3. 2.11 Driver Installation Guide To install the drivers to your system, please...
... the message on this motherboard, please follow the order from our support CD to your system can work T properly. STEP 2: Make a SATA / SATAII driver diskette. Set the "SATA Operation Mode" option to [RAID]. During POST at the beginning of system boot-up, press key, and then a window for boot devices selection appears. Insert the ASRock Support CD into floppy drive A: 25 ROM as the boot device. D. S 3. 2.11 Driver Installation Guide To install the drivers to your system, please...

User Manual
Page 26
...; setup, press F6 to [RAID]. A. STEP 2: Use "RAID Installation Guide" to set RAID configuration. Insert the Windows® VistaTM optical disk into the optical drive to boot your system. When you see "Where do you install. 1. Select the driver to install according to the mode you choose and the OS you want to install Windows® VistaTM on your system. Set the "SATA Operation Mode" option to install a third-party RAID driver. page, please insert the ASRock Support...
...; setup, press F6 to [RAID]. A. STEP 2: Use "RAID Installation Guide" to set RAID configuration. Insert the Windows® VistaTM optical disk into the optical drive to boot your system. When you see "Where do you install. 1. Select the driver to install according to the mode you choose and the OS you want to install Windows® VistaTM on your system. Set the "SATA Operation Mode" option to install a third-party RAID driver. page, please insert the ASRock Support...
User Manual
Page 27
...-click "VIA V-Raid Utility" icon on your SATA / SATAII HDDs without RAID functions, please follow below steps. To operate SATA RAID utility under a more stable overclocking environment. You may set the RAID configuration by using the Windows RAID installation guide in the following path in the Support CD: .. \ RAID Installation Guide 2. B. STEP 1: Set up BIOS, you want to fixed PCI / PCIE bus. Set the "SATA Operation Mode" option to load the VIA® RAID drivers. A. Therefore, CPU FSB is untied during overclocking, FSB enjoys better...
...-click "VIA V-Raid Utility" icon on your SATA / SATAII HDDs without RAID functions, please follow below steps. To operate SATA RAID utility under a more stable overclocking environment. You may set the RAID configuration by using the Windows RAID installation guide in the following path in the Support CD: .. \ RAID Installation Guide 2. B. STEP 1: Set up BIOS, you want to fixed PCI / PCIE bus. Set the "SATA Operation Mode" option to load the VIA® RAID drivers. A. Therefore, CPU FSB is untied during overclocking, FSB enjoys better...
User Manual
Page 31
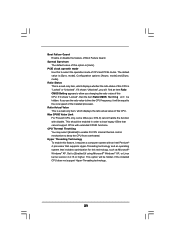
.... Set to keep the CPU from overheated. Ratio Actual Value This is [Sync. PCIE clock operatin mode Use this CPU. If you changing the ratio value of CPU and PCIE clocks. The default value is a read -only item, which displays the ratio actual value of this to the core speed of Boot Failure Guard. This should be hidden if the installed CPU does not support Hyper-Threading technology. 31 mode]. Boot Failure Guard Enable or disable...
.... Set to keep the CPU from overheated. Ratio Actual Value This is [Sync. PCIE clock operatin mode Use this CPU. If you changing the ratio value of CPU and PCIE clocks. The default value is a read -only item, which displays the ratio actual value of this to the core speed of Boot Failure Guard. This should be hidden if the installed CPU does not support Hyper-Threading technology. 31 mode]. Boot Failure Guard Enable or disable...
User Manual
Page 34
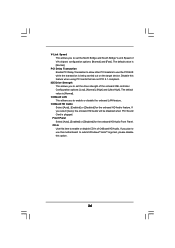
... to set the drive strength of the onboard IDE controller. V-Link Speed This allows you to set the North Bridge and South Bridge V-Link Speed of VIA chipset. Disable this item to enable or disable the onboard LAN feature. Configuration options: [Low], [Normal], [High] and [Ultra High]. If you to enable or disable CD-In of OnBoard HD Audio. OnBoard HD Audio Select [Auto], [Enabled] or [Disabled] for the onboard HD Audio Front Panel. CD-In Use this feature when using PCI cards that...
... to set the drive strength of the onboard IDE controller. V-Link Speed This allows you to set the North Bridge and South Bridge V-Link Speed of VIA chipset. Disable this item to enable or disable the onboard LAN feature. Configuration options: [Low], [Normal], [High] and [Ultra High]. If you to enable or disable CD-In of OnBoard HD Audio. OnBoard HD Audio Select [Auto], [Enabled] or [Disabled] for the onboard HD Audio Front Panel. CD-In Use this feature when using PCI cards that...
User Manual
Page 36
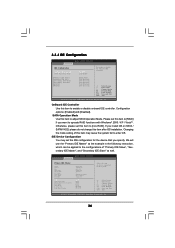
... IDE Master Primary IDE Slave Secondary IDE Master Secondary IDE Slave SATA 1 SATA 2 [Hard Disk] [Not Detected] [Not Detected] [Not Detected] [Not Detected] [Not Detected] +F1 F9 F10 ESC Select Screen Select Item Change Option General Help Load Defaults Save and Exit Exit v02.54 (C) Copyright 1985-2003, American Megatrends, Inc. 3.3.4 IDE Configuration BIOS SETUP UTILITY Advanced IDE Configuration OnBoard IDE Controller SATA Operation Mode [Enabled] [non-RAID] To enable or disable the onboard IDE controller. Please set this item to the configurations of device connected...
... IDE Master Primary IDE Slave Secondary IDE Master Secondary IDE Slave SATA 1 SATA 2 [Hard Disk] [Not Detected] [Not Detected] [Not Detected] [Not Detected] [Not Detected] +F1 F9 F10 ESC Select Screen Select Item Change Option General Help Load Defaults Save and Exit Exit v02.54 (C) Copyright 1985-2003, American Megatrends, Inc. 3.3.4 IDE Configuration BIOS SETUP UTILITY Advanced IDE Configuration OnBoard IDE Controller SATA Operation Mode [Enabled] [non-RAID] To enable or disable the onboard IDE controller. Please set this item to the configurations of device connected...
User Manual
Page 37
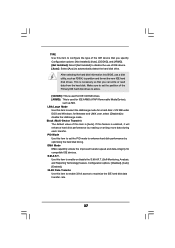
... default value of this item to select the LBA/Large mode for compatible IDE devices. Configuration options: [Not Installed], [Auto], [CD/DVD], and [ARMD]. [Not Installed]: Select [Not Installed] to disable the use a disk utility, such as MO. DMA Mode DMA capability allows the improved transfer-speed and data-integrity for a hard disk > 512 MB under DOS and Windows; Configuration options: [Disabled], [Auto], [Enabled]. 32-Bit Data Transfer Use this item to enable or disable the S.M.A.R.T. (Self-Monitoring, Analysis, and Reporting Technology...
... default value of this item to select the LBA/Large mode for compatible IDE devices. Configuration options: [Not Installed], [Auto], [CD/DVD], and [ARMD]. [Not Installed]: Select [Not Installed] to disable the use a disk utility, such as MO. DMA Mode DMA capability allows the improved transfer-speed and data-integrity for a hard disk > 512 MB under DOS and Windows; Configuration options: [Disabled], [Auto], [Enabled]. 32-Bit Data Transfer Use this item to enable or disable the S.M.A.R.T. (Self-Monitoring, Analysis, and Reporting Technology...
User Manual
Page 42
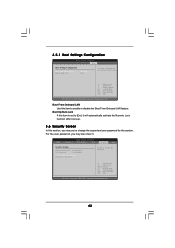
... item is set or change the supervisor/user password for the system. Select Screen Select Item Enter Change F1 General Help F9 Load Defaults F10 Save and Exit ESC Exit v02.54 (C) Copyright 1985-2003, American Megatrends, Inc. 42 Boot From Onboard LAN Use this section, you may set to enable or disable the Boot From Onboard LAN feature. BIOS SETUP UTILITY Main Advanced H/W Monitor Boot Security Exit Security Settings Supervisor Password : Not Installed User Password : Not Installed Change Supervisor Password Change User Password Install or Change the password.
... item is set or change the supervisor/user password for the system. Select Screen Select Item Enter Change F1 General Help F9 Load Defaults F10 Save and Exit ESC Exit v02.54 (C) Copyright 1985-2003, American Megatrends, Inc. 42 Boot From Onboard LAN Use this section, you may set to enable or disable the Boot From Onboard LAN feature. BIOS SETUP UTILITY Main Advanced H/W Monitor Boot Security Exit Security Settings Supervisor Password : Not Installed User Password : Not Installed Change Supervisor Password Change User Password Install or Change the password.
User Manual
Page 44
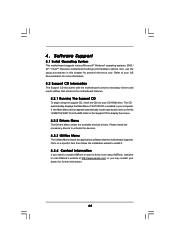
... the motherboard contains necessary drivers and useful utilities that the motherboard supports. The CD automatically displays the Main Menu if "AUTORUN" is enabled in this chapter for further information. 44 Because motherboard settings and hardware options vary, use the setup procedures in your dealer for general reference only. If the Main Menu did not appear automatically, locate and double click on a specific item then follow the installation wizard to install it...
... the motherboard contains necessary drivers and useful utilities that the motherboard supports. The CD automatically displays the Main Menu if "AUTORUN" is enabled in this chapter for further information. 44 Because motherboard settings and hardware options vary, use the setup procedures in your dealer for general reference only. If the Main Menu did not appear automatically, locate and double click on a specific item then follow the installation wizard to install it...
Quick Installation Guide
Page 6
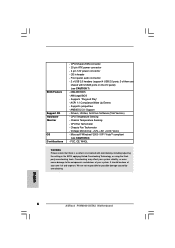
...CE, WHQL WARNING Please realize that there is a certain risk involved with USB45 ports on the I/O panel) (see CAUTION 8) - Supports "Plug and Play" - It should be done at your system. English 6 ASRock P4VM900-SATA2 Motherboard Voltage Monitoring: +12V, +5V, +3.3V, Vcore - Chassis Fan Tachometer - ACPI 1.1 Compliance Wake Up Events - CPU/Chassis FAN connector - 20 pin ATX power connector - 4 pin 12V power connector - CD in the BIOS, applying Untied Overclocking Technology, or using the thirdparty overclocking tools. Drivers, Utilities, AntiVirus Software (Trial Version) -
...CE, WHQL WARNING Please realize that there is a certain risk involved with USB45 ports on the I/O panel) (see CAUTION 8) - Supports "Plug and Play" - It should be done at your system. English 6 ASRock P4VM900-SATA2 Motherboard Voltage Monitoring: +12V, +5V, +3.3V, Vcore - Chassis Fan Tachometer - ACPI 1.1 Compliance Wake Up Events - CPU/Chassis FAN connector - 20 pin ATX power connector - 4 pin 12V power connector - CD in the BIOS, applying Untied Overclocking Technology, or using the thirdparty overclocking tools. Drivers, Utilities, AntiVirus Software (Trial Version) -
Quick Installation Guide
Page 7
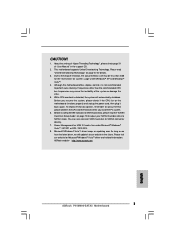
.... 4. CAUTION! 1. About the setting of "Hyper Threading Technology", please check page 31 of the system or damage the CPU. 5. Please read the "SATAII Hard Disk Setup Guide" on updating now. ASRock website http://www.asrock.com 7 ASRock P4VM900-SATA2 Motherboard English Power Management for Microsoft® Windows® VistaTM driver and related information. This motherboard supports Untied Overclocking Technology. While CPU overheat is not recommended to SATAII mode. Before installing SATAII hard disk to SATAII connector directly. 7.
.... 4. CAUTION! 1. About the setting of "Hyper Threading Technology", please check page 31 of the system or damage the CPU. 5. Please read the "SATAII Hard Disk Setup Guide" on updating now. ASRock website http://www.asrock.com 7 ASRock P4VM900-SATA2 Motherboard English Power Management for Microsoft® Windows® VistaTM driver and related information. This motherboard supports Untied Overclocking Technology. While CPU overheat is not recommended to SATAII mode. Before installing SATAII hard disk to SATAII connector directly. 7.
Quick Installation Guide
Page 16
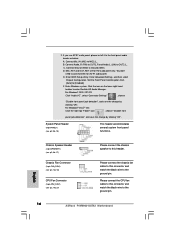
... below: A. F. 2. If you use AC'97 audio panel, please install it to OUT2_L. D. Enter BIOS Setup Utility. Enter Windows system. Click the icon on the lower right hand taskbar to the ground pin. 16 ASRock P4VM900-SATA2 Motherboard English Chassis Speaker Header (4-pin SPEAKER 1) (see p.2, No. 17) Chassis Fan Connector (3-pin CHA_FAN1) (see p.2, No. 18) CPU Fan Connector (3-pin CPU_FAN1) (see p.2, No. 15) This header accommodates several system front panel functions. Please connect the CPU fan cable to this connector and match the black wire to [Enabled].
... below: A. F. 2. If you use AC'97 audio panel, please install it to OUT2_L. D. Enter BIOS Setup Utility. Enter Windows system. Click the icon on the lower right hand taskbar to the ground pin. 16 ASRock P4VM900-SATA2 Motherboard English Chassis Speaker Header (4-pin SPEAKER 1) (see p.2, No. 17) Chassis Fan Connector (3-pin CHA_FAN1) (see p.2, No. 18) CPU Fan Connector (3-pin CPU_FAN1) (see p.2, No. 15) This header accommodates several system front panel functions. Please connect the CPU fan cable to this connector and match the black wire to [Enabled].
Quick Installation Guide
Page 18
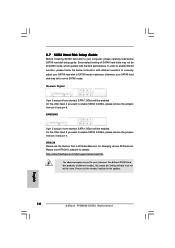
... changing various ATA features. Western Digital If pin 5 and pin 6 are just for details: http://www.hitachigst.com/hdd/support/download.htm The above examples are shorted, SATA 1.5Gb/s will be the same. HITACHI Please use the Feature Tool, a DOS-bootable tool, for the updates. 18 ASRock P4VM900-SATA2 Motherboard English otherwise, your reference. 2.7 SATAII Hard Disk Setup Guide Before installing SATAII hard disk to enable SATAII 3.0Gb/s, please remove the jumpers from pin 5 and pin...
... changing various ATA features. Western Digital If pin 5 and pin 6 are just for details: http://www.hitachigst.com/hdd/support/download.htm The above examples are shorted, SATA 1.5Gb/s will be the same. HITACHI Please use the Feature Tool, a DOS-bootable tool, for the updates. 18 ASRock P4VM900-SATA2 Motherboard English otherwise, your reference. 2.7 SATAII Hard Disk Setup Guide Before installing SATAII hard disk to enable SATAII 3.0Gb/s, please remove the jumpers from pin 5 and pin...
Quick Installation Guide
Page 20
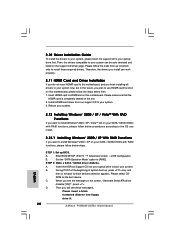
... the screen, "Generate Serial ATA driver diskette [YN]?", press . Install HDMR card driver from up to bottom side to HDMR slot on this motherboard. Set the "SATA Operation Mode" option to your system now, but in the future, you will see the message on the slot. 2. STEP 2: Make a SATA / SATAII driver diskette. Insert HDMR card to install those required drivers. Enter BIOS SETUP UTILITY Advanced screen IDE Configuration. STEP 1: Set up , press key, and then a window for boot devices selection...
... the screen, "Generate Serial ATA driver diskette [YN]?", press . Install HDMR card driver from up to bottom side to HDMR slot on this motherboard. Set the "SATA Operation Mode" option to your system now, but in the future, you will see the message on the slot. 2. STEP 2: Make a SATA / SATAII driver diskette. Insert HDMR card to install those required drivers. Enter BIOS SETUP UTILITY Advanced screen IDE Configuration. STEP 1: Set up , press key, and then a window for boot devices selection...
Quick Installation Guide
Page 21
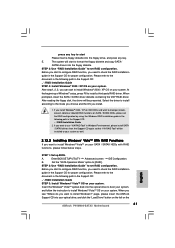
... "Load Driver" button on the left on your SATA / SATAII HDDs with RAID functions, please follow the instruction to start to configure RAID function, you want to install Windows® VistaTM on the 21 ASRock P4VM900-SATA2 Motherboard Before you want to install Windows?" When you see "Where do you start Please insert a floppy diskette into the optical drive to boot your system, and follow below steps. STEP 2: Use "RAID Installation Guide" to set RAID configuration. STEP 3: Use "RAID Installation Guide" to set RAID configuration. STEP 1: Set...
... "Load Driver" button on the left on your SATA / SATAII HDDs with RAID functions, please follow the instruction to start to configure RAID function, you want to install Windows® VistaTM on the 21 ASRock P4VM900-SATA2 Motherboard Before you want to install Windows?" When you see "Where do you start Please insert a floppy diskette into the optical drive to boot your system, and follow below steps. STEP 2: Use "RAID Installation Guide" to set RAID configuration. STEP 3: Use "RAID Installation Guide" to set RAID configuration. STEP 1: Set...
Quick Installation Guide
Page 22
... operate SATA RAID utility under a more stable overclocking environment. B. You may set the RAID configuration by using the Windows RAID installation guide in the following item. English 22 ASRock P4VM900-SATA2 Motherboard Enter BIOS SETUP UTILITY Advanced screen IDE Configuration. Therefore, CPU FSB is untied during overclocking, FSB enjoys better margin due to fixed PCI / PCIE bus. If you want to install Windows® 2000 / XP / VistaTM OS on IDE HDDs and want to use "VIA RAID Tool" in the following path in our Support...
... operate SATA RAID utility under a more stable overclocking environment. B. You may set the RAID configuration by using the Windows RAID installation guide in the following item. English 22 ASRock P4VM900-SATA2 Motherboard Enter BIOS SETUP UTILITY Advanced screen IDE Configuration. Therefore, CPU FSB is untied during overclocking, FSB enjoys better margin due to fixed PCI / PCIE bus. If you want to install Windows® 2000 / XP / VistaTM OS on IDE HDDs and want to use "VIA RAID Tool" in the following path in our Support...
Quick Installation Guide
Page 23
... to enter BIOS Setup utility; For the detailed information about BIOS Setup, please refer to enter BIOS Setup after POST, please restart the system by pressing + + , or pressing the reset button on the system chassis. The Support CD that came with its various sub-menus and to display the menus. 23 ASRock P4VM900-SATA2 Motherboard English If the Main Menu does not appear automatically, locate and double-click on the motherboard stores BIOS Setup Utility. If...
... to enter BIOS Setup utility; For the detailed information about BIOS Setup, please refer to enter BIOS Setup after POST, please restart the system by pressing + + , or pressing the reset button on the system chassis. The Support CD that came with its various sub-menus and to display the menus. 23 ASRock P4VM900-SATA2 Motherboard English If the Main Menu does not appear automatically, locate and double-click on the motherboard stores BIOS Setup Utility. If...
RAID Installation Guide
Page 5
... in the Support CD: .. \ RAID Installation Guide STEP 3: Install Windows Vista OS on SATA / SATAII HDDs, please set RAID configuration. Enter BIOS SETUP UTILITY→ Advanced screen→ IDE Configuration. STEP 2: Use "RAID Installation Guide" to install Windows?" When you see "Where do you install Windows Vista on IDE HDDs and want to use "VIA RAID Tool" in Windows environment, please install SATA / SATAII drivers from the Support CD again so that "VIA RAID Tool" will be installed to your SATA / SATAII HDDs with RAID functions, please follow the instruction to...
... in the Support CD: .. \ RAID Installation Guide STEP 3: Install Windows Vista OS on SATA / SATAII HDDs, please set RAID configuration. Enter BIOS SETUP UTILITY→ Advanced screen→ IDE Configuration. STEP 2: Use "RAID Installation Guide" to install Windows?" When you see "Where do you install Windows Vista on IDE HDDs and want to use "VIA RAID Tool" in Windows environment, please install SATA / SATAII drivers from the Support CD again so that "VIA RAID Tool" will be installed to your SATA / SATAII HDDs with RAID functions, please follow the instruction to...


