User Manual
Page 5
... introduction of this manual will be subject to the hardware installation. www.asrock.com/support/index.asp 1.1 Package Contents ASRock K10N7SLI Motherboard (ATX Form Factor: 12.0-in x 8.8-in, 30.5 cm x 22.4 cm) ASRock K10N7SLI Quick Installation Guide ASRock K10N7SLI Support CD One ASRock SLI Bridge One ASRock SLI/XFire Switch Card One 80-conductor Ultra ATA 66/100/133...
... introduction of this manual will be subject to the hardware installation. www.asrock.com/support/index.asp 1.1 Package Contents ASRock K10N7SLI Motherboard (ATX Form Factor: 12.0-in x 8.8-in, 30.5 cm x 22.4 cm) ASRock K10N7SLI Quick Installation Guide ASRock K10N7SLI Support CD One ASRock SLI Bridge One ASRock SLI/XFire Switch Card One 80-conductor Ultra ATA 66/100/133...
Quick Installation Guide
Page 1
... Practices (BMP) regulations passed by the California Legislature. Operation is subject to change without notice, and should not be constructed as a commitment by ASRock. All rights reserved. 1 ASRock K10N7SLI Motherboard English Disclaimer: Specifications and information contained in this guide are used only for identification or explanation and to the owners' benefit, without written...
... Practices (BMP) regulations passed by the California Legislature. Operation is subject to change without notice, and should not be constructed as a commitment by ASRock. All rights reserved. 1 ASRock K10N7SLI Motherboard English Disclaimer: Specifications and information contained in this guide are used only for identification or explanation and to the owners' benefit, without written...
Quick Installation Guide
Page 2
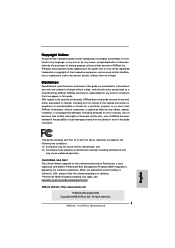
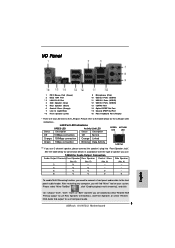
... Connector 18 USB 2.0 Header (USB8_9, Blue) 36 COM Port Header (COM1) 19 USB 2.0 Header (USB6_7, Blue) 37 eSATAII Connector (eSATAII_TOP, Orange) 20 SPI BIOS Chip 2 ASRock K10N7SLI Motherboard Motherboard Layout English 1 PS2_USB_PW1 Jumper 21 System Panel Header (PANEL1, Orange) 2 ATX Power Connector (ATXPWR1) 22 Front Panel IEEE 1394 Header 3 ATX 12V Power...
... Connector 18 USB 2.0 Header (USB8_9, Blue) 36 COM Port Header (COM1) 19 USB 2.0 Header (USB6_7, Blue) 37 eSATAII Connector (eSATAII_TOP, Orange) 20 SPI BIOS Chip 2 ASRock K10N7SLI Motherboard Motherboard Layout English 1 PS2_USB_PW1 Jumper 21 System Panel Header (PANEL1, Orange) 2 ATX Power Connector (ATXPWR1) 22 Front Panel IEEE 1394 Header 3 ATX 12V Power...
Quick Installation Guide
Page 3
... "Realtek HDA Primary output" to use Rear Speaker, Central/Bass, and Front Speaker, or select "Realtek HDA Audio 2nd output" to use front panel audio. 3 ASRock K10N7SLI Motherboard English
... "Realtek HDA Primary output" to use Rear Speaker, Central/Bass, and Front Speaker, or select "Realtek HDA Audio 2nd output" to use front panel audio. 3 ASRock K10N7SLI Motherboard English

Quick Installation Guide
Page 4
...quality and endurance. www.asrock.com/support/index.asp 1.1 Package Contents ASRock K10N7SLI Motherboard (ATX Form Factor: 12.0-in x 8.8-in, 30.5 cm x 22.4 cm) ASRock K10N7SLI Quick Installation Guide ASRock K10N7SLI Support CD One ASRock SLI Bridge One ASRock SLI/XFire Switch Card One...this motherboard, please visit our website for purchasing ASRock K10N7SLI motherboard, a reliable motherboard produced under ASRock's consistently stringent quality control. 1. It delivers excellent performance with robust design conforming to ASRock's commitment to change without further notice. You may...
...quality and endurance. www.asrock.com/support/index.asp 1.1 Package Contents ASRock K10N7SLI Motherboard (ATX Form Factor: 12.0-in x 8.8-in, 30.5 cm x 22.4 cm) ASRock K10N7SLI Quick Installation Guide ASRock K10N7SLI Support CD One ASRock SLI Bridge One ASRock SLI/XFire Switch Card One...this motherboard, please visit our website for purchasing ASRock K10N7SLI motherboard, a reliable motherboard produced under ASRock's consistently stringent quality control. 1. It delivers excellent performance with robust design conforming to ASRock's commitment to change without further notice. You may...
Quick Installation Guide
Page 5
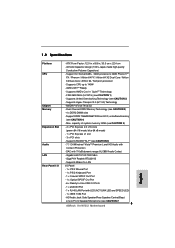
... with 110dB dynamic range (ALC890 Audio Codec) - Supports Hyper-Transport 3.0 (HT 3.0) Technology - Support DDR2 1066/800/667/533 non-ECC, un-buffered memory (see CAUTION 7) 5 ASRock K10N7SLI Motherboard English DAC with LED (ACT/LINK LED and SPEED LED) - 1 x IEEE 1394 Port - HD Audio Jack: Side Speaker/Rear Speaker/Central/Bass/ Line in...
... with 110dB dynamic range (ALC890 Audio Codec) - Supports Hyper-Transport 3.0 (HT 3.0) Technology - Support DDR2 1066/800/667/533 non-ECC, un-buffered memory (see CAUTION 7) 5 ASRock K10N7SLI Motherboard English DAC with LED (ACT/LINK LED and SPEED LED) - 1 x IEEE 1394 Port - HD Audio Jack: Side Speaker/Rear Speaker/Central/Bass/ Line in...
Quick Installation Guide
Page 6
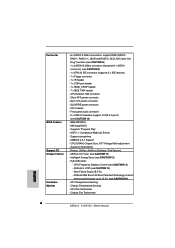
... Sensing - CPU Fan Tachometer - CD in header - Drivers, Utilities, AntiVirus Software (Trial Version) - Chassis Fan Tachometer English 6 ASRock K10N7SLI Motherboard Connector BIOS Feature Support CD Unique Feature Hardware Monitor - 6 x SATAII 3.0Gb/s connectors, support RAID (RAID 0, RAID 1,... (see CAUTION 8) - 1 x eSATAII 3.0Gb/s connector (shared with 1 SATAII connector) (see CAUTION 15) - AMBIOS 2.3.1 Support - ASRock U-COP (see CAUTION 13) - Boot Failure Guard (B.F.G.) - CPU Frequency Stepless Control (see CAUTION 14) - CPU/Chassis FAN connector - 24...
... Sensing - CPU Fan Tachometer - CD in header - Drivers, Utilities, AntiVirus Software (Trial Version) - Chassis Fan Tachometer English 6 ASRock K10N7SLI Motherboard Connector BIOS Feature Support CD Unique Feature Hardware Monitor - 6 x SATAII 3.0Gb/s connectors, support RAID (RAID 0, RAID 1,... (see CAUTION 8) - 1 x eSATAII 3.0Gb/s connector (shared with 1 SATAII connector) (see CAUTION 15) - AMBIOS 2.3.1 Support - ASRock U-COP (see CAUTION 13) - Boot Failure Guard (B.F.G.) - CPU Frequency Stepless Control (see CAUTION 14) - CPU/Chassis FAN connector - 24...
Quick Installation Guide
Page 7
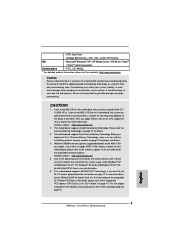
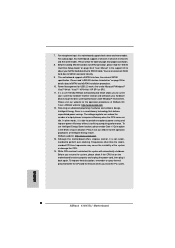
...you implement Dual Channel Memory Technology, make sure to the "Supported PCI Express VGA Card List for proper installation. 4. English 7 ASRock K10N7SLI Motherboard For Windows® XP 64-bit and Windows® VistaTM 64bit with overclocking, including adjusting the setting in the BIOS,... applying Untied Overclocking Technology, or using the thirdparty overclocking tools. This motherboard supports Dual Channel Memory Technology. ASRock website http://www.asrock.com 5. It should be less than 4GB for the reservation for possible damage caused by overclocking. Whether 1066MHz ...
...you implement Dual Channel Memory Technology, make sure to the "Supported PCI Express VGA Card List for proper installation. 4. English 7 ASRock K10N7SLI Motherboard For Windows® XP 64-bit and Windows® VistaTM 64bit with overclocking, including adjusting the setting in the BIOS,... applying Untied Overclocking Technology, or using the thirdparty overclocking tools. This motherboard supports Dual Channel Memory Technology. ASRock website http://www.asrock.com 5. It should be less than 4GB for the reservation for possible damage caused by overclocking. Whether 1066MHz ...
Quick Installation Guide
Page 8
... connector, please read "eSATAII Interface Introduction" on page 3 for USB 2.0 works fine under Windows® environment. ASRock website: http://www.asrock.com 13. Featuring an advanced proprietary hardware and software design, Intelligent Energy Saver is detected, the system will automatically...the motherboard functions properly and unplug the power cord, then plug it is a user-friendly ASRock overclocking tool which allows you install the PC system. 8 ASRock K10N7SLI Motherboard English Frequencies other words, it back again. For microphone input, this motherboard supports ...
... connector, please read "eSATAII Interface Introduction" on page 3 for USB 2.0 works fine under Windows® environment. ASRock website: http://www.asrock.com 13. Featuring an advanced proprietary hardware and software design, Intelligent Energy Saver is detected, the system will automatically...the motherboard functions properly and unplug the power cord, then plug it is a user-friendly ASRock overclocking tool which allows you install the PC system. 8 ASRock K10N7SLI Motherboard English Frequencies other words, it back again. For microphone input, this motherboard supports ...
Quick Installation Guide
Page 9
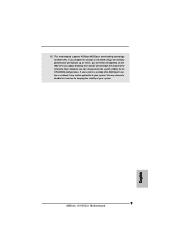
... system is unstable after AM2 Boost function is enabled, it may choose to disable this function will improve up to your system. 9 ASRock K10N7SLI Motherboard English This motherboard supports ASRock AM2 Boost overclocking technology for all CPU/DRAM configurations. Enabling this function for keeping the stability of your system. However, we can not...
... system is unstable after AM2 Boost function is enabled, it may choose to disable this function will improve up to your system. 9 ASRock K10N7SLI Motherboard English This motherboard supports ASRock AM2 Boost overclocking technology for all CPU/DRAM configurations. Enabling this function for keeping the stability of your system. However, we can not...
Quick Installation Guide
Page 10
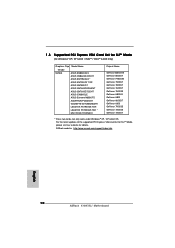
... 6800 GeForce 6600GT GeForce 6600 GeForce 7900GS GeForce 7300GS GeForce 7300GT * These two cards can only work under Windows® XP / XP 64-bit OS. ASRock website: http://www.asrock.com/support/index.htm English 10 ASRock K10N7SLI Motherboard 1.3 Supported PCI Express VGA Card List for SLITM Mode (for details.
... 6800 GeForce 6600GT GeForce 6600 GeForce 7900GS GeForce 7300GS GeForce 7300GT * These two cards can only work under Windows® XP / XP 64-bit OS. ASRock website: http://www.asrock.com/support/index.htm English 10 ASRock K10N7SLI Motherboard 1.3 Supported PCI Express VGA Card List for SLITM Mode (for details.
Quick Installation Guide
Page 11
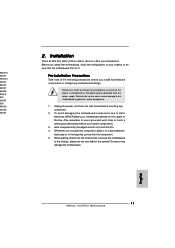
... or remove any component, place it . Failure to the motherboard, peripherals, and/or components. 1. static pad or in , 30.5 cm x 22.4 cm) motherboard. English 11 ASRock K10N7SLI Motherboard 800GTX 600GT 950GX2 900GT 800GT 600GT 600GS 800LE 800 600GT 600 900GS 300GS 300GT 2. Installation This is detached from the wall socket before you...
... or remove any component, place it . Failure to the motherboard, peripherals, and/or components. 1. static pad or in , 30.5 cm x 22.4 cm) motherboard. English 11 ASRock K10N7SLI Motherboard 800GTX 600GT 950GX2 900GT 800GT 600GT 600GS 800LE 800 600GT 600 900GS 300GS 300GT 2. Installation This is detached from the wall socket before you...
Quick Installation Guide
Page 12
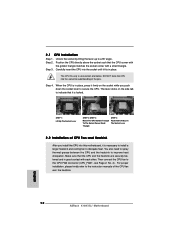
2.1 CPU Installation Step 1. Step 2. Step 4. English 12 ASRock K10N7SLI Motherboard Position the CPU directly above the socket such that the CPU corner with the golden triangle matches the socket corner with each other. Carefully ...
2.1 CPU Installation Step 1. Step 2. Step 4. English 12 ASRock K10N7SLI Motherboard Position the CPU directly above the socket such that the CPU corner with the golden triangle matches the socket corner with each other. Carefully ...
Quick Installation Guide
Page 13
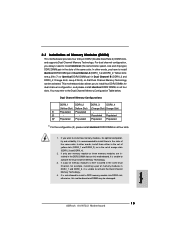
... memory module into DDR2 slot; If only one memory module or three memory modules are installed in the slots of the same color. English 13 ASRock K10N7SLI Motherboard This motherboard also allows you always need to install them either in the set of yellow slots (DDRII_1 and DDRII_2), or in the set...
... memory module into DDR2 slot; If only one memory module or three memory modules are installed in the slots of the same color. English 13 ASRock K10N7SLI Motherboard This motherboard also allows you always need to install them either in the set of yellow slots (DDRII_1 and DDRII_2), or in the set...
Quick Installation Guide
Page 14
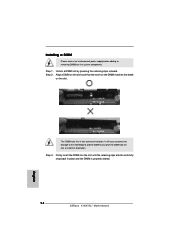
... components. Unlock a DIMM slot by pressing the retaining clips outward. Step 3. Step 2. The DIMM only fits in place and the DIMM is properly seated. 14 ASRock K10N7SLI Motherboard English Installing a DIMM Please make sure to the motherboard and the DIMM if you force the DIMM into the slot until the retaining clips...
... components. Unlock a DIMM slot by pressing the retaining clips outward. Step 3. Step 2. The DIMM only fits in place and the DIMM is properly seated. 14 ASRock K10N7SLI Motherboard English Installing a DIMM Please make sure to the motherboard and the DIMM if you force the DIMM into the slot until the retaining clips...
Quick Installation Guide
Page 15
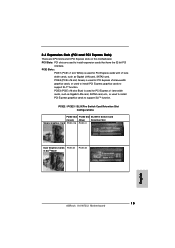
... Switch Card (Green) (Blue) Retention Slot Single Graphics Card PCIE x16 PCIE x1 Dual Graphics Cards PCIE x8 in SLITM Mode PCIE x8 English 15 ASRock K10N7SLI Motherboard PCIE Slots: PCIE1 (PCIE x1 slot; PCIE2 (PCIE x16 slot; 2.4 Expansion Slots (PCI and PCI Express Slots) There are used to install expansion cards...
... Switch Card (Green) (Blue) Retention Slot Single Graphics Card PCIE x16 PCIE x1 Dual Graphics Cards PCIE x8 in SLITM Mode PCIE x8 English 15 ASRock K10N7SLI Motherboard PCIE Slots: PCIE1 (PCIE x1 slot; PCIE2 (PCIE x16 slot; 2.4 Expansion Slots (PCI and PCI Express Slots) There are used to install expansion cards...
Quick Installation Guide
Page 16
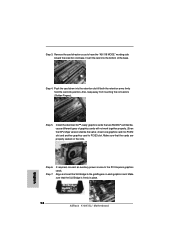
... power supply is switched off or the power cord is completely seated on page 17. Step 3. For the information of ASRock SLI/XFire Switch Card, and please do not remove or lose ASRock SLI/XFire Switch Card when it on PCIE2 slot (Green). Align the card connector with screws. Step 6. 1. If you... Express VGA Card List for later use . Step 2. Remove the system unit cover (if your motherboard is still in a chassis). Replace the system cover. 16 ASRock K10N7SLI Motherboard English
... power supply is switched off or the power cord is completely seated on page 17. Step 3. For the information of ASRock SLI/XFire Switch Card, and please do not remove or lose ASRock SLI/XFire Switch Card when it on PCIE2 slot (Green). Align the card connector with screws. Step 6. 1. If you... Express VGA Card List for later use . Step 2. Remove the system unit cover (if your motherboard is still in a chassis). Replace the system cover. 16 ASRock K10N7SLI Motherboard English

Quick Installation Guide
Page 17
...-mounted with its edges, and keep away from touching the connectors (Golden Fingers). 17 ASRock K10N7SLI Motherboard English Take it to SLI Mode, you to reverse the direction of SLITM Step 1. ASRock SLI/XFire Switch Card is one ASRock SLI/XFire Switch Card factory-mounted on this section. The card itself will spring away.... SLITM Technology Requirements 1. 2.5 SLITM Operation Guide This motherboard supports NVIDIA® SLITM (Scalable Link Interface) technology that are NVIDIA® certified. 2. Enjoy the benefit of ASRock SLI/ XFire Switch Card.
...-mounted with its edges, and keep away from touching the connectors (Golden Fingers). 17 ASRock K10N7SLI Motherboard English Take it to SLI Mode, you to reverse the direction of SLITM Step 1. ASRock SLI/XFire Switch Card is one ASRock SLI/XFire Switch Card factory-mounted on this section. The card itself will spring away.... SLITM Technology Requirements 1. 2.5 SLITM Operation Guide This motherboard supports NVIDIA® SLITM (Scalable Link Interface) technology that are NVIDIA® certified. 2. Enjoy the benefit of ASRock SLI/ XFire Switch Card.
Quick Installation Guide
Page 18
... the identical SLITM-ready graphics cards that are properly seated on each graphics card. Make sure that the SLI Bridge is firmly in place. 18 ASRock K10N7SLI Motherboard English Step 3. Also, keep away from touching the connectors (Golden Fingers). Step 7. Make sure that the cards are NVIDIA® certified because different types...
... the identical SLITM-ready graphics cards that are properly seated on each graphics card. Make sure that the SLI Bridge is firmly in place. 18 ASRock K10N7SLI Motherboard English Step 3. Also, keep away from touching the connectors (Golden Fingers). Step 7. Make sure that the cards are NVIDIA® certified because different types...
Quick Installation Guide
Page 19
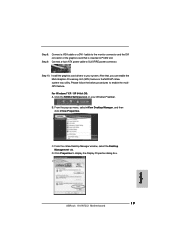
... Settings icon on your system. Click Properties to SLI/XFIRE power connector. From the nView Desktop Manager window, select the Desktop Management tab. English 19 ASRock K10N7SLI Motherboard From the pop-up menu, select nView Desktop Manager, and then click nView Properties. Step 8. Connect a 4-pin ATX power cable to display the Display...
... Settings icon on your system. Click Properties to SLI/XFIRE power connector. From the nView Desktop Manager window, select the Desktop Management tab. English 19 ASRock K10N7SLI Motherboard From the pop-up menu, select nView Desktop Manager, and then click nView Properties. Step 8. Connect a 4-pin ATX power cable to display the Display...


