User Manual
Page 5
...guration guide to BIOS setup and information of the motherboard and stepby-step guide to the hardware installation. www.asrock.com/support/index.asp 1.1 Package Contents ASRock H61M-GS / H61M-S Motherboard (Micro ATX Form Factor: 9.6-in x 7.8-in our support CD for details. 5 In this... the model you require technical support related to this motherboard, please visit our website for purchasing ASRock H61M-GS / H61M-S motherboard, a reliable motherboard produced under ASRock's consistently stringent quality control. In case any modifications of this manual will be subject...
...guration guide to BIOS setup and information of the motherboard and stepby-step guide to the hardware installation. www.asrock.com/support/index.asp 1.1 Package Contents ASRock H61M-GS / H61M-S Motherboard (Micro ATX Form Factor: 9.6-in x 7.8-in our support CD for details. 5 In this... the model you require technical support related to this motherboard, please visit our website for purchasing ASRock H61M-GS / H61M-S motherboard, a reliable motherboard produced under ASRock's consistently stringent quality control. In case any modifications of this manual will be subject...
Quick Installation Guide
Page 1
...reproduced, transcribed, transmitted, or translated in any language, in Perchlorate Best Management Practices (BMP) regulations passed by ASRock. ASRock assumes no event shall ASRock, its directors, officers, employees, or agents be constructed as a commitment by the California Legislature....may or may apply, see www.dtsc.ca.gov/hazardouswaste/perchlorate" ASRock Website: http://www.asrock.com Published February 2011 Copyright©2011 ASRock INC. All rights reserved. 1 ASRock H61M-GS / H61M-S Motherboard English Products and corporate names appearing in advance. When you...
...reproduced, transcribed, transmitted, or translated in any language, in Perchlorate Best Management Practices (BMP) regulations passed by ASRock. ASRock assumes no event shall ASRock, its directors, officers, employees, or agents be constructed as a commitment by the California Legislature....may or may apply, see www.dtsc.ca.gov/hazardouswaste/perchlorate" ASRock Website: http://www.asrock.com Published February 2011 Copyright©2011 ASRock INC. All rights reserved. 1 ASRock H61M-GS / H61M-S Motherboard English Products and corporate names appearing in advance. When you...

Quick Installation Guide
Page 2
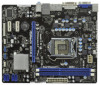
Motherboard Layout (H61M-GS / H61M-S) PS2 Mouse PS2 Keyboard 1 23 4 5 19.8cm (7.8 in) Designed in Taipei ErP/EuP Ready CPU_FAN1 ATX12V1 DX10.1 VGA1 24.4cm (9.6 in) DDR3 ATXPWR1 DDR3_B1 (64 ..., Blue) 11 SATA2 Connector (SATA2_2, Blue) 25 Front Panel Audio Header 12 SATA2 Connector (SATA2_3, Blue) (HD_AUDIO1, White) 13 Chassis Speaker Header (SPEAKER 1, White) English 2 ASRock H61M-GS / H61M-S Motherboard
Motherboard Layout (H61M-GS / H61M-S) PS2 Mouse PS2 Keyboard 1 23 4 5 19.8cm (7.8 in) Designed in Taipei ErP/EuP Ready CPU_FAN1 ATX12V1 DX10.1 VGA1 24.4cm (9.6 in) DDR3 ATXPWR1 DDR3_B1 (64 ..., Blue) 11 SATA2 Connector (SATA2_2, Blue) 25 Front Panel Audio Header 12 SATA2 Connector (SATA2_3, Blue) (HD_AUDIO1, White) 13 Chassis Speaker Header (SPEAKER 1, White) English 2 ASRock H61M-GS / H61M-S Motherboard

Quick Installation Guide
Page 3
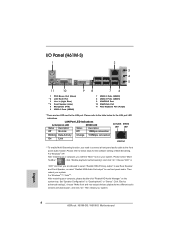
...advanced settings", choose "Make front and rear output devices playbacks two different audio streams simultaneously", and click "ok". English 3 ASRock H61M-GS / H61M-S Motherboard Please select "Mixer ToolBox" , click "Enable playback multi-streaming", and click "ok". Choose "2CH" or "4CH... system. Please refer to below for the software setting of Multi-Streaming. Then reboot your system. For Windows® 7 / VistaTM: After restarting your system. I/O Panel (H61M-GS) 1 2 3 4 5 11 10 98 7 6 1 PS/2 Mouse Port (Green) * 2 LAN RJ-45 Port 3 Line In (Light Blue) ** 4 ...
...advanced settings", choose "Make front and rear output devices playbacks two different audio streams simultaneously", and click "ok". English 3 ASRock H61M-GS / H61M-S Motherboard Please select "Mixer ToolBox" , click "Enable playback multi-streaming", and click "ok". Choose "2CH" or "4CH... system. Please refer to below for the software setting of Multi-Streaming. Then reboot your system. For Windows® 7 / VistaTM: After restarting your system. I/O Panel (H61M-GS) 1 2 3 4 5 11 10 98 7 6 1 PS/2 Mouse Port (Green) * 2 LAN RJ-45 Port 3 Line In (Light Blue) ** 4 ...
Quick Installation Guide
Page 4
... the system tray. Then reboot your system. Please refer to the table below steps for the LAN port LED indications. English 4 ASRock H61M-GS / H61M-S Motherboard Please select "Mixer ToolBox" , click "Enable playback multi-streaming", and click "ok". Then reboot your system. Click "... LED next to the LAN port. Choose "2CH" or "4CH" and then you need to connect a front panel audio cable to "Quadraphonic" or "Stereo". I/O Panel (H61M-S) 1 2 3 4 5 11 10 98 7 6 1 PS/2 Mouse Port (Green) * 2 LAN RJ-45 Port 3 Line In (Light Blue) ** 4 Front Speaker (Lime) 5 Microphone...
... the system tray. Then reboot your system. Please refer to the table below steps for the LAN port LED indications. English 4 ASRock H61M-GS / H61M-S Motherboard Please select "Mixer ToolBox" , click "Enable playback multi-streaming", and click "ok". Then reboot your system. Click "... LED next to the LAN port. Choose "2CH" or "4CH" and then you need to connect a front panel audio cable to "Quadraphonic" or "Stereo". I/O Panel (H61M-S) 1 2 3 4 5 11 10 98 7 6 1 PS/2 Mouse Port (Green) * 2 LAN RJ-45 Port 3 Line In (Light Blue) ** 4 Front Speaker (Lime) 5 Microphone...
Quick Installation Guide
Page 5
... to this manual will be found in the user manual presented in our support CD for purchasing ASRock H61M-GS / H61M-S motherboard, a reliable motherboard produced under ASRock's consistently stringent quality control. For the BIOS setup, please refer to the "User Manual" in...is recommended to set the BIOS option in , 24.4 cm x 19.8 cm) ASRock H61M-GS / H61M-S Quick Installation Guide ASRock H61M-GS / H61M-S Support CD 2 x Serial ATA (SATA) Data Cables (Optional) 1 x I/O Panel Shield ASRock Reminds You... Because the motherboard specifications and the BIOS software might be ...
... to this manual will be found in the user manual presented in our support CD for purchasing ASRock H61M-GS / H61M-S motherboard, a reliable motherboard produced under ASRock's consistently stringent quality control. For the BIOS setup, please refer to the "User Manual" in...is recommended to set the BIOS option in , 24.4 cm x 19.8 cm) ASRock H61M-GS / H61M-S Quick Installation Guide ASRock H61M-GS / H61M-S Support CD 2 x Serial ATA (SATA) Data Cables (Optional) 1 x I/O Panel Shield ASRock Reminds You... Because the motherboard specifications and the BIOS software might be ...
Quick Installation Guide
Page 6
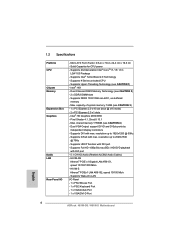
... - 5.1 CH HD Audio (Realtek ALC662 Audio Codec) - Supports Intel® Turbo Boost 2.0 Technology - Supports D-Sub with DVI port - H61M-S Atheros® PCIEx1 LAN AR8152, speed 10/100 Mb/s - Solid Capacitor for CPU power - Supports HDCP function with max. 1.2 Specifications Platform... I /O Panel - 1 x PS/2 Mouse Port - 1 x PS/2 Keyboard Port - 1 x VGA/D-Sub Port - 1 x VGA/DVI-D Port English 6 ASRock H61M-GS / H61M-S Motherboard Micro ATX Form Factor: 9.6-in x 7.8-in LGA1155 Package - Supports K-Series unlocked CPU - Intel® H61 - Max. capacity of system memory: 16GB ...
... - 5.1 CH HD Audio (Realtek ALC662 Audio Codec) - Supports Intel® Turbo Boost 2.0 Technology - Supports D-Sub with DVI port - H61M-S Atheros® PCIEx1 LAN AR8152, speed 10/100 Mb/s - Solid Capacitor for CPU power - Supports HDCP function with max. 1.2 Specifications Platform... I /O Panel - 1 x PS/2 Mouse Port - 1 x PS/2 Keyboard Port - 1 x VGA/D-Sub Port - 1 x VGA/DVI-D Port English 6 ASRock H61M-GS / H61M-S Motherboard Micro ATX Form Factor: 9.6-in x 7.8-in LGA1155 Package - Supports K-Series unlocked CPU - Intel® H61 - Max. capacity of system memory: 16GB ...
Quick Installation Guide
Page 7
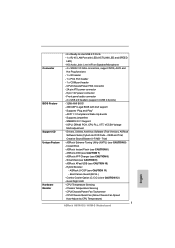
... FAN connector - 24 pin ATX power connector - 8 pin 12V power connector - Trial) - ASRock U-COP (see CAUTION 8) - Supports jumperfree - ASRock APP Charger (see CAUTION 11) - Hybrid Booster: - CPU/Chassis Quiet Fan (Allow Chassis Fan Speed Auto-Adjust by CPU Temperature) 7 ASRock H61M-GS / H61M-S Motherboard English Connector BIOS Feature Support CD Unique Feature Hardware Monitor - 6 x Ready...
... FAN connector - 24 pin ATX power connector - 8 pin 12V power connector - Trial) - ASRock U-COP (see CAUTION 8) - Supports jumperfree - ASRock APP Charger (see CAUTION 11) - Hybrid Booster: - CPU/Chassis Quiet Fan (Allow Chassis Fan Speed Auto-Adjust by CPU Temperature) 7 ASRock H61M-GS / H61M-S Motherboard English Connector BIOS Feature Support CD Unique Feature Hardware Monitor - 6 x Ready...
Quick Installation Guide
Page 8
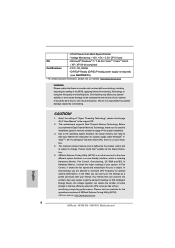
... (ErP/EuP ready power supply is required) (see CAUTION 13) * For detailed product information, please visit our website: http://www.asrock.com WARNING Please realize that there is a certain risk involved with overclocking, including adjusting the setting in a user-friendly interface, which...memory size may affect your system stability, or even cause damage to the components and devices of ASRock Extreme Tuning Utility (AXTU). ASRock website: http://www.asrock.com 8 ASRock H61M-GS / H61M-S Motherboard English Before you can save your OC settings as a profile and share ...
... (ErP/EuP ready power supply is required) (see CAUTION 13) * For detailed product information, please visit our website: http://www.asrock.com WARNING Please realize that there is a certain risk involved with overclocking, including adjusting the setting in a user-friendly interface, which...memory size may affect your system stability, or even cause damage to the components and devices of ASRock Extreme Tuning Utility (AXTU). ASRock website: http://www.asrock.com 8 ASRock H61M-GS / H61M-S Motherboard English Before you can save your OC settings as a profile and share ...

Quick Installation Guide
Page 9
...games! If you keep in touch with the SmartView utility that helps you desire a faster, less restricted way of the device. 9 ASRock H61M-GS / H61M-S Motherboard English With APP Charger driver installed, you can press key during the POST or press key to BIOS setup menu to control ...your Apple devices, such as a game joystick to access ASRock Instant Flash. ASRock motherboards are exclusively equipped with friends on the property of ...
...games! If you keep in touch with the SmartView utility that helps you desire a faster, less restricted way of the device. 9 ASRock H61M-GS / H61M-S Motherboard English With APP Charger driver installed, you can press key during the POST or press key to BIOS setup menu to control ...your Apple devices, such as a game joystick to access ASRock Instant Flash. ASRock motherboards are exclusively equipped with friends on the property of ...

Quick Installation Guide
Page 10
... heat dissipation, remember to spray thermal grease between the CPU and the heatsink when you checking with the power supply manufacturer for more details. 10 ASRock H61M-GS / H61M-S Motherboard English While CPU overheat is higher than 50% under 1.00W in off mode condition. Combo Cooler Option (C.C.O.) provides the flexible option to...
... heat dissipation, remember to spray thermal grease between the CPU and the heatsink when you checking with the power supply manufacturer for more details. 10 ASRock H61M-GS / H61M-S Motherboard English While CPU overheat is higher than 50% under 1.00W in off mode condition. Combo Cooler Option (C.C.O.) provides the flexible option to...

Quick Installation Guide
Page 11
... to insert the CPU into the screw holes to the motherboard, peripherals, and/or components. 2. Otherwise, the CPU will be seriously damaged. English 11 ASRock H61M-GS / H61M-S Motherboard When placing screws into the socket if above situation is any motherboard settings. 1. Load Plate Contact Array Load Lever Socket Body 1155-Pin Socket...
... to insert the CPU into the screw holes to the motherboard, peripherals, and/or components. 2. Otherwise, the CPU will be seriously damaged. English 11 ASRock H61M-GS / H61M-S Motherboard When placing screws into the socket if above situation is any motherboard settings. 1. Load Plate Contact Array Load Lever Socket Body 1155-Pin Socket...
Quick Installation Guide
Page 12
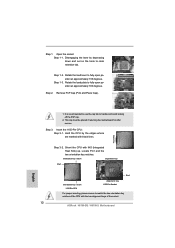
... 135 degrees. Rotate the load plate to match the two orientation key notches of the CPU with the two alignment keys of the socket. 12 ASRock H61M-GS / H61M-S Motherboard It is recommended to use the cap tab to clear retention tab. Step 1. Step 2. Locate Pin1 and the two orientation key notches. Step...
... 135 degrees. Rotate the load plate to match the two orientation key notches of the CPU with the two alignment keys of the socket. 12 ASRock H61M-GS / H61M-S Motherboard It is recommended to use the cap tab to clear retention tab. Step 1. Step 2. Locate Pin1 and the two orientation key notches. Step...
Quick Installation Guide
Page 13
... operation or contact other components. Fan cables on side closest to illustrate the installation of the heatsink for Socket LGA 1155/1156 CPU fan. 13 ASRock H61M-GS / H61M-S Motherboard English Connect fan header with the CPU fan connector on load plate, engage the load lever. 2.2 Installation of CPU Fan and Heatsink For...
... operation or contact other components. Fan cables on side closest to illustrate the installation of the heatsink for Socket LGA 1155/1156 CPU fan. 13 ASRock H61M-GS / H61M-S Motherboard English Connect fan header with the CPU fan connector on load plate, engage the load lever. 2.2 Installation of CPU Fan and Heatsink For...
Quick Installation Guide
Page 14
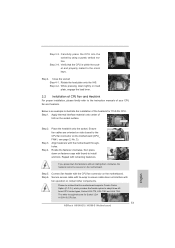
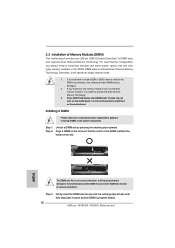
... and the DIMM is unable to install a DDR or DDR2 memory module into the slot at single channel mode. 1. Otherwise, it is properly seated. 14 ASRock H61M-GS / H61M-S Motherboard It is not allowed to activate the Dual Channel Memory Technology. 3. Unlock a DIMM slot by pressing the retaining clips outward. Step 3. Step 2. 2.3 Installation...
... and the DIMM is unable to install a DDR or DDR2 memory module into the slot at single channel mode. 1. Otherwise, it is properly seated. 14 ASRock H61M-GS / H61M-S Motherboard It is not allowed to activate the Dual Channel Memory Technology. 3. Unlock a DIMM slot by pressing the retaining clips outward. Step 3. Step 2. 2.3 Installation...
Quick Installation Guide
Page 15
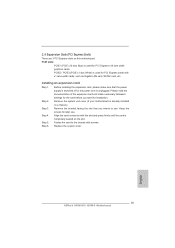
... unplugged. Step 3. Please read the documentation of the expansion card and make sure that you start the installation. Step 2. Replace the system cover. 15 ASRock H61M-GS / H61M-S Motherboard English Installing an expansion card Step 1. Align the card connector with the slot and press firmly until the card is already installed in...
... unplugged. Step 3. Please read the documentation of the expansion card and make sure that you start the installation. Step 2. Replace the system cover. 15 ASRock H61M-GS / H61M-S Motherboard English Installing an expansion card Step 1. Align the card connector with the slot and press firmly until the card is already installed in...
Quick Installation Guide
Page 16
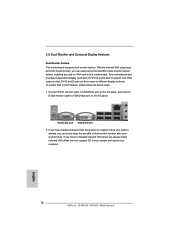
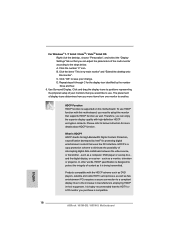
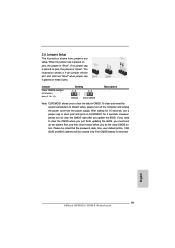
... our support CD to your system and restart your system already, you have installed onboard VGA driver from our support CD to your computer. 16 ASRock H61M-GS / H61M-S Motherboard English 2.5 Dual Monitor and Surround Display Features Dual Monitor Feature This motherboard supports dual monitor feature. This motherboard also provides independent display controllers...
... our support CD to your system and restart your system already, you have installed onboard VGA driver from our support CD to your computer. 16 ASRock H61M-GS / H61M-S Motherboard English 2.5 Dual Monitor and Surround Display Features Dual Monitor Feature This motherboard supports dual monitor feature. This motherboard also provides independent display controllers...

Quick Installation Guide
Page 17
... monitor". Set the "Screen Resolution" and "Color Quality" as Secondary. Set up a surround display environment: 1. B. C. Boot your card, one , two, three and four. 17 ASRock H61M-GS / H61M-S Motherboard English Install the onboard VGA driver and the add-on each monitor. Select the display icon identified by the number one monitor...
... monitor". Set the "Screen Resolution" and "Color Quality" as Secondary. Set up a surround display environment: 1. B. C. Boot your card, one , two, three and four. 17 ASRock H61M-GS / H61M-S Motherboard English Install the onboard VGA driver and the add-on each monitor. Select the display icon identified by the number one monitor...
Quick Installation Guide
Page 18
... "Personalize", and select the "Display Settings" tab so that you can enjoy the superior display quality with this motherboard, you purchase is compatible. 18 ASRock H61M-GS / H61M-S Motherboard English B. Click and drag the display icons to positions representing the physical setup of display icons determines how you move items from one monitor...
... "Personalize", and select the "Display Settings" tab so that you can enjoy the superior display quality with this motherboard, you purchase is compatible. 18 ASRock H61M-GS / H61M-S Motherboard English B. Click and drag the display icons to positions representing the physical setup of display icons determines how you move items from one monitor...
Quick Installation Guide
Page 19
... off the computer and unplug the power cord from the power supply. The illustration shows a 3-pin jumper whose pin1 and pin2 are setup. English 19 ASRock H61M-GS / H61M-S Motherboard After waiting for 5 seconds. When the jumper cap is placed on pins, the jumper is "Open". If no jumper cap is placed on...
... off the computer and unplug the power cord from the power supply. The illustration shows a 3-pin jumper whose pin1 and pin2 are setup. English 19 ASRock H61M-GS / H61M-S Motherboard After waiting for 5 seconds. When the jumper cap is placed on pins, the jumper is "Open". If no jumper cap is placed on...


