User Manual
Page 1
All rights reserved. 1 H61M-GS / H61M-S User Manual Version 1.0 Published February 2011 Copyright©2011 ASRock INC.
All rights reserved. 1 H61M-GS / H61M-S User Manual Version 1.0 Published February 2011 Copyright©2011 ASRock INC.
User Manual
Page 2
...without written consent of documentation by the California Legislature. ASRock assumes no event shall ASRock, its directors, officers, employees, or agents be reproduced, transcribed, transmitted, or translated in any language, in the manual or product. "Perchlorate Material-special handling may cause undesired... or error in any form or by any means, except duplication of ASRock Inc. CALIFORNIA, USA ONLY The Lithium battery adopted on this manual. Copyright Notice: No part of this manual, ASRock does not provide warranty of any kind, either expressed or implied, including...
...without written consent of documentation by the California Legislature. ASRock assumes no event shall ASRock, its directors, officers, employees, or agents be reproduced, transcribed, transmitted, or translated in any language, in the manual or product. "Perchlorate Material-special handling may cause undesired... or error in any form or by any means, except duplication of ASRock Inc. CALIFORNIA, USA ONLY The Lithium battery adopted on this manual. Copyright Notice: No part of this manual, ASRock does not provide warranty of any kind, either expressed or implied, including...
User Manual
Page 5
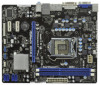
... subject to the hardware installation. For the BIOS setup, please refer to the "User Manual" in our support CD for purchasing ASRock H61M-GS / H61M-S motherboard, a reliable motherboard produced under ASRock's consistently stringent quality control. To get better performance in Windows® 7 / 7 ...in , 24.4 cm x 19.8 cm) ASRock H61M-GS / H61M-S Quick Installation Guide ASRock H61M-GS / H61M-S Support CD 2 x Serial ATA (SATA) Data Cables (Optional) 1 x I/O Panel Shield ASRock Reminds You... In case any modifications of this manual, chapter 1 and 2 contain introduction of the...
... subject to the hardware installation. For the BIOS setup, please refer to the "User Manual" in our support CD for purchasing ASRock H61M-GS / H61M-S motherboard, a reliable motherboard produced under ASRock's consistently stringent quality control. To get better performance in Windows® 7 / 7 ...in , 24.4 cm x 19.8 cm) ASRock H61M-GS / H61M-S Quick Installation Guide ASRock H61M-GS / H61M-S Support CD 2 x Serial ATA (SATA) Data Cables (Optional) 1 x I/O Panel Shield ASRock Reminds You... In case any modifications of this manual, chapter 1 and 2 contain introduction of the...
User Manual
Page 17
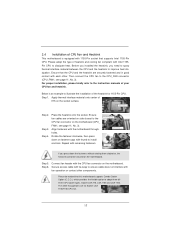
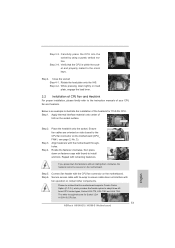
... Material Step 2. Step 5. Please adopt the type of heatsink and cooling fan compliant with remaining fasteners. For proper installation, please kindly refer to the instruction manuals of IHS on the socket surface. Step 1. Ensure fan cables are oriented on side closest to the CPU fan connector on fastener caps with fan...
... Material Step 2. Step 5. Please adopt the type of heatsink and cooling fan compliant with remaining fasteners. For proper installation, please kindly refer to the instruction manuals of IHS on the socket surface. Step 1. Ensure fan cables are oriented on side closest to the CPU fan connector on fastener caps with fan...

User Manual
Page 25
... restart the computer if the computer freezes and fails to the "FrontMic" Tab in the Realtek Control panel. Please follow the instruction in our manual and chassis manual to the power status indicator on the chassis front panel. For Windows® XP / XP 64-bit OS: Select "Mixer". Connect Ground (GND) to...
... restart the computer if the computer freezes and fails to the "FrontMic" Tab in the Realtek Control panel. Please follow the instruction in our manual and chassis manual to the power status indicator on the chassis front panel. For Windows® XP / XP 64-bit OS: Select "Mixer". Connect Ground (GND) to...
User Manual
Page 29
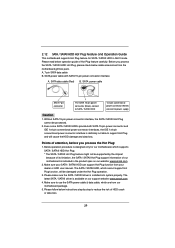
... guide of HDD crash or data loss. 29 SATA power cable with SATA 15-pin power connector interface A. Make sure your dealer or HDD user manual. Before you process the Hot Plug: 1. Below operation procedure is designed only for SATA / SATAII HDD in the product spec on our support website: ...www.asrock.com 4. The latest SATA / SATAII driver is definitely not able to reduce the risk of Hot Plug feature carefully. Make sure to power...
... guide of HDD crash or data loss. 29 SATA power cable with SATA 15-pin power connector interface A. Make sure your dealer or HDD user manual. Before you process the Hot Plug: 1. Below operation procedure is designed only for SATA / SATAII HDD in the product spec on our support website: ...www.asrock.com 4. The latest SATA / SATAII driver is definitely not able to reduce the risk of Hot Plug feature carefully. Make sure to power...

User Manual
Page 36
... Clock by Internal Graphics Device. Intel SpeedStep Technology Intel SpeedStep technology is [Enabled]. The default value is [Auto]. 36 Configuration options: [Auto] and [Manual]. If you can switch between multiple frequency and voltage points to change the ratio value of this motherboard. Please note that enabling this function may...
... Clock by Internal Graphics Device. Intel SpeedStep Technology Intel SpeedStep technology is [Enabled]. The default value is [Auto]. 36 Configuration options: [Auto] and [Manual]. If you can switch between multiple frequency and voltage points to change the ratio value of this motherboard. Please note that enabling this function may...
User Manual
Page 37
.... The default is [Auto]. Row Precharge Time (tRP) Use this item to change Write to Read Delay (tWTR) Auto/Manual setting. Max: 2N. The default is [Auto]. The default is selected, the motherboard will detect the memory module(s) inserted and assigns appropriate frequency automatically. .... The default is [Auto]. Read to Precharge (tRTP) Use this item to change Command Rate (CR) Auto/Manual setting. Core Current Limit Use this item to change CAS# Latency (tCL) Auto/Manual setting. CAS# Latency (tCL) Use this item to add voltage when CPU is in Turbo mode. Refresh Cyle Time (...
.... The default is [Auto]. Row Precharge Time (tRP) Use this item to change Write to Read Delay (tWTR) Auto/Manual setting. Max: 2N. The default is [Auto]. The default is selected, the motherboard will detect the memory module(s) inserted and assigns appropriate frequency automatically. .... The default is [Auto]. Read to Precharge (tRTP) Use this item to change Command Rate (CR) Auto/Manual setting. Core Current Limit Use this item to change CAS# Latency (tCL) Auto/Manual setting. CAS# Latency (tCL) Use this item to add voltage when CPU is in Turbo mode. Refresh Cyle Time (...
User Manual
Page 38
... select DRAM Voltage. ODT NOM (CHA) Use this item to change ODT NOM (CHB) Auto/Manual setting. The default value is [Auto]. The default value is [Auto]. ODT NOM (CHB) Use this item... to change ODT NOM (CHA) Auto/Manual setting. PCH Voltage Use this to select PCH Voltage. The default value is [Auto]. The default value ...Offset Use this to select IGPU Voltage Offset. VCCSA Voltage Use this to change ODT WR (CHA) Auto/Manual setting. ODT WR (CHA) Use this item to select VTT Voltage. The default value is [Auto]. VTT...
... select DRAM Voltage. ODT NOM (CHA) Use this item to change ODT NOM (CHB) Auto/Manual setting. The default value is [Auto]. The default value is [Auto]. ODT NOM (CHB) Use this item... to change ODT NOM (CHA) Auto/Manual setting. PCH Voltage Use this to select PCH Voltage. The default value is [Auto]. The default value ...Offset Use this to select IGPU Voltage Offset. VCCSA Voltage Use this to change ODT WR (CHA) Auto/Manual setting. ODT WR (CHA) Use this item to select VTT Voltage. The default value is [Auto]. VTT...
Quick Installation Guide
Page 5
... / VistaTM / VistaTM 64bit, it is recommended to set the BIOS option in Storage Configuration to the "User Manual" in , 24.4 cm x 19.8 cm) ASRock H61M-GS / H61M-S Quick Installation Guide ASRock H61M-GS / H61M-S Support CD 2 x Serial ATA (SATA) Data Cables (Optional) 1 x I/O Panel Shield ASRock Reminds You... It delivers excellent performance with robust design conforming to...
... / VistaTM / VistaTM 64bit, it is recommended to set the BIOS option in Storage Configuration to the "User Manual" in , 24.4 cm x 19.8 cm) ASRock H61M-GS / H61M-S Quick Installation Guide ASRock H61M-GS / H61M-S Support CD 2 x Serial ATA (SATA) Data Cables (Optional) 1 x I/O Panel Shield ASRock Reminds You... It delivers excellent performance with robust design conforming to...
Quick Installation Guide
Page 8
...Manual" in the support CD. 2. In Fan Control, it shows the major readings of memory modules on page 14 for possible damage caused by the chipset vendor and is defined by overclocking. Please visit our website for system usage under Windows® 7 / VistaTM / XP. ASRock website: http://www.asrock.com 8 ASRock H61M-GS / H61M...ne-tune different system functions in the BIOS, applying Untied Overclocking Technology, or using the third-party overclocking tools. ASRock Extreme Tuning Utility (AXTU) is an all-in-one tool to overclock CPU frequency for the latest information. ...
...Manual" in the support CD. 2. In Fan Control, it shows the major readings of memory modules on page 14 for possible damage caused by the chipset vendor and is defined by overclocking. Please visit our website for system usage under Windows® 7 / VistaTM / XP. ASRock website: http://www.asrock.com 8 ASRock H61M-GS / H61M...ne-tune different system functions in the BIOS, applying Untied Overclocking Technology, or using the third-party overclocking tools. ASRock Extreme Tuning Utility (AXTU) is an all-in-one tool to overclock CPU frequency for the latest information. ...
Quick Installation Guide
Page 13
...the IHS. Step 4-2. Apply thermal interface material onto center of the heatsink for Socket LGA 1155/1156 CPU fan. 13 ASRock H61M-GS / H61M-S Motherboard English Secure excess cable with tie-wrap to install and lock. Apply Thermal Interface Material Step 2. Step 3-4. Rotate... the motherboard throughholes. Step 6. Verify that this motherboard supports Combo Cooler Option (C.C.O.), which provides the flexible option to the instruction manuals of your CPU fan and heatsink. Step 4. Close the socket: Step 4-1. While pressing down lightly on the motherboard (CPU_ FAN1, ...
...the IHS. Step 4-2. Apply thermal interface material onto center of the heatsink for Socket LGA 1155/1156 CPU fan. 13 ASRock H61M-GS / H61M-S Motherboard English Secure excess cable with tie-wrap to install and lock. Apply Thermal Interface Material Step 2. Step 3-4. Rotate... the motherboard throughholes. Step 6. Verify that this motherboard supports Combo Cooler Option (C.C.O.), which provides the flexible option to the instruction manuals of your CPU fan and heatsink. Step 4. Close the socket: Step 4-1. While pressing down lightly on the motherboard (CPU_ FAN1, ...
Quick Installation Guide
Page 21
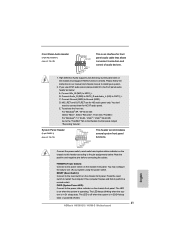
... sleep state or powered off when the system is in the Realtek Control panel. The LED keeps blinking when the system is in our manual and chassis manual to the front panel audio header as below . If you use AC'97 audio panel, please install it to install your system using the... and negative pins before connecting the cables. PWRBTN (Power Switch): Connect to connect them for AC'97 audio panel. The LED is off (S5). 21 ASRock H61M-GS / H61M-S Motherboard The LED is on the chassis front panel.
... sleep state or powered off when the system is in the Realtek Control panel. The LED keeps blinking when the system is in our manual and chassis manual to the front panel audio header as below . If you use AC'97 audio panel, please install it to install your system using the... and negative pins before connecting the cables. PWRBTN (Power Switch): Connect to connect them for AC'97 audio panel. The LED is off (S5). 21 ASRock H61M-GS / H61M-S Motherboard The LED is on the chassis front panel.
Quick Installation Guide
Page 25
... Memory on the file "ASSETUP.EXE" from the BIN folder in the Support CD to display the menus. 25 ASRock H61M-GS / H61M-S Motherboard English Set the option "SATA Mode" to the User Manual (PDF file) contained in your computer. For the detailed information about BIOS Setup, please refer to [IDE]. The...
... Memory on the file "ASSETUP.EXE" from the BIN folder in the Support CD to display the menus. 25 ASRock H61M-GS / H61M-S Motherboard English Set the option "SATA Mode" to the User Manual (PDF file) contained in your computer. For the detailed information about BIOS Setup, please refer to [IDE]. The...
