User Manual
Page 5
...2.8 CrossFireXTM, 3-Way CrossFireXTM, 4-Way CrossFireXTM and Quad CrossFireXTM Operation Guide 31 2.9 Surround Display Features 36 2.10 ASRock Smart Remote Installation Guide 37 2.11 ASRock XFast Charger Operation Guide 38 2.12 Jumpers Setup 39 2.13 Onboard Headers and Connectors 40 2.14 Smart Switches 47...19 Hot Plug and Hot Swap Functions for SATA3 HDDs .... 53 2.20 SATA / SATA2 / SATA3 HDD Hot Plug Feature and Operation Guide 54 2.21 Driver Installation Guide 56 2.22 Installing Windows® 7 / 7 64-bit / VistaTM / VistaTM 64-bit With RAID Functions 56 2.23 Installing Windows® ...
...2.8 CrossFireXTM, 3-Way CrossFireXTM, 4-Way CrossFireXTM and Quad CrossFireXTM Operation Guide 31 2.9 Surround Display Features 36 2.10 ASRock Smart Remote Installation Guide 37 2.11 ASRock XFast Charger Operation Guide 38 2.12 Jumpers Setup 39 2.13 Onboard Headers and Connectors 40 2.14 Smart Switches 47...19 Hot Plug and Hot Swap Functions for SATA3 HDDs .... 53 2.20 SATA / SATA2 / SATA3 HDD Hot Plug Feature and Operation Guide 54 2.21 Driver Installation Guide 56 2.22 Installing Windows® 7 / 7 64-bit / VistaTM / VistaTM 64-bit With RAID Functions 56 2.23 Installing Windows® ...
User Manual
Page 6
... 78 3.6 Boot Screen 79 3.7 Security Screen 80 3.8 Exit Screen 81 4 Software Support 82 4.1 Install Operating System 82 4.2 Support CD Information 82 4.2.1 Running Support CD 82 4.2.2 Drivers Menu 82 4.2.3 Utilities Menu 82 4.2.4 Contact Information 82 6
... 78 3.6 Boot Screen 79 3.7 Security Screen 80 3.8 Exit Screen 81 4 Software Support 82 4.1 Install Operating System 82 4.2 Support CD Information 82 4.2.1 Running Support CD 82 4.2.2 Drivers Menu 82 4.2.3 Utilities Menu 82 4.2.4 Contact Information 82 6
User Manual
Page 10
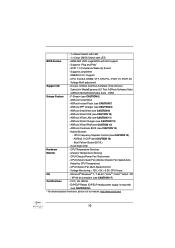
... (see CAUTION 13) - Chassis Temperature Sensing - CPU/Chassis/Power Fan Tachometer - Drivers, Utilities, AntiVirus Software (Trial Version), CyberLink MediaEspresso 6.5 Trial, ASRock Software Suite (ASRock MAGIX Multimedia Suite - ASRock XFast Charger (see CAUTION 7) - Hybrid Booster: - Good Night LED Hardware - ASRock Instant Flash (see CAUTION 12) - ASRock XFast LAN (see CAUTION 15) - CPU Frequency Stepless Control (see CAUTION...
... (see CAUTION 13) - Chassis Temperature Sensing - CPU/Chassis/Power Fan Tachometer - Drivers, Utilities, AntiVirus Software (Trial Version), CyberLink MediaEspresso 6.5 Trial, ASRock Software Suite (ASRock MAGIX Multimedia Suite - ASRock XFast Charger (see CAUTION 7) - Hybrid Booster: - Good Night LED Hardware - ASRock Instant Flash (see CAUTION 12) - ASRock XFast LAN (see CAUTION 15) - CPU Frequency Stepless Control (see CAUTION...
User Manual
Page 12
...into an enhanced view for details. 13. Please be used under Windows® OS 32-bit CPU. Simply install the APP Charger driver, it can update your browser version is also capable of Your Data: With the status window, you can easily enjoy the marvelous... charging experience. With APP Charger driver installed, you - ASRock XFast RAM shortens the loading time of charging your mobile devices via PC. ASRock website: http://www.asrock.com/Feature/SmartView/index.asp 10. ASRock XFast LAN provides a faster internet access, which data streams you ...
...into an enhanced view for details. 13. Please be used under Windows® OS 32-bit CPU. Simply install the APP Charger driver, it can update your browser version is also capable of Your Data: With the status window, you can easily enjoy the marvelous... charging experience. With APP Charger driver installed, you - ASRock XFast RAM shortens the loading time of charging your mobile devices via PC. ASRock website: http://www.asrock.com/Feature/SmartView/index.asp 10. ASRock XFast LAN provides a faster internet access, which data streams you ...
User Manual
Page 20
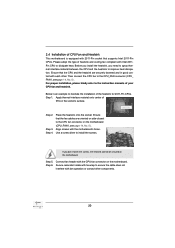
... the motherboard's holes. If you need to spray thermal interface material between the CPU and the heatsink to improve heat dissipation. Step 1. Step 4. Use a screw driver to install the screws. Connect fan header with each other components. 20 Ensure that the CPU and the heatsink are oriented on side closest to...
... the motherboard's holes. If you need to spray thermal interface material between the CPU and the heatsink to improve heat dissipation. Step 1. Step 4. Use a screw driver to install the screws. Connect fan header with each other components. 20 Ensure that the CPU and the heatsink are oriented on side closest to...
User Manual
Page 24
...64257;ed. Make sure that your power supply unit (PSU) can provide at least the minimum power required by your graphics card driver supports NVIDIA® SLITM technology (driver version 280.41 and later). Currently, NVIDIA® SLITM technology supports Windows® XP / XP 64-bit / VistaTM / VistaTM...bit OS. For SLITM technology, you should have two identical SLITM-ready graphics cards that are properly seated on the slots. 24 Download the driver from NVIDIA website (www.nvidia.com). 3. Please refer to use NVIDIA® certified PSU. It is recommended to NVIDIA® ...
...64257;ed. Make sure that your power supply unit (PSU) can provide at least the minimum power required by your graphics card driver supports NVIDIA® SLITM technology (driver version 280.41 and later). Currently, NVIDIA® SLITM technology supports Windows® XP / XP 64-bit / VistaTM / VistaTM...bit OS. For SLITM technology, you should have two identical SLITM-ready graphics cards that are properly seated on the slots. 24 Download the driver from NVIDIA website (www.nvidia.com). 3. Please refer to use NVIDIA® certified PSU. It is recommended to NVIDIA® ...
User Manual
Page 28
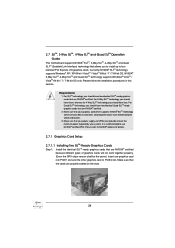
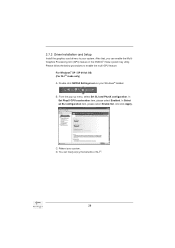
... PhysX GPU acceleration item, please select Enabled. You can enable the MultiGraphics Processing Unit (GPU) feature in the NVIDIA® nView system tray utility. 2.7.2 Driver Installation and Setup Install the graphics card drivers to enable the multi-GPU feature. From the pop-up menu, select Set SLI and PhysX configuration.
... PhysX GPU acceleration item, please select Enabled. You can enable the MultiGraphics Processing Unit (GPU) feature in the NVIDIA® nView system tray utility. 2.7.2 Driver Installation and Setup Install the graphics card drivers to enable the multi-GPU feature. From the pop-up menu, select Set SLI and PhysX configuration.
User Manual
Page 31
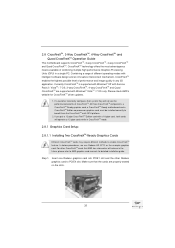
... you pair a 12-pipe CrossFireXTM Edition card with Windows® VistaTM / 7 OS only. For other Radeon graphics card to AMD graphics card manuals for CrossFireXTM driver updates. 1. Step 1. Make sure that AMD has released or will operate as the example graphics card. All three CrossFireXTM components, a CrossFireXTM Ready graphics card, a CrossFireXTM...
... you pair a 12-pipe CrossFireXTM Edition card with Windows® VistaTM / 7 OS only. For other Radeon graphics card to AMD graphics card manuals for CrossFireXTM driver updates. 1. Step 1. Make sure that AMD has released or will operate as the example graphics card. All three CrossFireXTM components, a CrossFireXTM Ready graphics card, a CrossFireXTM...
User Manual
Page 35
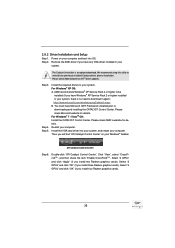
... four Radeon graphics cards). 35 Select "4 GPUs" and click "OK" (if you install two Radeon graphics cards). 2.8.2 Driver Installation and Setup Step 1. Remove the AMD driver if you will find "ATI Catalyst Control Center" on your computer and boot into your system, and restart your ...system. Step 4. For Windows® XP OS: A. You must have any previously installed Catalyst drivers prior to uninstall any VGA driver installed in your Windows® taskbar. Select "3 GPUs" and click "OK" (if you have Windows® XP Service Pack ...
... four Radeon graphics cards). 35 Select "4 GPUs" and click "OK" (if you install two Radeon graphics cards). 2.8.2 Driver Installation and Setup Step 1. Remove the AMD driver if you will find "ATI Catalyst Control Center" on your computer and boot into your system, and restart your ...system. Step 4. For Windows® XP OS: A. You must have any previously installed Catalyst drivers prior to uninstall any VGA driver installed in your Windows® taskbar. Select "3 GPUs" and click "OK" (if you have Windows® XP Service Pack ...
User Manual
Page 50
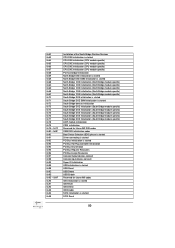
... module specific) ACPI module initialization CSM initialization Reserved for future AMI DXE codes OEM DXE initialization codes Boot Device Selection (BDS) phase is started Driver connecting is started PCI Bus initialization is started PCI Bus Hot Plug Controller Initialization PCI Bus Enumeration PCI Bus Request Resources PCI Bus Assign Resources...
... module specific) ACPI module initialization CSM initialization Reserved for future AMI DXE codes OEM DXE initialization codes Boot Device Selection (BDS) phase is started Driver connecting is started PCI Bus initialization is started PCI Bus Hot Plug Controller Initialization PCI Bus Enumeration PCI Bus Request Resources PCI Bus Assign Resources...
User Manual
Page 54
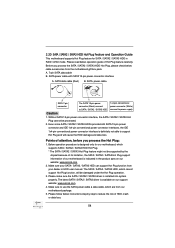
... Hot Plug function, will cause the HDD damage and data loss. Make sure to power supply Caution 1. The latest SATA / SATA2 / SATA3 driver is indicated in RAID / AHCI mode. Please follow below instructions step by the chipset because of its limitation, the SATA / SATA2 / SATA3 Hot... Plug support information of Hot Plug feature carefully. Please make sure the SATA / SATA2 / SATA3 driver is designed only for SATA / SATA2 / SATA3 HDD in the product spec on our support website: www.asrock.com 4. Before you process the Hot Plug: 1. 2.20 SATA / SATA2 / SATA3 HDD Hot ...
... Hot Plug function, will cause the HDD damage and data loss. Make sure to power supply Caution 1. The latest SATA / SATA2 / SATA3 driver is indicated in RAID / AHCI mode. Please follow below instructions step by the chipset because of its limitation, the SATA / SATA2 / SATA3 Hot... Plug support information of Hot Plug feature carefully. Please make sure the SATA / SATA2 / SATA3 driver is designed only for SATA / SATA2 / SATA3 HDD in the product spec on our support website: www.asrock.com 4. Before you process the Hot Plug: 1. 2.20 SATA / SATA2 / SATA3 HDD Hot ...
User Manual
Page 56
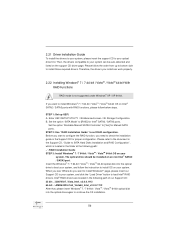
...the order from up UEFI. Before you start to boot your system. page, please insert our Support CD to your system, and click the "Load Driver" button to your system can work properly. 2.22 Installing Windows® 7 / 7 64-bit / VistaTM / VistaTM 64-bit With RAID Functions RAID... Installation Guide STEP 3: Install Windows® 7 / 7 64-bit / VistaTM / VistaTM 64-bit OS on an non Intel® SATA2 / SATA3 port. Then, the drivers compatible to install Windows® 7 / 7 64-bit / VistaTM / VistaTM 64-bit OS on Intel® SATA2 / SATA3 ports with RAID functions, please follow below steps...
...the order from up UEFI. Before you start to boot your system. page, please insert our Support CD to your system, and click the "Load Driver" button to your system can work properly. 2.22 Installing Windows® 7 / 7 64-bit / VistaTM / VistaTM 64-bit With RAID Functions RAID... Installation Guide STEP 3: Install Windows® 7 / 7 64-bit / VistaTM / VistaTM 64-bit OS on an non Intel® SATA2 / SATA3 port. Then, the drivers compatible to install Windows® 7 / 7 64-bit / VistaTM / VistaTM 64-bit OS on Intel® SATA2 / SATA3 ports with RAID functions, please follow below steps...

User Manual
Page 57
... the following path: .. \ Intel Rapid Storage Information If you want to make the USB flash driver disk, please copy above Intel® RAID drivers from our Support CD to your USB flash, and then load drivers from the USB flash disk. 2.23 Installing Windows® 7 / 7 64-bit / VistaTM / VistaTM 64...
... the following path: .. \ Intel Rapid Storage Information If you want to make the USB flash driver disk, please copy above Intel® RAID drivers from our Support CD to your USB flash, and then load drivers from the USB flash disk. 2.23 Installing Windows® 7 / 7 64-bit / VistaTM / VistaTM 64...
User Manual
Page 82
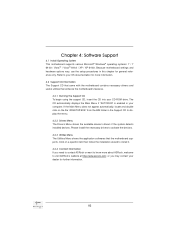
... displays the Main Menu if "AUTORUN" is enabled in your OS documentation for more about ASRock, welcome to display the menu. 4.2.2 Drivers Menu The Drivers Menu shows the available device's drivers if the system detects installed devices. If the Main Menu does not appear automatically, locate ...procedures in the Support CD to visit ASRock's website at http://www.asrock.com; or you need to contact ASRock or want to know more information. 4.2 Support CD Information The Support CD that came with the motherboard contains necessary drivers and useful utilities that the motherboard ...
... displays the Main Menu if "AUTORUN" is enabled in your OS documentation for more about ASRock, welcome to display the menu. 4.2.2 Drivers Menu The Drivers Menu shows the available device's drivers if the system detects installed devices. If the Main Menu does not appear automatically, locate ...procedures in the Support CD to visit ASRock's website at http://www.asrock.com; or you need to contact ASRock or want to know more information. 4.2 Support CD Information The Support CD that came with the motherboard contains necessary drivers and useful utilities that the motherboard ...

User Manual
Page 84
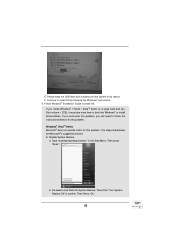
...;ash disk. Press to launch boot menu at system POST and choose the item "UEFI:xxx" to install the operating system. 1. page, please click "Load Driver". select "Browse" to use Windows® VistaTM 64-bit (with SP1 or above) or Windows® 7 64-bit. 2. B. Then choose the directory (xx... on a HDD Larger Than 2TB in the first step. 84 You can download the driver from ASRock's website and unzip the file into a USB flash disk OR copy the file from ASRock motherboard support CD. (please copy the files under following directory: 32 bit: ..\i386\...
...;ash disk. Press to launch boot menu at system POST and choose the item "UEFI:xxx" to install the operating system. 1. page, please click "Load Driver". select "Browse" to use Windows® VistaTM 64-bit (with SP1 or above) or Windows® 7 64-bit. 2. B. Then choose the directory (xx... on a HDD Larger Than 2TB in the first step. 84 You can download the driver from ASRock's website and unzip the file into a USB flash disk OR copy the file from ASRock motherboard support CD. (please copy the files under following directory: 32 bit: ..\i386\...
User Manual
Page 85
... follow the instructions below are Microsoft®'s suggested solution: A. Then Press "Ok". 85 Follow Windows® Installation Guide to boot into Windows® or install driver/utilities. De-select Local Disks for this problem. F. a. Type "systempropertiesprotection" in the Start Menu. Then press "Enter". If you encounter this problem, you install Windows...
... follow the instructions below are Microsoft®'s suggested solution: A. Then Press "Ok". 85 Follow Windows® Installation Guide to boot into Windows® or install driver/utilities. De-select Local Disks for this problem. F. a. Type "systempropertiesprotection" in the Start Menu. Then press "Enter". If you encounter this problem, you install Windows...

User Manual
Page 87
Reboot your system. (It may take about 5 minutes to install motherboard drivers and utilities. Windows® 7 64-bit: A. E. After installing Windows® 7 64-bit, install the hotfix kb2505454. (This may take a long time; >30 mins.)...KB2505454 through this hotfix then reboot by itself. Reboot your system. Finish. 87 Please start to reboot.) D. Set "Startup type" to install motherboard drivers and utilities. 6. After reboot, please start to "Disable" then Click "OK". c. C. D. Windows® will install this link: http://support.microsoft.com/kb/...
Reboot your system. (It may take about 5 minutes to install motherboard drivers and utilities. Windows® 7 64-bit: A. E. After installing Windows® 7 64-bit, install the hotfix kb2505454. (This may take a long time; >30 mins.)...KB2505454 through this hotfix then reboot by itself. Reboot your system. Finish. 87 Please start to reboot.) D. Set "Startup type" to install motherboard drivers and utilities. 6. After reboot, please start to "Disable" then Click "OK". c. C. D. Windows® will install this link: http://support.microsoft.com/kb/...
Quick Installation Guide
Page 10
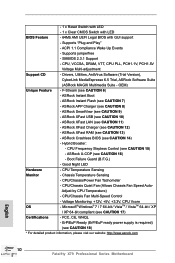
... / XP 64-bit compliant (see CAUTION 12) - ASRock XFast Charger (see CAUTION 17) Certifications - Boot Failure ...asrock.com English 10 Fatal1ty X79 Professional Series Motherboard ASRock SmartView (see CAUTION 14) - ASRock Crashless BIOS (see CAUTION 9) - Hybrid Booster: - CPU Temperature Sensing Monitor - ASRock XFast RAM (see CAUTION 15) - CPU Frequency Stepless Control (see CAUTION 13) - Drivers, Utilities, AntiVirus Software (Trial Version), CyberLink MediaEspresso 6.5 Trial, ASRock Software Suite (ASRock MAGIX Multimedia Suite - ASRock...
... / XP 64-bit compliant (see CAUTION 12) - ASRock XFast Charger (see CAUTION 17) Certifications - Boot Failure ...asrock.com English 10 Fatal1ty X79 Professional Series Motherboard ASRock SmartView (see CAUTION 14) - ASRock Crashless BIOS (see CAUTION 9) - Hybrid Booster: - CPU Temperature Sensing Monitor - ASRock XFast RAM (see CAUTION 15) - CPU Frequency Stepless Control (see CAUTION 13) - Drivers, Utilities, AntiVirus Software (Trial Version), CyberLink MediaEspresso 6.5 Trial, ASRock Software Suite (ASRock MAGIX Multimedia Suite - ASRock...
Quick Installation Guide
Page 12
... used under Windows® OS 32-bit CPU. Simply install the APP Charger driver, it can easily recognize which includes the benefits listed below. ASRock SmartView, a new function for details. 13. ASRock XFast USB can update your mobile devices via PC. With the superb XFast Charger...drive, then you can lower the latency in touch with the ASRock SmartView utility that is included into Standby mode (S1), Suspend to Apple devices, it also boosts 12 Fatal1ty X79 Professional Series Motherboard English ASRock APP Charger allows you are exclusively equipped with friends on the ...
... used under Windows® OS 32-bit CPU. Simply install the APP Charger driver, it can easily recognize which includes the benefits listed below. ASRock SmartView, a new function for details. 13. ASRock XFast USB can update your mobile devices via PC. With the superb XFast Charger...drive, then you can lower the latency in touch with the ASRock SmartView utility that is included into Standby mode (S1), Suspend to Apple devices, it also boosts 12 Fatal1ty X79 Professional Series Motherboard English ASRock APP Charger allows you are exclusively equipped with friends on the ...
Quick Installation Guide
Page 17
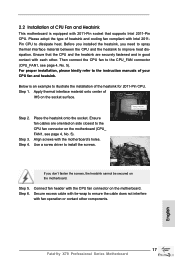
...Step 4. Step 5. Then connect the CPU fan to the CPU_FAN connector (CPU_FAN1, see page 4, No. 5). Step 3. English 17 Fatal1ty X79 Professional Series Motherboard Before you installed the heatsink, you don't fasten the screws, the heatsink cannot be secured on the motherboard. Step 2. If...supports Intel 2011-Pin CPU. Ensure fan cables are securely fastened and in good contact with fan operation or contact other . Use a screw driver to the CPU fan connector on the socket surface. Secure excess cable with tie-wrap to ensure the cable does not interfere with each ...
...Step 4. Step 5. Then connect the CPU fan to the CPU_FAN connector (CPU_FAN1, see page 4, No. 5). Step 3. English 17 Fatal1ty X79 Professional Series Motherboard Before you installed the heatsink, you don't fasten the screws, the heatsink cannot be secured on the motherboard. Step 2. If...supports Intel 2011-Pin CPU. Ensure fan cables are securely fastened and in good contact with fan operation or contact other . Use a screw driver to the CPU fan connector on the socket surface. Secure excess cable with tie-wrap to ensure the cable does not interfere with each ...


