User Manual
Page 5
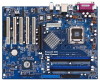
... subject to the hardware installation. Chapter 3 and 4 contain the configuration guide to quality and endurance. ASRock website http://www.asrock.com 1.1 Package Contents ASRock 775V88/775V88+ Motherboard (ATX Form Factor: 12.0-in x 9.2-in, 30.5 cm x 23.4 cm) ASRock 775V88/775V88+ Quick Installation Guide ASRock 775V88/775V88+ Support CD (including LGA 775 CPU Installation Live Demo) One 80-conductor Ultra ATA 66...
... subject to the hardware installation. Chapter 3 and 4 contain the configuration guide to quality and endurance. ASRock website http://www.asrock.com 1.1 Package Contents ASRock 775V88/775V88+ Motherboard (ATX Form Factor: 12.0-in x 9.2-in, 30.5 cm x 23.4 cm) ASRock 775V88/775V88+ Quick Installation Guide ASRock 775V88/775V88+ Support CD (including LGA 775 CPU Installation Live Demo) One 80-conductor Ultra ATA 66...
Quick Installation Guide
Page 1
...in any form or by any interference received, including interference that may appear in the guide or product. All rights reserved. 1 ASRock 775V88/775V88+ Motherboard English With respect to the contents of this guide are used only for informational use only and subject to infringe. Operation is... of merchantability or fitness for loss of profits, loss of business, loss of data, interruption of business and the like), even if ASRock has been advised of the possibility of such damages arising from any indirect, special, incidental, or consequential damages (including damages for a ...
...in any form or by any interference received, including interference that may appear in the guide or product. All rights reserved. 1 ASRock 775V88/775V88+ Motherboard English With respect to the contents of this guide are used only for informational use only and subject to infringe. Operation is... of merchantability or fitness for loss of profits, loss of business, loss of data, interruption of business and the like), even if ASRock has been advised of the possibility of such damages arising from any indirect, special, incidental, or consequential damages (including damages for a ...
Quick Installation Guide
Page 2
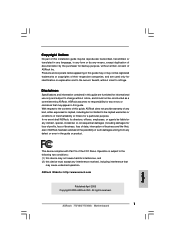
... Game Connector (GAME1) 25 PCI Slots (PCI 1-5) 26 Infrared Module Header (IR1) 27 BIOS chip 28 ATX Power Connector (ATXPWR1) 29 CPU Fan Connector (CPU_FAN1) 2 ASRock 775V88/775V88+ Motherboard Motherboard Layout English 1 PS2_USB_PWR1 Jumper 2 ATX Power Connector (ATX12V1) 3 775-Pin CPU Socket 4 North Bridge Controller 5 2 x 184-pin DDR DIMM Slots (Dual Channel A: DDR1...
... Game Connector (GAME1) 25 PCI Slots (PCI 1-5) 26 Infrared Module Header (IR1) 27 BIOS chip 28 ATX Power Connector (ATXPWR1) 29 CPU Fan Connector (CPU_FAN1) 2 ASRock 775V88/775V88+ Motherboard Motherboard Layout English 1 PS2_USB_PWR1 Jumper 2 ATX Power Connector (ATX12V1) 3 775-Pin CPU Socket 4 North Bridge Controller 5 2 x 184-pin DDR DIMM Slots (Dual Channel A: DDR1...
Quick Installation Guide
Page 3
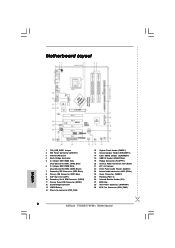
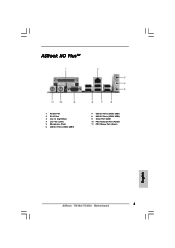
ASRock I/O PlusTM 1 Parallel Port 2 RJ-45 Port 3 Line In (Light Blue) 4 Line Out (Lime) 5 Microphone (Pink) 6 USB 2.0 Ports (USB4, USB5) 7 USB 2.0 Ports (USB0, USB1) 8 USB 2.0 Ports (USB2, USB3) 9 Serial Port: COM1 10 PS/2 Keyboard Port (Purple) 11 PS/2 Mouse Port (Green) English 3 ASRock 775V88/775V88+ Motherboard
ASRock I/O PlusTM 1 Parallel Port 2 RJ-45 Port 3 Line In (Light Blue) 4 Line Out (Lime) 5 Microphone (Pink) 6 USB 2.0 Ports (USB4, USB5) 7 USB 2.0 Ports (USB0, USB1) 8 USB 2.0 Ports (USB2, USB3) 9 Serial Port: COM1 10 PS/2 Keyboard Port (Purple) 11 PS/2 Mouse Port (Green) English 3 ASRock 775V88/775V88+ Motherboard
Quick Installation Guide
Page 4
... the Support CD. It delivers excellent performance with robust design conforming to ASRock's commitment to change without further notice. ASRock website http://www.asrock.com 1.1 Package Contents ASRock 775V88/775V88+ Motherboard (ATX Form Factor: 12.0-in x 9.2-in, 30.5 cm x 23.4 cm) ASRock 775V88/775V88+ Quick Installation Guide ASRock 775V88/775V88+ Support CD (including LGA 775 CPU Installation Live Demo) One 80-conductor...
... the Support CD. It delivers excellent performance with robust design conforming to ASRock's commitment to change without further notice. ASRock website http://www.asrock.com 1.1 Package Contents ASRock 775V88/775V88+ Motherboard (ATX Form Factor: 12.0-in x 9.2-in, 30.5 cm x 23.4 cm) ASRock 775V88/775V88+ Quick Installation Guide ASRock 775V88/775V88+ Support CD (including LGA 775 CPU Installation Live Demo) One 80-conductor...
Quick Installation Guide
Page 5
...: Speed: 802.3u (10/100 Ethernet), supports Wake-On-LAN Hardware Monitor: CPU temperature sensing, Chassis temperature sensing, CPU overheat shutdown to protect CPU life (ASRock U-COP)(see CAUTION 3), CPU fan tachometer, Chassis fan tachometer, Voltage monitoring: +12V, +5V, +3V, Vcore PCI slots: 5 slots with PCI Specification 2.2 AGP slot: 1 AGP slot... 4) USB 2.0: 8 USB 2.0 ports: include 6 ready-to-use USB 2.0 ports on the rear panel, plus one on-board header supporting 2 extra USB 2.0 ports (see CAUTION 5) English 5 ASRock 775V88/775V88+ Motherboard
...: Speed: 802.3u (10/100 Ethernet), supports Wake-On-LAN Hardware Monitor: CPU temperature sensing, Chassis temperature sensing, CPU overheat shutdown to protect CPU life (ASRock U-COP)(see CAUTION 3), CPU fan tachometer, Chassis fan tachometer, Voltage monitoring: +12V, +5V, +3V, Vcore PCI slots: 5 slots with PCI Specification 2.2 AGP slot: 1 AGP slot... 4) USB 2.0: 8 USB 2.0 ports: include 6 ready-to-use USB 2.0 ports on the rear panel, plus one on-board header supporting 2 extra USB 2.0 ports (see CAUTION 5) English 5 ASRock 775V88/775V88+ Motherboard
Quick Installation Guide
Page 6
...advanced users' reference, see CAUTION 6) OS: Microsoft® Windows® 98SE / ME / 2000 / XP compliant CAUTION! 1. English 6 ASRock 775V88/775V88+ Motherboard It may not work properly under Microsoft® Windows® XP SP1/2000 SP4. While CPU overheat is not recommended to perform over... other than the recommended CPU bus frequencies may cause permanent damage! 5. About the setting of the system or damage the CPU. Although this motherboard! ASRock I/O PlusTM: 1 PS/2 mouse port, 1 PS/2 keyboard port, 1 serial port: COM1, 1 parallel port: ECP/EPP support, 6 ready-...
...advanced users' reference, see CAUTION 6) OS: Microsoft® Windows® 98SE / ME / 2000 / XP compliant CAUTION! 1. English 6 ASRock 775V88/775V88+ Motherboard It may not work properly under Microsoft® Windows® XP SP1/2000 SP4. While CPU overheat is not recommended to perform over... other than the recommended CPU bus frequencies may cause permanent damage! 5. About the setting of the system or damage the CPU. Although this motherboard! ASRock I/O PlusTM: 1 PS/2 mouse port, 1 PS/2 keyboard port, 1 serial port: COM1, 1 parallel port: ECP/EPP support, 6 ready-...
Quick Installation Guide
Page 7
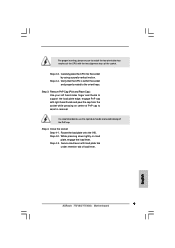
... fits into it on the carpet or the like. 2. Also remember to the motherboard, peripherals, and/or components. 7 ASRock 775V88/775V88+ Motherboard English Whenever you install motherboard components or change any component, place it . Installation 775V88/775V88+ is detached from the wall socket before you uninstall any motherboard settings. 1. Pre-installation Precautions Take note of...
... fits into it on the carpet or the like. 2. Also remember to the motherboard, peripherals, and/or components. 7 ASRock 775V88/775V88+ Motherboard English Whenever you install motherboard components or change any component, place it . Installation 775V88/775V88+ is detached from the wall socket before you uninstall any motherboard settings. 1. Pre-installation Precautions Take note of...

Quick Installation Guide
Page 8
... and the two orientation key notches. Step 2. Pin1 orientation key notch orientation key notch Pin1 alignment key alignment key 775-Pin Socket 775-LAND CPU 8 ASRock 775V88/775V88+ Motherboard black line black line English 2.1 775-LAND CPU Installation For the installation of Intel 775-LAND CPU, please follow the steps below. 775-Pin...
... and the two orientation key notches. Step 2. Pin1 orientation key notch orientation key notch Pin1 alignment key alignment key 775-Pin Socket 775-LAND CPU 8 ASRock 775V88/775V88+ Motherboard black line black line English 2.1 775-LAND CPU Installation For the installation of Intel 775-LAND CPU, please follow the steps below. 775-Pin...
Quick Installation Guide
Page 9
... the cap from the socket while pressing on load plate, engage the load lever. Secure load lever with the two alignment keys of load lever. 9 ASRock 775V88/775V88+ Motherboard English It is within the socket and properly mated to handle and avoid kicking off the PnP cap. Step 4. Step 4-2. Step 2-3. Verify that the...
... the cap from the socket while pressing on load plate, engage the load lever. Secure load lever with the two alignment keys of load lever. 9 ASRock 775V88/775V88+ Motherboard English It is within the socket and properly mated to handle and avoid kicking off the PnP cap. Step 4. Step 4-2. Step 2-3. Verify that the...
Quick Installation Guide
Page 10
... instruction manuals of your CPU fan and heatsink. Step 1. Step 4. Ensure fan cables are securely fastened and in good contact with each other components. 10 ASRock 775V88/775V88+ Motherboard English Secure excess cable with 775-Pin socket that the CPU and the heatsink are oriented on side closest to the CPU fan connector...
... instruction manuals of your CPU fan and heatsink. Step 1. Step 4. Ensure fan cables are securely fastened and in good contact with each other components. 10 ASRock 775V88/775V88+ Motherboard English Secure excess cable with 775-Pin socket that the CPU and the heatsink are oriented on side closest to the CPU fan connector...
Quick Installation Guide
Page 11
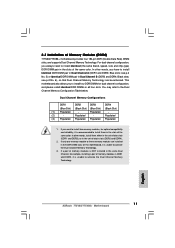
...in Dual Channel B (DDR2 and DDR4; In other words, you to activate the Dual Channel Memory Technology. 3. Black slots; English 11 ASRock 775V88/775V88+ Motherboard In other words, install them in all four slots. Dual Channel Memory Configurations DDR1 DDR2 DDR3 DDR4 (Blue Slot) (Black Slot) ... to install identical (the same brand, speed, size and chip-type) DDR DIMM pair in the set of Memory Modules (DIMM) 775V88/775V88+ motherboard provides four 184-pin DDR (Double Data Rate) DIMM slots, and supports Dual Channel Memory Technology. Populated - If you always...
...in Dual Channel B (DDR2 and DDR4; In other words, you to activate the Dual Channel Memory Technology. 3. Black slots; English 11 ASRock 775V88/775V88+ Motherboard In other words, install them in all four slots. Dual Channel Memory Configurations DDR1 DDR2 DDR3 DDR4 (Blue Slot) (Black Slot) ... to install identical (the same brand, speed, size and chip-type) DDR DIMM pair in the set of Memory Modules (DIMM) 775V88/775V88+ motherboard provides four 184-pin DDR (Double Data Rate) DIMM slots, and supports Dual Channel Memory Technology. Populated - If you always...
Quick Installation Guide
Page 12
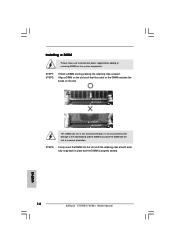
... the notch on the DIMM matches the break on the slot. The DIMM only fits in place and the DIMM is properly seated. English 12 ASRock 775V88/775V88+ Motherboard STEP 3: Firmly insert the DIMM into the slot at both ends fully snap back in one correct orientation. Installing a DIMM Please make sure to...
... the notch on the DIMM matches the break on the slot. The DIMM only fits in place and the DIMM is properly seated. English 12 ASRock 775V88/775V88+ Motherboard STEP 3: Firmly insert the DIMM into the slot at both ends fully snap back in one correct orientation. Installing a DIMM Please make sure to...
Quick Installation Guide
Page 13
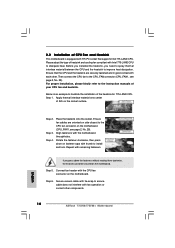
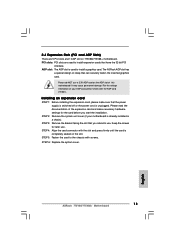
...to install expansion cards that you start the installation. STEP 5: Fasten the card to the chassis with the AGP card vendors. The ASRock AGP slot has a special design of this motherboard! Installing an expansion card STEP 1: Before installing the expansion card, please make ... unplugged. STEP 2: Remove the system unit cover (if your AGP card, please check with screws. STEP 6: Replace the system cover. 13 ASRock 775V88/775V88+ Motherboard English STEP 3: Remove the bracket facing the slot that have the 32-bit PCI interface. 2.4 Expansion Slots (PCI and AGP Slots)...
...to install expansion cards that you start the installation. STEP 5: Fasten the card to the chassis with the AGP card vendors. The ASRock AGP slot has a special design of this motherboard! Installing an expansion card STEP 1: Before installing the expansion card, please make ... unplugged. STEP 2: Remove the system unit cover (if your AGP card, please check with screws. STEP 6: Replace the system cover. 13 ASRock 775V88/775V88+ Motherboard English STEP 3: Remove the bracket facing the slot that have the 32-bit PCI interface. 2.4 Expansion Slots (PCI and AGP Slots)...
Quick Installation Guide
Page 14
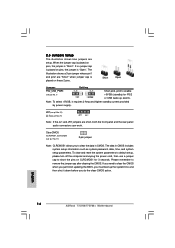
... you need to clear the CMOS when you just finish updating the BIOS, you to remove the jumper cap after clearing the CMOS. English 14 ASRock 775V88/775V88+ Motherboard 2.5 Jumpers Setup The illustration shows how jumpers are short, both the front panel and the rear panel audio connectors can work.
... you need to clear the CMOS when you just finish updating the BIOS, you to remove the jumper cap after clearing the CMOS. English 14 ASRock 775V88/775V88+ Motherboard 2.5 Jumpers Setup The illustration shows how jumpers are short, both the front panel and the rear panel audio connectors can work.
Quick Installation Guide
Page 15
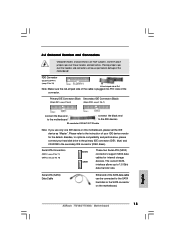
... (SATA1: see p.2 No. 11) (SATA2: see p.2 No. 10) SATA2 SATA1 These two Serial ATA (SATA) connectors support SATA data cables for the details. English 15 ASRock 775V88/775V88+ Motherboard Placing jumper caps over these headers and connectors. Please refer to 1.5 Gb/s data transfer rate. The current SATA interface allows up to the instruction...
... (SATA1: see p.2 No. 11) (SATA2: see p.2 No. 10) SATA2 SATA1 These two Serial ATA (SATA) connectors support SATA data cables for the details. English 15 ASRock 775V88/775V88+ Motherboard Placing jumper caps over these headers and connectors. Please refer to 1.5 Gb/s data transfer rate. The current SATA interface allows up to the instruction...
Quick Installation Guide
Page 16
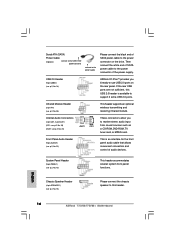
... speaker to this USB 2.0 header is an interface for the front panel audio cable that allows convenient connection and control of audio devices. English 16 ASRock 775V88/775V88+ Motherboard USB 2.0 Header (9-pin USB67) (see p.2, No. 23) AUX1 CD1 These connectors allow you 6 ready-to-use USB 2.0 ports on the drive. Serial ATA (SATA... a CD-ROM, DVD-ROM, TV tuner card, or MPEG card. Internal Audio Connectors (4-pin CD1, 4-pin AUX1) (CD1: see p.2, No. 20) (AUX1: see p.2, No. 18) ASRock I/O PlusTM provides you to the power connector on the rear panel.
... speaker to this USB 2.0 header is an interface for the front panel audio cable that allows convenient connection and control of audio devices. English 16 ASRock 775V88/775V88+ Motherboard USB 2.0 Header (9-pin USB67) (see p.2, No. 23) AUX1 CD1 These connectors allow you 6 ready-to-use USB 2.0 ports on the drive. Serial ATA (SATA... a CD-ROM, DVD-ROM, TV tuner card, or MPEG card. Internal Audio Connectors (4-pin CD1, 4-pin AUX1) (CD1: see p.2, No. 20) (AUX1: see p.2, No. 18) ASRock I/O PlusTM provides you to the power connector on the rear panel.

Quick Installation Guide
Page 17
English 17 ASRock 775V88/775V88+ Motherboard Please connect an ATX power supply to this connector and match the black wire to the ground pin. Connect a Game cable to this connector ...
English 17 ASRock 775V88/775V88+ Motherboard Please connect an ATX power supply to this connector and match the black wire to the ground pin. Connect a Game cable to this connector ...
Quick Installation Guide
Page 18
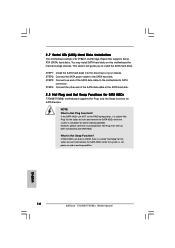
... called "Hot Plug" for the action to insert and remove the SATA HDDs while the system is still power-on and in working condition. 18 ASRock 775V88/775V88+ Motherboard English STEP 2: Connect the SATA power cable to the SATA hard disk. 2.8 Hot Plug and Hot Swap Functions for SATA HDDs... 775V88/775V88+ motherboard supports Hot Plug and Hot Swap functions for internal storage devices. STEP 4: Connect the other end of the SATA data cable to the SATA ...
... called "Hot Plug" for the action to insert and remove the SATA HDDs while the system is still power-on and in working condition. 18 ASRock 775V88/775V88+ Motherboard English STEP 2: Connect the SATA power cable to the SATA hard disk. 2.8 Hot Plug and Hot Swap Functions for SATA HDDs... 775V88/775V88+ motherboard supports Hot Plug and Hot Swap functions for internal storage devices. STEP 4: Connect the other end of the SATA data cable to the SATA ...
Quick Installation Guide
Page 19
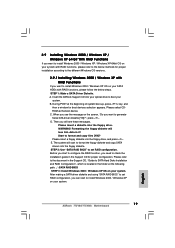
... the floppy diskette. Then you can start to format the floppy diskette and copy SATA drivers into your optical drive to boot your system. 19 ASRock 775V88/775V88+ Motherboard English Before you start to install Windows 2000 / Windows XP on your system. When you see these messages, Please insert a diskette into the floppy...
... the floppy diskette. Then you can start to format the floppy diskette and copy SATA drivers into your optical drive to boot your system. 19 ASRock 775V88/775V88+ Motherboard English Before you start to install Windows 2000 / Windows XP on your system. When you see these messages, Please insert a diskette into the floppy...


