User Manual
Page 5
...-conductor Ultra ATA 66/100/133 IDE Ribbon Cable One Ribbon Cable for purchasing ASRock 775V88/775V88+ motherboard, a reliable motherboard produced under ASRock's consistently stringent quality control. In case any modifications of this manual occur, the updated version will be available on ASRock website as well. Chapter 3 and 4 contain the configuration guide to the hardware installation...
...-conductor Ultra ATA 66/100/133 IDE Ribbon Cable One Ribbon Cable for purchasing ASRock 775V88/775V88+ motherboard, a reliable motherboard produced under ASRock's consistently stringent quality control. In case any modifications of this manual occur, the updated version will be available on ASRock website as well. Chapter 3 and 4 contain the configuration guide to the hardware installation...

User Manual
Page 17
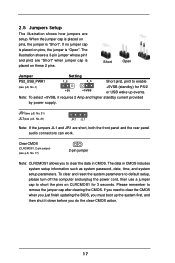
... jumper) (see p.8, No. 1) +5V +5VSB +5VSB (standby) for 3 seconds. The data in CMOS. If you need to clear the CMOS when you just finish updating the BIOS, you to short the pins on pins, the jumper is "Short". 2.5 Jumpers Setup The illustration shows how jumpers are setup. Please remember to enable (see...
... jumper) (see p.8, No. 1) +5V +5VSB +5VSB (standby) for 3 seconds. The data in CMOS. If you need to clear the CMOS when you just finish updating the BIOS, you to short the pins on pins, the jumper is "Short". 2.5 Jumpers Setup The illustration shows how jumpers are setup. Please remember to enable (see...

User Manual
Page 23
... UTILITY when you see on your system. Because the BIOS software is constantly being updated, the following selections: Main To set up the system time/date information Advanced To set up the advanced BIOS features H/W Monitor To display current hardware status Boot To set up the default system device to locate... and load the Operating System Security To set up the computer. The Flash Memory on the menu bar, and then press to enter the BIOS SETUP UTILITY after POST, restart the system by pressing + + , or by turning the system off and then back on the system chassis. If...
... UTILITY when you see on your system. Because the BIOS software is constantly being updated, the following selections: Main To set up the system time/date information Advanced To set up the advanced BIOS features H/W Monitor To display current hardware status Boot To set up the default system device to locate... and load the Operating System Security To set up the computer. The Flash Memory on the menu bar, and then press to enter the BIOS SETUP UTILITY after POST, restart the system by pressing + + , or by turning the system off and then back on the system chassis. If...

User Manual
Page 24
...jump to the Exit Screen or exit the current screen 3.2 Main Screen When you enter the BIOS SETUP UTILITY, the Main screen will appear and display the system overview BIOS SETUP UTILITY Main Advanced H/W Monitor Boot Security Exit System Overview System Time System Date [17:...00:09] [W Tueed 0182/0/222/2/2000044]] BIOS Version : 775V88+BBIOIOSSPP1.10.0 0 Processor Type : GInetneul (iRne) IPnetnetli(uRm) (CRP)U4 3C.P20UG2H.4z0 GHz Processor Speed : 322400 MHz Cache Size : 512KB Microcode Update : 0F24/1E Total Memory DIMM 1 DIMM 2 DIMM 3 DIMM 4 :...
...jump to the Exit Screen or exit the current screen 3.2 Main Screen When you enter the BIOS SETUP UTILITY, the Main screen will appear and display the system overview BIOS SETUP UTILITY Main Advanced H/W Monitor Boot Security Exit System Overview System Time System Date [17:...00:09] [W Tueed 0182/0/222/2/2000044]] BIOS Version : 775V88+BBIOIOSSPP1.10.0 0 Processor Type : GInetneul (iRne) IPnetnetli(uRm) (CRP)U4 3C.P20UG2H.4z0 GHz Processor Speed : 322400 MHz Cache Size : 512KB Microcode Update : 0F24/1E Total Memory DIMM 1 DIMM 2 DIMM 3 DIMM 4 :...
Quick Installation Guide
Page 4
...) Cable One Serial ATA (SATA) HDD Power Cable (Optional) One ASRock I/O PlusTM Shield 4 ASRock 775V88/775V88+ Motherboard English 1. ASRock website http://www.asrock.com 1.1 Package Contents ASRock 775V88/775V88+ Motherboard (ATX Form Factor: 12.0-in x 9.2-in the Support CD. Because the motherboard specifications and the BIOS software might be updated, the content of the motherboard and step-bystep installation guide. This...
...) Cable One Serial ATA (SATA) HDD Power Cable (Optional) One ASRock I/O PlusTM Shield 4 ASRock 775V88/775V88+ Motherboard English 1. ASRock website http://www.asrock.com 1.1 Package Contents ASRock 775V88/775V88+ Motherboard (ATX Form Factor: 12.0-in x 9.2-in the Support CD. Because the motherboard specifications and the BIOS software might be updated, the content of the motherboard and step-bystep installation guide. This...
Quick Installation Guide
Page 14
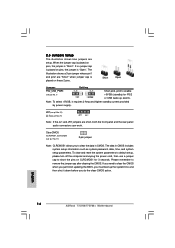
... "Open". The data in CMOS. Please remember to clear the CMOS when you just finish updating the BIOS, you need to remove the jumper cap after clearing the CMOS. If you must boot up events. English 14 ASRock 775V88/775V88+ Motherboard The illustration shows a 3-pin jumper whose pin1 and pin2 are "Short" when jumper cap...
... "Open". The data in CMOS. Please remember to clear the CMOS when you just finish updating the BIOS, you need to remove the jumper cap after clearing the CMOS. If you must boot up events. English 14 ASRock 775V88/775V88+ Motherboard The illustration shows a 3-pin jumper whose pin1 and pin2 are "Short" when jumper cap...
User Manual
Page 5
Chapter 3 and 4 contain the configuration guide to BIOS setup and information of the motherboard and step-bystep guide to the hardware installation. In case any modifications of this manual occur, the updated version will be available on ASRock website as well. ASRock website http://www.asrock.com 1.1 Package Contents ASRock 775V88 Motherboard (ATX Form Factor: 12.0-in x 9.2-in...
Chapter 3 and 4 contain the configuration guide to BIOS setup and information of the motherboard and step-bystep guide to the hardware installation. In case any modifications of this manual occur, the updated version will be available on ASRock website as well. ASRock website http://www.asrock.com 1.1 Package Contents ASRock 775V88 Motherboard (ATX Form Factor: 12.0-in x 9.2-in...
User Manual
Page 17
.... Clear CMOS (CLRCMOS1, 2-pin jumper) (see p.8, No. 1) +5V +5VSB +5VSB (standby) for 3 seconds. If you need to clear the CMOS when you just finish updating the BIOS, you to short the pins on pins, the jumper is placed on CLRCMOS1 for PS/2 or USB wake up the system first, and then shut...
.... Clear CMOS (CLRCMOS1, 2-pin jumper) (see p.8, No. 1) +5V +5VSB +5VSB (standby) for 3 seconds. If you need to clear the CMOS when you just finish updating the BIOS, you to short the pins on pins, the jumper is placed on CLRCMOS1 for PS/2 or USB wake up the system first, and then shut...

User Manual
Page 23
... restart by pressing the reset button on the system chassis. Because the BIOS software is constantly being updated, the following selections: Main To set up the system time/date information Advanced To set up the advanced BIOS features H/W Monitor To display current hardware status Boot To set up the... top of the screen has a menu bar with its test routines. BIOS SETUP UTILITY 3.1 Introduction This section explains how to use the BIOS SETUP UTILITY to choose among the selections on . If you wish to enter the BIOS SETUP UTILITY after POST, restart the system by pressing + + , ...
... restart by pressing the reset button on the system chassis. Because the BIOS software is constantly being updated, the following selections: Main To set up the system time/date information Advanced To set up the advanced BIOS features H/W Monitor To display current hardware status Boot To set up the... top of the screen has a menu bar with its test routines. BIOS SETUP UTILITY 3.1 Introduction This section explains how to use the BIOS SETUP UTILITY to choose among the selections on . If you wish to enter the BIOS SETUP UTILITY after POST, restart the system by pressing + + , ...

User Manual
Page 24
...Please check the following table for all the settings To save changes and exit the BIOS SETUP UTILITY To jump to the Exit Screen or exit the current screen 3.2 Main Screen When you enter the BIOS SETUP UTILITY, the Main screen will appear and display the system overview... System Overview System Time System Date [17:00:09] [MTuoen0088/0/022/2/2000044] ] BIOS Version : 775V88 BIOS P1.00 Processor Type : GInetneul (iRne) IPnetnetli(uRm) (CRP)U4 3C.P20UG2H.4z0 GHz Processor Speed : 322400 MHz Cache Size : 512KB Microcode Update : 0F24/1E Total Memory DIMM 1 DIMM 2 DIMM 3 DIMM 4 : 512MB...
...Please check the following table for all the settings To save changes and exit the BIOS SETUP UTILITY To jump to the Exit Screen or exit the current screen 3.2 Main Screen When you enter the BIOS SETUP UTILITY, the Main screen will appear and display the system overview... System Overview System Time System Date [17:00:09] [MTuoen0088/0/022/2/2000044] ] BIOS Version : 775V88 BIOS P1.00 Processor Type : GInetneul (iRne) IPnetnetli(uRm) (CRP)U4 3C.P20UG2H.4z0 GHz Processor Speed : 322400 MHz Cache Size : 512KB Microcode Update : 0F24/1E Total Memory DIMM 1 DIMM 2 DIMM 3 DIMM 4 : 512MB...


